American Sewing Guild (ASG)

Visit our blog Visit the ASG Facebook page Visit ASG on Pinterest Visit ASG's YouTube channel Visit ASG on Instagram
  • Home
  • Join ASG
    • Join Online
    • Chapter Locations
    • Member Benefits
    • Member Brochure
    • Join by Mail
  • Education & Classes
  • Resources
    • Contests & Awards
    • Giving Back
    • Hall of Fame
    • Travel and Tours
    • Measurement Chart
  • Shop
    • ASG Store
    • Chapter Products
    • Video Resources
  • Blog
  • About
    • About Us
    • Donate to ASG
    • ASG Sensitivity Statement
    • FAQ’s
    • Start a Chapter
  • Contact
  • Member Login
    • Login First!
    • Members Only
    • Leadership Only
    • Website FAQ’s
    • Logout
  •  

May 29, 2026

Sew Cool: The Best Summer Garments and Fabrics for Beating the Heat

When temperatures climb and humidity settles in, sewing enthusiasts are able to create garments specifically designed for comfort. Store-bought summer clothing often prioritizes trends over practicality, leaving wearers stuck in clingy synthetics or stiff fabrics that trap heat. Sewing your own warm-weather wardrobe allows you to choose breathable fabrics, relaxed silhouettes, and thoughtful details that help you stay cool while still looking stylish.

From breezy linen dresses to feather-light cotton tops, the right combination of fabric and garment design can make all the difference during the hottest months of the year.

Why Fabric Matters in Summer

The secret to comfortable summer clothing begins with fiber content. Natural fibers tend to outperform synthetics in hot weather because they breathe better and allow moisture to evaporate more easily. Fabric weave and weight also play an important role. Lightweight, loosely woven fabrics encourage airflow and prevent clothing from sticking to the skin.

Best Summer Fabrics

Linen

Linen is often considered the gold standard for summer sewing. Made from flax fibers, it is exceptionally breathable, moisture-wicking, and cool against the skin. Linen garments also develop a relaxed softness over time that many sewists adore.

One of linen’s greatest strengths is its ability to dry quickly, making it ideal for humid climates. Yes, it wrinkles easily, but many sewists embrace those wrinkles as part of linen’s effortless charm.

Essex Linen
Essex Linen from Spoonflower

While traditional linen is made entirely from the fibers of the flax plant, Essex linen is a popular fabric line created by Robert Kaufman that blends 55% linen and 45% cotton. The addition of cotton makes Essex linen different from standard 100% linen:

  • Wrinkle Resistance: The cotton blend helps reduce the heavy wrinkling characteristic of traditional linen.
  • Texture & Feel: It retains the rustic look and subtle texture of linen but has a softer hand-feel thanks to the cotton.
  • Handling: Pure linen can be stiff, sheer, and prone to severe wrinkling. Essex linen is more flexible, slightly thicker, and drapes beautifully.

Cotton Lawn and Voile

For lightweight blouses, sundresses, and flowing skirts, cotton lawn and cotton voile are summer favorites. These fabrics feel airy and soft while remaining easy to sew.

Cotton lawn has a smooth, slightly crisp finish, while voile is softer and more sheer. Both fabrics are excellent for layered garments that still feel cool and comfortable.

FeatureCotton LawnCotton Voile
TextureCrisp, smooth, and slightly lustrous.Soft, silky, and airy.
Weave / WeightTightly woven, slightly heavier than voile.Looser, open weave, extremely thin and lightweight.
OpacityMostly opaque; rarely requires a lining.Highly sheer; often requires a slip or lining for garments.

Read this article from Threads Magazine on How to Sew Finely Woven Batiste, Lawn, and Voile

Double Gauze

Double gauze has become increasingly popular among garment sewists because of its cloud-like softness and breathability. This lightly crinkled cotton fabric traps tiny pockets of air between its layers, helping regulate temperature naturally.

It works beautifully for relaxed tops, casual dresses, beach cover-ups, and loose-fitting shorts. Double gauze garments often feel like wearing pajamas in the best possible way.

Organic Cotton Double GauzeDouble gauze from StoneMountain & Daughter FabricsDouble Gauze from Gorgeous Fabrics
nani IRO Sanga Organic Cotton Double Gauze – Orange
Kokka Fabrics
Nani Iro – Open Weave Cotton Double Gauze – Waterfall – Purple
StoneMountain Fabrics
Italian Cotton Gauze Double Cloth – Peachy
Gorgeous Fabrics

Rayon and Viscose

Rayon Challis
Rayon Challis- Blue Floral, Daybreak Bloom Print
Mood Fabrics

While technically semi-synthetic, rayon and viscose are derived from plant fibers and are beloved for their drape and cool touch. These fabrics flow beautifully and work especially well for loose summer garments with movement.

Rayon challis is especially popular for wide-leg pants, wrap dresses, and breezy tops. The downside is that rayon can be slippery to sew and may wrinkle easily, but many sewists find the comfort worth the extra effort.

The Best Garments for Hot Weather

Choosing the right garment style matters just as much as selecting the right fabric. Loose silhouettes allow air circulation, while fitted garments can trap heat and moisture against the body.

Linen Pants and Wide-Leg Trousers

Many people swear by loose linen pants for summer comfort. Wide-leg styles allow airflow while still protecting skin from direct sun exposure. Elastic waistbands, cropped lengths, and pull-on styles add practicality and ease.

Pairing lightweight linen pants with a simple tank or sleeveless blouse creates an outfit that feels polished without overheating.

Shift Dresses and Sundresses

Simple summer dresses are sewing staples because they require minimal layering and offer maximum airflow. A-line dresses, tiered sundresses, and loose shift silhouettes work especially well in extreme heat.

Look for designs with:

  • Sleeveless or cap sleeve construction
  • Loose waists
  • Open necklines
  • Minimal lining
  • Breathable facings instead of heavy interfacing

Garments that skim rather than cling to the body often feel dramatically cooler during summer months.

And don’t miss an opportunity to add some pizazz. Soft, embroidered touches add elegance to linen.

Embroidery on linen

Camp Shirts and Oversized Button-Ups

Relaxed woven tops are another warm-weather essential. Camp shirts made from linen, cotton lawn, or rayon can be worn open over tanks or buttoned on their own.

Oversized silhouettes not only feel cooler but also create that relaxed summer aesthetic many sewists love.

Easy Pull-On Shorts

Loose-fitting shorts with elastic waistbands are practical, comfortable, and quick to sew. Linen blends, cotton chambray, and lightweight twill all work well for casual summer bottoms.

Many sewists also love pajama-inspired sets with coordinating shorts and tops because they feel elevated while remaining incredibly comfortable.

Construction Tips for Summer Sewing

Summer garments benefit from thoughtful construction techniques that reduce bulk and increase breathability.

French seams, bias-bound edges, and lightweight facings can help garments feel softer and less heavy against the skin. Many sewists also skip unnecessary linings or substitute partial linings to avoid extra layers.

Choosing lighter-colored fabrics can also make a surprising difference. Pale shades reflect sunlight better than dark colors, helping garments feel cooler outdoors.

Another smart detail is ease. Summer clothing should have slightly more wearing ease than fitted winter garments. Extra room improves airflow and allows fabric to move away from the skin rather than cling to it.

Sewing a Wardrobe You’ll Actually Wear

One of the joys of summer sewing is that warm-weather garments are often beginner-friendly. Loose silhouettes, simple construction, and forgiving fits make summer projects approachable and satisfying.

More importantly, handmade summer clothing can be customized for genuine comfort. Sewists can adjust sleeve length, neckline depth, inseam measurements, and fabric choices to suit their climate and lifestyle perfectly.

The result is a wardrobe filled with garments that feel as good as they look — pieces designed not just for style, but for surviving scorching afternoons, humid evenings, and everything summer brings.


~American Sewing Guild

May 22, 2026

Blanket Stitch

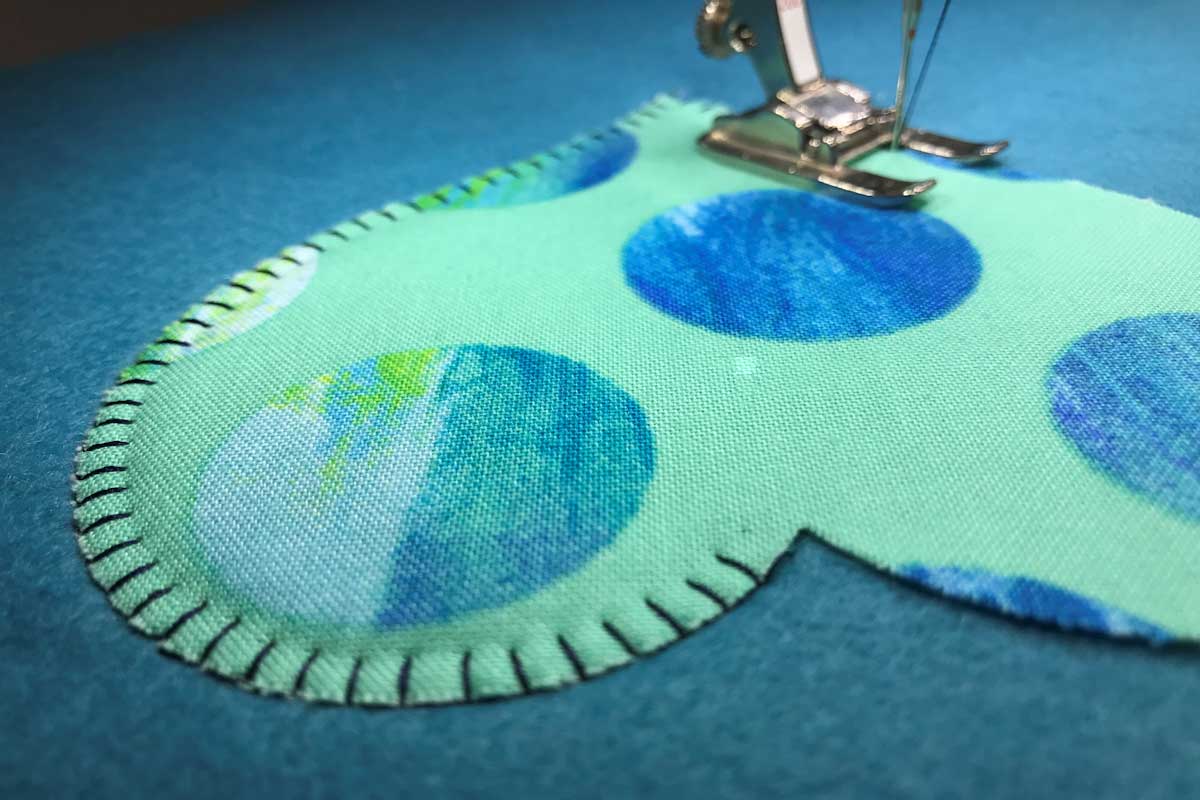
Originally used as an edge finish on heavy wool blankets (hence the name), this aptly named stitch is much more versatile. It can be used for many decorative applications and stitches out quickly and evenly, mimicking hand stitches with the same moniker.

A blanket stitch can be recognized by its two distinct directions—a vertical stitch and a
‘bite” stitch perpendicular to the vertical stitch, forming a distinct right angle. The bite stitch is actually two stitches—one to the left and one to the right to return the needle to the vertical stitch positioning.

The stitch is adjustable in both length (the space between the bites) and width (the reach of the bite to the left). You can have wide bites close together, narrow bites further apart or any combination of the two. If your machine has any kind of software adjustments, you can even change individual stitches (length, width and stitch angle) for a more eclectic hand-stitched look.

While used most frequently for appliqué (both raw edge and turned), the blanket stitch can also be used as an edge finish on both single- and double-layer edges. It can also be used to accent seams, pockets and hems, and to apply trims such as ribbon, binding and bias tape.

Machine Set-up

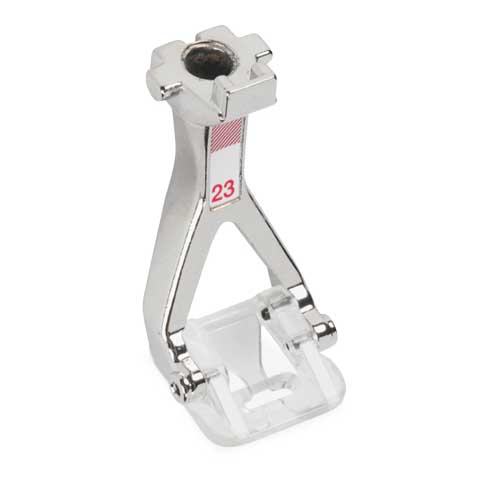
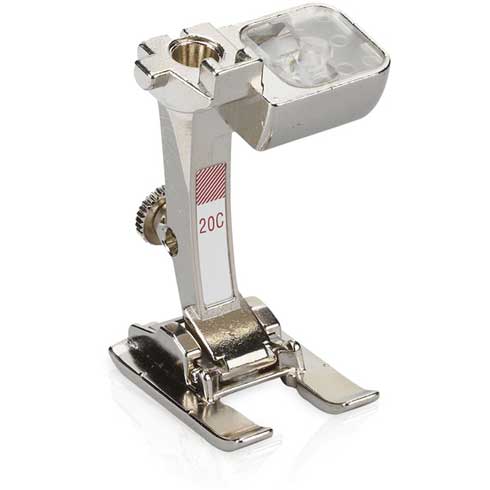
Open-toe foot

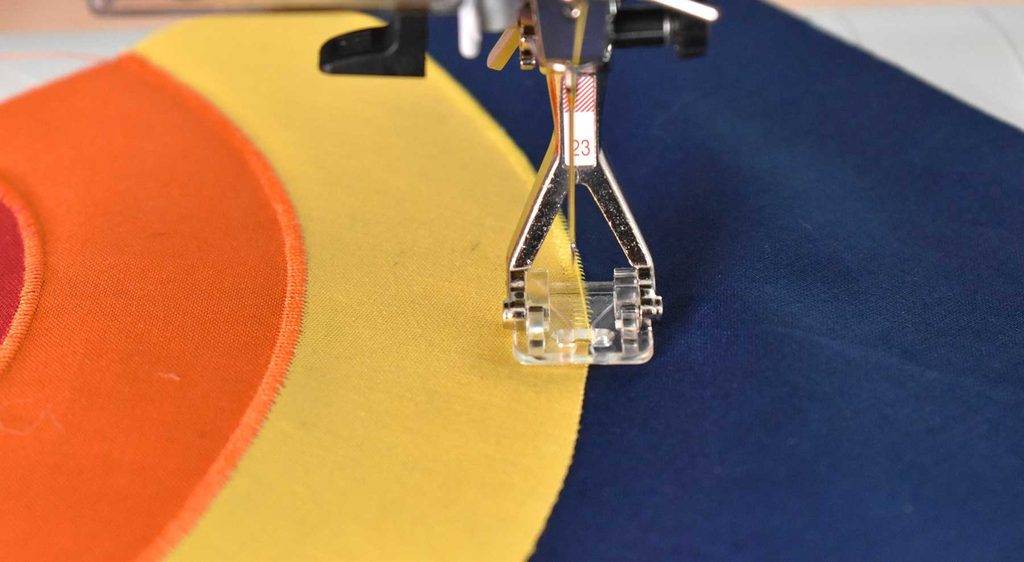
It’s important to select an open-toe foot when using the blanket stitch, as visibility is critical for precise placement. If you’re machine has one, choose an open-toe foot that can also use the dual-feed function for even feeding.

Part of the fun of the blanket stitch is that the look can vary greatly, depending on the type of thread you choose. You can use it with monofilament for an invisible appearance, regular sewing weight thread, or with any number of decorative threads, including wool for a hand-stitched look.

The type of thread you choose and your fabric type will determine the kind and size of the needle needed for perfect stitching. It’s important that the needle eye is large enough not to shred the thread since it’s entering and exiting the same needle hole during the stitch formation.

Apply binding

Blanket Stitch Tips

  • If your project has corners, curves or points, use the needle-down function if you have it to keep the stitch from shifting as you pivot around the shape.
  • Setting the machine needle position to the right or left also helps with visibility and allows the presser foot edge to be used as a guide for stitching.
  • If your machine has mirror-imaging functions, it’s possible to reset the bite portion to form in the opposite direction, depending on your comfort level with the stitch.
  • Your project may require a stabilizer underneath to avoid puckering if the fabric is lightweight.
  • Always stitch a test sample to adjust the stitch settings before beginning the project.

Appliqué

The easiest way to appliqué with a blanket stitch is to secure the appliqué shape in place first using fusible web. That prevents any shifting during the edge-stitching process. Fuse the entire shape or just the edges, or optionally, use a light touch of fabric glue under the edges.

Using the blanket stitch for appliqué creates a neat finish to either a raw or turned edge. The vertical portion of the stitch can rest along the appliqué edge or actually be on it, depending on the desired finished look. Most commonly, it trails along the edge with the bite piercing the appliqué fabric.

At the corner of an appliqué, stop on the vertical stitch side of the stitch with the needle down in the fabric. Lift the presser foot and pivot at the angle needed for the corner. If it’s a right angle, you can then begin stitching again on the adjacent side. If it’s not a right angle or you prefer a diagonal cornering stitch, then pivot accordingly.

Right angle pivot at the corner
Pivot diagonally at the corner
Diagonal corner stitch

When appliquéing curves, you may need to pivot repeatedly around the curve edges to avoid stitches at odd angles if you try to stitch continuously. Each time, simply leave the needle tip in the fabric and pivot slightly to keep the stitches aligned.

Pivot evenly around curves

Added Pizazz

Because the blanket stitch bite is a single stitch in each direction, it can also be used as a channel to add other fiber embellishments after stitching, like yarn or beads, and they’re securely held in place.

Add other embellishments under the blanket stitch

All images compliments of Bernina


~Linda Griepentrog is the owner of G Wiz Creative Services and she does writing, editing and designing for companies in the sewing, crafting and quilting industries. In addition, she escorts fabric shopping tours to Hong Kong. She lives at the Oregon Coast with her husband Keith, and three dogs, Yohnuh, Abby, and Lizzie. Contact her at gwizdesigns@aol.com.


Tagged With: blanket stitch, machine stitches, sewing tips

May 15, 2026

Petti Pants: Equal Parts Romance and Ruffles

If you’ve spent even five minutes on sewing TikTok, Pinterest, or cottagecore Instagram lately, you’ve probably noticed a surprising garment quietly taking over: petti pants. Also called pettipants, bloomers, or lace pants, these floaty, feminine bottoms are suddenly everywhere — layered under oversized shirts, peeking out beneath dresses, or worn boldly as statement pants all on their own. They are also a wonderful anti-chafing option for hot, sticky summers.

The trend is part vintage romance, part practical comfort, and part “I want my clothes to feel like poetry.” Fashion sites are already calling petticoat pants one of the breakout looks of summer 2026.

What makes this trend especially exciting for sewing enthusiasts is that petti pants are surprisingly easy. At their core, they’re simply loose pants or bloomers with gathering, elastic, and decorative trim. Translation? You can customize them endlessly.

What Exactly Are Petti Pants?

Traditionally, pettipants were worn as lingerie or modesty garments beneath skirts and dresses. Vintage versions often featured soft cotton fabric, lace trim, ruffles, and wide gathered legs.

Modern interpretations lean heavily into:

  • Cottagecore aesthetics
  • Victorian-inspired silhouettes
  • Romantic lace details
  • Relaxed comfort dressing
  • Layered boho styling

Today’s versions range from:

  • Cropped lace bloomers
  • Full-length gathered pants
  • Tiered ruffle styles
  • Sheer embroidered versions
  • Soft pajama-inspired silhouettes

And honestly? They’re the kind of garment that makes people say, “Wait… you MADE those?!”

Why Sewists Love Them

Petti pants hit the sweet spot between fashionable and achievable. They’re popular because:

  • They require relatively little fitting
  • Elastic waistbands are forgiving
  • Lightweight fabrics sew beautifully
  • Lace and trim hide beginner mistakes
  • They’re easy to personalize
  • They look expensive even when made affordably

Sewists on Reddit and sewing forums frequently recommend bloomers and petti pants as excellent beginner projects because the construction is simple and the styling opportunities are endless.

Fabric Suggestions

The fabric choice completely changes the personality of your petti pants.

Soft & Romantic

Perfect for airy, dreamy styles:

  • Cotton voile
  • Cotton lawn
  • Double gauze
  • Lightweight batiste

A beautiful option is Cotton Voile Fabric By The Yard, which has the lightweight softness ideal for gathered bloomers.

Another excellent choice is Cotton Voile Fabric, available in many colors and perfect for soft layering pieces.

Vintage-Inspired

For true antique vibes:

  • Washed linen
  • Eyelet cotton
  • Handkerchief linen
  • Lightweight muslin

Dramatic & Fashion-Forward

For modern runway-inspired versions:

  • Sheer organza overlays
  • Crinkle cotton
  • Embroidered mesh
  • Lightweight rayon challis

Lace & Trim Ideas

This is where petti pants become dangerously addictive. You start by adding “just a little lace,” and suddenly you’re attaching ruffles to absolutely everything in your sewing room.

Popular trim styles include:

  • Scalloped lace
  • Crochet lace
  • Ruffled lace edging
  • Eyelet trim
  • Embroidered mesh lace
  • Pintucks and insertion lace

A few pretty options include:

  • White Scalloped Edge Lace Trim
  • White Ruffled Lace Trim
  • Embroidered White Border Lace Trim
  • Lace USA Corded Lace Trimming

One of the easiest ways to elevate simple bloomers is to sew multiple rows of gathered lace near the hem. The result instantly feels vintage-inspired and boutique-quality.

Pattern Ideas & Sewing Approaches

The beauty of petti pants is that you do not necessarily need a dedicated pattern. Many sewists simply adapt existing pajama pants or bloomer patterns.

Here are a few approaches:

1. Start With Simple Elastic-Waist Pants

Take a loose pajama pants pattern and:

  • Widen the leg
  • Shorten to capri or cropped length
  • Add elastic at the hem
  • Finish with lace trim

2. Use a Bloomer Pattern

Search terms that work well:

  • Victorian bloomers
  • Lace bloomers
  • Pettipants
  • Cottagecore bloomers
  • Lolita bloomers

Popular Etsy pattern styles include the ones featured in the “Pettipants Bloomers” and “Lace Bloomers Pants” collections.

3. Add Ruffles Everywhere

The secret sauce of dramatic petti pants? More gathering than you think is reasonable. Try:

  • Tiered legs
  • Double lace hems
  • Back ruffles
  • Pintucked panels
  • Contrasting lace inserts

Styling Ideas

Modern sewists are wearing petti pants:

  • Under oversized linen dresses
  • With cropped sweaters
  • Paired with chunky boots
  • Styled with ballet flats
  • Layered beneath tunics
  • With oversized button-down shirts

The current fashion trend especially favors white or cream versions with visible lace hems.

Budget-Friendly Sewing Tip

One of the smartest ideas circulating online right now is using thrifted cotton sheets or vintage tablecloths as fabric sources. Sewists love this approach because older cotton often has a soft, worn-in quality that works perfectly for romantic garments.

Plus, there’s something delightfully rebellious about turning Grandma’s floral sheet set into fashion-forward lace bloomers.

Final Thoughts

Petti pants are proof that fashion trends eventually circle back to comfort, creativity, and individuality. They’re whimsical without trying too hard, stylish without sacrificing comfort, and incredibly satisfying to sew.

And perhaps best of all, they invite experimentation. Add more lace. Add another ruffle. Make them absurdly dramatic if you want. This is not a trend built around restraint. This is a trend built around joy!


~American Sewing Guild

May 8, 2026

Hurray for Hemstitching

Hemstitching is actually a very old technique that was done by tediously drawing threads and embellishing with hand stitches, but in today’s world it’s easy to do by machine.

Photo courtesy of Euro-notions

 What you need

The secret to hemstitching is the perfect combo of fabric, specialty needle, thread, stabilizer and stitches.

Linen and linen blends are ideal as a fabric base, but you can also use batiste and voile. The latter two are often found in heirloom pieces where this technique is especially appropriate. The secret is that you need a natural-fiber fabric that isn’t too tightly woven. Knit fabric does not work with this technique.

Photo courtesy of Euro-notions

A wing needle is paramount—often called a hemstitch needle, it has protrusions on each side of the needle shaft so that it makes holes in the fabric by spreading the fibers. These specialty needles are available in sizes 16-19 (100/120).

Choose a lightweight thread, either in a matching or contrasting color, depending on the desired finished look. Size 60-80 threads work well as they don’t fill in the hole created by the needle wings and leave a clean opening. Use a matching color bobbin thread.

Stabilizer is imperative to make this technique work. Liquid or spray stabilizer works best and can be supplemented with another water-soluble stabilizer and/or starch if needed. It’s important that the fabric is very stiff for optimal stitching results.

Obviously, you want to use a presser foot with a wide opening for greater visibility and room for the wing needle swing—either a clear zigzag foot or a metal open-toe foot is ideal. Some machines have limitations to the available stitch width when using a wing needle, so double check your instruction book. If your machine has dual feed, activate that function as well for even fabric feeding.

CAUTION: When using a wing needle, don’t use your machine’s needle threader or thread cutting functions, as they can be damaged by the “wings”.

Which stitch?

Hemstitch diagram
Courtesy of Euro-notions

The secret to choosing a stitch is that the needle needs to go into the same hole in the fabric multiple times, so choose a stitch that goes forward and backward, and/or side to side. Some machines have specially labeled stitches for hemstitching, sometimes under an heirloom sewing menu. Straight triple stitch, blanket stitches, star stitches and honeycomb stitches all work well, but play with other stitches to check results.

hemstitch samples
Image courtesy of Bernina

Ready, set, stitch

Mark the area of the fabric where you want to stitch using a removable marker. If it’s a hem area, press under the hem first then plan to stitch just inside the upper hem edge. Another option for marking it to actually pull a thread but be sure your fabric/project is on grain if you choose this option.

Test-stitch on scraps of stiffened fabric to check stitch length and width prior to sewing your actual project. Just as a double-check for the width setting, hand turn the handwheel to be sure the wing needle clears the foot you’ve chosen. Make any adjustments needed, including length, width and tension, to get the look you want.

Hemstitching. Image courtesy of Bernina

Stitch along the marked line and sew slowly, remembering that the machine is going backward and forward/side to side, to form each stitch and the needle needs to penetrate the same hole multiple times to make a prominent opening. Don’t push or pull the fabric.

Depending on what you’re hemstitching, you might want to create an allover design on fabric to be used for a yoke, cuff, collar, placket or hem band on an heirloom garment. Or, you may be actually hemming a napkin or garment. If it’s the latter, trim the excess hem allowance width once your embellishing efforts are complete.

Trimming hemstitching
Image courtesy of Bernina

If your stitching line ends don’t go into a seam allowance, bring the top thread to the underside and tie off to finish and secure the stitches.

The last step is to remove the stiffener/stabilizer from the fabric, following the manufacturer’s instructions. When the fabric is dry, press the stitched area from the wrong side of the fabric to set the hole openings. This leaves a clear design area. If needed, apply light starch to smooth the finish.

hemstitched finishes
Image courtesy of Bernina

~Linda Griepentrog is the owner of G Wiz Creative Services and she does writing, editing and designing for companies in the sewing, crafting and quilting industries. In addition, she escorts fabric shopping tours to Hong Kong. She lives at the Oregon Coast with her husband Keith, and three dogs, Yohnuh, Abby, and Lizzie. Contact her at gwizdesigns@aol.com.

May 1, 2026

A Little Fabric, A Lot of Drama

When you sew your own clothes, you already know this simple truth: the final garment is only half the story. The other half is a comedy of errors, fabric scraps, questionable decisions, and a level of optimism that borders on delusion.

A little fabric, a lot of drama

Let’s start with pattern sizing—arguably the greatest work of fiction in the sewing world. You hold up the envelope, confidently select your size, and think, “That seems reasonable.” Fast forward to the muslin stage, and suddenly you’re swimming in something that could double as a decorative parachute. Or worse, you can’t get it past your shoulders and briefly wonder if your arms have been secretly weightlifting without your consent. Pattern sizing isn’t just inconsistent—it’s a personality test. Are you the kind of person who trusts the chart? Or the kind who whispers, “I’ll just cut a size smaller and hope for the best”?

Then there’s fabric shopping. This is where logic goes to die. You walk in needing a sensible cotton for a blouse and leave with three yards of neon flamingo print rayon because “it spoke to you.” It always speaks to you. Fabric has a way of convincing you that you are a completely different person—someone who attends garden parties, drinks sparkling lemonade, and wears wide-legged pants that dramatically catch the breeze. Reality: you will wear that fabric once, feel slightly overdressed at the grocery store, and then lovingly fold it back into your closet like a cherished but confusing memory.

Washing machine

Of course, before you even cut into that fabric, there’s the sacred ritual of pre-washing. Or, more accurately, the internal debate about whether you can skip it. You stand there, holding your yardage, doing mental gymnastics: “It’s probably pre-shrunk… right? I mean, how much could it shrink?” This is the same logic that leads to a perfectly fitted garment turning into something that now fits a moderately sized house cat. Pre-washing is the broccoli of sewing—no one enjoys it, but we all know what happens if you skip it.

Cutting the fabric is another moment of high drama. You lay everything out carefully, double-check the grainline, smooth every wrinkle… and then immediately question every life choice you’ve ever made. Did you place that piece correctly? Is that the right side or the wrong side? Why do both sides suddenly look identical? And why, halfway through cutting, do you discover you’re missing a crucial pattern piece that was definitely in the envelope five minutes ago?

Sewing itself is where the real comedy kicks in. You begin confidently, stitching along, feeling like a professional. Then, out of nowhere, your machine decides it’s had enough. The thread tangles into a tiny, impenetrable nest. The bobbin behaves like it’s possessed. You rethread everything three times, adjust the tension, whisper a few encouraging words (or not-so-encouraging ones), and somehow, miraculously, it works again—as if nothing ever happened. Sewing machines are like cats: affectionate one moment, utterly unpredictable the next.

Let’s not forget seam ripping, the unsung hero of garment sewing. You will use it more than you care to admit. There’s a special kind of humility that comes with realizing you’ve sewn an entire sleeve on inside out. Or attached a collar upside down. Or, in a truly impressive feat, sewn a pocket completely shut. Seam ripping teaches patience, resilience, and how to mutter under your breath with impressive creativity.

Woman ripping a seam

And then there’s fitting. Ah, fitting. The stage where you try on your garment and stand in front of the mirror, twisting and turning like you’re solving a complex puzzle. “If I just take it in here… and maybe let it out there… and somehow adjust this area that doesn’t seem physically possible…” You pin, you adjust, you step back. Sometimes it works beautifully. Other times, you end up wondering if it would be easier to simply start over—or move to a place where no one expects clothes to fit properly.

But despite all of this—the sizing confusion, the fabric fantasies, the machine meltdowns—there’s nothing quite like the moment you finish a garment. You put it on, look in the mirror, and think, “I made this.” And suddenly, all the chaos feels worth it. Even if one sleeve is slightly more enthusiastic than the other. Even if the hem isn’t perfectly even. Even if you’re the only one who knows where the “creative design decisions” are hiding.

Because here’s the secret: sewing your own clothes isn’t about perfection. It’s about the stories stitched into every piece. It’s about the time you accidentally used contrasting thread and decided it was a “design feature.” It’s about the fabric you couldn’t resist, the pattern you wrestled into submission, and the quiet satisfaction of creating something uniquely yours.

And honestly, if everything went perfectly every time… what would we even laugh about?


From the utterances in every sewing room of every ASG member.

  • 1
  • 2
  • 3
  • …
  • 90
  • Next Page »

Become a Member

Join the only national organization dedicated to Advancing Sewing as an Art and Life Skill.

Join Now button

Blog Article Categories

  • ASG Conference
  • Chapter Stories
  • Embroidery
  • Fitting
  • Learn to Sew
  • National Sewing Month
  • Products, Books, & Patterns
  • Projects
  • Quilting
  • Sewing
  • Sewing Techniques
  • Sewing Tips
  • Sewing Tours
  • Videos
  • Disclaimer
  • Privacy Policy

American Sewing Guild
National Headquarters
9660 Hillcroft, Suite 230
Houston TX 77096
713-729-3000 | 713-721-9230 Fax
www.ASG.org

ASG wordcloud - education, conference, discounts, videos, special offers, tours and more

Copyright © 1998–2026 · American Sewing Guild · All Rights Reserved