American Sewing Guild (ASG)

Visit our blog Visit the ASG Facebook page Visit ASG on Pinterest Visit ASG's YouTube channel Visit ASG on Instagram
  • Home
  • Join ASG
    • Join Online
    • Chapter Locations
    • Member Benefits
    • Member Brochure
    • Join by Mail
  • Education & Classes
  • Resources
    • Contests & Awards
    • Giving Back
    • Hall of Fame
    • Travel and Tours
    • Measurement Chart
  • Shop
    • ASG Store
    • Chapter Products
    • Video Resources
  • Blog
  • About
    • About Us
    • Donate to ASG
    • ASG Sensitivity Statement
    • FAQ’s
    • Start a Chapter
  • Contact
  • Member Login
    • Login First!
    • Members Only
    • Leadership Only
    • Website FAQ’s
    • Logout
  •  

September 26, 2025

Tips for Professional Results with Pants

Sewing pants can be as simple or as challenging as the style you choose. For results that look truly professional, concentrate on three essentials: precise preparation for fit, skillful execution, and flawless finishing. Meticulous pressing, accurate cutting, and well-placed fitting adjustments are the details that elevate your work from homemade to high-end.

  • Cut with precision on the grain. Carefully align your pattern pieces with the fabric’s grainline to ensure the pants hang correctly and avoid leg twist, which is especially important for tight-fitting pants with stretch. 
  • Press every seam as you sew. First press the seam flat to “set” the stitches, then open the seam allowances and press them flat.
  • Pocket openings should lay flat against the body.
  • To avoid ripples in your seams when stitching, apply a bit of pressure to the seam on each side of the needle as you are sewing.
  • Handle waistbands with care: Use a medium-weight, not-stiff interfacing for your waistband. For a perfect fit, divide the waistband and pants in fourths to align and distribute gathers or ease evenly. For elastic waistbands, use wide elastic in a snug casing to prevent twisting. 
  • For a clean finish on a fly-front zipper, interface the facing for extra stability and use a template when topstitching.
  • Reinforce the bottom of the fly front curve with bar tacks using a dense zigzag stitch. This secures the zipper shield and reinforces a high-stress area.
  • Pants should be hemmed with a slight angle to the back, with no more than a 1/2″ to 1″ hem. However, note that in some cases, a deeper hem will give more weight and help the pants hang better.
  • Pleats should be pressed flat above the crotch line. If you like the crease in the pants to run the entire length of the leg, it should merge with the crease in the pleat.

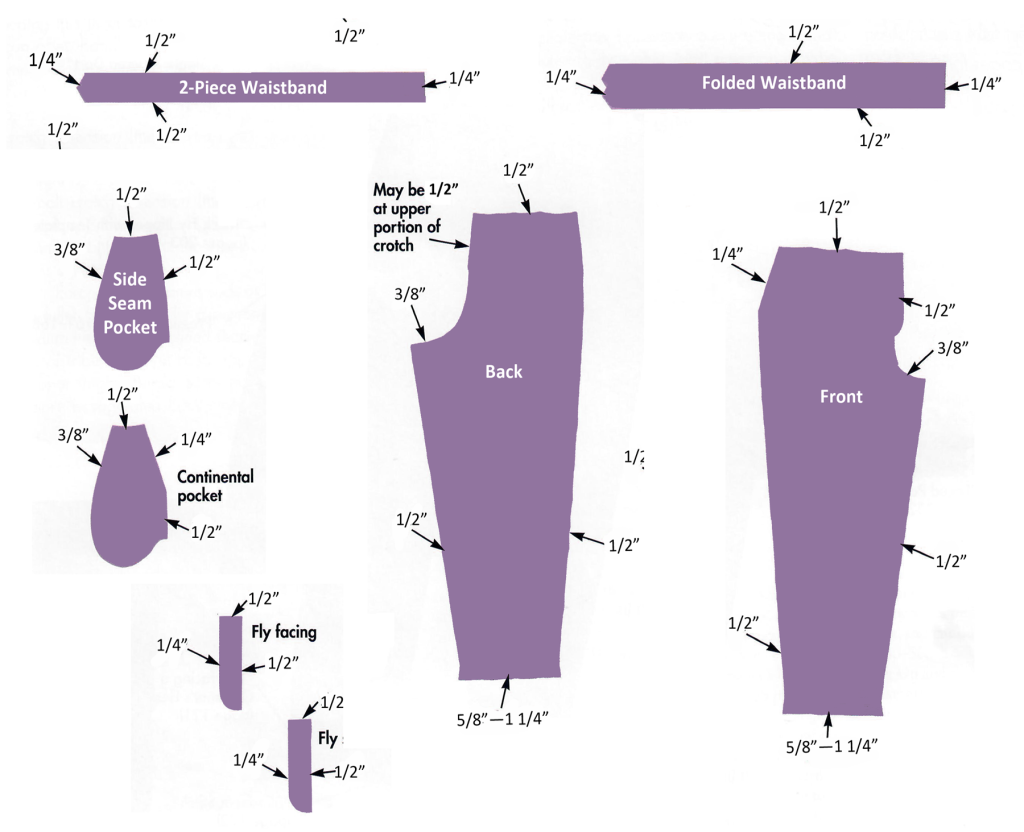
Suggested Seam Allowances

Professional designers can often spot a home-sewn garment by its standard 5/8″ seam allowance, which can influence how the seam—and even the entire garment—hangs. The graphic below highlights the seam allowances more commonly used by designers.

A Bunch of Tips to Sew Better Pants

Cornelius Quiring started a personal journey to create adaptive clothing to fit his own body that had been damaged in a farm accident. His learning process has evolved into fitting and sewing tips that he shares with his viewers. This video shares tips on adjusting waistbands, crotch seams, and more.  


September 19, 2025

Greeting Cards Meet Creativity

Every card is a smile waiting to happen—but when you sew your own, you’re not just sending a message, you’re sending a handcrafted masterpiece.

Remember all those decorative stitches you just had to have when you purchased your machine? Maybe you have some fabric scraps that are too beautiful to toss, or leftover quilt squares. Cardmaking is a great place to use all of it with aplomb, so fire up your sewing machine and let the fun begin.

Getting started

Visit a craft store or shop online for card blanks. These are die-cut card stock available in various shapes—with frames in square, rectangular, circle or other cut-out shapes. These frames are also often available in the photo department of a store as the same item can be used to showcase photos, but we’re going to use fabric pieces instead.

Blank tri-fold cards available on Amazon (affilate link)

Double check that your frames are tri-fold, meaning that there’s a section of the card stock that goes behind whatever is showcased in the frame opening. That extra fold hides any stitching on the underside and makes it unseen by the card’s recipient. If the card frame isn’t a tri-fold, then you’ll need to plan something like a decorative paper panel to go behind your addition.

You can carefully cut your own card blanks with an X-Acto knife, or if you have a die-cutting machine, it’s easy to make your own card stock frames.

Many card blanks come with matching envelopes, but if not, check the craft store for coordinating envelopes in the proper size.

You’ll also need a glue stick or tape to anchor the stitched piece to your card frame.

Once you have the paper portion of your project selected, let it speak to you about what kind of stitched piece should go with it.

Almost anything is fair game for cardmaking—small bits of colorful fabric collaged together, pieced ribbon bits, leftover quilt blocks too good to throw away, machine embroidered test pieces, or specific pieces made for the card shape. It’s also a good opportunity to showcase novelty threads and embellishments of all sorts—from sequins to trims and everything in between.

Stitching up

If you’re hand stitcher, cards are a great place to showcase your stitchery. The space is relatively small and things sew up fast for framing.

If you prefer a quilted inset, use all or part of a leftover block to feature.

For machine sewers, the world is your oyster for stitch combinations to embellish the small size piece needed for cardmaking. Cards are also ideal just for showcasing a beautiful piece of fabric—sans any stitching.

  • No matter which technique you plan to use, it’s a good idea to stabilize the featured piece. A lightweight iron-on stabilizer is ideal for most circumstances, and a lightweight batting is great for quilting a small fabric block to fit your frame.
  • Before you stitch your featured piece, trace the frame opening size onto the fabric right side using a removable marker. This gives you lines to stitch within.
  • Extend any embellishment—stitching, trim, etc.—1/4” beyond the traced line and anchor all the threads securely. Then trim your finished piece 3/8” beyond the traced line with your feature area centered.
Linda Griepentrog
  • Open out the tri-fold section to showcase the frame opening, then place the featured fabric piece under the cut-out in the desired position. If you’re including ribbon or trim on top of the fabric, this is time to place it into position. Carefully apply glue or tape to the extension area underlap area only.
  • Before finishing the card, you can stitch around the opening shape if you want to. Use a small sharp needle and a medium stitch length. Too small of a stitch may damage the card stock. Bring threads to the underside and tie off to anchor—don’t backstitch.
  • To finish the card, fold the third panel over the underside of the fabric piece and lightly glue the corners in place. This hides the underside of your stitching. Allow to dry thoroughly.
  • Finally, write your heartfelt sentiments inside the card using a colorful marker and send it on its way!

All photos, except where noted, are reprinted with permission from Bernina

~Linda Griepentrog is the owner of G Wiz Creative Services and she does writing, editing and designing for companies in the sewing, crafting and quilting industries. In addition, she escorts fabric shopping tours to Hong Kong. She lives at the Oregon Coast with her husband Keith, and three dogs, Yohnuh, Abby, and Lizzie. Contact her at .

September 12, 2025

How Deep is That Hem


Standard hem depths vary by garment to ensure proper drape and a polished appearance. A finished hem should be smooth, flat, and a uniform depth with enough weight to allow it to hang well. The style of the garment and the fabric’s weight will influence the appropriate hem depth. The following guidelines are a good place to start. Remember that these are just guidelines and that there’s more than one right way to finish your garment.

GARMENTSUGGESTED TYPE OF HEMTYPCIAL DEPTH OF HEM
Blouse, tucked inNarrow, double-folded, rolled1/4″ – 1/2″
Blouse, untuckedNarrow double-fold, possibly with small vents at the side.3/8″ – 3/4″
CoatBlindstitch with interfacing1 1/2″ – 2″
Dress, standard lengthBlindstitch, felled hem, or rolled hem.1 1/2″ – 2″ (typical)
1/2″ for sheer fabrics
>2″ for heavier fabrics
JacketBlindstitch with interfacing1 1/2″ – 2″
Women’s dress slacks*Blindstitch5/8″ – 1 1/4″
PulloverBlindstitch or topstitch3/8″ – 1 1/4″
ShirtTopstitch3/8″ – 5/8″
ShortsTopstitch5/8″ – 1 1/4″
Skirt, full or flaredBlindstitch or topstitch1/4″ – 3/8″
Skirt, A-line and StraightBlindstitch, or may use a faced hem.2″ – 3″
TopBlindstitch or topstitch3/4″ – 1 1/4″
Men’s Trousers*Blindstitch, double fold, straight, rolled or faced. 2″

Notes:

* Pant break: The finished length of the pants is described by the “break,” which refers to the fold created where the pant leg meets the shoe.

  • No break: A modern, clean look where the pant hem rests just above the shoe.
  • Medium or half break: A classic, traditional length with a single, slight crease where the pants meet the shoe.
  • Full break: A longer, more conservative length with a generous fold that covers most of the shoelaces. 

Sewing a blind hem by hand:

Sewing a blind hem by machine:


September 5, 2025

Creative Couching

While some people may define couching as reclining on a well-padded sofa, the sewing definition of the term is a lot more fun! Couching is a creative embellishment technique of securing one or more strands of trim to a base fabric.

Great Choices

Choose almost any kind of trim for your project—embroidery floss, yarn, cord, braid or even narrow strips of fabric. Then pick a thread—any kind is fair game—a matte cotton, a shiny rayon or metallic, a solid or variegated hue, and even monofilament if you don’t want stitching to show. Use a contrast color for emphasis, or a matching color to highlight the trim itself and not the couching stitching.

A simple zigzag stitch (see above) will work to anchor strands, or perhaps you prefer a more elaborate decorative stitch pattern. The criteria for choosing—it has to be wide enough to span the trim(s) you’re couching, and it can’t be too dense that it creates uneven feeding issues.

A universal needle works well for most couching applications, in a size consistent with the fabric weight. For delicate knits, try a ballpoint or stretch needle to avoid damaging the fabric.

Couching with multi-color trim

Depending on the weight of the fabric base, it’s usually a good idea to use a stabilizer behind to avoid puckering. For stable fabrics, a tear-away stabilizer works well; for stretchier or lighter weight fabrics, a knit interfacing on the fabric underside is helpful, in addition to the stabilizer.

Foot Notes

Then comes the choice of presser foot, testing is the name of the game. Simple couching can be done using a regular zigzag or satin-stitch foot if the trim isn’t too bulky. Most machine brands offer a couching or braiding foot, with a recessed area on the underside to handle tubular or bulky trims.

Couching/braiding foot

If you want to couch multiple strands at the same time, check out a multi-hole foot that aligns and separates the trim strands as you stitch to keep them organized.

Multi-hole foot

Begin by reading your owner’s manual to see the types of feet available for your machine, then test-stitch using the trim of choice to check for even feeding.

Couching Methods

There are three ways to couch:

  • Using a specialty presser foot and letting the feed-dogs feed the fabric and trim through the machine.
  • Couching can be done with free-motion stitching
Free Motion Stitching
  • Couching can also be done using specially digitized designs made for the addition of yarns or trim.
Specially digitized designs

If you’re using embroidery software, stabilize, hoop the area and stitch following the instructions with the chosen motif.

To couch traditionally or use free-motion work, mark the design on the right side of the fabric using a removable marking method. This can be in the form of simple lines to follow, or an area to be filled in. It’s helpful if the couching line(s) can end in a seam for secure anchoring, but that’s not always possible.

As you couch, if you need to turn a corner, leave the needle down in the fabric, then lift the foot and continue sewing.

Simple outline couching

If you can’t end the couched design in a seam, leave the trim ends long enough to thread into a needle and bring them to the underside along with the couching threads. Knot to secure.

For free-motion couching, set your machine for free-motion stitching (see the manual for your brand), choose a presser foot that will help feed the trim while you move to fill the desired area. Free-motion couching is most often done using monofilament thread so the couched threads are the highlight and not the stitching itself.

Free-motion couching with yarn

Fancy Dancy

It’s easy to add beads or charms to the trim being couched, but this requires extra care when the couching is being done to avoid hitting those additions.

  • Simply manually turn the hand-wheel to step by the bead or other addition and begin stitching again on the other side of it.
  • Combine rows of decorative stitching with couching for added accents.
Combine couching with decorative stitching
  • Press your couched area over a towel or other padded surface to avoid flattening the trim.

Before You Begin: Make a sampler of different stitches and threads to see what works best with your trim to give you the look you like.

All photos courtesy of Bernina


~Linda Griepentrog is the owner of G Wiz Creative Services and she does writing, editing and designing for companies in the sewing, crafting and quilting industries. In addition, she escorts fabric shopping tours to Hong Kong. She lives at the Oregon Coast with her husband Keith, and three dogs, Yohnuh, Abby, and Lizzie. Contact her at .

August 29, 2025

Lace Collar Love

Creating unique collars for garments is a fun and creative way to transform an outfit into something truly special. Lace collars have always carried an air of elegance and delicate craftsmanship. First appearing in the 16th and 17th centuries, they quickly became a favorite among European aristocracy, worn by both men and women as a sign of wealth and refinement. Over time, their designs shifted with fashion trends, becoming especially popular in the Victorian era, when they added charm to high-neck blouses and dresses. Today, lace collars still enchant designers and fashion lovers alike—whether on vintage pieces, bridal looks, or modern styles—proving that this timeless accessory continues to inspire and elevate fashion through the ages.

Pink lace collar

Types of Lace Collars

  • Detachable Lace Collar – A versatile accessory that instantly elevates any garment with a touch of lace.
  • Ruffled Lace Collar – A voluminous, Victorian-inspired detail that adds drama and timeless elegance.
  • Peter Pan Collar – A soft, rounded style that brings a feminine, vintage charm to blouses and dresses.
  • Scalloped Lace Collar – Designed with a graceful, wavy edge, often seen in romantic or bridal fashions.
  • Venetian Lace Collar – Distinguished by intricate patterns and fine needlework, perfect for elegant or antique-inspired attire.

Making a Detachable Lace Collar

The Last Stitch website offers a great tutorial on making a detachable lace collar:

How to make a detachable lace collar

Styling Tips for Lace Collars

Wide lace collar
  • Go for Glam: For a timeless look, style a lace collar with a crisp, solid-colored blouse or dress. White or cream collars over dark fabrics create a striking vintage-inspired contrast reminiscent of the Edwardian era.
  • Give it a Modern Twist: Detachable lace collars are trending in today’s fashion world. Layer one over a casual sweater, T-shirt, or shift dress to instantly elevate your outfit with a touch of playful sophistication. Many modern designers now offer detachable collars as statement accessories, making them easy to swap out and restyle.
  • Feeling Goth: Black lace collars pair beautifully with darker palettes, leather, and velvet. They’re a staple in gothic and Victorian-inspired wardrobes, often worn with chokers or layered necklaces for dramatic effect.
  • Here Comes the Bride: Lace collars bring an air of romance and refinement to wedding gowns and formal attire. They can be delicately sewn onto necklines or designed as detachable accessories, giving brides the flexibility to change their look from ceremony to reception.
  • Accessorizing Tip: Lace collars pair well with brooches, cameos, or delicate chains. Adding jewelry can help balance the softness of lace with a bolder statement piece.
  • Seasonal Styling: Light lace collars in white or pastel shades are perfect for spring and summer outfits, while darker tones and heavier lace textures complement autumn and winter wardrobes.


  • 1
  • 2
  • 3
  • …
  • 86
  • Next Page »

Become a Member

Join the only national organization dedicated to Advancing Sewing as an Art and Life Skill.

Join Now button

Blog Article Categories

  • ASG Conference
  • Chapter Stories
  • Embroidery
  • Fitting
  • Learn to Sew
  • National Sewing Month
  • Products, Books, & Patterns
  • Projects
  • Quilting
  • Sewing
  • Sewing Techniques
  • Sewing Tips
  • Sewing Tours
  • Videos
  • Disclaimer
  • Privacy Policy

American Sewing Guild
National Headquarters
9660 Hillcroft, Suite 230
Houston TX 77096
713-729-3000 | 713-721-9230 Fax
www.ASG.org

ASG wordcloud - education, conference, discounts, videos, special offers, tours and more

Copyright © 1998–2025 · American Sewing Guild · All Rights Reserved