American Sewing Guild (ASG)

Visit our blog Visit the ASG Facebook page Visit ASG on Pinterest Visit ASG's YouTube channel Visit ASG on Instagram
  • Home
  • Join ASG
    • Join Online
    • Chapter Locations
    • Member Benefits
    • Member Brochure
    • Join by Mail
  • Education & Classes
  • Resources
    • Contests & Awards
    • Giving Back
    • Hall of Fame
    • Travel and Tours
    • Measurement Chart
  • Shop
    • ASG Store
    • Chapter Products
    • Video Resources
  • Blog
  • About
    • About Us
    • Donate to ASG
    • ASG Sensitivity Statement
    • FAQ’s
    • Start a Chapter
  • Contact
  • Member Login
    • Login First!
    • Members Only
    • Leadership Only
    • Website FAQ’s
    • Logout
  •  

February 27, 2026

Mitering Magic

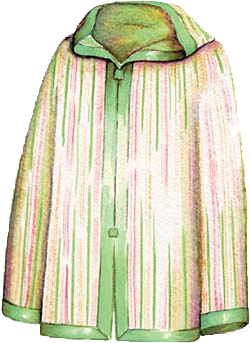
While miters may serve as a basic way to clean-finish garments, they are just cool enough to think about using as embellishments. Why not feature them on your garments and show off your skills? It’s fun to use a normally utilitarian technique as an artistic detail.

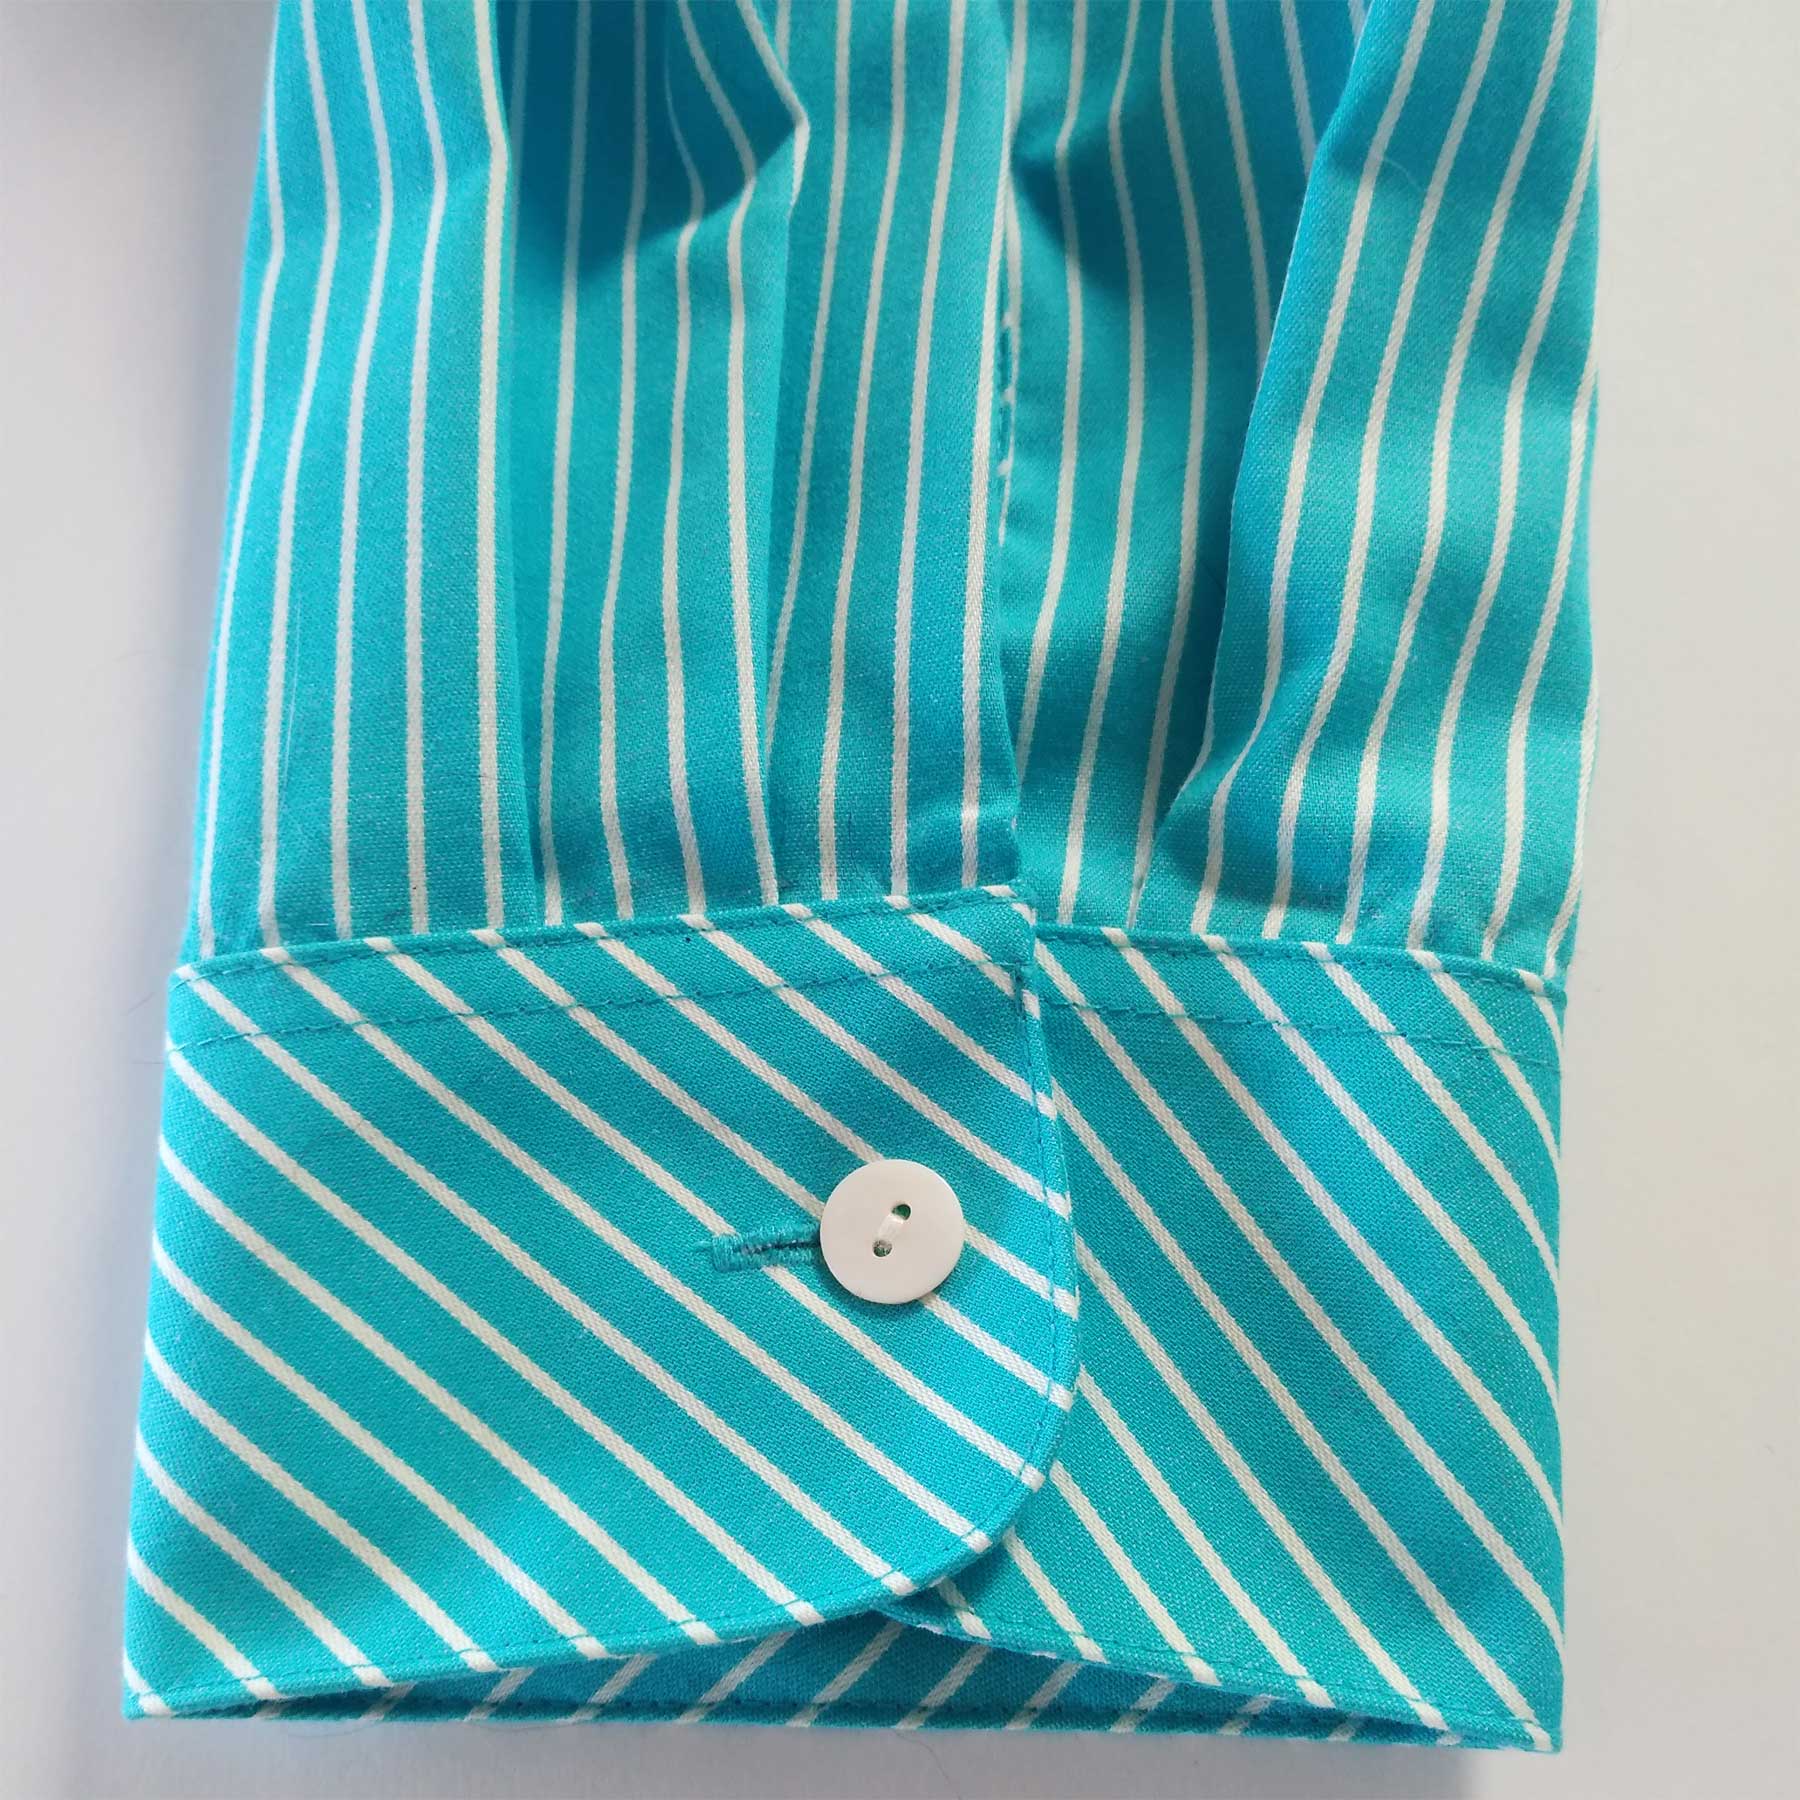
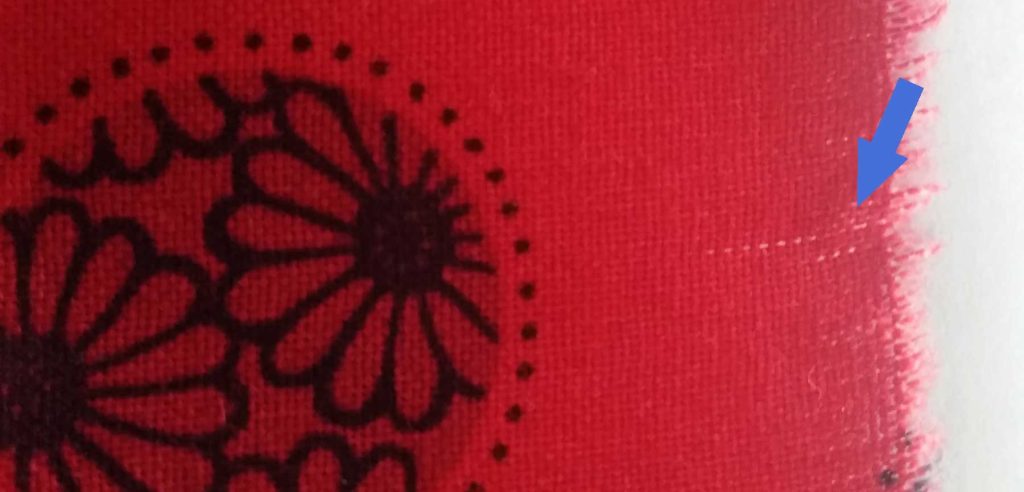
There are three miter techniques that lend themselves to embellishing ideas. What is so appealing about these are the possibilities of using really “out-there” fabrics and trims: print fabrics that are too gaudy to wear as a total garment, but great when reduced to a narrow strip; stripes that can run vertically or horizontally to meet creatively at corners; shiny fabrics to use with matte-finished fabrics; bubbly textures on smooth fabrics; or reversible fabrics that show off their contrasting wrong sides when turned. Those orphan fabrics in your stash may be just the ticket for some wonderful binding.

Mitered Binding

Traditional binding is a method of covering an edge that encases the raw edge and looks attractive on both sides. It eliminates the need for hems and/or facings and it adds the punch of trim to both the inside and the outside of the garment.

Binding is applied before intersecting components, such as facings, collars, or waistbands, are attached to the garment or before other elements, such as hems, are finished. It is most commonly cut on the bias so that it fits easily around curves and corners. But if you are dealing with straight edges and right-angled corners, a binding can be cut on the straight of grain. It will certainly be easier to handle; it may also be a more economical use of fabric.

Getting started

Whether you’re working with bias or straight grain strips, the first step is to determine how wide you want the finished binding to be. A binding can be any width from very narrow, such as 1⁄2″ wide, to several inches wide—it’s all about the effect you want to achieve. The width of your strips needs to equal four times the finished width.

The next step is to determine how much binding you need. Measure the length of the edge(s) you are covering with binding. If you are adding binding as an edge finish to a pattern that doesn’t call for it, trim off the seam allowances along the edges to be encased in binding and then measure.

Once you’ve determined how much binding you need and how wide it should be, cut and join enough fabric strips to make a continuous piece of binding that is the required length plus a few extra inches. Use 1⁄4″ seams to join the strips.

  • Press the binding in half lengthwise, wrong sides together. Then press the seam allowances to the inside of the binding so that they meet at the center crease.
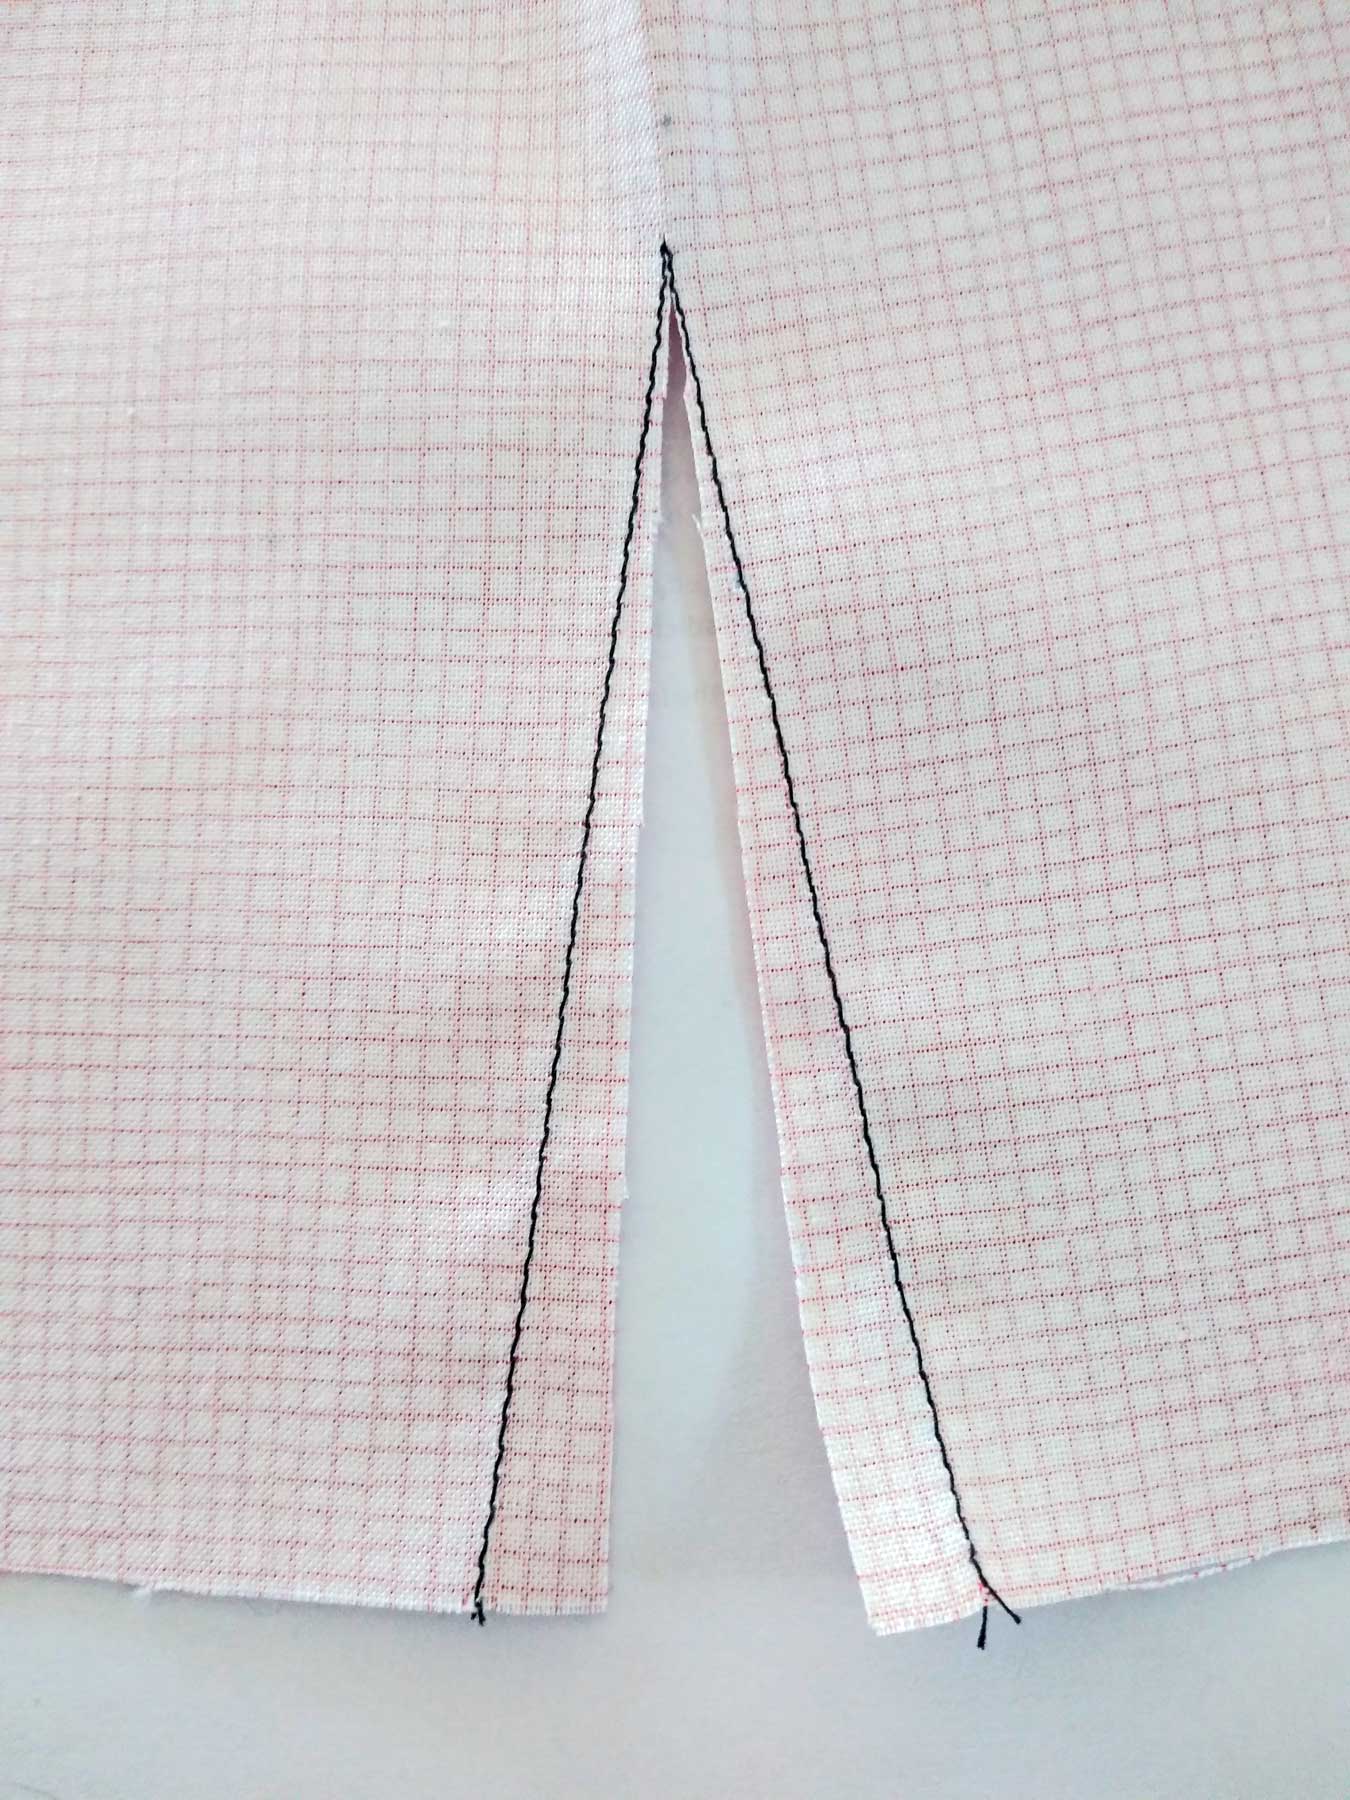
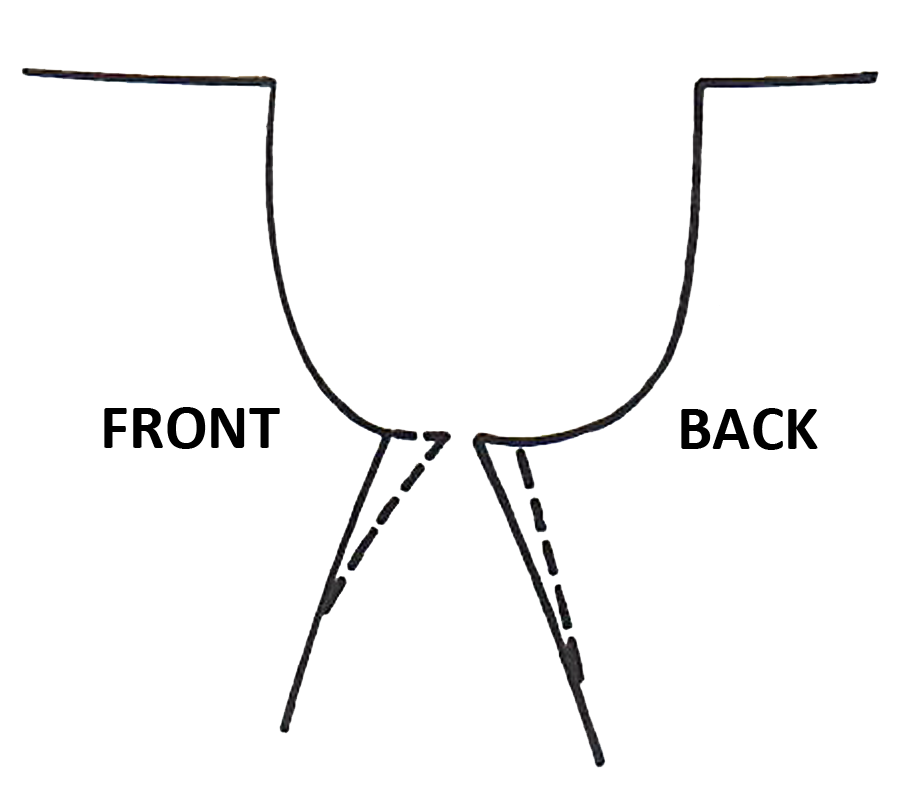
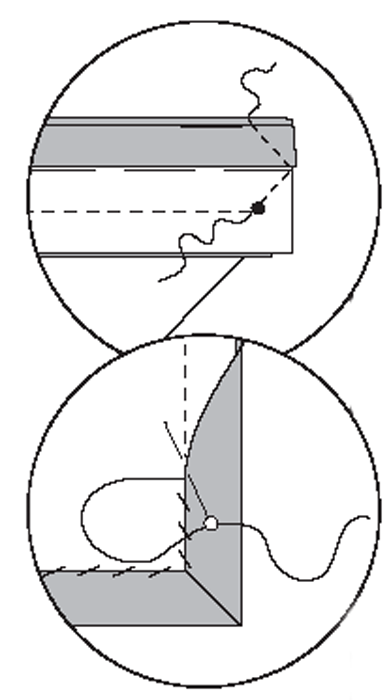
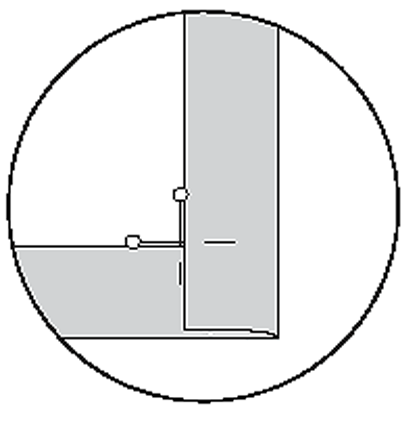
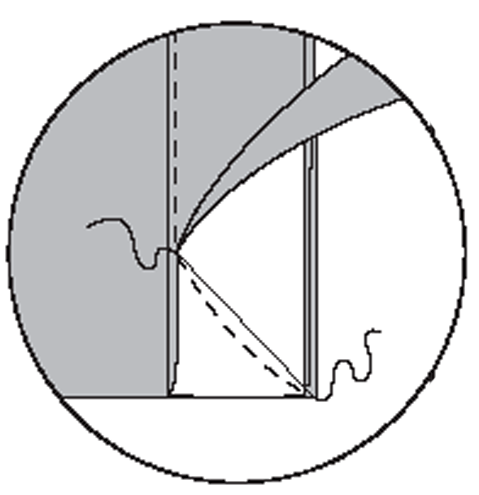
  • Open out one seam allowance and pin the binding to the edge of the garment, right sides together. It is important to remember that the other seam allowance always stays folded to the inside of the strip. Position the binding so that you begin stitching at a point that will be hidden in a seam or hem. Stop stitching near the corner, at a point from the intersecting edge that equals the width of the seam allowance.

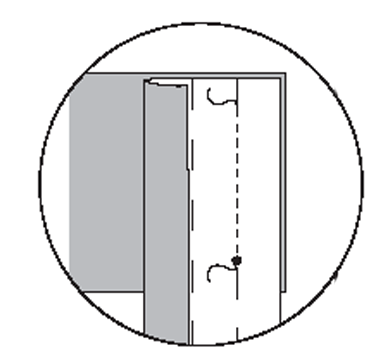
  • Fold the binding diagonally against the last stitch, forming an “L.” Place a pin on the binding that matches the cut edge of the garment.
  • Using the pin as a guide, fold the binding back on itself. Insert the needle exactly where the previous stitching ended and stitch along the intersecting edge.

Sewing Tip: It will be easier to accomplish this if you turn your garment over and sew on the underside so you can see exactly where the previous stitching ended.

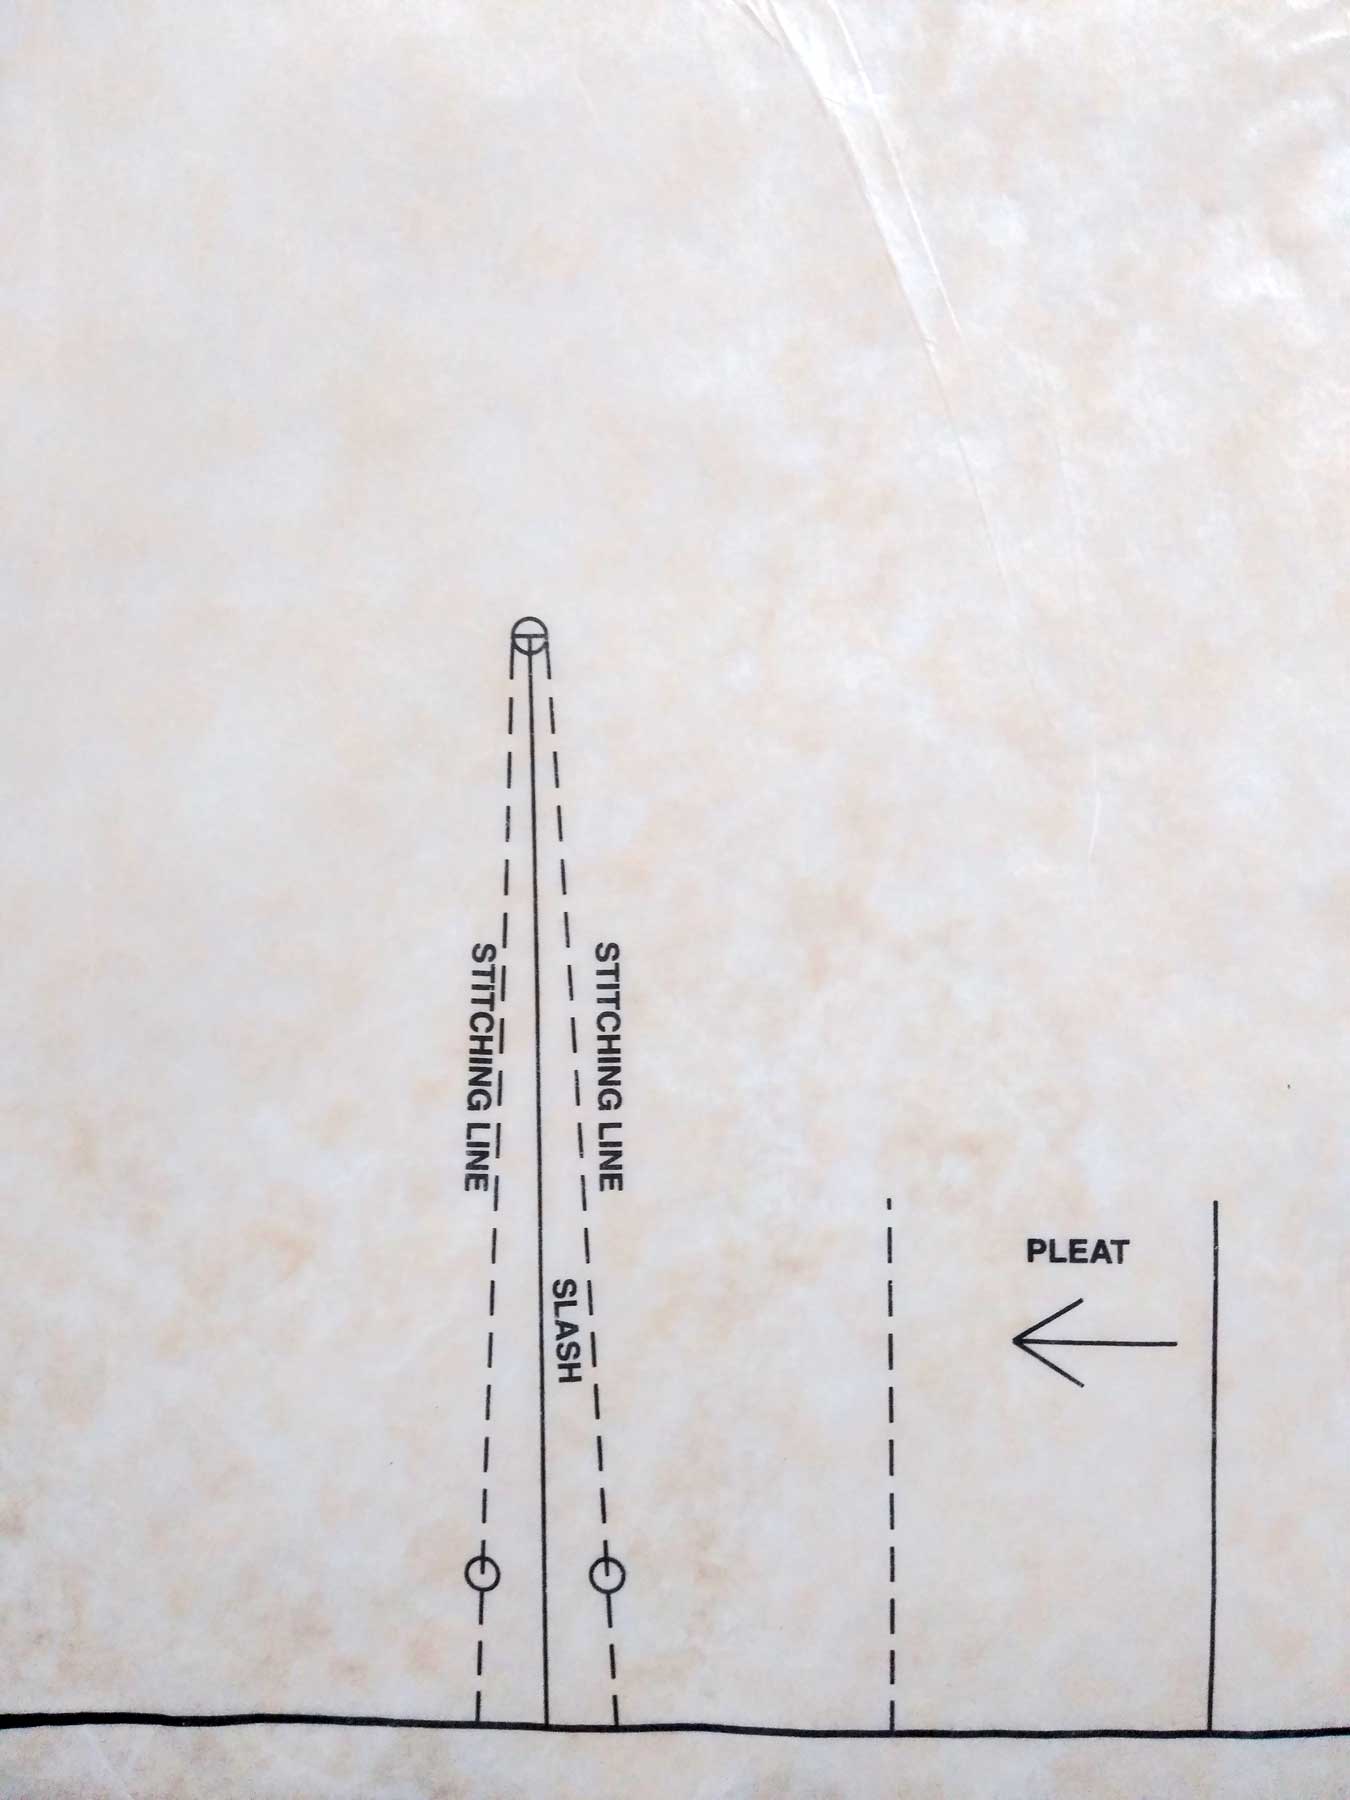
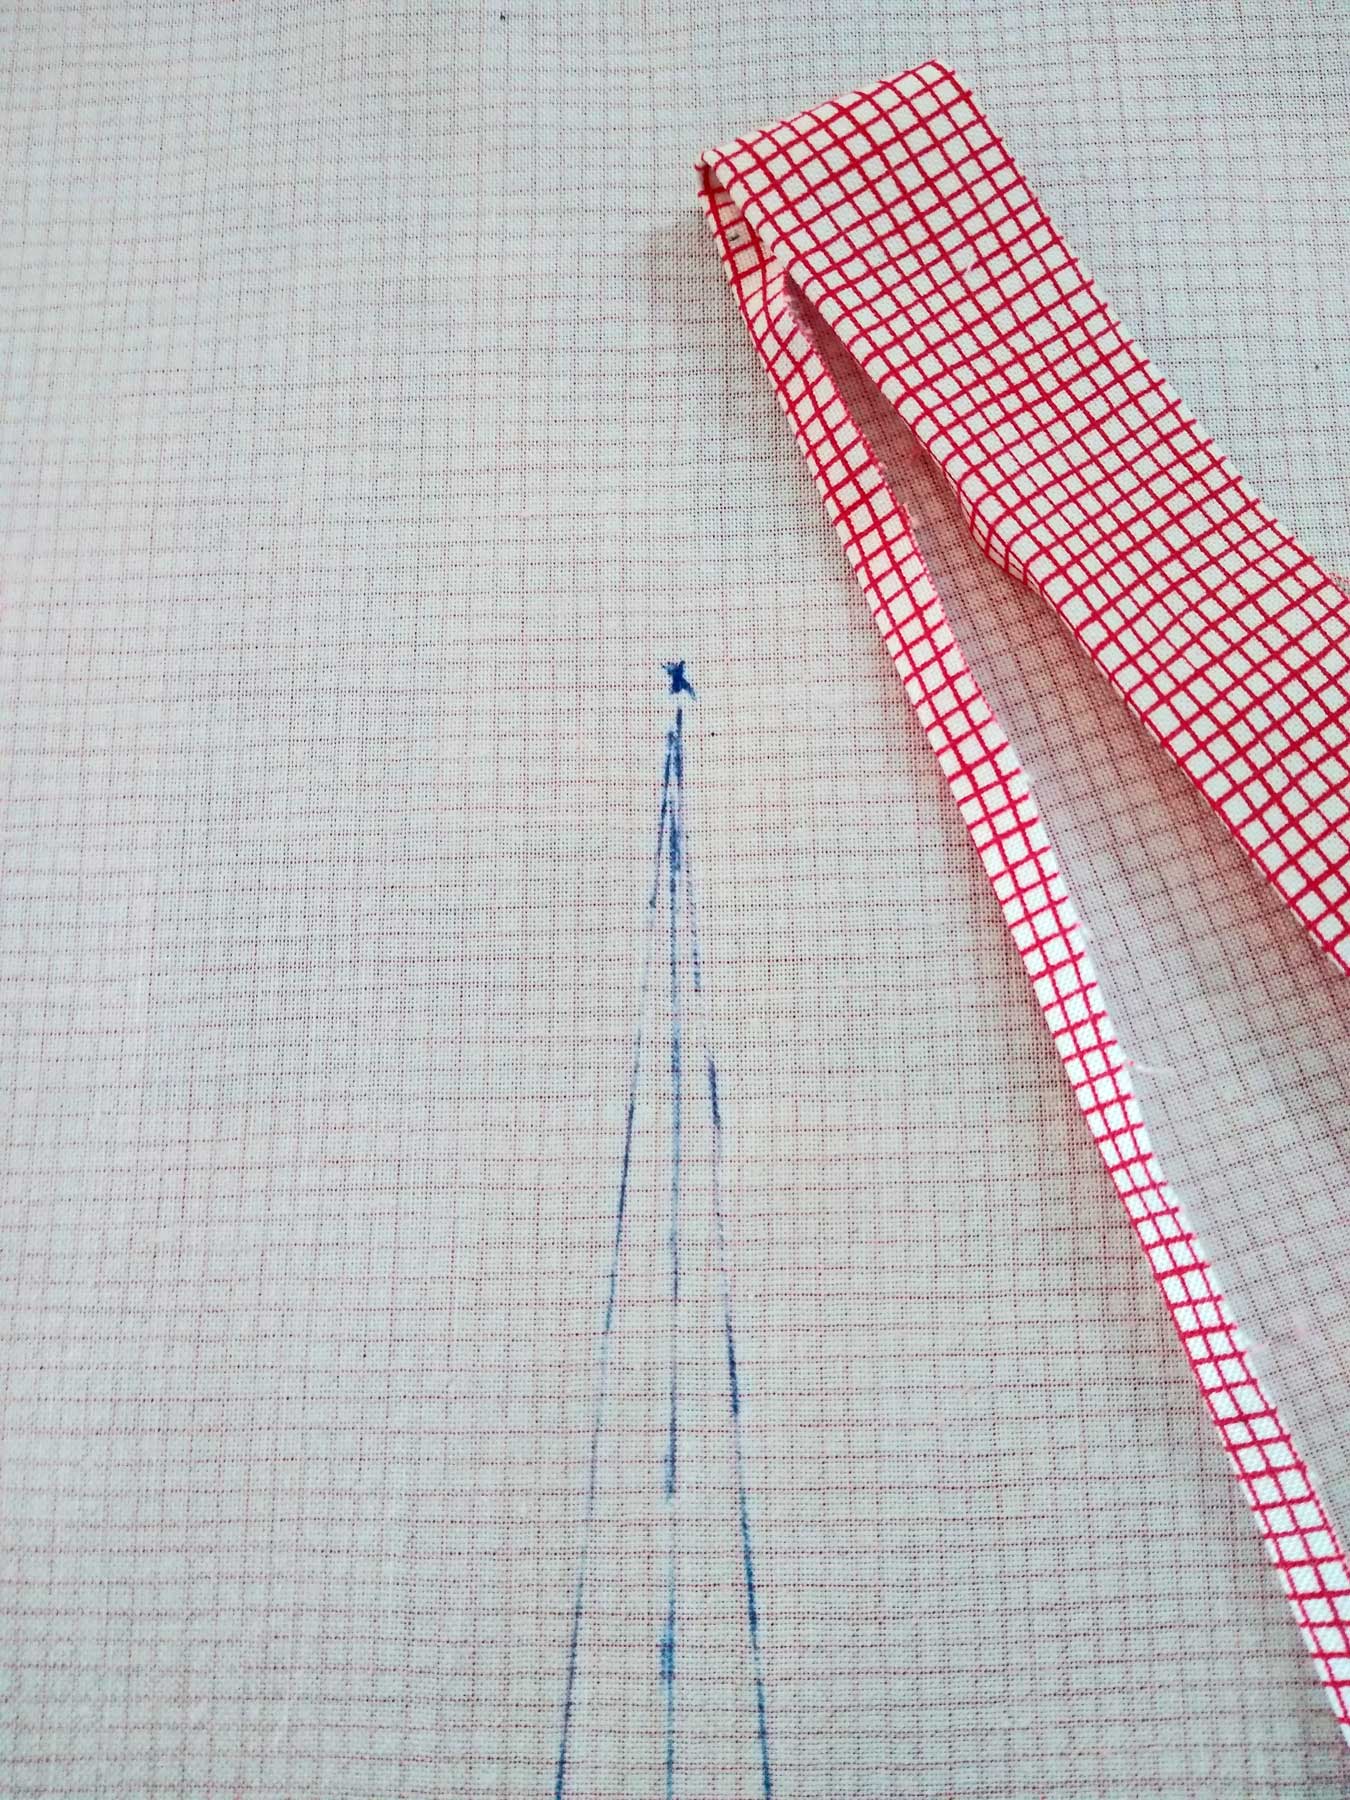
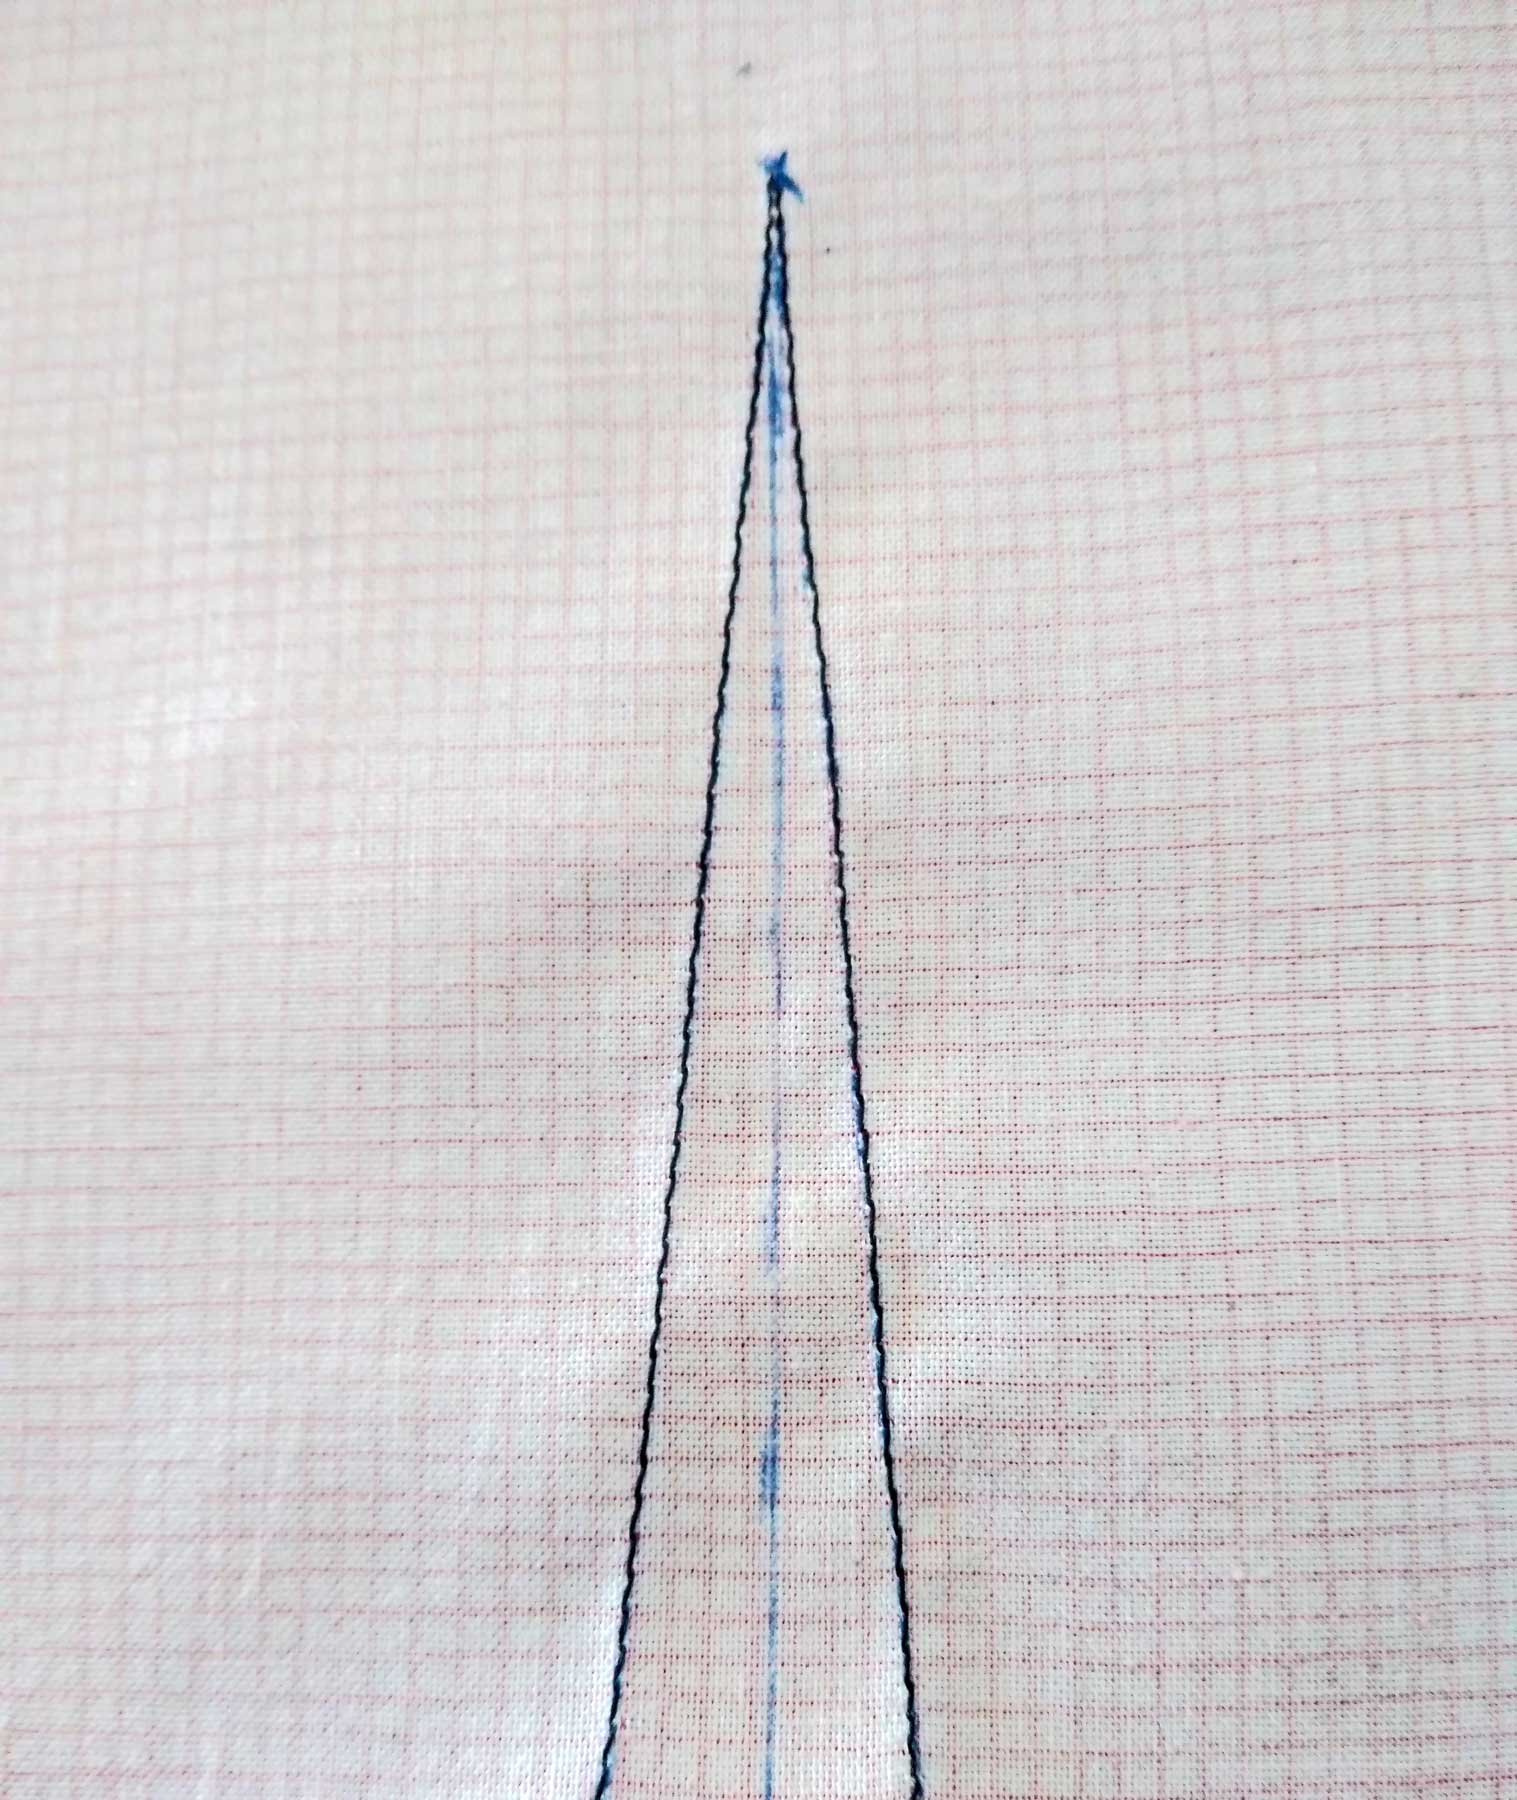
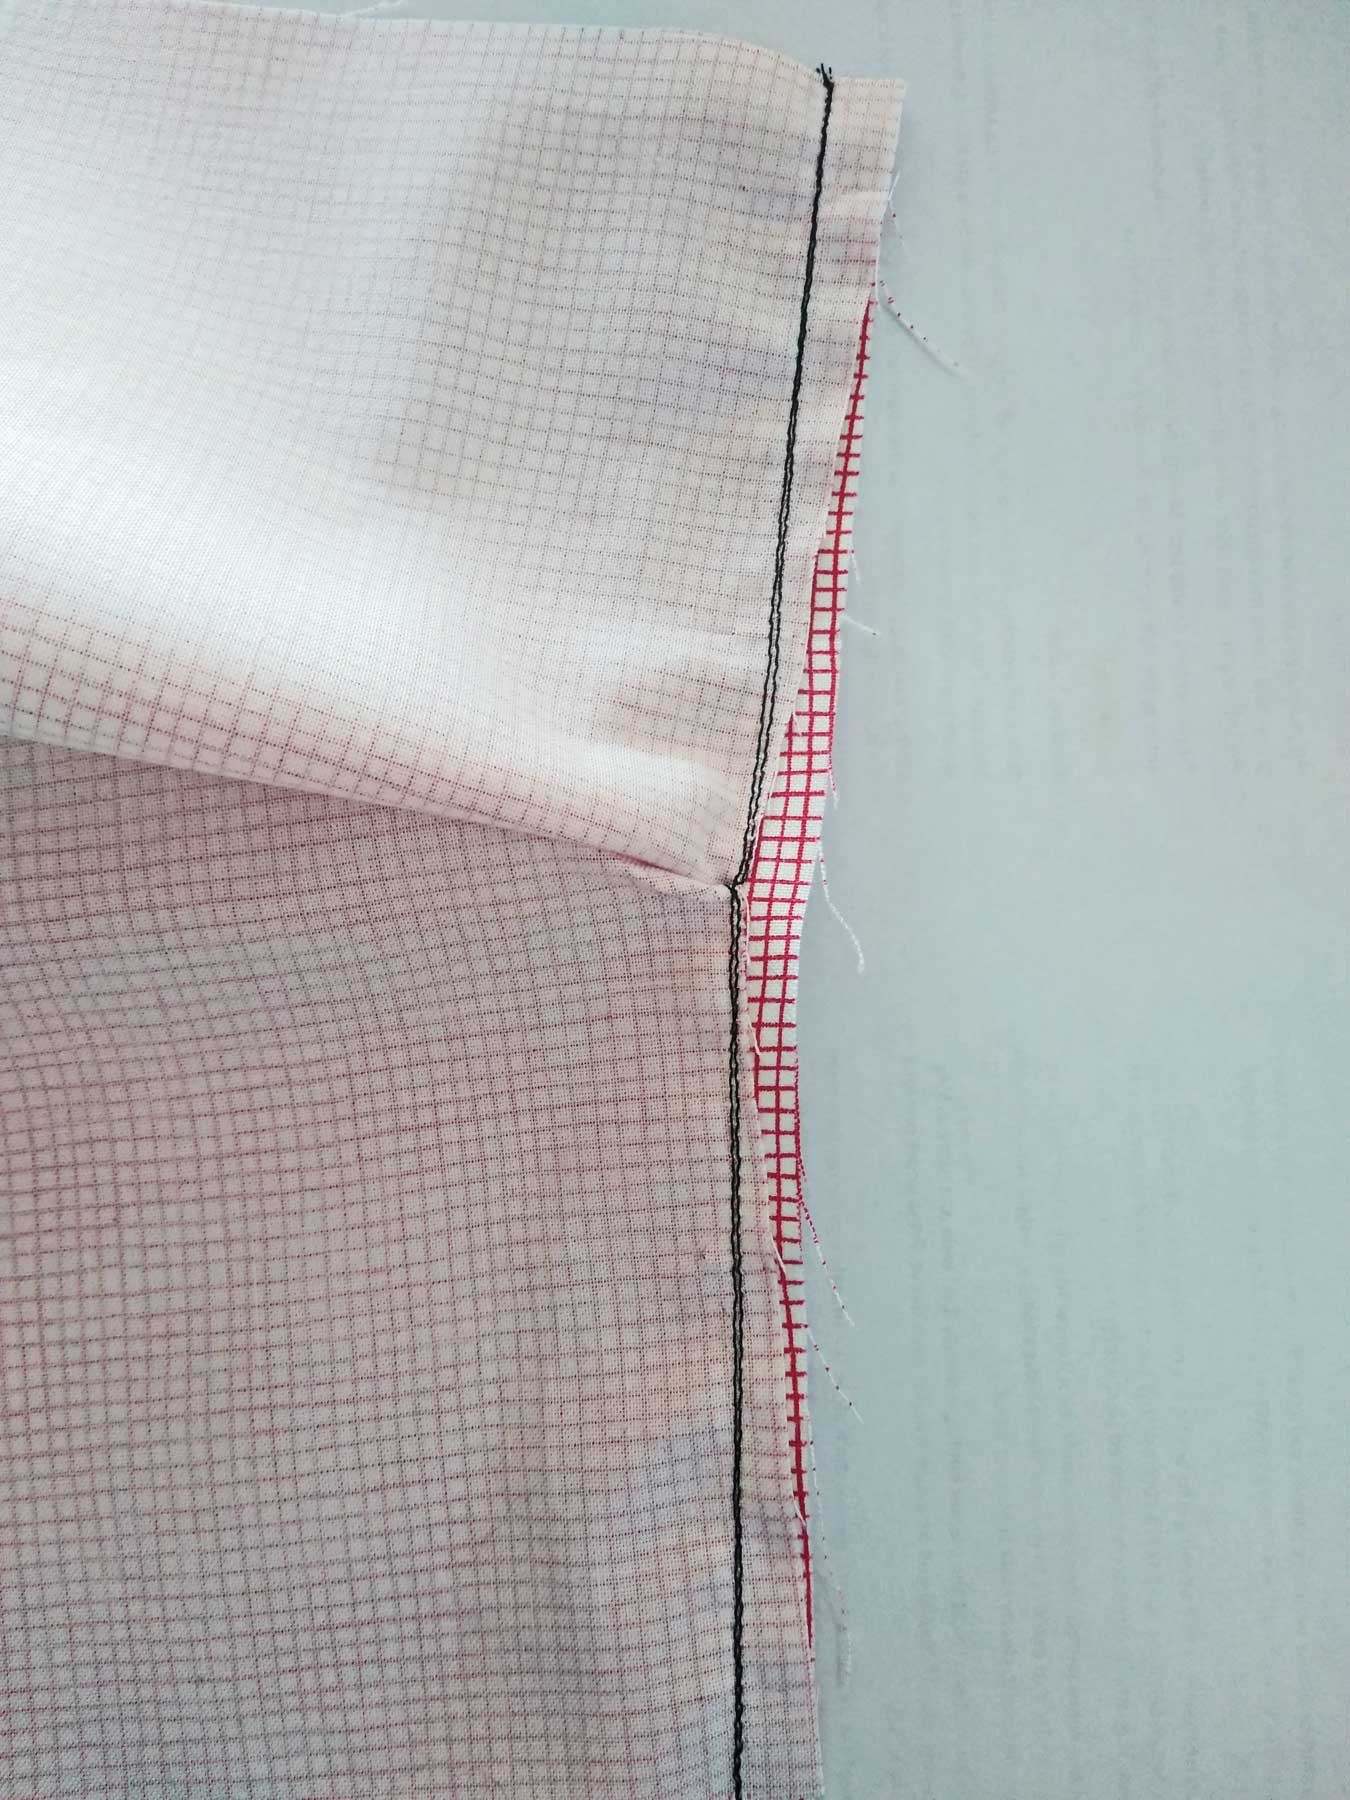
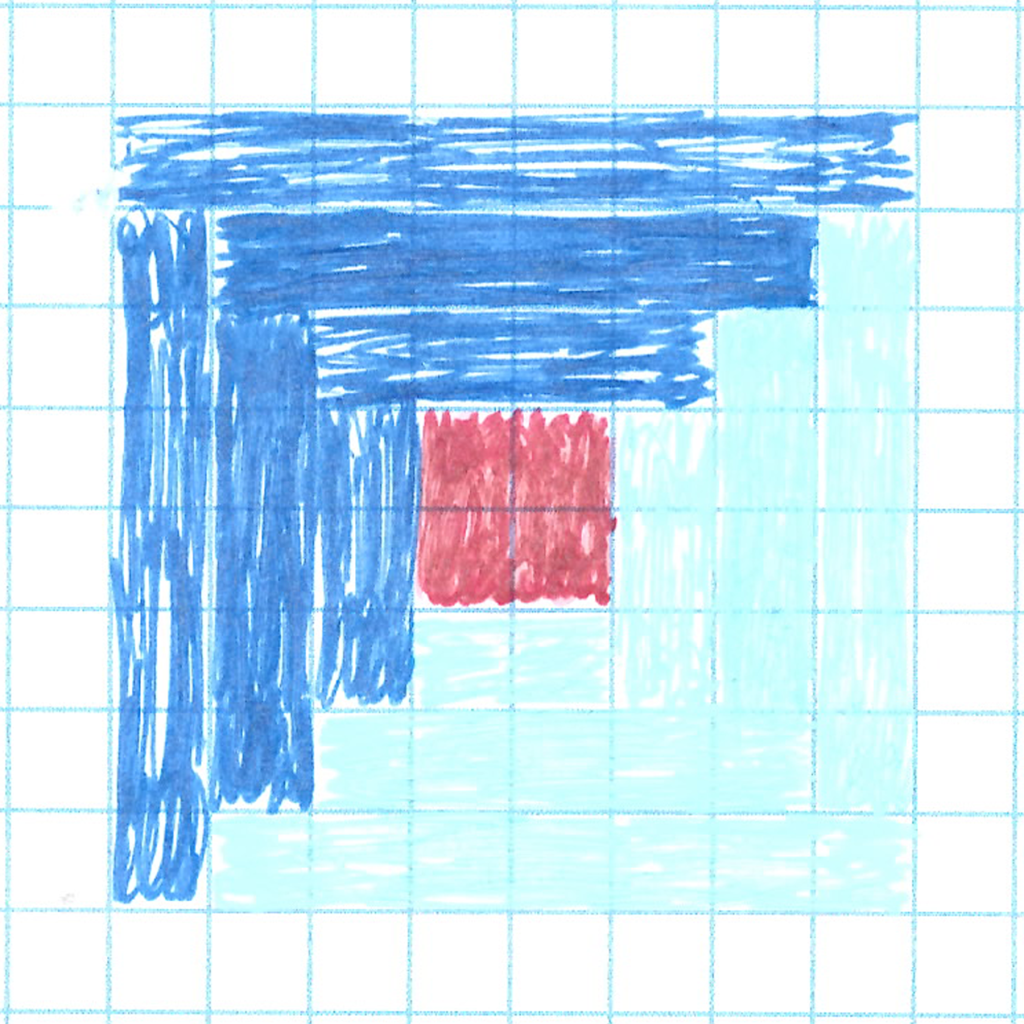
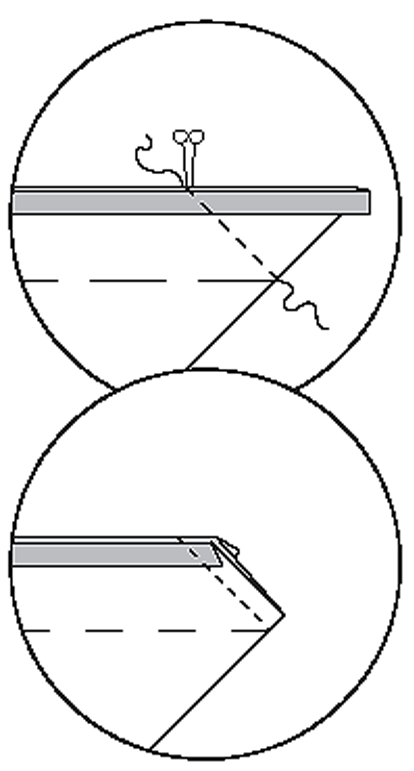
  • To complete the miter: using a marking tool, draw an arrow on the binding that starts at the last stitch in the corner, angles out to the center of the binding at the crosswise fold and continues up to a point that meets the seamline.
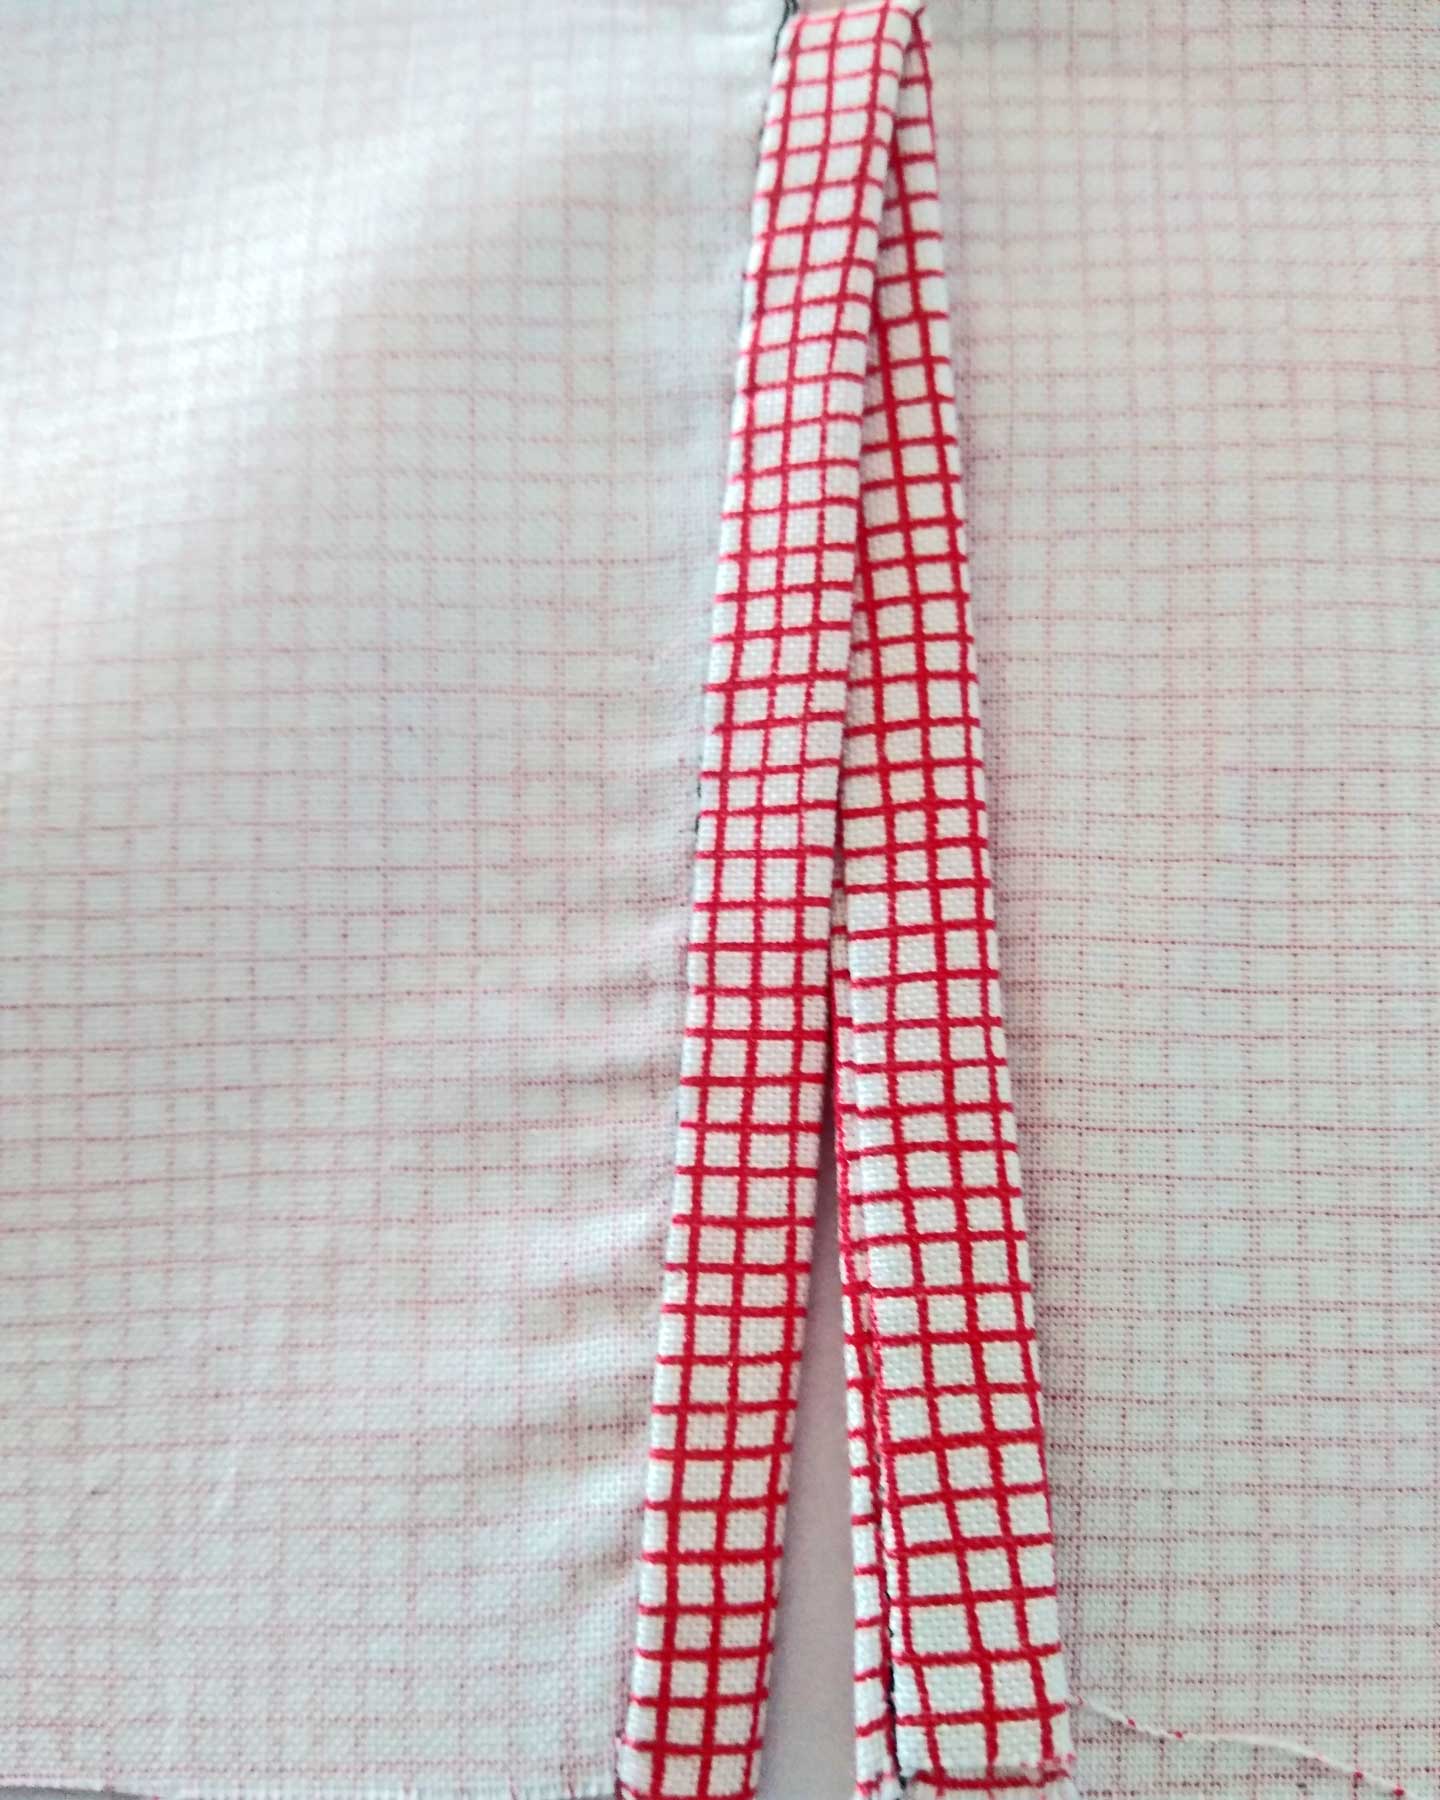
  • Stitch on the marked line, stitching through the binding only; do not stitch through the encased seam allowances. Check that the corner turns and miters well, and then trim the excess fabric. Once the corner is turned, pin the binding to just cover the stitching line and slipstitch in place.

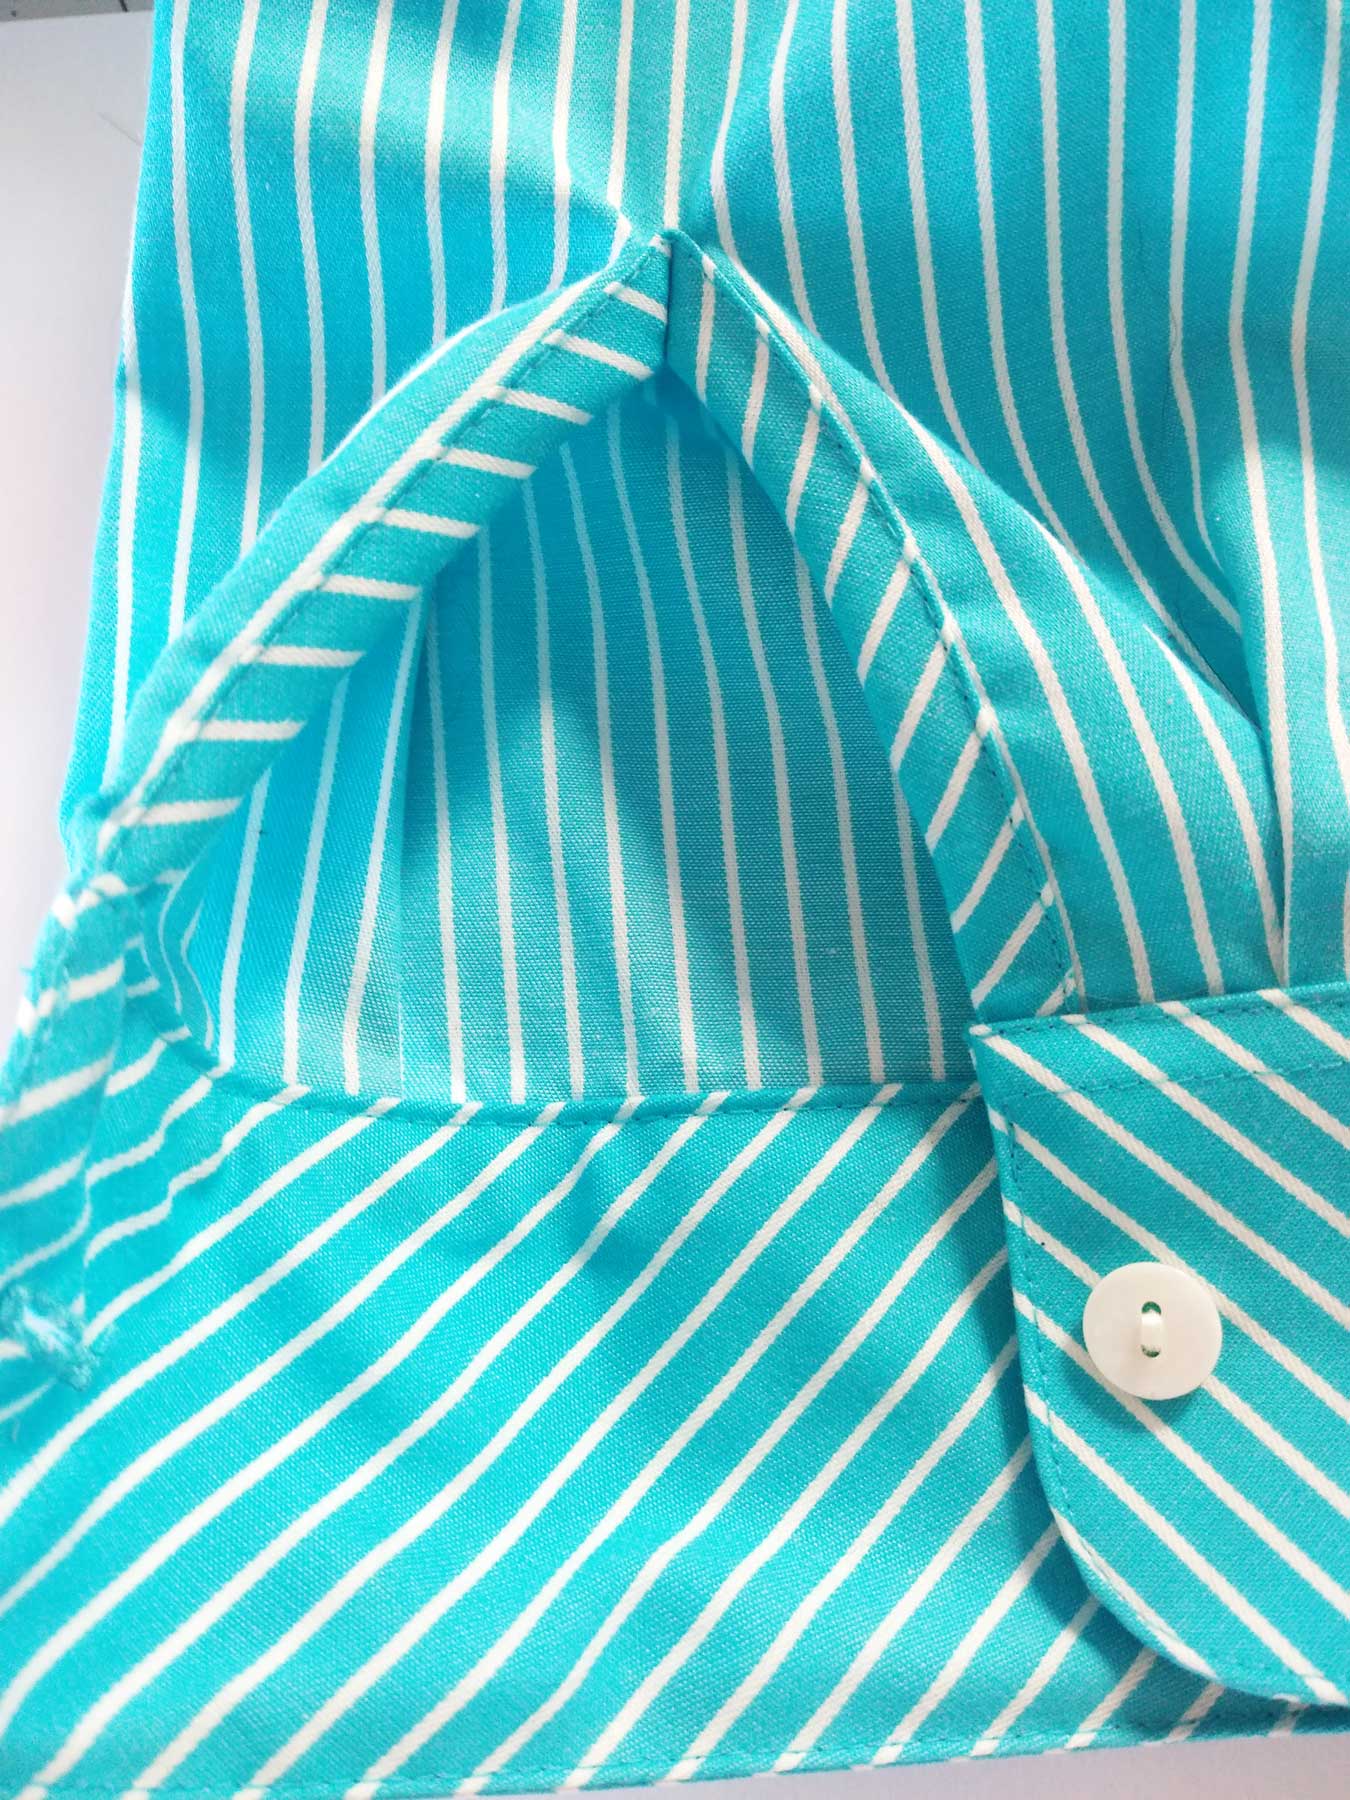
Mitered Hems to the Outside

When a facing meets a hem, there is an opportunity for a miter. Usually, we relegate these connections to the insides of our garment. However, if your fabric has a usable wrong side, rethink this detail. If you turn both edges to the outside, the result is a wonderful couture detail. Increase or decrease the widths of the facings and hems; make them the same width or make them different.

When a garment is lined with contrasting fabric, mitering the hems to the outside brings that contrast color to the forefront. No matter what effect you choose, here’s how to miter the corners perfectly.

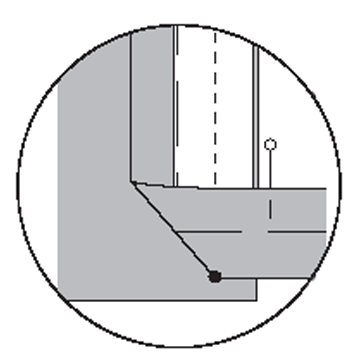
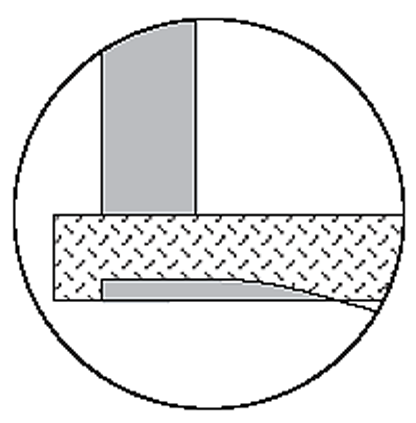
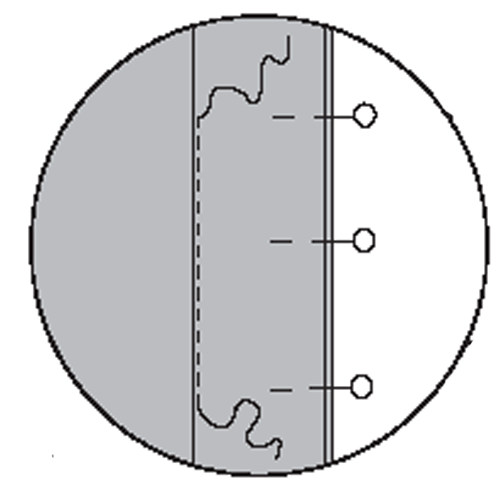
  • From a manila file folder, straight-cut two tagboard templates. Cut one template the width of the finished hem or facing and the second template 1⁄2″ narrower than the finished hem.
  • Working at your ironing surface, place the widest template on the right side of the fabric. Press the fabric up over the edge of the tagboard, matching the raw edge of the fabric to the top edge of the template. Press through all layers.
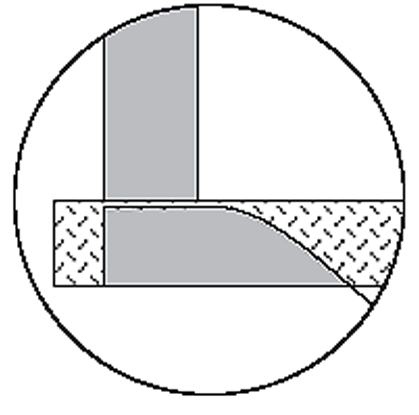
  • Open out the fabric. Place the narrower template in the pressed crease. Fold the raw edge of the garment up over the template to create a 1/2″ turndown and press. Once you have completed both steps on one edge, repeat these steps to press the intersecting edge. Refold the edges and press both hems in place.
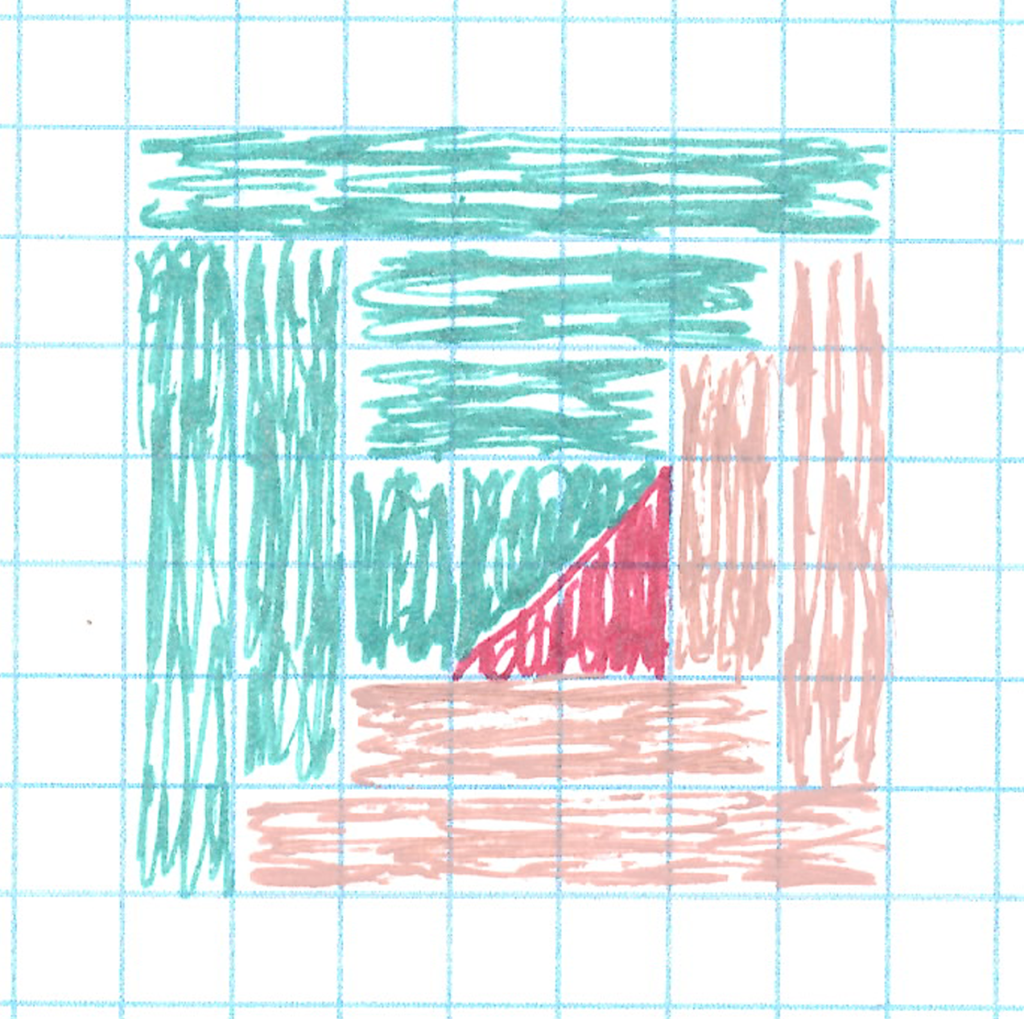
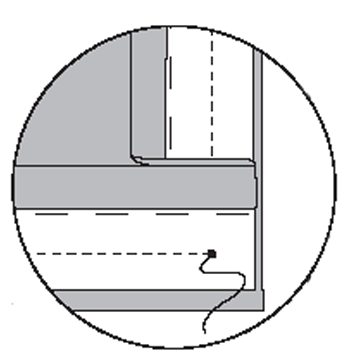
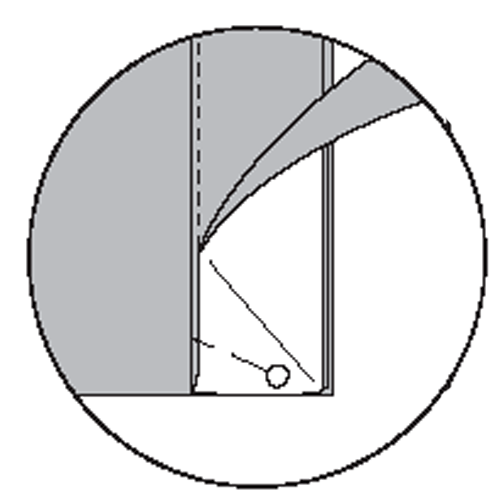
  • To complete the miter: Place one pin in the hem allowance only, perpendicular to the hem fold. Place a second pin in the opposite hem fold at the intersection of the two hems.
  • Open out the two hems, keeping the 1⁄2″ turndown in place. With the right sides together, match the pins exactly at the folded edges. Mark a diagonal line from the pins to the point where the first creaseline meets the diagonal fold. Sew from the pins to the point, backstitching at both ends. Trim to 1/4″.
  • Press the seam open over a point presser. Turn it right side out and press again.
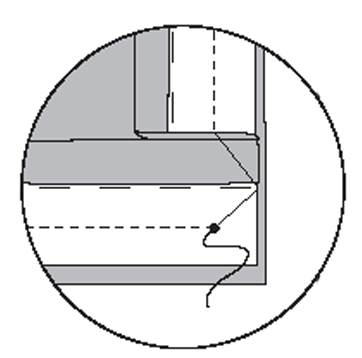
  • To ensure a good topstitching line without the hem pulling and rippling, take the time to hand baste along the inner fold. Then it is easy to topstitch the mitered hems in place without any worries.

Applied and Mitered Trim

When an applied trim is used to define the edges of a garment, the result is an intriguing design element. Strips of torn fabric, interesting selvages, or ribbons and braids add that adventurous touch to an edge. On an unlined garment, trim can also serve a functional purpose: turn the facing or hem edge to the outside, apply the trim over the raw edge, and you have a clean finish both inside and out.

  • Cut a length of trim long enough to border the entire garment plus a few inches. Starting at the top of an edge that will be sewn into a seam or hem, pin the trim in place and edge-stitch along its inner edge, stopping at a point above the intersecting edge that is equal to the width of the trim.
  • To complete the miter: At the corner, fold the trim back on itself, aligning the fold with the bottom edge of the garment. Mark a diagonal line from the last stitch on the inner edge to the corner point of the trim.
  • Using the marked line as a guide, stitch a line with about a 1⁄16″ bow to it through all layers. Trim off the excess below this stitching as best you can. Fold the trim down and continue sewing the inner edge of the trim.
  • When all the miters have been done, go back and stitch the outside edge of the trim to the garment. You can sew decorative stitches over the previous straight stitches or couch over small cords or decorative threads to enhance the trims even more.

Linda Lee, ASID is a designer, sewing instructor, and author, including a book titled, “Mastering Miters” (the source of this article’s technical art), and produces The Sewing Workshop Pattern Collection, a group of patterns for distinctive garments using innovative sewing techniques. She is also a licensed interior designer. Learn more at www.sewingworkshop.com.

February 20, 2026

Cuff Placket Pointers

If you’re making a shirt or blouse with long sleeves, you know that you need space to get your hand through the cuff opening, and that’s where a placket is needed. A placket is the opening above the actual cuff.

The most common treatment of that opening is to bind it in a matching fabric, though occasionally for a design detail the binding is a contrast. The binding can be cut on the straight grain or on the bias. The latter is often done on striped shirtings for a fun contrast.

When you look at the sleeve pattern lower edge, you’ll see a narrow triangle where the placket opening goes (1). Transfer that marking to your cut sleeve pieces using a method appropriate to the garment fabric. Be sure to clearly mark the upper point.

1

Follow the pattern instructions to cut the placket binding—usually 1 1/4” wide and twice as long at the placket opening, plus 1”. You’ll need a binding strip for each sleeve. Press under one long edge of the binding 1/4” (2).

2

Once you’ve marked the opening on each sleeve, stitch along the triangle legs for reinforcement through the single layer of sleeve fabric. As you near the point, shorten the stitch length to about 15 stitches per inch. Pivot at the point, then stitch down the other side returning the stitch length to normal about an inch away from the apex (3).

3

Slash down the triangle center all the way to the point, but not through the stitching. The opening is now ready to bind (4).

4

Binding Basics

Pin the unpressed edge of the binding right sides together with the opened out slit opening. Align the reinforcement stitching line with a 1/4” seam allowance on the binding. Match the edges at the beginning and end of the strip, but note that in the middle, you’ll be able to see the binding strip extending beyond the slashed opening edges. The marked point should be 1/4” in from the edge.

Stitch the binding to the placket opening using an even 1/4” seam and being careful not to stitch a pucker at the point (5). You’ll only be catching a few threads of the shirting fabric at the point. Press the seam allowances toward the binding strip.

5

Fold the placket band to the wrong side of the sleeve with the folded edge just over the stitching line. Hand-stitch the folded edge in place (6).

6

Two other Options

  • If you prefer a machine stitched binding, place the binding on the wrong side of the shirt sleeve and fold to the right side after stitching, then edgestitch the folded edges in place over the stitching line, again being careful at the point not to sew in a pucker.
  • If you prefer a double-layer binding, cut the binding strip 1 3/4” wide, press in half, then apply either to the right or wrong side, depending on your preference.

Finishing Touches

To finish the placket, fold the sleeve opening and press the binding so that it’s extended on the back side of the sleeve and pressed under on the overlap side. Baste the lower sleeve edge to secure the binding overlap in place.

Stitch the binding edges together at the upper fold along a 45° angle. Be careful not to catch the sleeve in the stitching.

Apply the cuff to the lower sleeve edge following the pattern directions.


~Linda Griepentrog is the owner of G Wiz Creative Services and she does writing, editing and designing for companies in the sewing, crafting and quilting industries. In addition, she escorts fabric shopping tours to Hong Kong. She lives at the Oregon Coast with her husband Keith, and three dogs, Yohnuh, Abby, and Lizzie. Contact her at gwizdesigns@aol.com.


February 13, 2026

Sewing Q&A: Pull Marks, Sherpa Closures, and Machine Cleaning

What causes little pulled marks and discolored threads in my fabric?

Pulled thread

There are a variety of causes for pulled marks in fabric. First, there can be an actual flaw in the fabric, whether in the weave, the dyeing process or the printing process. But, if the mark occurs as you cut, the culprit is very likely a dull or damaged spot on either your scissor blades or your rotary cutter blade, which in turn snags the fabric threads.

Pulled threads can also result if you tear the fabric on either the crosswise or lengthwise grain. The stress of the tearing process shifts threads and can expose undyed areas. Better to cut than tear.

Pulled thread

If the issue of pulled threads occurs while you’re sewing a seam, the likely offender is a dull or damaged needle that’s catching on the fabric weave. It may show up as an isolated instance, or at regular intervals, depending on the extent of the damage.

The solution to all these situations to prevent fabric damage is to maintain the sharpness of your tools, and replace needles on a regular basis.


I’m making a sherpa jacket, but not sure what type of closure is appropriate for this very bulky fabric. What are good options?

Fleece closures
Image compliments of Bernina

The bulk of sherpa, or any faux fur, makes it an unlikely candidate for the traditional button and buttonhole closure. The pile surface makes it almost impossible to get a good-looking buttonhole, and also to keep it from stretching out of shape.

If you really want a button closure, consider using large buttons with loops instead of buttonholes, or toggle sets. Extra-large hook-and-eye closures are another option—look for them designated as “fur hooks”.

The best solution for furry fabrics is to use large snaps for closures. They don’t interfere with the bulky surface and they come in a variety of finishes to coordinate with any fabric. You can also paint them with nail polish or a paint designed for metal if you want a custom color, or cover them in a coordinating lining fabric.

Depending on the jacket style, another closure option is an exposed sport-weight separating zipper. The heavier teeth are sturdy and don’t tend to catch the fuzzy fabric surface.


How often should I clean my machine?

The answer depends on the type of sewing you do and the types of fabrics you’re sewing. A simple answer would be to clean the bobbin and feed-dog area after every project. But, if your fabric is very fuzzy and lint prone, you may need to do it more often.

Lint in the bobbin

Fabrics like fur, wool, fleece, etc. produce more lint than hard-surface fabrics and that can build up around the feed-dogs. If the lint becomes too compacted, your machine won’t stitch properly and if you have a built-in thread cutter, it may not work properly. If you continue to sew without cleaning out the lint build-up, it can become more compacted and driven into the internal mechanism of the machine. That could mean an expensive repair.

It’s easy to take off the machine needle plate and use a small stiff brush to remove built-up lint from around the feed-dogs, thread cutter and in the bobbin area. It’s important to remove the lint and not push it into the machine. Avoid the temptation to use canned air, as the force of the blast simply pushes lint further into the machine.

Consult your owner’s manual for cleaning instructions specific to your model, and note the areas needing regular maintenance.  The book will also include information on properly reassembling the machine after you’ve taken it apart for cleaning. Like any expensive piece of equipment, your machine will last longer with proper and regular maintenance.

You may be surprised at the amount of lint that builds up after even a single project!


~Linda Griepentrog is the owner of G Wiz Creative Services and she does writing, editing and designing for companies in the sewing, crafting and quilting industries. In addition, she escorts fabric shopping tours to Hong Kong. She lives at the Oregon Coast with her husband Keith, and three dogs, Yohnuh, Abby, and Lizzie. Contact her at gwizdesigns@aol.com.

February 6, 2026

Pant Particulars

Pants are such important elements in our wardrobe today that it is hard to believe that when pants first hit the high-fashion runways during the Sixties, ladies wearing pants were not even permitted in better restaurants!

dress pants

Pants were worn for casual wear, gardening, and cleaning the house, but they were not considered appropriate dress for fashionable ladies. Today, pants are an essential element in most wardrobes-worn almost anywhere, for most occasions, and by almost everyone.

Made in every fabric, pants range from tailored trousers and elegant culottes to drawstring pants and comfortable sweats. Lengths can be anywhere from short or to the knee, mid-calf, ankle, or even skimming the floor. Generally the most popular designs have slight flares or straight legs which flatter less-than-perfect figures. However, many styles are close-fitting to showcase beautiful bodies.

Here are some hints for choosing and fitting pants that will enable you to look your best:

Flatter the Figure

To evaluate your figure in the latest pants’ designs, plan a leisurely shopping trip. Try on the new styles. It may take a while for your eye to become accustomed to a new look so don’t be discouraged if you don’t like the first pair you try. Try some others and reconsider before you decide that the style is really not flattering for you.

The most flattering pants will make you look taller and thinner. One of the most popular styles, the classic trouser, is also one of the most flattering. Designed to create the illusion of an elongated, slimmer figure, trousers have an assortment of vertical lines such as the fly front, stitched pleats, and waist-to-ankle creases that will make you look taller. Slanted pockets at the sides will minimize large thighs and hips and make you look slimmer.

When you prefer a dressier look, trousers are not the only choice. Other flattering styles include designs that have some fullness and a slight flare at the hem. By contrast, very straight or close-fitting styles tend to emphasize the hips and are less flattering on many figures.

Generally, soft fabrics with enough body to skim the figure without clinging are more flattering for larger figures than plaids, stiff or bulky materials, and knits that fit like a second skin. Color-wise, dark and medium shades are generally more slimming than brights and light colors. However, in the summer and in resort areas where the light is brighter and more intense, medium and lighter shades may be more flattering because the body’s silhouette blends into the surroundings.

To add the illusion of height, choose traditional long pants instead of knee-length shorts or pedal pushers. Match the jacket and pants whenever possible; and avoid horizontal patterns and cuffed hems.

Measure Your Body

For many, a better fit is the motivating factor when deciding to sew pants. Good fit starts with good measurements. Before you measure your figure, tie a narrow piece of elastic around your waist. Then, with a disappearing marking pen, mark the side seam locations, center back, and center front on the elastic and on your undergarments.

  • Waist: Place the tape measure around the waist and hold it together at the left side seam. Sit down, then release the tape measure until it fits comfortably yet snugly. Record the measurements at the center back, center front, and side seams. If you don’t have a helper, use a washable felt tip pen to mark on the tape measure. If you have an “average” figure, your front waist will be 1″ larger than the back waist. If you don’t have an average figure, you’re not alone.
  • Hip: At the hipline, measure the front and back separately. At the fullest part of the abdomen, measure the front between the side seams. Measure the distance between the waist elastic and the fullest part of the abdomen. Measure the back at the fullest part of the hip- and the distance to the waist elastic. Record these measurements.
  • Crotch depth: Sit on a wooden chair. Using a tape measure, measure the side seam from elastic at the waist to the chair.
  • Crotch length: Measure from the waist elastic at the center back, through the legs, to the waist: at the center front.
  • Crotch point: Use a piece of narrow 1/4” twill tape and something like a large fishing weight to determine the location of the fork or crotch point where the seams meet at the top of the inseam, and the lengths for the front and back crotch. Cut the tape 30″ to 50″ long depending on your size. Place the weight on the tape and sew it at the center. Place the tape between your legs so that the , weight is at the fork or crotch point. Hold the tape snug, but not tight. Pin one end of the tape to the waist elastic at the center front. Pin the other end at the center back. Mark the twill tape at the waist, then remove the pins. Measure from the weight to the marks to determine the crotch lengths for the front and back.
  • Length measurements: For future reference, measure and record the length of the side seam from the waist to the crease at the back of your knee, the ankle bone, mid-calf, and the horizontal seam at the top of the shoe heel. If you like pants at a particular length not previously mentioned, measure for it also.

Adjust the Pattern

No matter what the pants style, the most flattering pants are wrinkle free and fit the body attractively. Compare the waist and hip measurements on the pattern to your measurements to determine whether your figure deviates from the “average” figure and how much the pattern needs to be adjusted. Then compare the measurements on the pattern to the measurements on the pattern itself to determine how much ease has been added for movement and style.

On most patterns, the waistband pattern is 1/2” longer than the waist measurement on the pattern but it can be as much as 1″ longer. Some of this ease is simply taken up by the bulk of the fabric, and the remainder allows you to move comfortably.

The measurement of the waistline seam on the pants is 1/2″ to 1″ longer than the seam on the waistband so that the pants can be eased to the band to fit the body more attractively. The hip measurement is at least 2″ larger than the hip measurement on the pattern.

Compare your front and back measurements to the measurements of the pattern pieces; and adjust the pattern as needed so it will fit as designed. Measure the crotch depth on the pattern, and compare it with your measurements. Add 1/2″ additional ease. If the crotch is too tight at the first fitting, you can lower the crotch easily; but, if it is too low, it is more difficult to raise it.

After the crotch depth has been adjusted, measure the crotch length on the front and back pattern pieces. Compare the measurements to your personal measurements. Adjust the pattern. For example, if you have a large abdomen and flat hips, the front crotch length will be too short and the back too long. Extend or shorten the seamlines as needed to make the adjustment. Redraw the inseams as needed.

Adjusting the crotch depth

Fine Tune the Back Fit

To shape the pants’ back so that the pants will fit smoothly and attractively over the buttocks and highs, you may need to modify the crotch and inseam on the back pattern.

The back inseam should be shorter than the front so that the front of the pants has enough ease to permit movement and prevent binding as you sit and walk. This also allows the back of the pants to fit the buttocks smoothly without wrinkling and bagging.

Before the cutting out the pants, stack the front and back pattern pieces so that the notches on the inseam match. If the back inseam is not shorter than the front inseam, measure and mark a point on the back inseam 1/2″ below the cutting line. Draw a new cutting line beginning at the marked point. Trim away the excess above the new cutting line.

New cutting point

After the pants have been cut, place the back sections with the right sides together on the ironing board. Beginning about 7″ below the waist, steam and stretch the curved section of the back crotch. When the curve is stretched, it will look like a backward “J.” To stretch the back inseams so that they are the same length as the front, steam and press from the inseam notch to the crotch. If there is no notch above the knee, stretch from the knee to the crotch.

Stretching the inseams

~Claire Shaeffer was a couture expert, educator, and author of many books on couture sewing techniques. She also designed couture patterns for Vogue Patterns and hosted videos on numerous couture topics.

January 30, 2026

Log Cabin Quilt: What’s in a Block?

Log cabin is one of the oldest, and easiest, quilt blocks—ideal for beginners, as it features only strips and squares. But do you know the story behind this commonly found block and its variations?

Log Cabin Quilt blocks

First appearing in the Civil War era, the quilt block may actually have a political connotation, as would-be officials ran as “log cabin candidates” hearkening to their rural roots.

The early log cabin quilts were a mix of silk, cotton, wool, velvet and shirting as the components reflected the available fabrics at the time. Most of the quilts were made from worn or discarded clothing, so the fabrics were repurposed. A bit later, calicos were introduced into the mix as fabric technologies improved.

In the middle

The center square of a log cabin block was traditionally red, symbolizing the hearth and fire that was the center of the home in pioneer times. Later, some log cabin quilt blocks used yellow squares in the center to symbolize light streaming in through the cabin windows.

Variations over the years

As fabric technology improved, so did the number of variations on the traditional log cabin block, so get out your graph paper and play with colors.

Traditional blocks showcase a bright center square and then diagonally half the block has “logs” of light colors, and the opposite half has logs of darker colors (1).

Log Cabin
1

 Sometimes the block center square is divided in half diagonally to reflect the light/dark color scheme (2).

Log cabin
2

 Strips (aka “logs”) are added around the center square in either a clockwise or counterclockwise sequence with seams pressed toward the addition.

Another variation on the block is called Courthouse Steps. This block is built by adding strips to opposite sides of the center square, alternating top-bottom with side-to-side. Keeping with the light/dark sequencing, a secondary hourglass shape is formed (3).

Log cabin
3

 Small squares, known as cornerstones, can be added to the “logs” before they are attached to the previous one, forming a secondary diagonal pattern in addition to the light and dark sequencing (4).

4

Depending on color placement, it’s also possible to create a spiral looking color pattern within the log cabin block.

Variations can also be constructed with the square portion not in the middle of the finished block (5).

Log cabin
5

Light and dark logs can be of differing widths on one or both sides of the starting square (6). Numerous variations can be made by changing the strip width, as well as the colors.

Log cabin
6

All set

Once you’ve created all the blocks for your quilt, the setting, or how you put them together, will also add additional patterning to the project.

Alternating light and dark placement result in a Straight Furrow setting.

Straight Furrow

Placing like values together creates secondary patterning of light and dark diagonal “squares”.

Log cabin light and dark diagonal squares.

If the blocks are assembled to make concentric squares within a larger square, the setting is called a Barn Raising.

Making the block

You really don’t need a pattern to make log cabin blocks. Simply cut a center square and start building out with the logs, choosing colors and widths as you please. After each addition, press the seam toward the added strip.

Continue alternating strips to get the block size you want. One block can become a pillow, multiple blocks can build a quilt. The world is your oyster in terms of color and patterning, so create something whimsical and lively, or something more somber and traditional.

If you feel the need, draw your block design and setting ideas on graph paper using colored pencils or crayons to help visualize the finished project.


~Linda Griepentrog is the owner of G Wiz Creative Services and she does writing, editing and designing for companies in the sewing, crafting and quilting industries. In addition, she escorts fabric shopping tours to Hong Kong. She lives at the Oregon Coast with her husband Keith, and three dogs, Yohnuh, Abby, and Lizzie. Contact her at gwizdesigns@aol.com.

  • 1
  • 2
  • 3
  • …
  • 68
  • Next Page »

Become a Member

Join the only national organization dedicated to Advancing Sewing as an Art and Life Skill.

Join Now button

Blog Article Categories

  • ASG Conference
  • Chapter Stories
  • Embroidery
  • Fitting
  • Learn to Sew
  • National Sewing Month
  • Products, Books, & Patterns
  • Projects
  • Quilting
  • Sewing
  • Sewing Techniques
  • Sewing Tips
  • Sewing Tours
  • Videos
  • Disclaimer
  • Privacy Policy

American Sewing Guild
National Headquarters
9660 Hillcroft, Suite 230
Houston TX 77096
713-729-3000 | 713-721-9230 Fax
www.ASG.org

ASG wordcloud - education, conference, discounts, videos, special offers, tours and more

Copyright © 1998–2026 · American Sewing Guild · All Rights Reserved