American Sewing Guild (ASG)

Visit our blog Visit the ASG Facebook page Visit ASG on Pinterest Visit ASG's YouTube channel Visit ASG on Instagram
  • Home
  • Join ASG
    • Join Online
    • Chapter Locations
    • Member Benefits
    • Member Brochure
    • Join by Mail
  • Education & Classes
  • Resources
    • Contests & Awards
    • Giving Back
    • Hall of Fame
    • Travel and Tours
    • Measurement Chart
  • Shop
    • ASG Store
    • Chapter Products
    • Video Resources
  • Blog
  • About
    • About Us
    • Donate to ASG
    • ASG Sensitivity Statement
    • FAQ’s
    • Start a Chapter
  • Contact
  • Member Login
    • Login First!
    • Members Only
    • Leadership Only
    • Website FAQ’s
    • Logout
  •  

October 24, 2025

Wrap Mastery: Fall Wraps & Shawls to Elevate Your Wardrobe

There’s something magical about the first real chill of fall. The trees are showing off, pumpkin spice has returned, and sewists everywhere are pulling out soft wools, plush knits, and cozy flannels. If you’re craving a quick, satisfying project that adds warmth and style to your wardrobe, a fall wrap, cover-up, or shawl might be just what you need. These pieces are endlessly versatile — part accessory, part statement, and all comfort.

Let’s explore some favorite styles and how you can make your own.

The Classic Rectangle Wrap

Think of the rectangle wrap as the “little black dress” of outerwear sewing — simple, timeless, and always right. It’s essentially a large piece of fabric that drapes elegantly around your shoulders, and yet it can look completely different depending on fabric choice and finishing. A simple rectangular wrap can be folded in half and belted for a cape-like look or draped over one shoulder with a brooch for instant sophistication. This shawl is the perfect excuse to add a new wearable art technique to your repertoire.

Best fabrics: Wool blends, cashmere, flannel, or heavier knits for warmth; lightweight challis or double gauze for transitional weather.

How to make it:

  • Cut a rectangle anywhere from 28″ to 42″ wide and 60″ to 84″ long. Shorter lengths make for a skimpier wrap that tends not to stay put.
  • When determining length, consider personal preferences (longer lengths tend to be more dramatic) as well as the proportions of the wearer (80″ of fabric can overwhelm a petite person).
  • Finish the edges with a narrow hem, fringe, or a decorative blanket stitch.
  • For added polish, consider adding a contrast binding or leather toggle closure.

The Ruana: The Best of Both Worlds

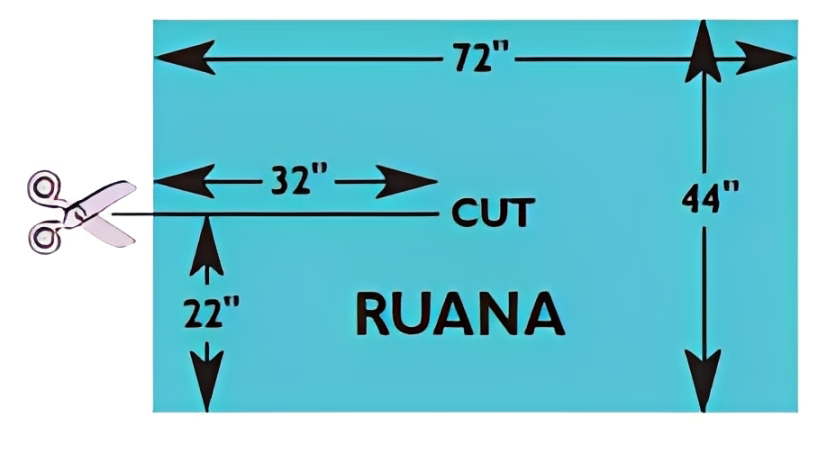
If a poncho and a shawl had a stylish child, it would be the ruana. Traditionally South American in origin, the ruana drapes beautifully while offering easy arm movement thanks to its open front. A ruana starts with about two yards of 45″-wide fabric.

For the simplest ruana, follow the diagram shown below. Try it on to check the proportions. If it’s too long, cut an equal amount off the lower edges on both front and back. Depending on your fabric, you may also want to cut away 2 1/2″ to 3″ on each side of the front opening so it falls smoothly around your neck. Finish all the raw edges. If it suits the fabric, consider self-fringe for the lower edges. The ruana looks equally great tossed over jeans and boots or layered over a dress. You can add a belt for shaping or even line it with a contrasting fabric for a fully reversible version.

Cocoon Wrap

The cocoon wrap also begins life as a flat rectangle. It is constructed with a front opening that goes approximately one-third up the length of the fabric and has side seams with deep armhole openings. When it is on the body, the short neck opening causes the garment to shift so that it is longer in the back. The front opening will cascade into a lapel-like effect. It’s beautiful in a variety of fabrics, including wool, lightweight wovens, and sheers. If you’re a frequent airline traveler, consider making one in fleece so it can serve as a combination traveling cloak and blanket.

The Poncho-Style Cover-Up

A poncho is like a wearable hug — roomy, stylish, and surprisingly easy to sew. You can make one with minimal shaping, no pattern required.

How to make it:

  • Start with a square or rectangle of fabric about 45″–50″ wide and long.
  • Fold it in half and cut a small neckline (try a shallow oval about 6″ wide).
  • Finish the neckline with bias binding, a facing, or even a cozy turtleneck collar cut from a rib knit.
  • For extra flair, add side seams with button or snap closures, leaving 8–10 inches open at the bottom for movement. Try sewing it from plaid flannel for a casual vibe or boiled wool for something more refined.

Pro tip: Fringe or decorative topstitching around the edges adds a custom touch without much effort.

Triangles make great wraps, too.

The easiest shape is a square, folded diagonally. Let the width of the fabric (48″, 54″, or 60″) dictate the size of the square. If you are embellishing your shawl and want to conceal its wrong side, cut two triangles, embellish one, and then sew the two together. Using the cutting diagram below, 3 1/2 yards of 45″-wide fabric will give you two ample triangles. If you want the shawl to have a larger presence, add fringe to the outer edges.

 The Capelet: Small but Mighty

When you want just a touch of warmth without overwhelming your outfit, a capelet hits the sweet spot. It’s shorter than a cape and perfect for highlighting collars, buttons, or jewelry.

Sewing inspiration: Use a pattern designed for wovens or repurpose a vintage coat pattern by cropping it to shoulder length. Lightweight wool, boucle, or quilted fabrics are excellent choices. Add details like a Peter Pan collar, large buttons, or a satin lining for a polished finish.
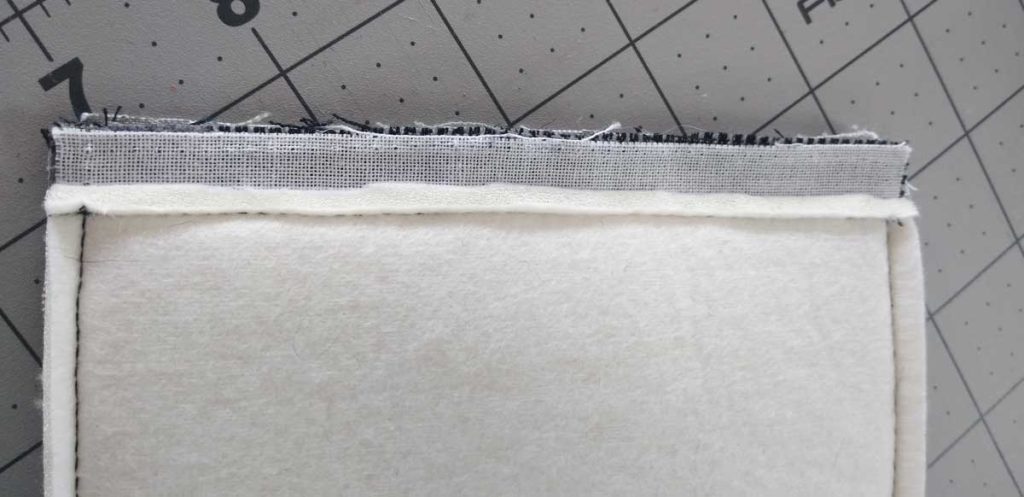
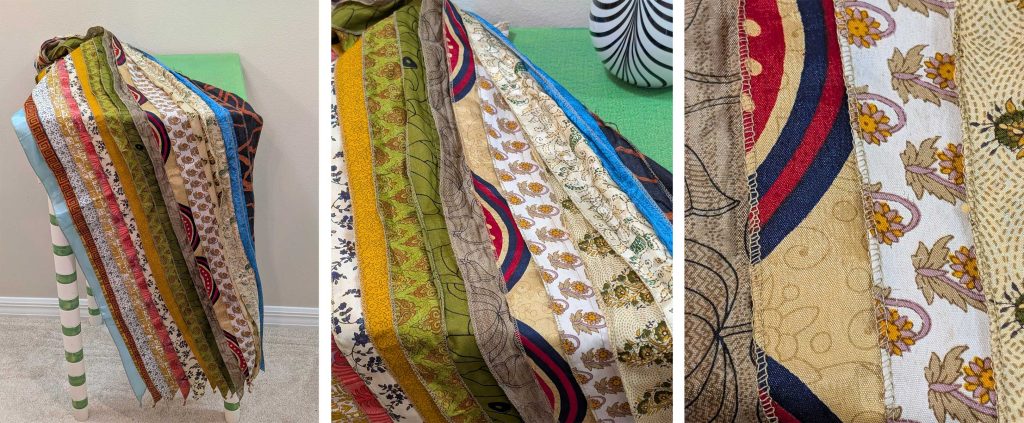
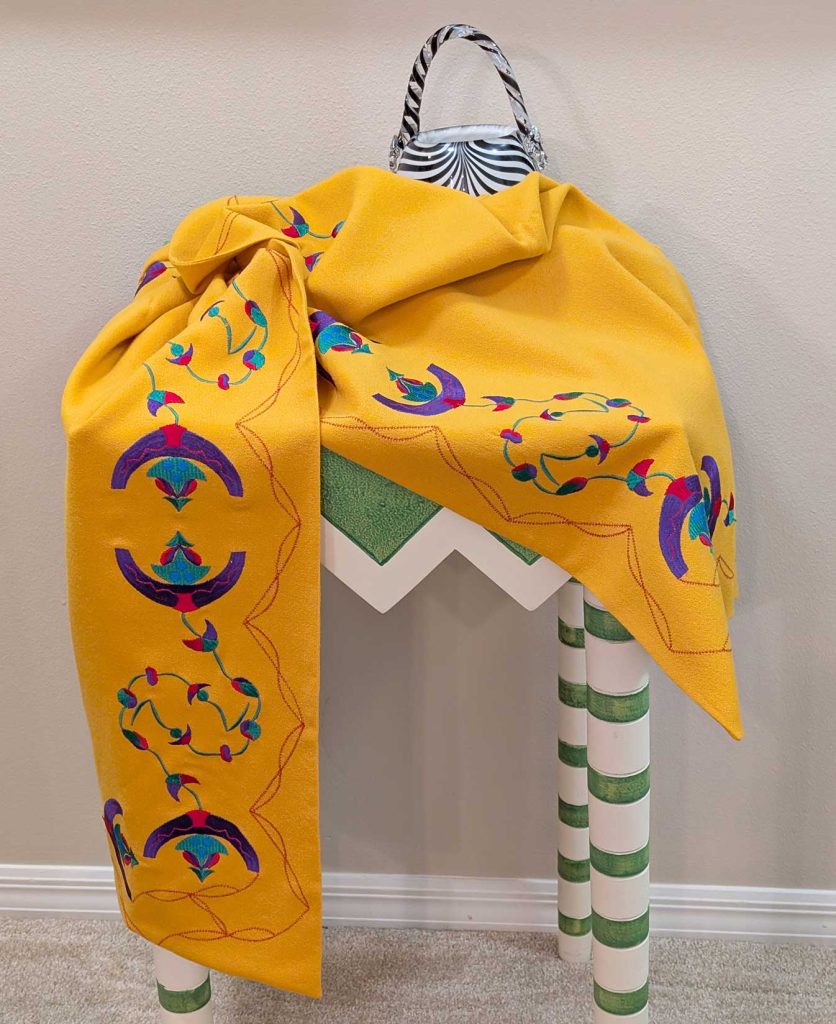
The Shoulder Wrap

Larger than a scarf, but not a full shawl, this is great to wear as an accessory or to ward off a bit of chill in the air. The one pictures is approximately 7′ long and 20″ wide and is made from folded strips of fabric that are serged together.

The Blanket Scarf Shawl

If “cozy chic” is your fall aesthetic, the blanket scarf shawl delivers in spades. Oversized and effortlessly fashionable, it’s perfect for layering and snuggling.

How to make it:

  • Cut a large square, about 50″ x 50″.
  • Fringe the edges or hem them narrowly.
  • For a reversible twist, sew two coordinating flannels or lightweight wools wrong sides together, turning and topstitching around the edge.
  • Wear it diagonally across the body, belted at the waist, or simply draped around the neck. It’s one of those accessories that looks like you “just threw it on” but makes any outfit instantly more stylish.

Fabric and Finish Ideas

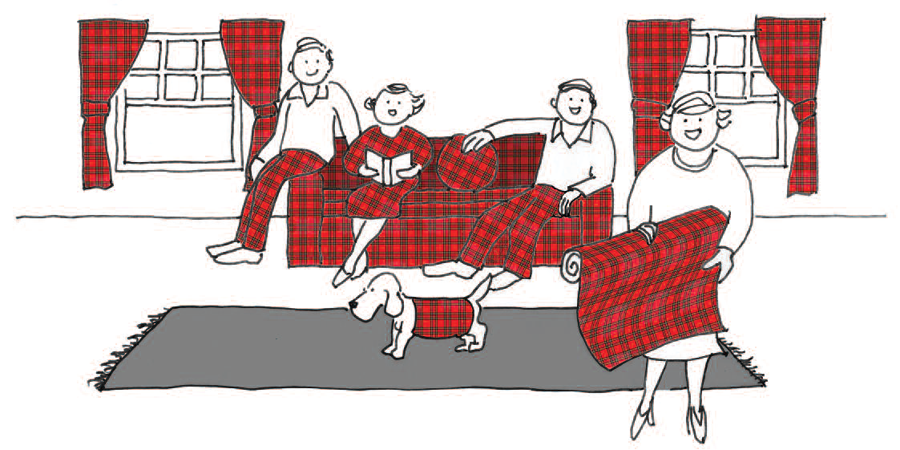
  • Plaid flannel: Classic and cozy — just be sure to match those checks!
  • Sweater knits: Drape beautifully and require minimal sewing.
  • Boiled wool: Doesn’t fray, so you can leave raw edges for a modern, minimalist finish.
  • Tweed or boucle: Add instant texture and luxury.
  • Try embellishing your wrap with appliqué, embroidery, or even a few hand-sewn beads for a personal touch. A coordinating pin or handmade belt can also transform the look.

 Embellishments

When it comes to embellishments, it’s a big wide world. Here are just a few ideas:

  • Fabric dyeing. If you can’t find the colorway you desire, you can tie-dye, vat dye, sponge print, or even spray die to get the print and colors that suit your fancy.
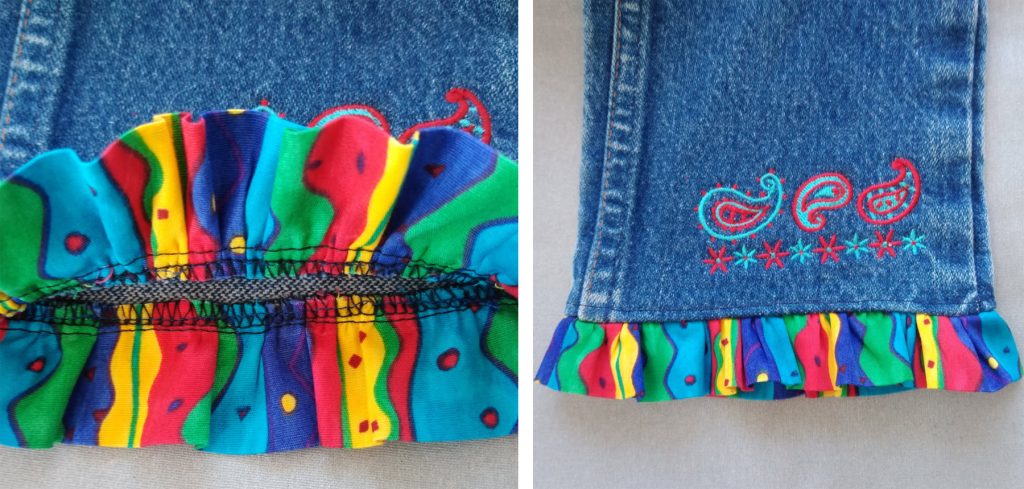
  • Machine embroidery. With limitless possibilities, the only caveat is to pay attention to scale and/or repetition so the motif doesn’t disappear into the folds of your wrap. And think about how your finished wrap will look on both sides. If this is a problem, consider these two solutions: create free-standing machine embroidery motifs that can be appliquéd in place or line/self-line the wrap.
  • Edgings. Ruffles, feathers, fringe, pleating, beading, even embroidered appliques are all fabulous ways to define the edges of your wrap.

Wrapping It Up (Pun Intended)

Fall sewing is all about comfort meeting creativity. Wraps, cover-ups, and shawls are ideal projects whether you’re a beginner looking for a no-pattern project or an experienced sewist seeking to play with texture and design. They’re quick, functional, and satisfyingly stylish — the sewing equivalent of a warm cup of cider. So go ahead: pull out that fabric you’ve been saving, grab your rotary cutter, and make yourself something fabulous to bundle up in. When the leaves fall and the air turns crisp, you’ll be wrapped in your own handmade warmth — and style.


October 17, 2025

Q&A: Jeans, Grommets, & Invisible Zippers, Oh My!

We receive numerous sewing queries and many require relative short answers, so check out our Q&A for some timesaving tips.

Q: My granddaughter’s jeans keep looking too short for her as she grows taller. Is there a quick way to add length instead of just cutting them off for shorts?

A: Absolutely—when kids grow taller rather than wider, there’s no need to ditch the pants quite yet. Add a ruffle to the lower edge and tie it in with an embroidered motif. Open up the inseam for easy access for embroidering the motif, then measure the leg circumference to figure the ruffle amount needed. Each ruffle piece should be about 2 ½ to 3 times the width of the jeans leg circumference. Cut the piece twice the desired finished length, plus seam allowances.

After embroidering, stitch up the inside leg seam to form a circle and trim off the bulky jeans hem. Sew the ruffle short ends together to form a circle. Fold the ruffle strip in half wrong sides together and press.  Quarter-mark the leg opening and the ruffle raw edges. Sew a gathering thread around the ruffle raw edges and pull up to match the leg circumference. Matching the quarter-points, pin the ruffle to the jeans leg right side, pulling up the gathering thread to match the leg width. Stitch the ruffle in place, then serge or zigzag the raw edges together. Topstitch, if desired. Repeat for the second leg. This adds a few more months of growth room to the jeans!


Q: I’m scared to put in grommets. Any advice?

A: Grommets can be scary since they’re usually inserted when your project is otherwise completed, so one slip-up can potentially ruin the entire thing. But, never fear, you can do it!

Image courtesy of Bernina

Grommet insertion processes can vary slightly by brand, but here are some general hints:

  • Be sure the area where the grommets are placed is reinforced with added interfacing, batting or multiple fabric layers (like a facing) to strengthen it. Your pattern should give you guidance on the best option.
  • Carefully mark the center of each grommet location, trace the template and cut the appropriate size hole. Be careful not to cut the hole too large!
  • Note that grommets have both a male and female portion and you need one of each for every grommet opening.
  • Use the appropriate tool or pliers to apply your particular grommet brand. Test on a scrap of fabric with the same number of layers prior to starting on your project.

Q: I love the look of invisible zippers, but I never seem to get the stitching close enough to the coils to make it truly invisible. Can you help?

A: Invisible zippers create a professional looking garment when they’re installed properly. The key is to stitch as close to the coils as possible using a specialty presser foot. This foot is can be an accessory for your machine, or some are sold by the zipper manufacturer, and it “rolls out” the zipper coil so you can stitch close to it without catching the teeth. The teeth travel in a groove under the presser foot, and in conjunction with adjusting the needle position, you should be able to stitch close enough to hide the zipper teeth. On lightweight invisible zippers, it helps to hold the coils in their rolled out position as they feed into the foot groove. If you’re not comfortable with your fingers that close to the needle, use an awl for that process to keep them in place for stitching.

Image courtesy of Bernina

If you don’t have a special foot for installation, use your regular zipper foot and adjust the needle position to be right next to the coils, then manually roll out the coils and stitch along the base of the coils.

If your zipper pull doesn’t quite blend with the fabric, think about using nail polish to match it up.


~Linda Griepentrog is the owner of G Wiz Creative Services and she does writing, editing and designing for companies in the sewing, crafting and quilting industries. In addition, she escorts fabric shopping tours to Hong Kong. She lives at the Oregon Coast with her husband Keith, and three dogs, Yohnuh, Abby, and Lizzie. Contact her at .

October 10, 2025

Seeking Creativity

The first time he walked by me, I wasn’t sure he even saw me. The second time, he did glance my way.

The third time, however, he paused and asked, “Are you OK?”

“Yes,” I replied, and he walked on.

Woman hugging fabric

But it was the fourth time that he stopped and said, “What are you doing? Why are you just sitting there holding fabric?”

“Seeking creativity,” I responded.

The look on his face told me he didn’t understand, and no matter what I said, I knew he would never understand. Despite the fact that we have been together for nearly 50 years, he still doesn’t “get” my fascination with fabric. How could he? He has never sewn. He has never held a cozy velour and fantasized about all it could be—a jacket, a top, a robe, even a pair of pants.

He doesn’t understand the loving effort it takes to select the perfect embroidery design to use to embellish an otherwise plain fabric. He doesn’t understand the enjoyment of seeing the design come to life as the stitches form.

How could I explain to him the multitude of possibilities that were racing through my mind for that one piece of fabric? My imagination had been nearly overwhelmed with all the potential. I could make that fabric into anything I wanted. I could select the type of garment. I could select the pattern and cut. I could make changes that even the pattern designer never dreamed of. I just needed time to sit and think and hold the fabric . . . time to dream.

I suddenly had a flashback to my ninth grade home ec class when my teacher told us to ask the fabric what it wanted to be. She told us to hold the fabric and talk to it. I remember thinking she was nuts. I remember the look we gave her.

That was the same look on his face. Oh no, did he think I was losing it? Was he going to start watching me for signs of dementia? I quickly recovered and said, “I’m just tired. I got this fabric out to make something and am just resting a minute before I climb the stairs to the sewing room.”

Relief flooded his face. Resting for a minute was something he could understand. “Oh,” he said, and off he went to his computer.

No, he would never understand my fascination with fabric or the process of creativity. He would not be able to talk the talk of designers. He would never just sit with me and experience the feel of a fabric. This was not something we could ever share. But that was OK. I was not alone. I picked up the phone and called an ASG sister.

There are just some things that only another sewer can understand.


Sometimes, we dig through the archives and find an oldie-but-goodie that we feel needs shared again. This article was written by Rosemary Fajgier who was a Princeton, N.J. Chapter founding member, was president of her chapter for four years and also served on the ASG National Board of Directors (BOD) as well as serving as National BOD Chair.

October 3, 2025

Taming Bulky Seams

It’s not often that I write about my personal sewing projects, but I’m currently making bags for our community’s upcoming holiday market, and I’ve been stitching up some very thick seams.

All patterns from Noodlehead Designs

I’m making Oxbow Totes, Sandhill Slings and Making Backpacks, all from Noodlehead Designs, and some of the seams are really thick—like eleven strata thick with multiple canvas, interfacing, foam, lining and webbing layers stacked atop each other.

This isn’t the only time our machines (and our patience) are called upon for thick seaming. Have you tried hemming denim jeans and cautiously approaching the flat-felled seams on the inner and/or outer legs? That can be a bit of a scary moment.

There are some challenges with thick seams, and sometimes some broken needles, but generally most of today’s sewing machines are up for the challenge if you follow some simple guidelines.

Be Thick Smart

  • Make sure your machine is clean, oiled and lint free. Snap off or unscrew the needle plate and brush out the lint and threads that have accumulated below. Follow the manufacturer’s guidelines for oiling to keep things running smoothly.
  • Use a new needle in a size large enough to accommodate the maximum number of fabric layers. Note that the needle can be a Universal, Denim or Sharp point, depending on the fabric density.
  • Swap out pins for spring clips to hold multiple layers in place. Pins will only bend as they try to secure too many layers. Spring clips are available in different sizes to “bite” various thicknesses. Stitch up to the clip, then remove it before continuing the stitching line.
  • If you have the option, set your machine for the “needle down” function. Keeping the needle in the fabric as you stop to adjust layers helps maintain an even seamline.
  • Use a longer than normal stitch length for construction and topstitching heavy layers and slow the stitching speed.
  • If you have a walking foot or dual-feed system, both can be helpful for even feeding of stacked layers.
  • Adjust the presser foot pressure on your machine if you can. Lighter pressure helps keep multiple layers from scooting as you sew seams.
  • Don’t push or pull the seams as you sew them. Let the machine feed dogs move the fabric through the machine at an even pace.
  • Use the handwheel to stitch to through extra-heavy areas or when you come close to zippers and/or fragile or bulky hardware areas.
  • Topstitch to help hold layers flat, whether seam allowances are pressed in one direction, or opened.
  • If you’re stitching various thicknesses in one pass—like hemming jeans over bulky seams—use a height compensation tool to stitch onto and off the extra-bulky areas. You may have one of these devices with your machine accessories, or you can purchase a generic version.
Bernina Height Compensation Tool
  • Always grade and/or trim seam allowances to reduce bulk. When grading seams, the layer closest to the outside of your project is left the longest, and the seam allowance widths get ever-so-slightly narrower as you work your way to the most inside-facing seam allowance. This helps to taper the bulk and avoids a sheer “drop-off” where all seam allowances end.
  • Anytime you can, reduce bulk by eliminating some layers from within the seam allowance. For example, trim foam to keep it outside the seamline or perhaps just barely caught in stitching to hold it in place.
  • If you do break a needle, be sure to carefully remove the broken bits so they don’t lodge in the bobbin area of the machine wreaking havoc.
  • For handwork areas, use a thimble to avoid piercing your fingertips while trying to push the needle through thick layers.
  • Fill the iron with plenty of water and press every seam in bulky fabrics. You’ll have much better control of the project than if you don’t press as you sew.

Following these simple tips can reduce your stress when sewing bulky seams and add a more professional look to your project.


~Linda Griepentrog is the owner of G Wiz Creative Services and she does writing, editing and designing for companies in the sewing, crafting and quilting industries. In addition, she escorts fabric shopping tours to Hong Kong. She lives at the Oregon Coast with her husband Keith, and three dogs, Yohnuh, Abby, and Lizzie. Contact her at .

September 26, 2025

Tips for Professional Results with Pants

Sewing pants can be as simple or as challenging as the style you choose. For results that look truly professional, concentrate on three essentials: precise preparation for fit, skillful execution, and flawless finishing. Meticulous pressing, accurate cutting, and well-placed fitting adjustments are the details that elevate your work from homemade to high-end.

  • Cut with precision on the grain. Carefully align your pattern pieces with the fabric’s grainline to ensure the pants hang correctly and avoid leg twist, which is especially important for tight-fitting pants with stretch. 
  • Press every seam as you sew. First press the seam flat to “set” the stitches, then open the seam allowances and press them flat.
  • Pocket openings should lay flat against the body.
  • To avoid ripples in your seams when stitching, apply a bit of pressure to the seam on each side of the needle as you are sewing.
  • Handle waistbands with care: Use a medium-weight, not-stiff interfacing for your waistband. For a perfect fit, divide the waistband and pants in fourths to align and distribute gathers or ease evenly. For elastic waistbands, use wide elastic in a snug casing to prevent twisting. 
  • For a clean finish on a fly-front zipper, interface the facing for extra stability and use a template when topstitching.
  • Reinforce the bottom of the fly front curve with bar tacks using a dense zigzag stitch. This secures the zipper shield and reinforces a high-stress area.
  • Pants should be hemmed with a slight angle to the back, with no more than a 1/2″ to 1″ hem. However, note that in some cases, a deeper hem will give more weight and help the pants hang better.
  • Pleats should be pressed flat above the crotch line. If you like the crease in the pants to run the entire length of the leg, it should merge with the crease in the pleat.

Suggested Seam Allowances

Professional designers can often spot a home-sewn garment by its standard 5/8″ seam allowance, which can influence how the seam—and even the entire garment—hangs. The graphic below highlights the seam allowances more commonly used by designers.

A Bunch of Tips to Sew Better Pants

Cornelius Quiring started a personal journey to create adaptive clothing to fit his own body that had been damaged in a farm accident. His learning process has evolved into fitting and sewing tips that he shares with his viewers. This video shares tips on adjusting waistbands, crotch seams, and more.  


  • 1
  • 2
  • 3
  • …
  • 66
  • Next Page »

Become a Member

Join the only national organization dedicated to Advancing Sewing as an Art and Life Skill.

Join Now button

Blog Article Categories

  • ASG Conference
  • Chapter Stories
  • Embroidery
  • Fitting
  • Learn to Sew
  • National Sewing Month
  • Products, Books, & Patterns
  • Projects
  • Quilting
  • Sewing
  • Sewing Techniques
  • Sewing Tips
  • Sewing Tours
  • Videos
  • Disclaimer
  • Privacy Policy

American Sewing Guild
National Headquarters
9660 Hillcroft, Suite 230
Houston TX 77096
713-729-3000 | 713-721-9230 Fax
www.ASG.org

ASG wordcloud - education, conference, discounts, videos, special offers, tours and more

Copyright © 1998–2025 · American Sewing Guild · All Rights Reserved