American Sewing Guild (ASG)

Visit our blog Visit the ASG Facebook page Visit ASG on Pinterest Visit ASG's YouTube channel Visit ASG on Instagram
  • Home
  • Join ASG
    • Join Online
    • Chapter Locations
    • Member Benefits
    • Member Brochure
    • Join by Mail
  • Education & Classes
  • Resources
    • Contests & Awards
    • Giving Back
    • Hall of Fame
    • Links
    • Travel and Tours
    • Measurement Chart
  • Shop
    • ASG Store
    • Chapter Products
    • Video Resources
  • Blog
  • About
    • About Us
    • Donate to ASG
    • ASG Sensitivity Statement
    • FAQ’s
    • Start a Chapter
  • Contact
  • Member Login
    • Login First!
    • Members Only
    • Leadership Only
    • Website FAQ’s
    • Logout
  •  

July 5, 2024

Linen Placemats for Dress Collar & Cuffs

To add an easy heirloom look to a child’s dress, use two pre-made, hemstitched linen placemats on the collar and cuffs.  Two placemats will provide enough fabric for the collar, cuffs, corded piping, covered buttons, and even a matching headband.

Linen Placemat Collar

Supplies

  • 2 Linen placemats
  • Commercial dress pattern with high bodices front and back
  • Dress fabric
  • Any additional items as noted on pattern
  • Your choice of embellishments, if desired

Placemats can be new or reused from placemats found in your closet, thrift stores, or a retail store. To personalize the finished garment, add fabrics, trims, buttons, or embroidery. Your imagination is the only limit to creating a treasured garment, accessory or treasured gift.

Linen Placemat

Collar

1. Start by cutting out a complete front bodice from the pattern.

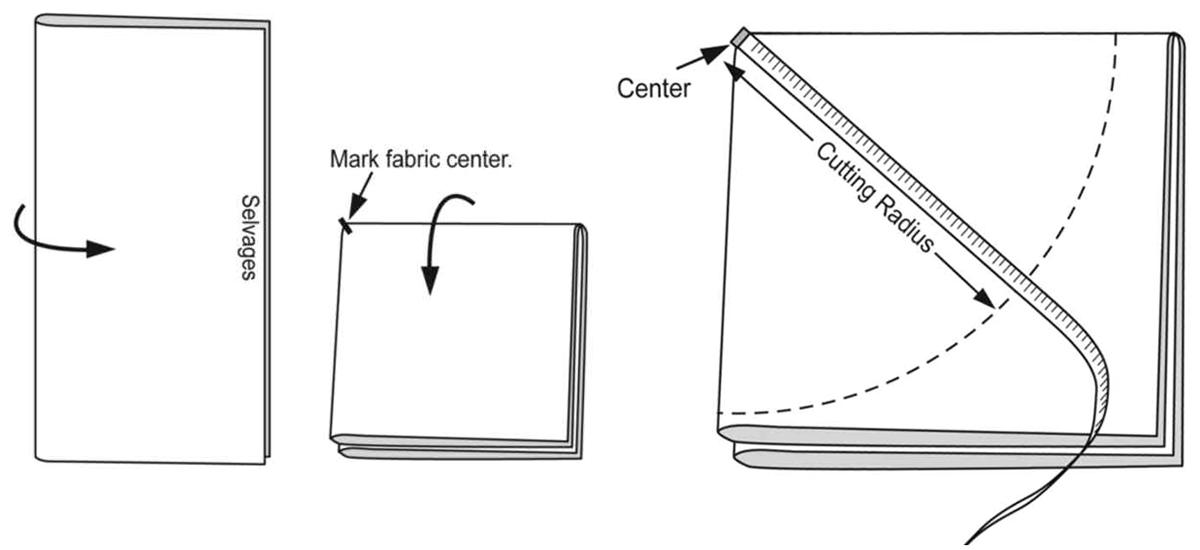
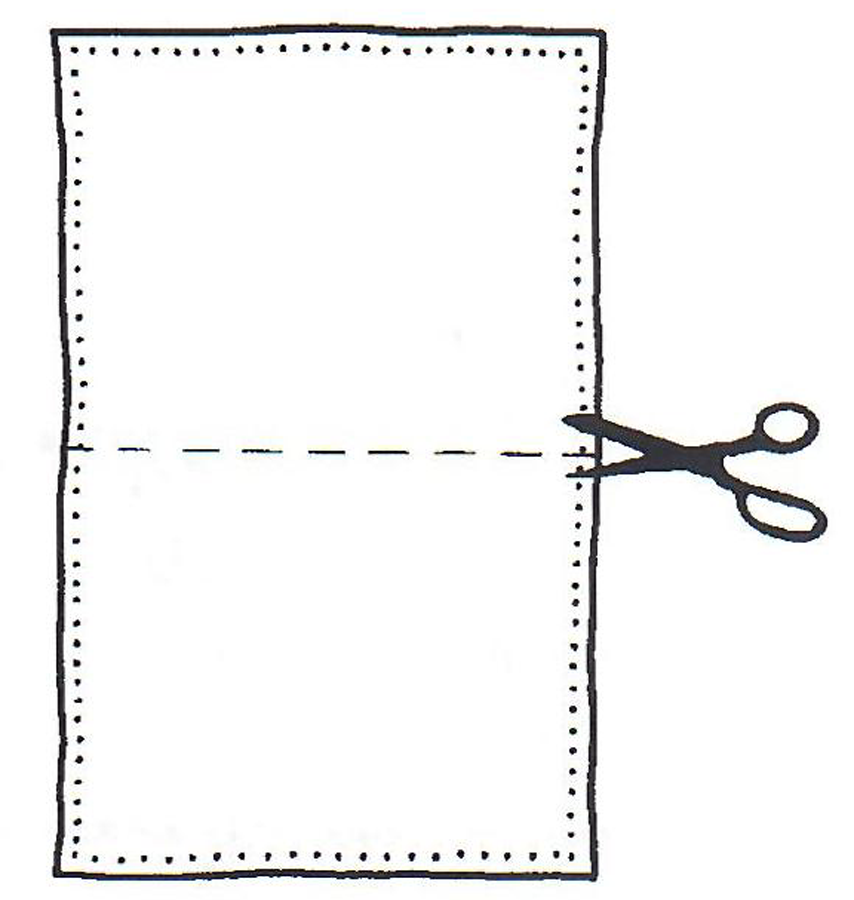
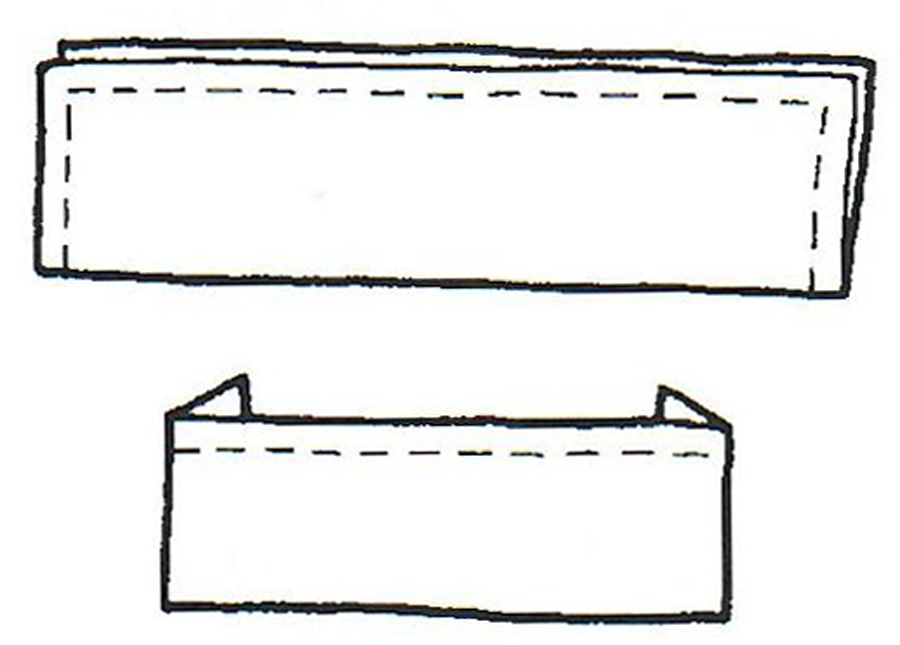
2. Clean and starch the placemats, then one of the placemats in half crosswise across the short length. (Figure 1)

Figure 1

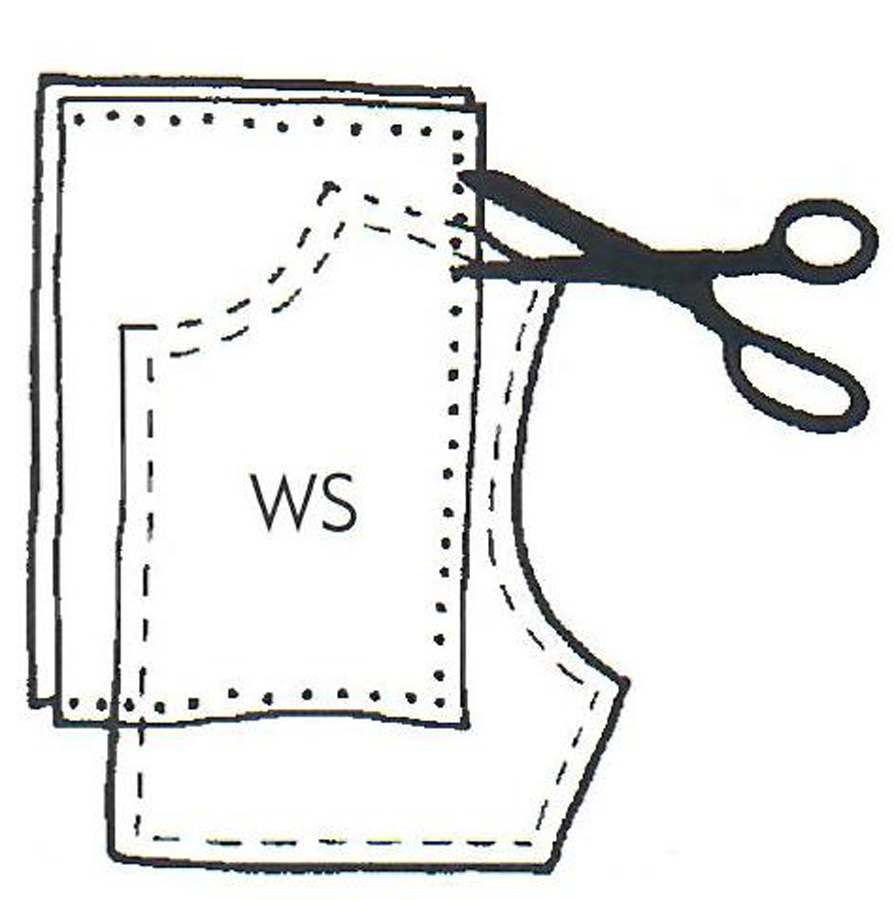
3. To make the collar, pin one of the placemat halves over the front bodice. Adjust the collar length either to show or cover the bodice seam. Trim the placemat along the neck and shoulders. (Figure 2)

Figure 2

4. Cut the second placemat half in half crosswise in the same manner as the first placemat. (Figure 3)

Figure 3

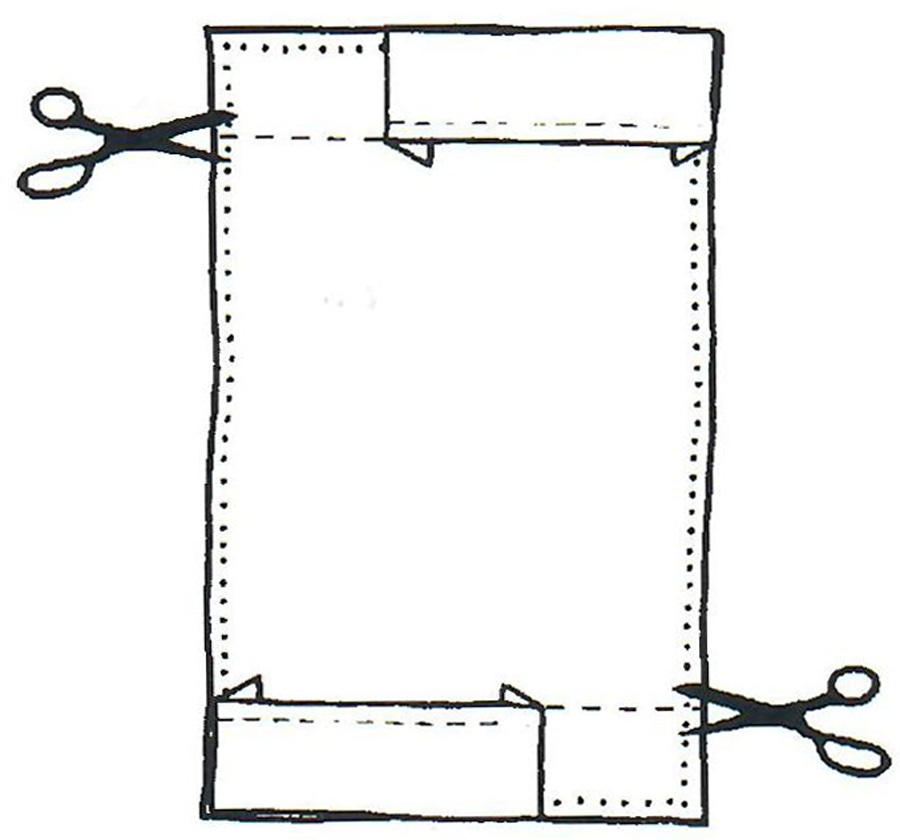
5. Put these two placemat pieces right sides together and pin them to the back bodice, adjusting shoulder width and collar length to match the already cut front collar. Trim placemat pieces along neck, shoulder and, if necessary, the center-back edge. (Figure 4)

Figure 4

6. French-seam the collar front to the back at the shoulders, pressing seam allowances toward front. Narrowly hem each collar back edge, using the 5/8″ seam allowance.

7. Baste the collar to the bodice neckline, both right sides up, matching center fronts and shoulder seams. The collar neckline will be finished simultaneously with the dress neckline.

Cuffs

8. Fold the cuff pattern along fold line, then fold away seam allowances at short ends. (Figure 5)

Figure 5

9. Pin the cuff long folded edge to a short end of second placemat, then cut all the way across placemat end. Repeat to cut second cuff across opposite placemat end. (Figure 6)

Figure 6

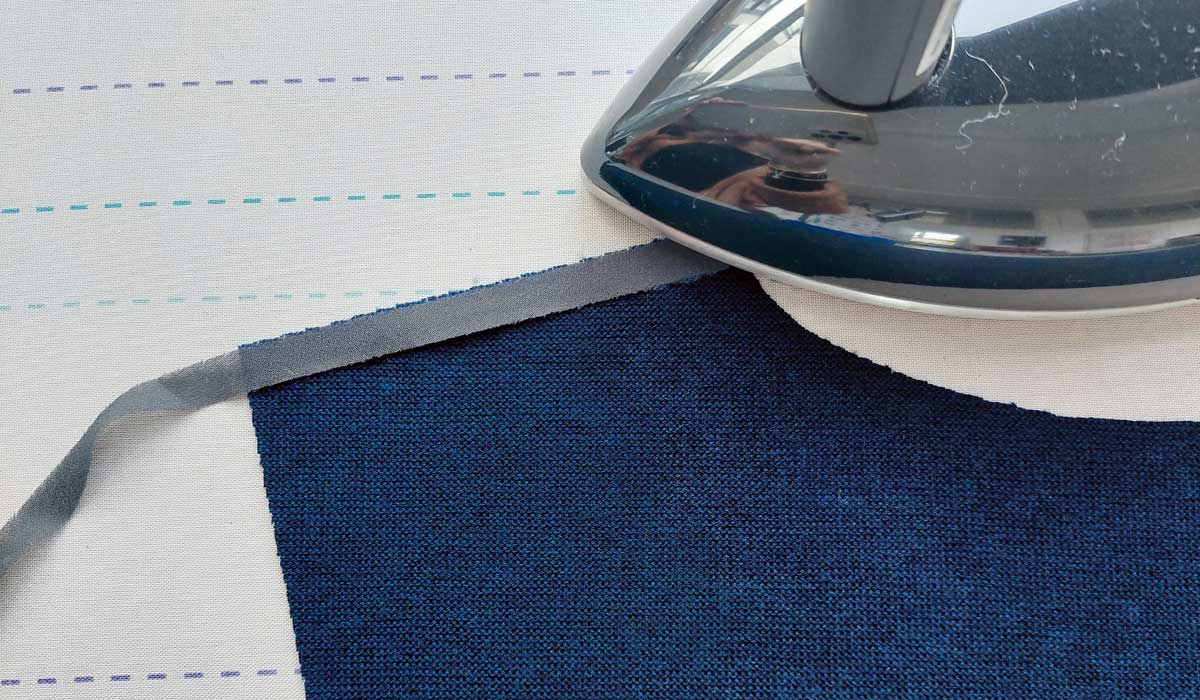
11. If the placemat piece is longer than the cuff pattern, press the extra amount to the wrong side on the cuff’s underlap (button) end. Tack this folded amount or fuse using paper-backed fusible web.

12. Sew each cuff to a prepared sleeve edge. Serge or trim-and-bind this seam allowance since it will be visible.

13. To reinforce a single fabric layer, pin two rectangles under each cuff’s buttonhole area. Sew the buttonholes, then trim interfacing close to the stitching.


~Adapted from an article from Affordable Heirlooms, printed with permission

Did you enjoy this article?
Are you an ASG member?
This field is for validation purposes and should be left unchanged.

June 28, 2024

Little Bits (of knowledge) to Make Your Sewing Easier

Sometimes all it takes to make a task easier is just a little bit of information or a short helpful hint. As members of the American Sewing Guild, that’s what the alliance is all about—sharing better and easier ways to do things. So let’s look at some helpful hints and tips to make our sewing lives run more smoothly:

— If you need colored elastic and your fabric store doesn’t stock it, look for ponytail holders and/or elastic hairbands at your local dollar store. Both come in a wide assortment of colors and they’re perfect to use for a variety of sewing tasks like button loops, belt loops, etc. where the elastic is visible.

Hairbands available from your retailer or on Amazon.

— When you stitch a dart, avoid a lump at the pointed end that sometimes happen with backstitching. To secure the end of the dart, simply shorten your stitch length down to 1 as you approach the point. No need for an abrupt ending or backstitched lump. This same technique can be used at the beginning and end of a seam as well.

— Got leftover soap slivers in your bathroom or kitchen? Use them for marking design details on garment fabrics. They’re also great as pincushions to lubricate pin points and making pinning easier.

— Need to stitch a straight line that’s too far in from the edge to use your seam guide? Head for the hardware store (or the garage) and get some painter’s tape. Place it where you need it and use the straight edge as a guide for your stitching. If you’re doing multiple rows of stitching, after you’ve done the first one, use the presser foot edge to space the remaining rows, or another strip of tape, depending on the distance. Painter’s tape pulls off easily without damaging most fabric surfaces, but test first on anything with pile, sequins or other delicate finish.

— A fun travel tip: Use the holes in a large button to keep earring pairs together in your suitcase.

— To safely cut open a buttonhole, place a straight pin at the ends of the stitched buttonhole and use your seam ripper to cut from the middle toward each end. The pin will stop you from slicing through the end stitching and making a creative opportunity repair.

— Think about using dental floss anywhere you need a heavy thread. It’s ideal for gathering over or for sewing on metal buttons that tend to cut threads.

— If you’re having trouble moving your fabric evenly for free-motion stitching, use a new sponge in each hand for added grip of the fabric surface.

— Not sure what color thread to use to sew on a multi-color trim? Opt for invisible monofilament, as it spans all colors and virtually disappears. Check for clear or smoke, depending on your trim color and pair it with regular thread in the bobbin to match the fabric base color.

— If you do a lot of sewing, pre-wind bobbins in common colors you use frequently. Or purchase pre-wound ones that fit your machine.

Pre-wound bobbins available from your retailer or on Amazon.

— If you’ve got a new sewing machine, make a stitch sampler for handy reference. Just sew rows of all the stitches side by side and label with the name/number so you know what the stitch looks like when it’s actually sewn as opposed to just the schematic on the machine. For best results, use two layers of fabric with interfacing between.

— To help extend the life of your good sewing shears, wipe off the blades after each project you cut out. Manmade fibers can build up on blades and dull them more quickly.

— Working on a really bulky napped fabric, like fur or sherpa? Use flat flower-head pins for easier visibility. Regular pins can get lost in the pile.

Flat, flower-head pins available from your retailer or on Amazon.

— To adjust the tension on your machine, put a different color thread in the bobbin from the needle. That makes it easier to see any imbalance and you’ll know how to adjust it for perfect stitching.

— Whenever possible, end topstitching into a seam. If that’s not possible, leave long threads at each end, thread them into a hand-sewing needle and bring them to the underside of the fabric and tie off to secure.


~Linda Griepentrog is the owner of G Wiz Creative Services and she does writing, editing and designing for companies in the sewing, crafting and quilting industries. In addition, she escorts fabric shopping tours to Hong Kong. She lives at the Oregon Coast with her husband Keith, and three dogs, Yohnuh, Abby, and Lizzie. Contact her at .

June 21, 2024

How to Create a Round Tablecloth

Creating a custom tablecloth for your round dining table not only adds a personalized touch to your home decor but can also be the base to transform an “ugly duckling” table to a touch of elegance. Whether you’re looking to enhance your dining experience for everyday meals, are hosting a special occasion, or sprucing up an outdoor table for a summer dinner on the patio with friends, a beautiful tablecloth can bring elegance and charm to your setting. With a few basic sewing skills and an easy cutting method for round cloths, you’ll be able to create a beautiful tablecloth that fits your table perfectly and showcases your personal style.

Outdoor set dining table

Measuring

Start by measuring the diameter of the tabletop through the center of the table from edge to edge, then divide this number in half to find the table’s radius. For example, if your table is 36″ wide, the table’s radius is half of that, or 18″.

Tablecloth length exampleNext, you’ll determine the side drop, which is the measurement from the top of the table to the bottom length for how low you want the tablecloth to hang.

  • For a casual look, a drop of 6″ to 10″ is standard.
  • For a more formal look, a drop of 15″ is a good choice.
  • For an elegant look, go for floor-length which is usually 30″.

Once you’ve chosen your desired drop length, you can calculate the tablecloth’s cutting measurement by add together the tabletop radius + the drop measurement + the hem allowance.

Yardage

The following table will help you determine how much fabric you need. This also shows how much trim you’ll need for the edges if you choose to add it.

Round tablecloth yardage chart

Cutting

Fold your fabric in half lengthwise, matching the selvage edges, then in half again, matching the cut edges this time. Then use a pin to mark the folded corner (fabric center). Pin your fabric around the edges to make sure it does not shift. Then position one end of a tape measure at the marked corner fold. Use the tape measure like a compass and mark the cutting radius every few inches, creating a pie-shaped cutting line. Finally, cut through all four layers of fabric at once along the marked line.

Folding & cutting fabric for a round tablecloth

Finishing the Edge

Depending on your final look, choose a narrow hem for this finish, which could include a contrasting thread color, embroidery, decorative stitching, or a unique trim. You can also serge the edge for lighter finish.


June 14, 2024

Sewing Q&A: Stay Tape, Freestanding Embroidery, Pinking Shears, & Selvage

I’ve heard about using stay tape when sewing on knits, but I don’t really know how. Can you help?

Stay Tape (photo courtesy oF Bernina)

Stay tape is used to keep seamlines from stretching, especially on knit fabrics, but also on loosely woven fabrics. Without stay tape, some seams can ripple and distort during stitching, especially those on the crosswise grain of the fabric.

Stay tapes can be constructed two ways—woven or knit—and most are fusible. Woven tapes are good to use on straight seams, as they do not flex around curves, like armholes, where knit ones are a better choice. In addition to shoulder seams, stay tapes can be used on garment openings and to stabilize a zipper placket. Wrap garment bodices are also an ideal place to use stay tape so they hug the body without gaping.

Stay tapes come up to 1” wide, depending on your pattern’s seam allowance width. The wider tapes are ideal to stabilize a hemline in knit fabrics, preventing rippling when you topstitch.

Follow the manufacturer’s instructions to apply the stay tape, but be sure it is wide enough to span the seamline on the garment wrong side. On very loosely woven fabrics, measure the stay length on the original pattern piece and ease the cut fabric piece to fit that size.

I’m new to machine embroidery and wondering what “freestanding embroidery” means?

Freestanding Embroidery (images courtesy of Bernina)

Most machine embroidery designs are made to be sewn to a fabric base to help support the stitches and keep the motifs in shape. However, some digitizers create designs that can stand alone, without a fabric base. This is done by adding additional supporting stitches to the embroidery during its creation.

Freestanding designs are sewn on an easily removable stabilizer (water- or heat-soluble), so once that is removed, all you see are threads of the stitches. These types of designs are often used for creating jewelry, mats, 3-D pieces, baskets, etc. where there is no visible background.

While you can stitch a freestanding motif on a fabric base, you cannot stitch a regular motif onto a totally removable stabilizer and expect it to maintain its integrity, so look for specially marked freestanding designs for this technique.

A friend told me that I need to have a pair of pinking shears. Why do I need them and how are they used?

Professional Heavy Duty Pinking Shears available on Amazon.

Like many helpful sewing tools, pinking shears aren’t a necessity, but they’re nice to have in your sewing toolbox. Pinking shears have blades that cut in a sawtooth pattern. Depending on the brand, the actual shape and size of the “tooth” can vary.

Pinking shears are great for trimming seam allowance edges in woven fabrics to keep them from raveling. Once the seam is sewn, trim each seam allowance edge evenly. In the same way, they can be used to finish hem edges for a flat finish.

They’re also perfect for making a decorative edge on non-wovens, like fleece, felt and some knits.

One construction use for pinking shears is to use them to reduce bulk in curved area seams, like necklines, armholes, etc. Rather than trimming and clipping the seam allowances, you can make a single pass with pinking shears and do both functions at the same time.

Why do sewing books suggest trimming the selvage off fabric before using it?

The selvage is the lengthwise edge of a woven fabric and it’s more tightly woven than the main portion of the fabric. Because there are more threads in the selvage, it can shrink differently than the other portions, causing puckering. You may have noticed that if you’ve pre-washed any cotton fabrics. So, rather than distort the fabric, it’s best to trim them off.

Selvages don’t ravel, so if they’re not puckered after pre-washing, they can be used as an edge finish for straight areas like garment waistbands, bindings and hems. Some quilters like to save the selvages as many have interesting printing and designs on them and can be pieced together for scrappy blocks. Trimmed selvages can also be used like straight-grain stay tape (see above).

On fabrics other than quilting cottons, selvages can be incredibly interesting in both weave and coloration, so the strips can also be used for trim (like on a pocket), a straight seam finish or coordinating binding.

See our article, Selvages: On the Edge


~Linda Griepentrog is the owner of G Wiz Creative Services and she does writing, editing and designing for companies in the sewing, crafting and quilting industries. In addition, she escorts fabric shopping tours to Hong Kong. She lives at the Oregon Coast with her husband Keith, and three dogs, Yohnuh, Abby, and Lizzie. Contact her at .

Did you enjoy this article?
Are you an ASG member?
This field is for validation purposes and should be left unchanged.

June 7, 2024

DIY Needle Sorting Pincushion

Needle Cushion

The thrill of selecting a pattern, snagging that perfect fabric, and retreating to your personal haven of creativity to craft a spectacular piece is unrivaled. Whether gorgeous garment, cozy quilt, chic handbag, or comfy pillow, the journey is the reward. But sometimes we just need that immediate ‘sew’-phoria from a quick and easy project. This project takes a humble tuna can and gives it a recyled life as a super-handy organizer cushion for your sewing machine needles. And the best part? Each section is labeled for different needle sizes and types. No more guessing games of “what size needle is this?”

Materials

  • Empty tuna can-6 1/2 oz. size
  • 1/4 yd. decorator fabric
  • 1 1/3 yards 1/8″ ribbon
  • Perle cotton or similar cord
  • 24″ small cable cord for piping
  • Fiber fill, scraps of batting, or other pincushion filler
  • 6″ square of iron-on tear away Stabilizer

Cut from Fabric

  • 24″ x 1″ crossgrain strip to cover cord for piping
  • 4 1/2 ” circle
  • 9″ circle
  • 3″ x 22″ strip for puffing
  • 3″ x 11%” strip for lining

Cut

  • 24″ Cable Cord
  • 30″ Perle cotton
  • Eight 6″ pieces of 1/8″ Ribbon

Sew

Puffing Strip

  1. Snap on a gathering foot. Set stitch length for approximately 2 to 1 fullness. Try stitch length 5, tension 7, and sew a practice sample. Measure it before and after stitching. If it gathers up to half the original size, you have 2 to 1 fullness. Adjust length and tension as needed. The longer the length and tighter the tension the more fabric will gather. Because softer fabric gathers more easily, prewash fabric that is stiff with sizing.
  2. Gather both long edges of 3″ x 22″ puffing strip, stitching 5/8″ from the edge. The feed teeth are what make the gathering foot gather. You must have the fabric under the entire width of the presser foot. This is the reason for a full 5/8″ seam allowance on each edge. Do not help the fabric by pulling it from behind or holding it beside the foot as this flattens the gathers as they try to form. It is easy to make beautiful even gathers if you keep your hands in front of the foot.
  3. Piping – Snap on a piping foot. Return the tension and stitch length to normal. Make 24″ of piping by wrapping the 1″ wide strip of fabric around the cable cord and placing it in the groove on the underside of the foot, raw edges to the right. Stitch with a straight stitch.
  4. Sew piping to one long edge of the puffing strip with a 5/8″ seam allowance. Lay the piping on top of the puffing strip, right sides together. The raw edges won’t match, but there is no need to pin as long as the piping is laying in the groove on the underside of the foot. Simply keep the edge of the puffing strip at the 5/8″ guideline, and the piping will be guided as you stitch. Adjust your needle position slightly to the left to cover the previous stitching. Trim seams to less than 1/4″.
  5. To sew the remaining piping around the 4 1/2″ circle, clip the piping seam allowance to the stitching and sew with the piping foot and 1/4” seam allowance. Set the needle stop down on your sewing machine to make it easier to stitch those tight curves. For less bulk at the overlap, pull out and cut off 1/2″ of the cord at the beginning and end of the circle so you can lap “cordless” piping at the ends.
  6. Sew the lining strip to the piped edge of the puffing strip by placing the lining right sides together with the piped puffing strip. The piping foot will find the piping right through the fabric. Trim seam close to stitching.
  7. Sew the other edge of the puffing to the piped circle, right sides together with the circle on the top. Begin sewing 5/8″ from the end of the puffing strip and sew completely around following the piping. Trim seam close to stitching.
  8. Snap on the regular sewing foot. Sew up the side seam to form a circle. Trim seam.
  9. Turn the piece right side out. It should look a little like a miniature chef’s hat.
  10.  Slip the tuna can inside and pull the lining over the edge.

Cushion

  1. Fold the 9″circle to form eight pie wedge sections. Mark these sections by pressing to create creases.
  2. Center a piece of stabilizer under the circle. Make a small buttonhole in the very center. Cut the buttonhole open with the buttonhole chisel. Write, stitch, or embroider the different needle sizes in each section with your writing sewing machine. Include size 90, 80, 70, 60, Wing, Twin, Stretch, Jeans, Embroidery, or other sizes and types you use most.
  3. Bartack the ribbon ends at the outer edge of the circle at each of the eight markings like spokes on a wheel. Pull opposite ribbon ends through the buttonhole in the center. Tie those ends to secure.
  4. Snap on a narrow braiding foot. Select a narrow zigzag, slip the perle cotton into the guide on the foot. Zigzag over the cord, being sure not to catch it with the zigzag going all the way around the outside edge of the circle at a 3/8″seam allowance. Drop the feed teeth and stitch in place at the beginning and the end to secure.
  5. Pull up the ends of the cord to gather. Put stuffing inside the circle in a doughnut form. Stuff firmly. Tie the cord ends tightly. Pull up the ribbons through the center of the stuffing and secure.
  6. Poke the cushion snugly into the covered tuna can and stick in needles! Remember not to save needles that have been used for one garment or more. And anytime you have a machine problem, change the needle and rethread.

~ Project used with permission from “America Sews with Sue Hausmann”

  • « Previous Page
  • 1
  • …
  • 9
  • 10
  • 11
  • 12
  • 13
  • …
  • 64
  • Next Page »

Become a Member

Join the only national organization dedicated to Advancing Sewing as an Art and Life Skill.

Join Now button

Blog Article Categories

  • ASG Conference
  • Chapter Stories
  • Embroidery
  • Fitting
  • Learn to Sew
  • National Sewing Month
  • Products, Books, & Patterns
  • Projects
  • Quilting
  • Sewing
  • Sewing Techniques
  • Sewing Tips
  • Sewing Tours
  • Videos
  • Disclaimer
  • Privacy Policy

American Sewing Guild
National Headquarters
9660 Hillcroft, Suite 230
Houston TX 77096
713-729-3000 | 713-721-9230 Fax
www.ASG.org

ASG wordcloud - education, conference, discounts, videos, special offers, tours and more

Copyright © 1998–2025 · American Sewing Guild · All Rights Reserved