American Sewing Guild (ASG)

Visit our blog Visit the ASG Facebook page Visit ASG on Pinterest Visit ASG's YouTube channel Visit ASG on Instagram
  • Home
  • Join ASG
    • Join Online
    • Chapter Locations
    • Member Benefits
    • Member Brochure
    • Join by Mail
  • Conference & Education
  • Resources
    • Contests & Awards
    • Giving Back
    • Hall of Fame
    • Links
    • Travel and Tours
    • Measurement Chart
  • Shop
    • ASG Store
    • Chapter Products
    • Video Resources
  • Blog
  • About
    • About Us
    • Donate to ASG
    • ASG Sensitivity Statement
    • FAQ’s
    • Start a Chapter
  • Contact
  • Member Login
    • Login First!
    • Members Only
    • Leadership Only
    • Website FAQ’s
    • Logout
  •  

February 23, 2024

Hideaway Ideas for Small Sewing Spaces

As creative as we are with our sewing skills, sometimes we also have to get creative with our sewing space. A large, dedicated sewing room is every sewist’s dream, but finding the perfect sewing furniture for small spaces can be challenging, especially if it needs to blend with your living room, dining room, or bedroom decor and may need hidden away when not in use. Your local sewing store will usually have wonderful choices, but we also found some other sources for multifunctional spaces.

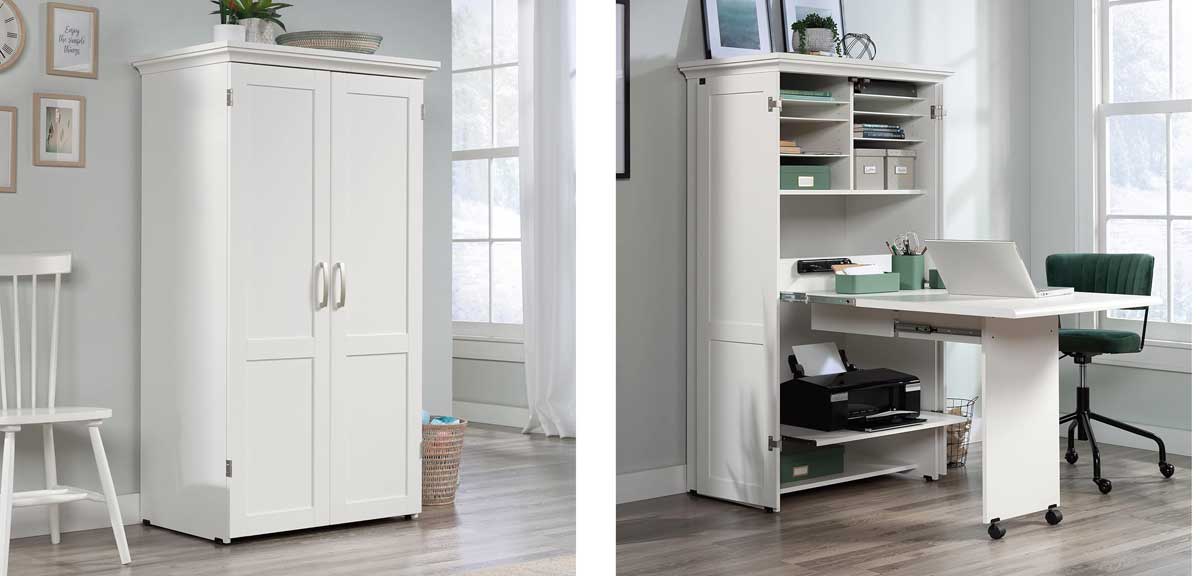
Sauder Craft and Sewing Armoire

When the doors are closed on this armoire, it’s just a stylish cabinet in your room. Open the doors to reveal a slide-out table for your sewing machine and 6 adjustable shelves to use for storage and comes in several different finishes to blend with your decor. The armoire is available from various online resources such as Home Depot, Walmart, Amazon, and more. Visit the Sauder website to see all of their furniture options. Assembly required.

If you purchase from one of our Amazon links, we may earn a small commission at no additional cost to you.

Sauder Craft Armoire

IKEA

IKEA, known for its affordable furniture, offers possibilities for creating a customized and efficient sewing space with pieces that can be repurposed to create a work area that suits your needs.

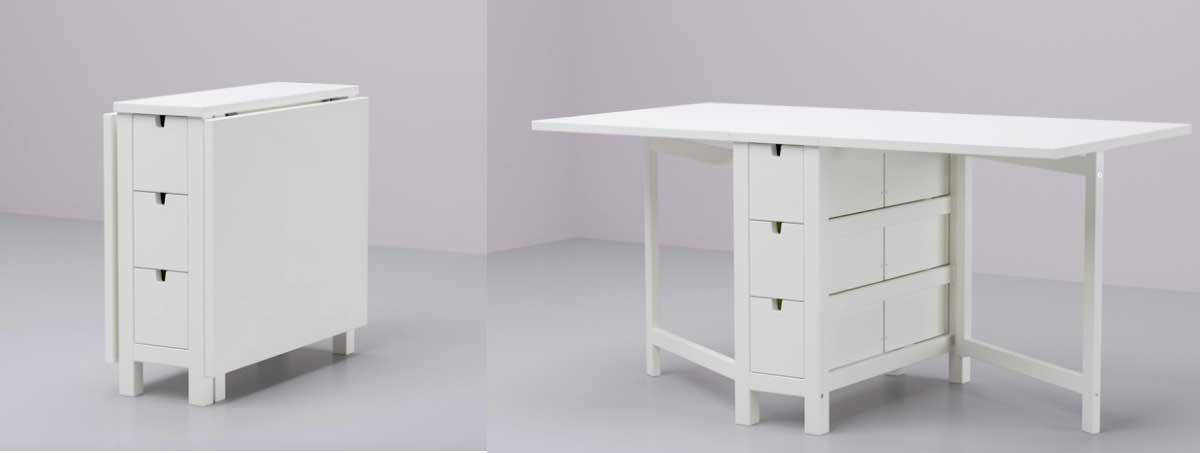
  • Foldable NORDEN Gateleg Table: Maximize space with the NORDEN gateleg table. When folded down, it’s compact enough to sit against the wall, but when expanded, it offers a large workspace for cutting fabric or as a work area. Mounting casters to the bottom enhances mobility and flexibility. Comes in white or birch.
IKEA NORDEN Gateleg table
  • LINNMON tabletop and ALEX drawers. Combine two or more ALEX drawer units as table legs, then place the LINNMON tabletop on them. This creates a sturdy and spacious surface for your workspace.

Ikea furniture


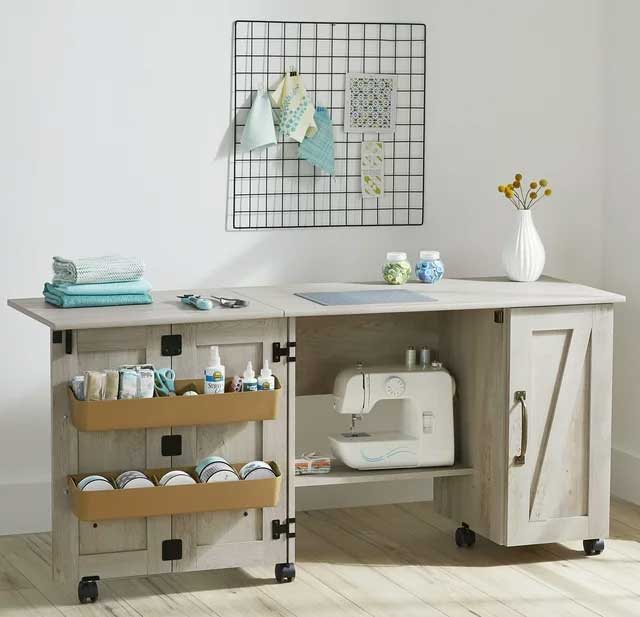
Better Homes & Gardens Modern Farmhouse Sewing Table

When this cabinet is closed, your machine and storage areas are hidden and the extension folds down flush to the cabinet. It takes up a small footprint and looks like a small sideboard in your room.

Better Homes & Gardens Farmhouse Sewing Table

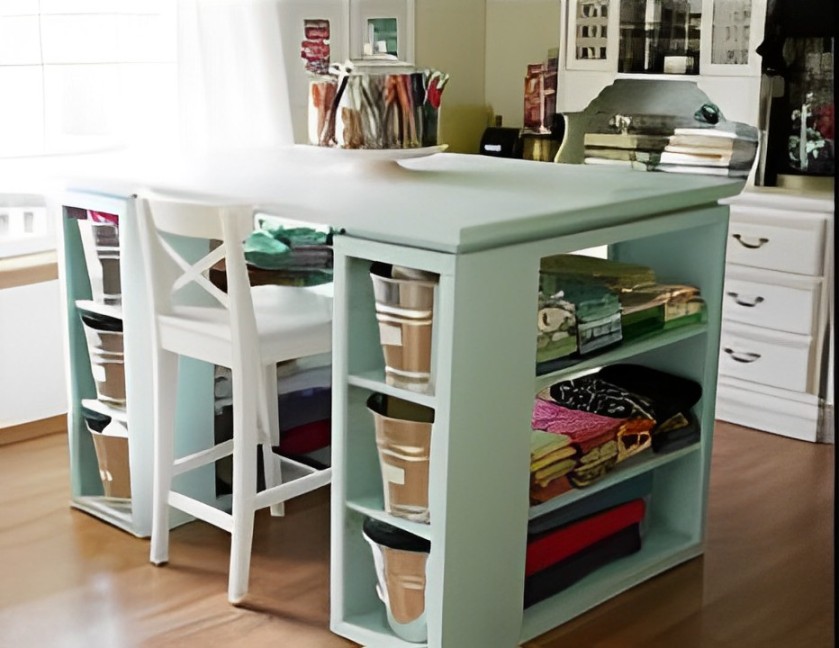
DIY with Lumber and Paint

This sewing station can be made with DIY products from a big box store, or with pre-fab bookshelves. Add an MDF or laminated top and paint in your favorite color. Tip: some bookshelf units (including the BILLY bookshelves from IKEA) have doors available so that you can hide your supplies.
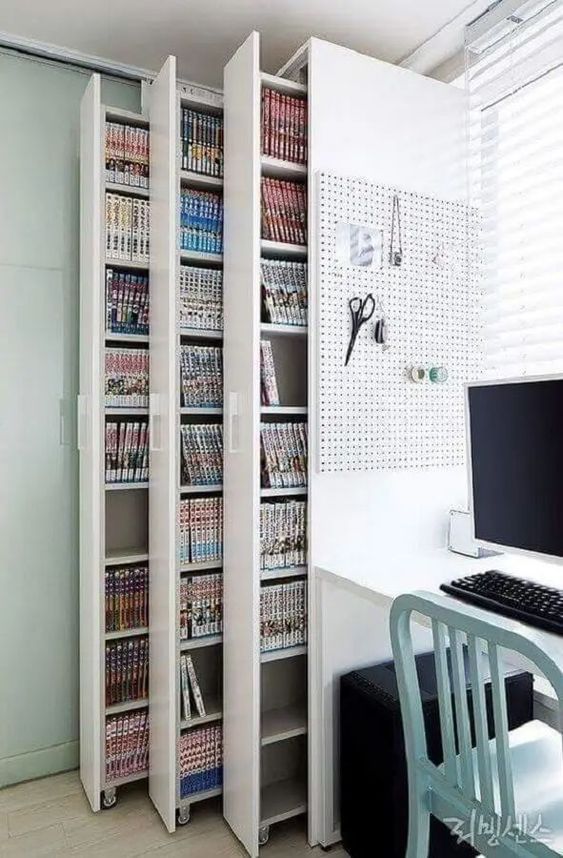
Image from Pinterest. Click for additional pictures and dimensions.

Slide and Hide

Small spaces need big solutions. “Cabinet filler” organizers are often found in the kitchen next to a wall or refrigerator. They can be wide or narrow and easily slide out on wheels to quickly choose what you need, then slide back in to be hidden away. These cabinets offer plenty of storage in a small footprint and can easily be customized with one or more sliders as needed.

Image from Pinterest user Craft-O-Maniac.com.

Whether you’re a seasoned seamstress or just starting out, organizing your sewing space to what’s comfortable for you and to what fits in your budget and home is key to unlocking your creativity and maximizing efficiency. Hopefully, these ideas will help you turn every project into a satisfying and enjoyable journey!


Did you enjoy this article?
Are you an ASG member?
This field is for validation purposes and should be left unchanged.


February 16, 2024

Presser Foot Fun: Non-Stick Machine Feet

Non-Stick Zigzag Teflon Sewing Machine Presser Foot
Non-Stick Zigzag Teflon Sewing Machine Presser Foot available on Amazon.

Nothing is more frustrating than uneven stitching—your thread stitches can go from long to short in an instant, ruining your line of topstitching or seaming. In severe cases, the wickedly short stitches can damage fragile fabrics by creating a hole, and some fabrics don’t take kindly to ripping out stitching and beginning anew.

Stitching in one place isn’t a normal option, but sometimes you can end up doing so accidentally. This phenomenon often occurs on fabrics that tend to stick to the presser foot, sometimes causing things to come to a complete standstill. Vinyls, plastics, foams, laminated fabrics, suedes and leathers are the most frequent culprits as they can actually adhere to the bottom of metal presser feet. Add in a bit of warmth from the sewing machine light and voila—a sudden slowdown.

The solution: Always test-stitch and switch presser feet if there’s an issue.

Many sewing machine companies make non-stick presser feet specifically to handle these pesky fabrics. Depending on the brand of machine you own, you may be able to buy multiple types of non-stick feet for your machine, including those for zigzagging, straight stitching, decorative stitching or zipper insertion. Some non-stick feet can also accommodate a built-in dual-feed mechanism. Check with your dealer or look for generic non-stick feet for the same purposes.

If a non-stick foot isn’t available for your machine model, or you prefer not to purchase one, but still need a little gliding power, try this: Purchase some frosted tape the width of your presser foot base and cover the bottom of a regular foot with the tape. Use the handwheel to perforate the needle hole in the tape and carefully trim the tape to clear the needle area for stitching. Peel off the tape when you’re done with your project.

Examples of non-stick feet from Bernina

A Close Cousin…a Roller Foot

Roller presser foot available from Amazon.

A close cousin to the non-stick foot is a roller foot. This unique foot serves the same purpose as the non-stick foot and upon careful examination, you’ll see that it has one or more tiny rollers built into it. The roller mechanism keeps the foot just slightly above the machine feed dogs for easier feeding.  Some roller feet are made from metal, others from non-stick material. Like its non-stick counterparts, the roller foot helps eliminate uneven stitching on sticky fabrics as it simply rolls over the surface without allowing any adhesion that can create uneven stitches.

Think of a roller foot like you think of snow tires for your car—a little bit of extra traction to keep things moving smoothly.

Underside of a Bernina roller foot

Note that some roller feet have smooth rollers, while others have cross-hatching for gripping the fabric surface. If you have a very delicate fabric, like chiffon or Lycra, it’s best to opt for smooth rollers to avoid imprinting or potential snagging.

Beyond Sticky

Both the roller foot and the non-stick foot can be used not only with those fabrics that tend to stick and cause uneven stitching, but they can be used with equal aplomb on bulky and “spongy” fabrics like bouclé, tweed suiting, bulky wool coatings and any type of fabric with an uneven surface or heavy nap. The rollers on the roller foot will glide over the surface irregularities without snagging or having the presser foot toes hang up on loose threads in a bulky weave.

If you’re stitching on paper for cardmaking, a roller foot can also be helpful for more even feeding, particularly on textured and novelty papers. Handmade papers, and those with seeds and natural materials incorporated are ideal to pair with either a roller foot or non-stick foot for effortless stitching.


~Linda Griepentrog is the owner of G Wiz Creative Services and she does writing, editing and designing for companies in the sewing, crafting and quilting industries. In addition, she escorts fabric shopping tours to Hong Kong. She lives at the Oregon Coast with her husband Keith, and three dogs, Yohnuh, Abby, and Lizzie. Contact her at .

Did you enjoy this article?
Are you an ASG member?
This field is for validation purposes and should be left unchanged.

February 9, 2024

Sew an Easy Sleeve Placket

A sleeve placket is that nifty little opening at the bottom of a sleeve, skillfully stitched to let your hand slip through with ease. Typically, you’ll spot it on shirts or blouses, and it’s usually topped off with a neat cuff. Beyond its practicality, the placket can also be a real style statement. Ever thought of mixing things up with contrasting fabric for the cuff and placket?

Sleeve placket

1: When making the placket, remember that the slash is on the sleeve back. Begin by marking the slash lines on sleeves. At the lower edge of own sleeve, measure 3 3/4” (9.5 cm) from one side edge, opposite the pleat markings. At the point, draw a slash line 5 1/2 (14 cm) long. Repeat this procedure with the second sleeve, measuring from opposite edge. This will give you a right and a left sleeve. (Figure 1)

Figure 1
Figure 1

2: Cut each sleeve on the slash line. Then cut two pieces of fabric on the straight of grain, 6 3/8” x 1 1/2” for under the sleeve packets.

3: With wrong sides of the under-sleeve placket together, fold under in half lengthwise and press.

4: On each long side of placket, fold 1/4” (0.6 cm) to the wrong side and press. (Figure 2)

Figure 2
Figure 2

5. Insert the back side of slash on the sleeve between folds of the under-sleeve placket, matching cut edges inside, as illustrated. (Figure 3)

Figure 3
Figure 3

6. Pin in position and edgestitch on under-sleeve placket as illustrated, being sure to catch placket in the stitching on the underside. Trim the excess placket even with lower edge of the sleeve.(Figure4)

Figure 4
Figure 4

7. Fold each of the 6 3/8” x 4” (cut on the straight of grain) sleeve plackets wrong sides together on center foldline and press in crease #1.

8. With wrong sides together, fold cut edge on each side to meet crease #1. Press, forming creases #2 and #3. (Figure 5)

Figure 5
Figure 5

9. Trim 1/2″ (1.3 cm) from the side edges.

Right Sleeve

10. For placket on right sleeve, fold placket right sides together, taking care to match crease #2 to crease #1. Stitch across upper edge with a 1/8″ (0.3 cm) seam allowance. (Figure 6)

Figure 6
Figure 6

11. Turn right side out and form the point of the placket by matching the seamline to the trimmed edge. (Figure 7)

Figure 7
Figure 7

12. With wrong sides together bring crease #3 to crease # 2 and arrange the corners of placket. Press. (Figure 8)

Figure 8
Figure 8

13. Insert front side of sleeve slash between the folds of the placket, matching cut edges inside as illustrated. (Figure 9)

Figure 9
Figure 9

14. Pin in position and edgestitch on the placket, sewing around the box, and continuing to lower edge of sleeve, being sure to catch the placket in the stitching on underside. Trim excess placket even with the lower edge of sleeve. (Figure 10)

Figure 10
Figure 10

Left Sleeve

15. For placket on the left sleeve, fold placket right sides together, matching crease #3 to crease #1. Stitch across upper edge with a 1/8″ (0.3 cm) seam allowance. (Figure 11)

Figure 11
Figure 11

16. Tum right side out and form point of placket by matching the seam line to the trimmed edge. (Figure 12)

Figure 12
Figure 12

17. With wrong sides together, bring crease #2 to crease #3 and arrange the corners of the placket. Press. (Figure 13)

Figure 13
Figure 13

18. Insert front side of sleeve slash between folds of placket, matching cut edges inside. (Figure 14)

Figure 14
Figure 14

19. Pin in position and edgestitch on the placket, sewing around the box, and continuing to lower sedge of sleeve, being sure to catch placket in stitching on underside. Trim excess placket even with lower edge of sleeve. (Figure 15)

Figure 15
Figure 15

~Reprinted with permission

Did you enjoy this article?
Are you an ASG member?
This field is for validation purposes and should be left unchanged.

February 2, 2024

Zippers with ZIP!

Zippers don’t have to be under flaps—they can be showcased on the outside of a project and embellished as well.

Four decorated zippers

It’s All About the Stitches

You know all those stitches in the machine that you admire, but may not use often? Many of those are perfect to highlight an exposed zipper. Just pick one that’s to your liking and adjust the width to be less than ½” so you don’t run into the zipper teeth.

Choose a narrow presser foot that can ride along the zipper tape, but still allow for the width of your stitch. Adjust the needle position and stitch width to finesse the placement. Most zipper feet will allow you to sew a motif stitch with a narrow width, as opposed to just straight stitch. Key to this effort is testing by turning the handwheel manually throughout the entire stitch sequence to be sure the needle doesn’t hit the foot (or the zipper teeth) during any portion of the motif sewing. Once you’ve determined that, you’re ready to stitch on the zipper tape.

Any type of thread can be used for embellishing zippers—choose a metallic thread to accent metal zipper teeth, a bold color for prominence, or even a variegated thread for interest.

Green zipper with flowers

Sport-weight zippers have wider tapes than all-purpose zippers, making them ideal for using decorative stitching since there’s more room for embellishing. Some will allow for multiple rows of stitches, depending on the stitch width used.

There are actually two ways you can embellish a zipper tape—one is stitching only on the zipper tape itself, and the second is to stitch on the tape as you’re applying it to the garment or other project.

If you want to embellish the tape prior to applying the zipper, some machines find it challenging to grab the narrow tape and feed it evenly under the foot. To resolve that dilemma, adhere the zipper to a removable embroidery stabilizer to support the narrow tape. Water-soluble or tear-away stabilizers work well, as does a removable adhesive version. You can pin the zipper to the stabilizer or use temporary spray adhesive if you’re stabilizer doesn’t have adhering properties itself.

Red zipper with black stitching

Once the zipper is adhered to a larger backing, simply stitch up the center of the tape, stop your stitching, and slide the zipper pull out of the way as needed for access. Then continue stitching.

Black zipper with gold stitching

When your embellishing is complete, remove the stabilizer following the manufacturer’s instructions.

Attaching the Zipper

To attach the exposed zipper, fold under the placket opening edges, pin the zipper in place keeping the finished edge away from the teeth so the zipper can function, and topstitch the zipper tape outer edge in place using matching thread and straight stitching.

If you prefer to do the decorative stitching directly onto the zipper/garment layers, it’s easiest to apply it flat, prior to cutting the placket opening. Using water-soluble basting tape, adhere the zipper in place over the marked opening and decoratively stitch along the zipper tape edges. The lower zipper tape edges can be turned under if desired prior to stitching. After stitching is complete, carefully slice open the garment placket layer down the zipper center and fold back the edges. Stitch again with straight stitching to hold the edges in place if desired, or use a narrow strip of fusible web for that purpose. A knit fabric underlayer can simply be trimmed close to the zipper teeth so the zipper can actually function without the fabric getting caught in the teeth.

Colorful zipper


~Linda Griepentrog is the owner of G Wiz Creative Services and she does writing, editing and designing for companies in the sewing, crafting and quilting industries. In addition, she escorts fabric shopping tours to Hong Kong. She lives at the Oregon Coast with her husband Keith, and three dogs, Yohnuh, Abby, and Lizzie. Contact her at .

Did you enjoy this article?
Are you an ASG member?
This field is for validation purposes and should be left unchanged.

January 26, 2024

Sublime Felt!

Felt is more than just a material for holiday decorations; it possesses a variety of properties that make it a versatile medium for diverse projects. Its nonwoven nature means it doesn’t ravel and provides durability and insulating qualities. It also comes in a broad range of colors, thicknesses, and textures. Such characteristics render felt ideal for creating unique dimensional clothing items like scarves, hats, purses, and slippers. Moreover, felt serves as a fantastic material for crafting dolls, enhancing its project possibilities.

Felt

The History of Felt

Felt is the world’s oldest textile and predates the spinning of yarn or the weaving of threads into fabric. No one is sure how felt was discovered, but some believe that nomadic tribes in central Asia and Turkey noticed the matting of sheep’s wool and began to use this matted wool for the soles of shoes. The constant pressure from walking caused the wool to mat further, creating a rough form of felt. It has a soft and dense texture and is known for its ability to insulate and provide warmth.

Felt can be made from any natural fiber. When the fibers are exposed to a combination of water, heat, and pressure, they entangle to form felt. Feltmaking kits are available to create your own felt at home. Homemade felt has a looser texture than commercial felt but is also very versatile. Felt can also be created from synthetic fibers.

One-of-a-Kind Felt Fabric

Felt allows you to express your creativity in new ways. Using your sewing machine, you can create new types of fabrics by cutting, stacking, and stitching felt to incorporate the variety of colors and thicknesses. Because of its beautiful, smooth, warm finish, the queen of all felt is 100% wool felt. But blends of wool and rayon also offer options to make dimensional fabric. Felt can be washed and dried to produce interesting textured effects. Once you have the texture you want, you can continue to enhance it by adding embellishments of beads, buttons, trims, fabric paint, and other items—the list is limited only by your imagination.

Felt Dolls

Felt dollDolls are easy to make and felt brings a natural warmth, depth, and variety of color that is perfect for doll skin. It takes fabric paint and inks beautifully, resulting in subtle textures and shadows just like porcelain. Making a doll with 100% wool felt is a satisfying experience because the felt is easy to stuff and will give you a smooth finish with no lumps or bumps.

Cut-Play Felt

To make cut-play felt (also called reverse appliqué), stitch two layers of felt together and cut away shapes to add texture and interest. A simple purse is a great first project for this technique.

Felt purseBecause the felt may shrink up to 15%, make sure to allow for this, especially if you are making clothing. Use 100% wool felt for the base fabric and an 80% wool/20% rayon blend felt for the top fabric.

Cut the two fabrics slightly larger than the desired finished purse and baste them together along the outside edges. Create a template for the desired decorative motif then, using the template, trace the shapes onto the top layer of felt. Stitch along the traced lines, using a stitch length of 20 stitches-per-inch. Carefully cut away the inside of the shape close to the stitching to reveal the under layer of felt. Once all of the shapes are cut out, toss the fabric into a hot wash cycle (no soap) and then a hot dryer. After removing from the dryer, you will find that the top felt has developed soft, crinkly edges that form a pleasing look. Now it is time to embellish with buttons in the center of each motif. To construct the purse, fold and sew the sides to together. To finish, line the pouch and add the closure of your choice.

Visit this website for a tutorial on reverse appliqué with felt.


Did you enjoy this article?
Are you an ASG member?
This field is for validation purposes and should be left unchanged.

Tagged With: cut-play felt, felt

  • « Previous Page
  • 1
  • …
  • 11
  • 12
  • 13
  • 14
  • 15
  • …
  • 62
  • Next Page »

Become a Member

Join the only national organization dedicated to Advancing Sewing as an Art and Life Skill.

Join Now button

Blog Article Categories

  • ASG Conference
  • Chapter Stories
  • Embroidery
  • Fitting
  • Learn to Sew
  • National Sewing Month
  • Products, Books, & Patterns
  • Projects
  • Quilting
  • Sewing
  • Sewing Techniques
  • Sewing Tips
  • Sewing Tours
  • Videos
  • Disclaimer
  • Privacy Policy

American Sewing Guild
National Headquarters
9660 Hillcroft, Suite 230
Houston TX 77096
713-729-3000 | 713-721-9230 Fax
www.ASG.org

ASG wordcloud - education, conference, discounts, videos, special offers, tours and more

Copyright © 1998–2025 · American Sewing Guild · All Rights Reserved