American Sewing Guild (ASG)

Visit our blog Visit the ASG Facebook page Visit ASG on Pinterest Visit ASG's YouTube channel Visit ASG on Instagram
  • Home
  • Join ASG
    • Join Online
    • Chapter Locations
    • Member Benefits
    • Member Brochure
    • Join by Mail
  • Conference & Education
  • Resources
    • Contests & Awards
    • Giving Back
    • Hall of Fame
    • Links
    • Travel and Tours
    • Measurement Chart
  • Shop
    • ASG Store
    • Chapter Products
    • Video Resources
  • Blog
  • About
    • About Us
    • Donate to ASG
    • ASG Sensitivity Statement
    • FAQ’s
    • Start a Chapter
  • Contact
  • Member Login
    • Login First!
    • Members Only
    • Leadership Only
    • Website FAQ’s
    • Logout
  •  

August 23, 2024

Mitered Napkin Corners

Nothing can add more pizzazz to a table setting than some fun fabric napkins. Whether you choose a whimsical quilting cotton, a solid linen, an ethnic print, or an elegant home décor fabric, napkins add a colorful accent.

Mitered napkin

There are several ways to finish the edges of your napkins, and we’ve talked about some previously in this article. Today’s napkin edge focus is on an easy mitered hem finish for single- and double-layer napkins.

Fabric napkins can be many finished sizes, from a 12” cocktail version to a full 24” dinner cover-up. Most napkins are square, though there’s the occasional round version thrown into the mix for a holiday tree fold.

It goes without saying that you want to choose a washable fabric for a napkin that you plan on really using for meals…cottons are great, polyester is fine for a sheen, or perhaps real linen for texture.

Depending on your fabric width and napkin size, figure how many you can get across and the total number needed before you figure yardage. From 54”-wide fabric, you can cut three 18” squares across the fabric width; from 42”-wide fabric, you can cut only two across the width. Keep in mind that using this hemming method, you’ll lose 2” of napkin size from the cut square size.

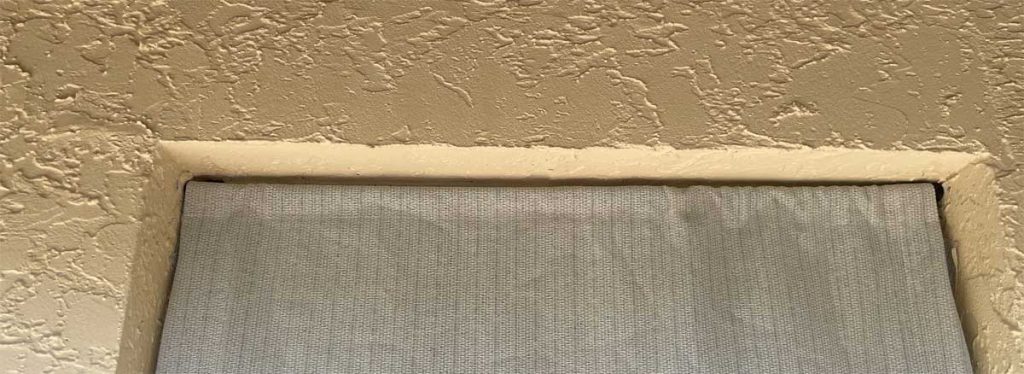
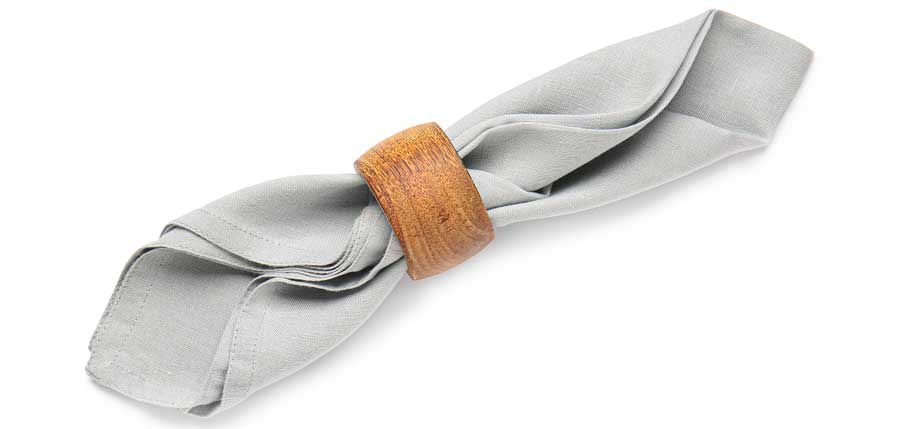
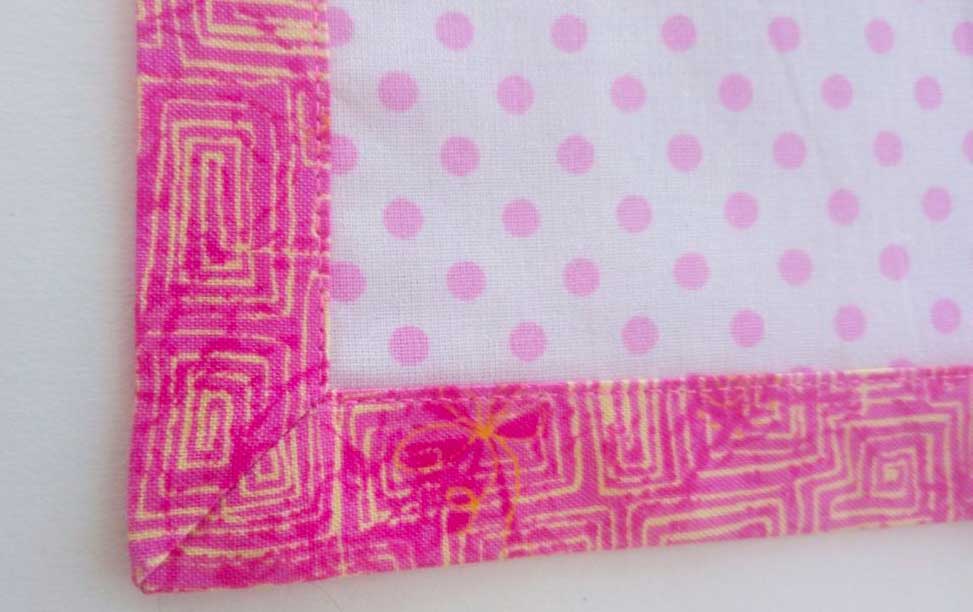
Hemmed napkins with mitered corners

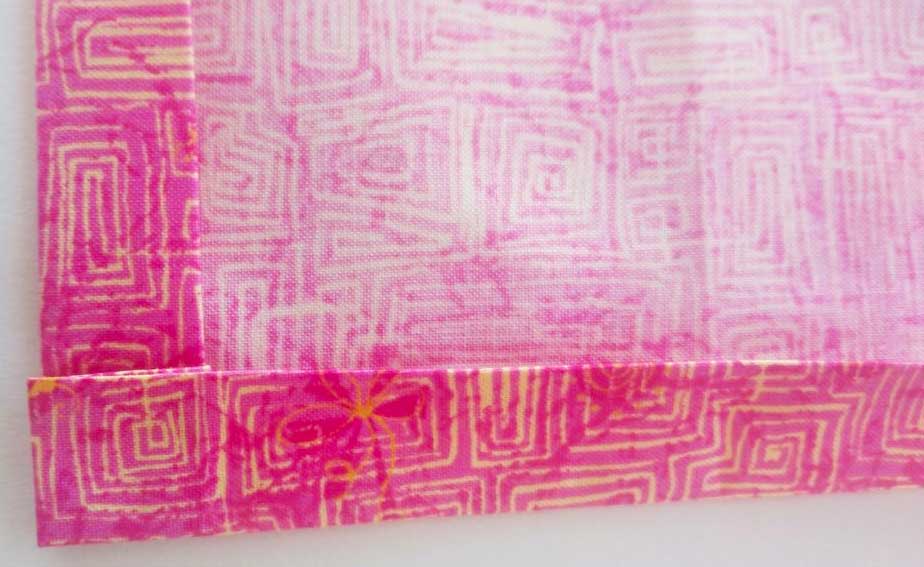
Once you’ve cut the napkin squares, press under ¼” on each napkin edge. Then press under a ¾”-wide hem on all edges (1).

Figure 1

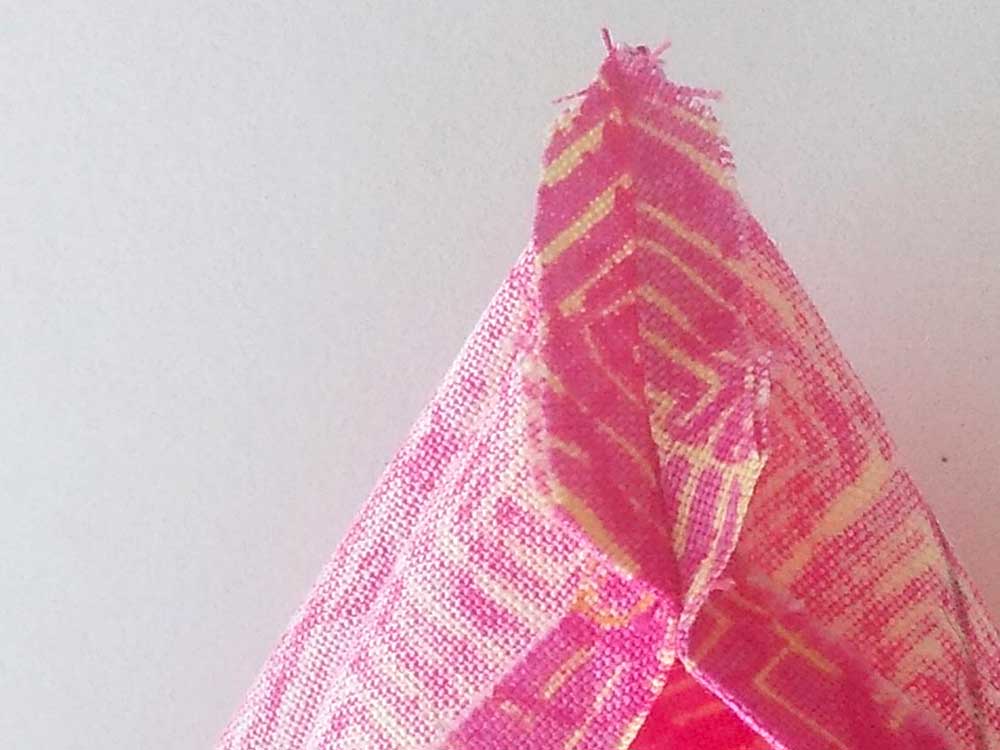
Fold adjacent napkin edges right sides together keeping the narrowly pressed edge folded. This forms a sharp point (2).

Figure 2

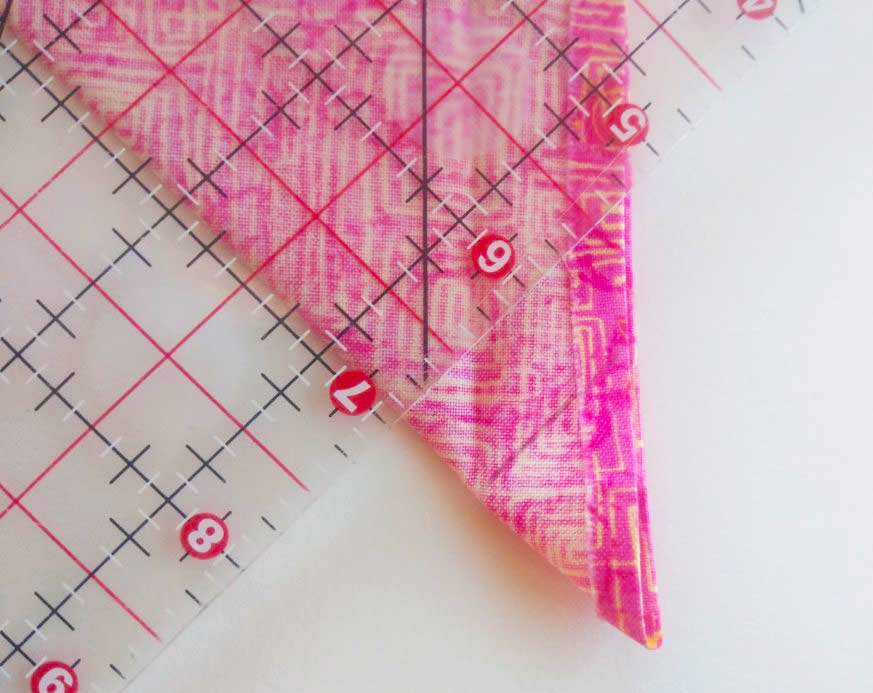
Using the 45° marking on a ruler, draw a line diagonally across the corner. Stitch on the line (3).

Figure 3

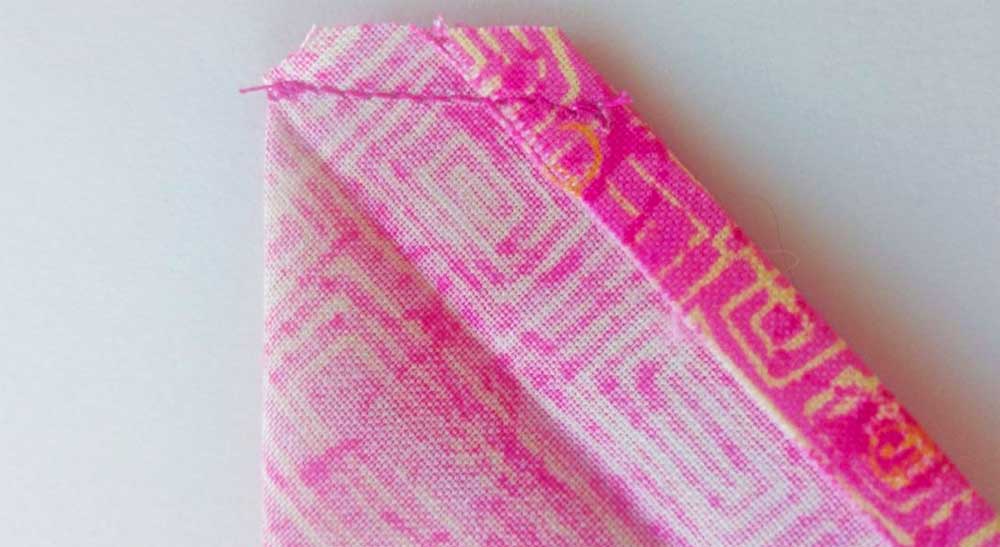
Trim the excess point fabric ¼” from the stitching line, trim the corner diagonally, and finger-press the seam allowance open (4).

Figure 4

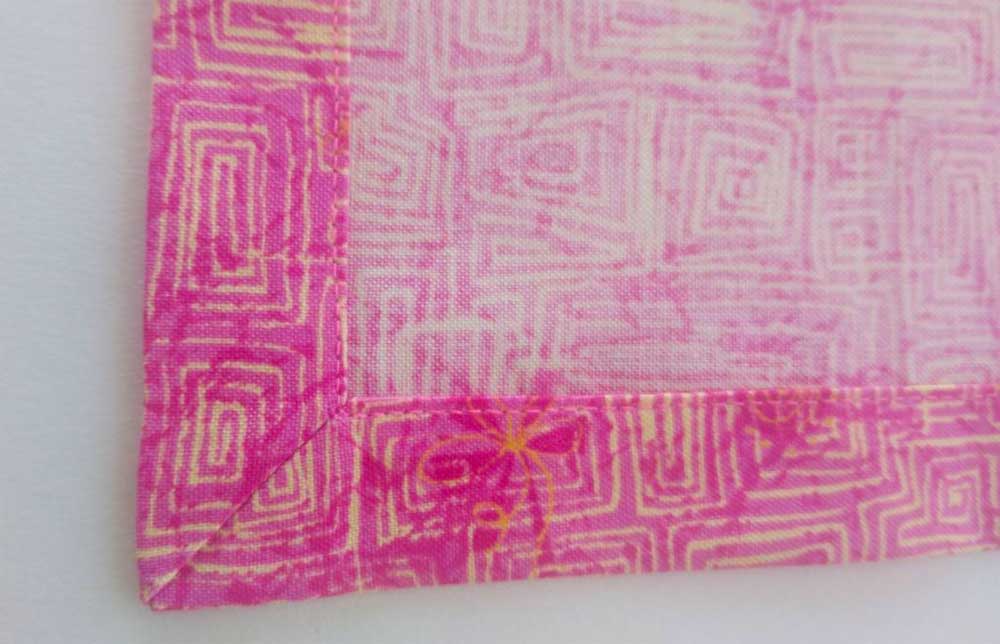
Turn the hem to the napkin wrong side and press the squared corner (5). Use a point presser if needed to sharpen the corner. Repeat for each corner of the napkin.

Figure 5

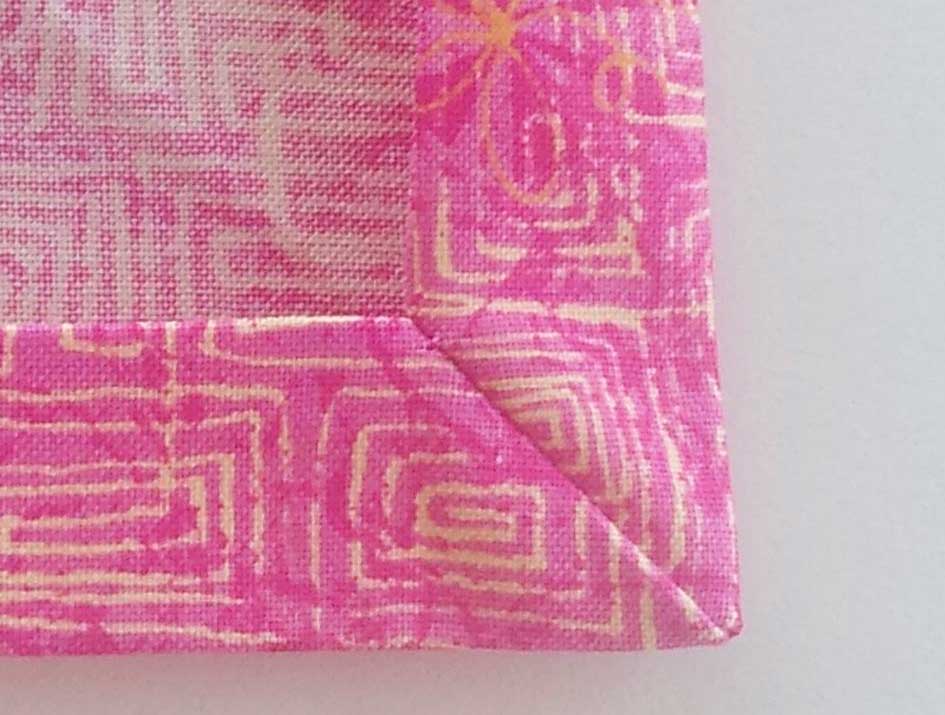
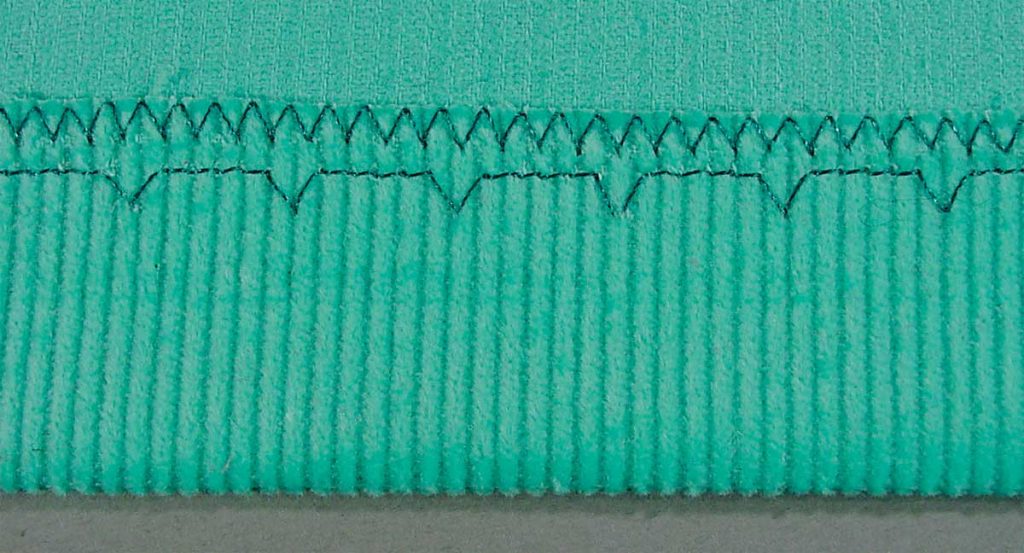
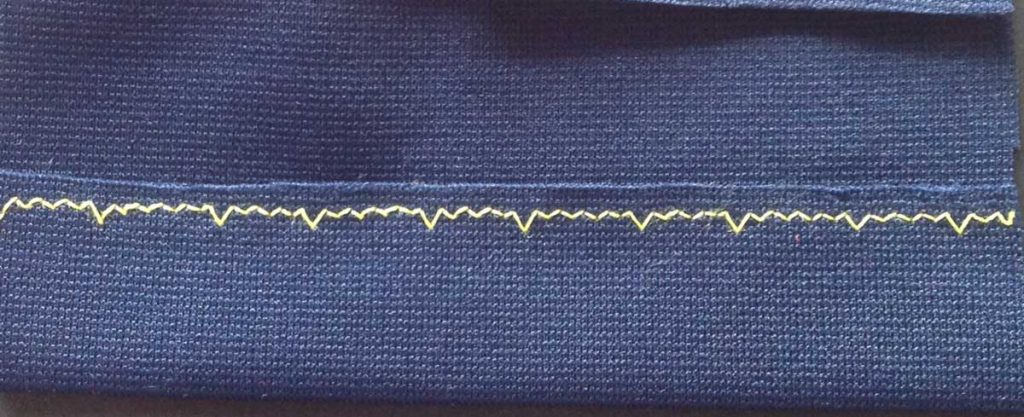
Topstitch the folded hem edge in place around the napkin (6, 7). This can be done with matching or contrasting thread, using a straight or decorative stitch. If you prefer an additional row of stitching, edgestitch the napkin.

Figure 6


Figure 7


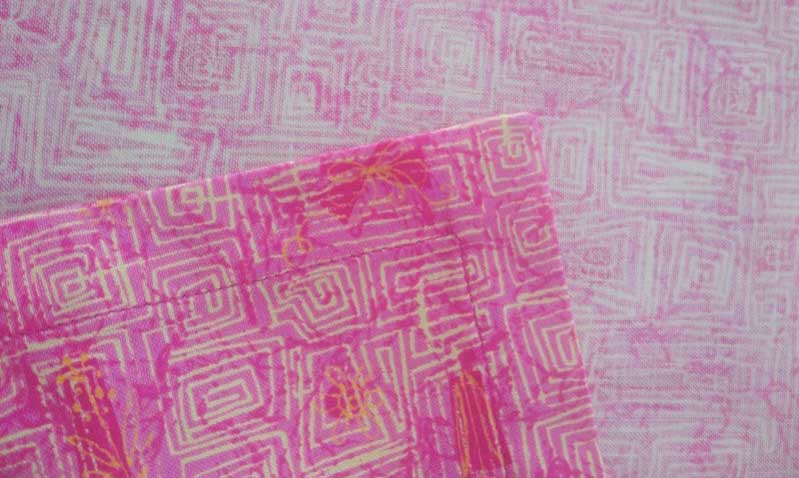
Repeat for each napkin you’re making. If you prefer not to have stitching showing, fuse the upper hem edge in place with a narrow strip of fusible web.

On the double

If you want your napkin to be double sided, cut a coordinating fabric square 2 ¼” smaller than the original square size.

Follow the directions above, but before you topstitch the hem in place, place the coordinating fabric square inside the hem on the wrong side of the napkin and smooth in place (8).

Figure 8

Once the second layer is smoothed in place and hems are repositioned, topstitch the hem edge through all the layers.

Making a double-sided napkin is a great way to hide the underside of a printed fabric that may not be as pretty as the right side, plus it adds a bit of body and contrast to the napkin.

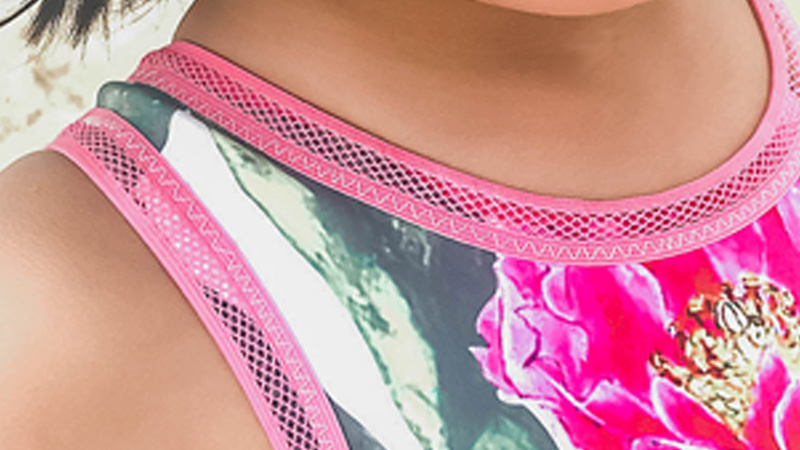
This same mitering technique can be used on other right angles as well, like collars, slits, pockets, table runners, quilt tops, etc.


~Linda Griepentrog is the owner of G Wiz Creative Services and she does writing, editing and designing for companies in the sewing, crafting and quilting industries. In addition, she escorts fabric shopping tours to Hong Kong. She lives at the Oregon Coast with her husband Keith, and three dogs, Yohnuh, Abby, and Lizzie. Contact her at .

August 16, 2024

Sewing with Outdoor Shade Fabric is a Breeze

Outdoor shade fabrics can create comfortable and shaded spaces in gardens, patios, and other outdoor areas. Frequently used for commercial shade sails, pergola covers, canopies, tents, and awnings, DIY enthusiasts can also purchase the fabric in rolls and easily and inexpensively create shade wherever it’s needed. While providing shade is its typical use, shade cloth is also an affordable way to block sunlight and heat from hitting windows directly, significantly reducing heat gain inside your home. Additionally, it remains breathable, allowing fresh air to pass through the fabric while still providing visibility to the outside.

Shade sail

Selecting the Right Outdoor Shade Fabric

Before you begin sewing, it’s important to select the appropriate fabric. Outdoor shade fabrics are designed to withstand harsh weather conditions, including UV rays, rain, and wind. Some popular types include:

  • Polyester Mesh: This fabric is durable, breathable, and resistant to UV rays. It’s ideal for creating shade sails and patio covers.
  • Acrylic Fabric: Known for its resistance to mold and mildew, acrylic fabric is perfect for awnings and pergola covers. It’s also water-resistant and comes in a variety of colors and patterns.
  • PVC-Coated Polyester: This fabric is highly durable and waterproof, making it suitable for areas with heavy rain. It’s commonly used for canopies and tarps.

Coolaroo shade fabric is a popular choice, as well as brands such as NCSNA, Vigoro, and others. Shade fabric is available in rolls of different widths, lengths, and colors in home and garden stores, or online retailers such as Amazon. When choosing a fabric, consider the specific needs of your project, such as the level of shade required, the weather conditions in your area, and the aesthetic you want to achieve.

When planning your project, remember that the coated (shiny) side should always be installed facing the sun.

Outdoor shade fabrics also come with varying levels of UV protection, which is an essential factor in determining how effective they are at blocking harmful ultraviolet (UV) rays from the sun. The UV qualities of shade fabric are typically measured by two main factors: UV Block Percentage and Ultraviolet Protection Factor (UPF).

UV Block Percentage

The UV block percentage indicates how much of the sun’s UV rays the fabric can block. For example, if a fabric has a UV block percentage of 90%, it means that 90% of the UV rays are blocked, and only 10% pass through the fabric. The UV block percentage is directly related to the density and weave of the fabric:

  • Low UV Block (50-70%): These fabrics provide some shade and minimal UV protection. They are more breathable and allow more light to pass through, making them suitable for areas where light is desired but full sun exposure is not.
  • Medium UV Block (70-90%): These fabrics offer a moderate level of UV protection and are commonly used for patio covers, pergola shades, and shade sails. They provide a good balance between light filtration and sun protection.
  • High UV Block (90-98%): Fabrics with a high UV block percentage offer significant protection against UV rays, making them ideal for areas where maximum sun protection is required, such as playgrounds, pools, or areas with high sun exposure.

Ultraviolet Protection Factor (UPF)

The UPF rating indicates how much UV radiation a fabric allows to reach the skin. It is similar to the SPF (Sun Protection Factor) rating used for sunscreens but applies to fabrics:

  • UPF 15-24: Provides good UV protection, blocking 93.3% to 95.9% of UV radiation. Suitable for fabrics that offer some protection but are not intended for extended periods of sun exposure.
  • UPF 25-39: Provides very good UV protection, blocking 96.0% to 97.4% of UV radiation. These fabrics are effective for general outdoor use where moderate sun protection is needed.
  • UPF 40-50+: Provides excellent UV protection, blocking 97.5% to 99% of UV radiation. Fabrics with a UPF of 50+ offer the highest level of protection and are recommended for areas with intense sun exposure or for individuals with sensitive skin.

Shade fabric on a roll

Fabric Characteristics Affecting UV Qualities

Several characteristics of the fabric influence its UV protection levels:

  • Weave Density: Tightly woven fabrics tend to offer better UV protection because they allow fewer UV rays to penetrate through the small gaps in the weave.
  • Color: Darker colors generally absorb more UV rays than lighter colors, which can result in higher UV protection. However, darker colors still allow heat to penetrate. White or lighter colors will reflect heat.
  • Material: The type of material (e.g., polyester, acrylic, PVC-coated) affects the UV protection. Synthetic materials like polyester and acrylic often provide better UV protection compared to natural fibers.
  • Coatings and Treatments: Some fabrics are treated with UV inhibitors or coatings that enhance their UV protection. These treatments can significantly increase the fabric’s ability to block UV rays.

Application-Specific UV Qualities

Different outdoor shade fabric applications may require different levels of UV protection:

  • Shade Sails: Typically require high UV block percentages (85-98%) and UPF ratings of 30-50+ to protect against the sun’s rays effectively.
  • Awnings and Pergola Covers: Often use fabrics with medium to high UV protection, depending on the level of shade and sun exposure desired.
  • Canopies, Tents, and Window Shades: May require fabrics with the highest UV protection (90-98% UV block, UPF 40-50+) to provide shelter in exposed areas and minimize heat intrusion.

Thread

Coats and Clark outdoor threadTo ensure your shade cloth project holds up to the weather, it’s crucial to use UV-resistant polyester thread, such as the Coats Outdoor Living thread, which is designed to withstand prolonged exposure to sunlight. Polyester thread is also resistant to mold, mildew, and moisture, making it ideal for outdoor applications and ensuring that the seams hold up well, even under tension or in harsh weather conditions. Alternatively, you can use ‘lifetime threads’ that are crafted from polytetrafluoroethylene (PTFE) and are commonly used by shade sail manufacturers. PTFE lifetime threads are typically available from marine supply stores.

Needle Size

A size 90 to 110 needle, such as the kind used for working with denim, upholstery fabrics, PVC, and vinyl, can be used for shade cloth.

Steps

Decide on Mounting: Determine how your shade cloth will be mounted. Grommets, D-rings, or shade clips can be used to attach to structures. If you’ll be using them as window shades, plan for rod openings at the top and bottom, and use tension rods to mount inside the window frame.

Shade fabric mounted on a tension rod inside a window frame.
  1. Measure and Cut the Fabric: Start by measuring the area where the shade fabric will be installed. Add extra inches to each side for hems, seams, and pockets (if being used with a rod). Use heavy-duty scissors or a utility knife to cut the fabric.
  2. Hem the Edges: Because the fabric doesn’t fray, you could leave the cut edge; however, a 1 1/2″ to 2″ fold provides sturdiness to all sides and also provides solid anchor points. A single fold is sufficient if grommets aren’t being used. A double-folded hem will provide strength and durability to the fabric for mounting hardware. Stitch using either a straight or zig-zag stitch. Alternatively, edge binding can be used to reinforce the edges.
  3. Rod Pocket: If using as window shades, sew an open pocket at the top and bottom for your rods.
  4. Reinforce the Corners: Corners are often the weakest points in shade fabrics, so reinforcing them is crucial. Cut small pieces of reinforcement tape or webbing and sew them onto the corners of the fabric. This will prevent tearing and provide extra strength where the fabric will be attached to a structure.
  5. Test the Fit: Once you’re satisfied with the fit, install the shade fabric in its final location. Use ropes, cables, or other fasteners to secure the fabric to the structure. Make sure the fabric is taut to prevent sagging and ensure it provides maximum shade.

If using the shades for your windows, install them on the OUTSIDE of your windows to prevent the heat from transferring through the window into your room.

As temperatures rise, a shade sail, cover, or window shade will help keep you and your home cool and comfortable, allowing you to customize your outdoor spaces according to your needs and style.


August 13, 2024

2024 Fashion Show

Images from the 2024 Fashion Show at ASG Conference. Special thanks to Barbara George from the San Jose, CA chapter for organizing this event!

August 9, 2024

How to: Blind Hem Stitch

Ah, hem

Whether you prefer to hem your garments by hand or machine is a matter of preference but sewing machine manufacturers have risen to the latter cause by including a blind hem stitch on most models. It may be one of those quirky-looking stitches you don’t often use, but creating an invisible hem on many fabrics is possible.

The Stitches

You may, in fact, have two blind hem stitches—one for knits and one for wovens. The knit stitch has multiple zigzags between larger “bite” stitches, while the stitch for wovens has straight stitches between the wide zigzag bites.

Woven blind hem stitch. Image compliments of Bernina.


Knit blind hem stitch

The knit zigzags allow the hemline to still have some flexibility and stretch, while the straight stitch version creates a stable hem.

Blind hem Foot

Blind hem foot from Singer.

Your machine brand may also offer a specialty presser foot specifically for blind hemming. The guide bar is movable on some brands of feet, so that the wide zigzag catches only a small amount of the garment fabric and hem area.

Before you dive in to the real deal, it’s imperative to practice this process on some scraps of your project fabric before sewing the actual garment. Fine tune the stitch and placement for minimal show-through on the right side.

Choose a thread color that closely matches your fabric. If you’re working with a print fabric, choose a thread color to blend with the most dominant color. Use the same color bobbin and top thread. Tempting as it may be, it’s best not to use invisible thread for blind hemming.

On the edge

If the garment fabric ravels, finish the hem edge using a zigzag, serging or hem tape to neaten it. If it isn’t too heavy, simply press under the raw hem edge ¼” and stitch it in place.

On knit fabrics, no hem edge finish is needed, as knits don’t ravel. However, you can finish the edge if you prefer.

It’s all about folding

The key to an invisible blind hem is in the folding. First, fold and press the finished hem allowance to the wrong side. Fold the garment back upon itself leaving ¼” of the hem extending beyond the fold. Pin the folded hem in place. The ¼” extension is where the stitching will be placed.

Adjust the stitch width so that the stitching along the finished hem edge will allow the wide zigzag “bite” to catch a tiny portion of the garment wrong side. If that stitch catches too much fabric, the stitch will show prominently on the garment right side. If it doesn’t catch enough fabric, your hem will not stay in place. The key is to catch just the right amount to hold and not show. Working with a practice piece of the same fabric as your garment is key to proper positioning.

If you have an adjustable foot, you can move the stitch right or left by moving the guide that runs along the folded hem edge. Or you can adjust the stitch width, or a combination of the two for optimum catch and hold and minimal show on the right side.

In addition to adjusting the stitch width, you can also adjust the stitch length to spread out the bite stitches, depending on the fabric. But don’t lengthen the stitch too much as the hem could gape or be caught during wearing.

If your machine has an adjustable needle position, you can also use that to fine-tune the stitch placement. So, it’s a balance of the stitch width and stitch length, and the positioning of the stitch using an adjustable foot and needle positioning.

Blind hem foot in use. Photo compliments of Bernina.

Once you’ve practiced and gotten the hang of it, then sew around the hem on your garment. When stitching is complete, open out the hem and press to set the stitching.

Fabric options

Singer blindhem foot in use.

Machine blind hemming works best on textured medium- to heavy-weight fabrics. It’s ideal for wool, fleece, suitings, etc. The texture helps to hide the bite stitch thread, as does any fabric print. For lightweight fabrics and solid colors, the stitch will show more and if you’re not happy with the look, opt for another hemming method.


~Linda Griepentrog is the owner of G Wiz Creative Services and she does writing, editing and designing for companies in the sewing, crafting and quilting industries. In addition, she escorts fabric shopping tours to Hong Kong. She lives at the Oregon Coast with her husband Keith, and three dogs, Yohnuh, Abby, and Lizzie. Contact her at .

August 2, 2024

Fold-Over Elastic

Fold-over elastic (also known as FOE) is one of those notions that, once you try it, you’ll wonder how you ever managed without it. It’s a versatile, latex-free product that functions similarly to bias binding to finish a raw edge, with the added benefit of stretch and recovery so it keeps the edge up against the body. FOE comes in a variety of widths, finishes, patterns, and colors, and for that very special project, you can even dye your own.

Fold-over elastic is available from sewing retailers and from Amazon. We receive a small commission when you make a purchase from Amazon using this link.

The elastic has a channel right down the middle to easily fold it exactly in half.  In most cases, the narrower the elastic, the more stretch it has. While you can use different widths of fold-over elastic on the same project but keep the stretch factor of each and where you plan to use it when choosing your yardage.

How to use it

In most cases, your elastic should be 90% of the length of your fabric. Remember to account for seaming!

Tip: If your fold-over elastic has both a shiny and a matte side, the shiny side is typically the outside or “front” of the elastic.

To start insertion, leave about 1″ of elastic hanging off the edge of the fabric. Fold the elastic, encasing the edge of your fabric, then stitch through all layers of elastic and fabric in one operation. Choose a stitch that can be centered so that it sews half on the elastic and half on the fabric. A good choice is the wavy zigzag serpentine stitch. To accommodate the stretch in the elastic, lengthen the stitch slightly. For some applications, such as when using a 5/8″ wide, satin-finish fold-over to finish a neckline, use a matching silk thread so that the stitches will blend in. In this case, position the stitches so they fall mainly on the elastic, just barely catching the fabric on the left swing of the needle. After you have done this once or twice, you will find pins are only a nuisance.

Watch this video for 4 different ways to sew with fold-over elastic:

Project Ideas

Diaper covers: For moms who prefer to use cloth diapers, diaper covers are often a “must have.” You can whip up a dozen in no time flat using 1″ fold-over elastic. The product is latex free, so it’s hypoallergenic and great for baby and functions as a binding along the straight edges of the cover. In the leg area, where a tight fit is crucial to holding in wetness, pull firmly on the elastic as you apply it. Once you are past the leg area, release the elastic so it becomes “just” a binding. Even on the straight edges, pull on the elastic ever so slightly so there will be no slack in your diaper cover.

Plan to join the ends of the elastic in an inconspicuous spot, such as at the center back. To do this, start and stop the application about 2″ on either side of where you want the joining to fall, also remembering to leave 1″ tails of elastic. Place the elastic tails right sides together and stitch a 1″ seam. Trim the seam allowance to 1/4″. Open up the seam allowance, refold the elastic, and complete the application.

Swimwear: If you use FOE for swimwear, you won’t be folding over the edge of the fabric so start by trimming 1/4″ from the seam allowances that you will be finishing with the elastic. Remember that your fabric is not folded, it will simply be encased withing the fold-over elastic.

Click the image below for an article at Brother with step by step instructions for sewing with fold-over elastic.

Visit Brother-USA for step-by-step photos for how to sew with fold-over elastic.

Other great projects include baby clothes, fitted sheets, and converting a crew neck T-shirt to a satin-edge T-shirt with a deeper neckline. You can even fix a gaping neckline or armhole with FOE.


  • « Previous Page
  • 1
  • …
  • 6
  • 7
  • 8
  • 9
  • 10
  • …
  • 63
  • Next Page »

Become a Member

Join the only national organization dedicated to Advancing Sewing as an Art and Life Skill.

Join Now button

Blog Article Categories

  • ASG Conference
  • Chapter Stories
  • Embroidery
  • Fitting
  • Learn to Sew
  • National Sewing Month
  • Products, Books, & Patterns
  • Projects
  • Quilting
  • Sewing
  • Sewing Techniques
  • Sewing Tips
  • Sewing Tours
  • Videos
  • Disclaimer
  • Privacy Policy

American Sewing Guild
National Headquarters
9660 Hillcroft, Suite 230
Houston TX 77096
713-729-3000 | 713-721-9230 Fax
www.ASG.org

ASG wordcloud - education, conference, discounts, videos, special offers, tours and more

Copyright © 1998–2025 · American Sewing Guild · All Rights Reserved