American Sewing Guild (ASG)

Visit our blog Visit the ASG Facebook page Visit ASG on Pinterest Visit ASG's YouTube channel Visit ASG on Instagram
  • Home
  • Join ASG
    • Join Online
    • Chapter Locations
    • Member Benefits
    • Member Brochure
    • Join by Mail
  • Conference & Education
  • Resources
    • Contests & Awards
    • Giving Back
    • Hall of Fame
    • Links
    • Travel and Tours
    • Measurement Chart
  • Shop
    • ASG Store
    • Chapter Products
    • Video Resources
  • Blog
  • About
    • About Us
    • Donate to ASG
    • ASG Sensitivity Statement
    • FAQ’s
    • Start a Chapter
  • Contact
  • Member Login
    • Login First!
    • Members Only
    • Leadership Only
    • Website FAQ’s
    • Logout
  •  

January 19, 2024

Q&A: Piping, Seam Allowances, PomPoms

How do I?

Sewers can frequently say these three simple words to other sewers, and it’s often at an ASG meeting, get together, or workshop. Most times the answer is simple and readily shared by perhaps a more experienced sewer. We’ve received some of those questions, and we’ve got some answers.


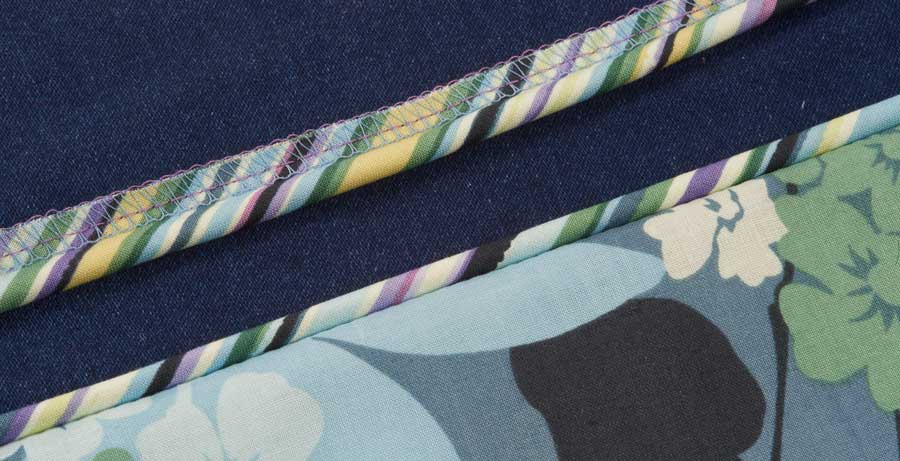
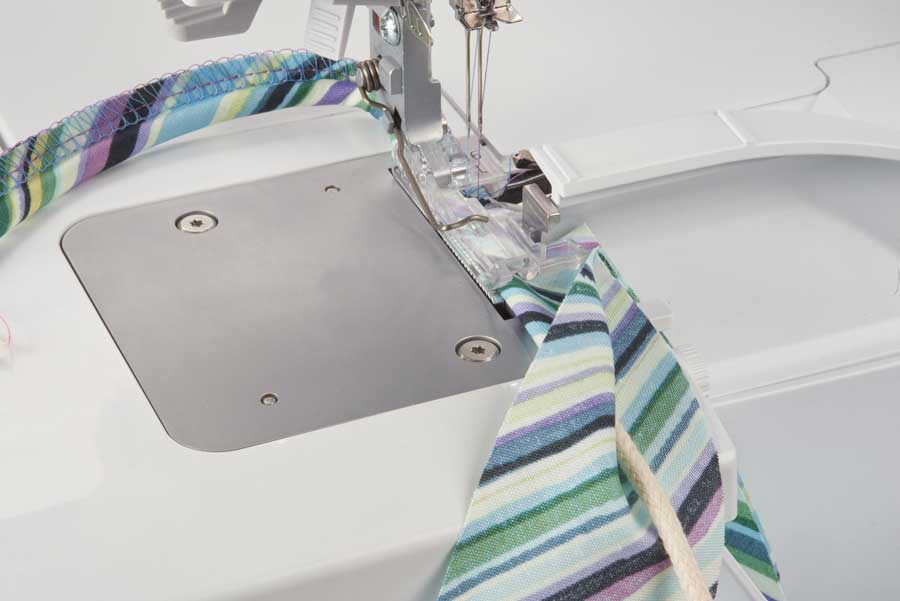
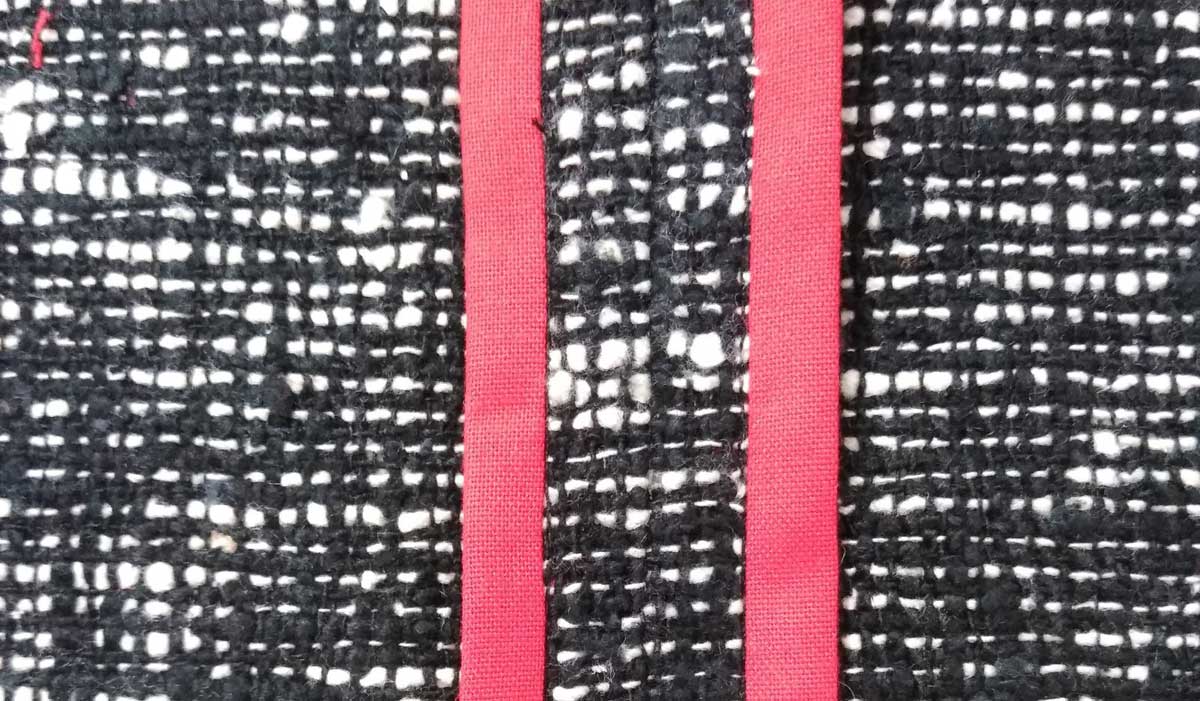
HOW DO I…make piping so that the stitching doesn’t show when I insert it?

Making piping

The easiest way to solve this dilemma is to not stitch it when you’re covering it! Measure the circumference of your piping filler cord and add 1 ¼” for seam allowances. Cut your piping covering fabric to that width by the amount of length needed, plus an extra inch or two. This fabric can be cut on the straight grain or bias, depending on where the piping will go and the desired finished look. If it goes around any curves, cut the covering fabric on the bias.

Cut a strip of fusible web the same size as the covering fabric, noting that it may be necessary to abut the ends to get the length needed.

Place the fusible web on the wrong side of the fabric strip and wrap it around the filler cord. Using the tip of your iron, press the long raw edges of the piping covering together, snugging the fabric up to the cord. During insertion, use your zipper foot and adjust the needle position so it’s as close to the cord as possible for perfect piping.


HOW DO I…finish the seam allowances of an unlined jacket made from a ravelly fabric like silk suiting?

Hong Kong finish

One of the easiest and nicest looking methods of taming a ravelly suiting is called a Hong Kong finish. It’s easy to do and makes the inside of your jacket look stunning.

Begin by choosing a binding fabric—it can be a color match to your garment, or a stark contrast if you prefer; it can be solid or print, depending on how much pizazz you want on the inside. Lining fabric works well for this technique as it’s lightweight, but you can also use lightweight cotton.

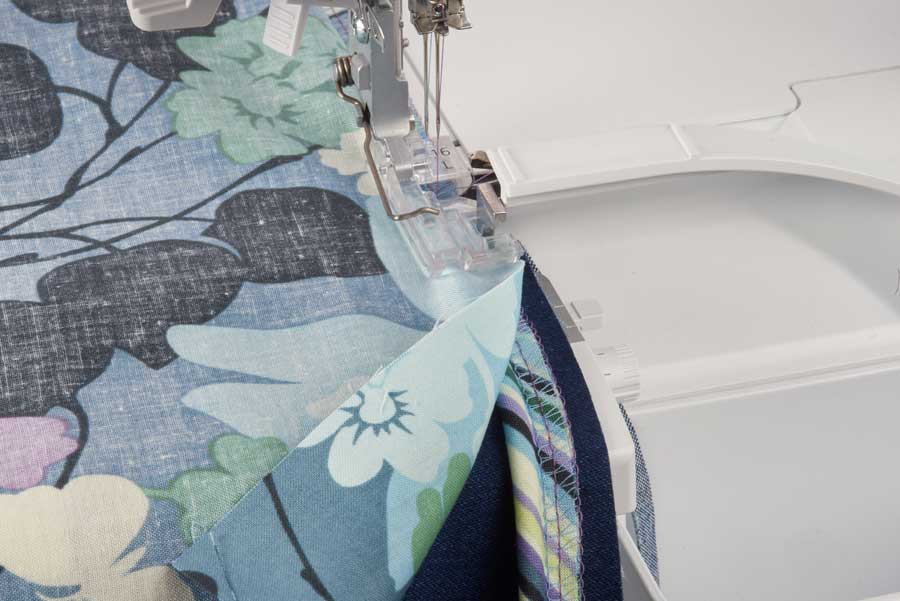
Cut bias binding strips 1” wide (1 ¼”-1 ½” for bulky garment fabrics). This allows you to bind both straight and curved seams without puckers. Piece the strips together with diagonal seams to get the length needed and press those joining seams open.

Press the seam allowances of the jacket open (except armholes). On armholes, press the seam allowances in one direction and bind the two edges together. Pin the binding to a single layer of the seam allowance, matching the raw edges. Sew with a ¼” seam allowance being careful not to stretch the binding. Press the binding away from the seam, and fold it snugly over the seam allowance edge, then pin in place. Stitch in the ditch of the seam to secure the binding underside. Press, then trim off any excess binding width on the wrong side, leaving about 1/8” beyond the stitching.

Quick Tip: For even faster binding, use fusible thread in the bobbin for the initial stitching line, then fold the binding strip over the seam allowance edge and press to hold it in place.

This technique can also be used on facing, pocket and hem edges for a beautiful inside finish. And it can be used on reversible garments as well—instead of stitching in the ditch of just the single-layer seam allowance, stitch through the entire garment to flatten the seam. One side will show topstitching and the other side will show the finished seam allowances.

Learn more about the Hong Kong seam finish in the article, “Tailoring Tricks Part 3: Hong Kong Seam Finish”


HOW DO I…make a pompom for a fleece hat?

Pompoms

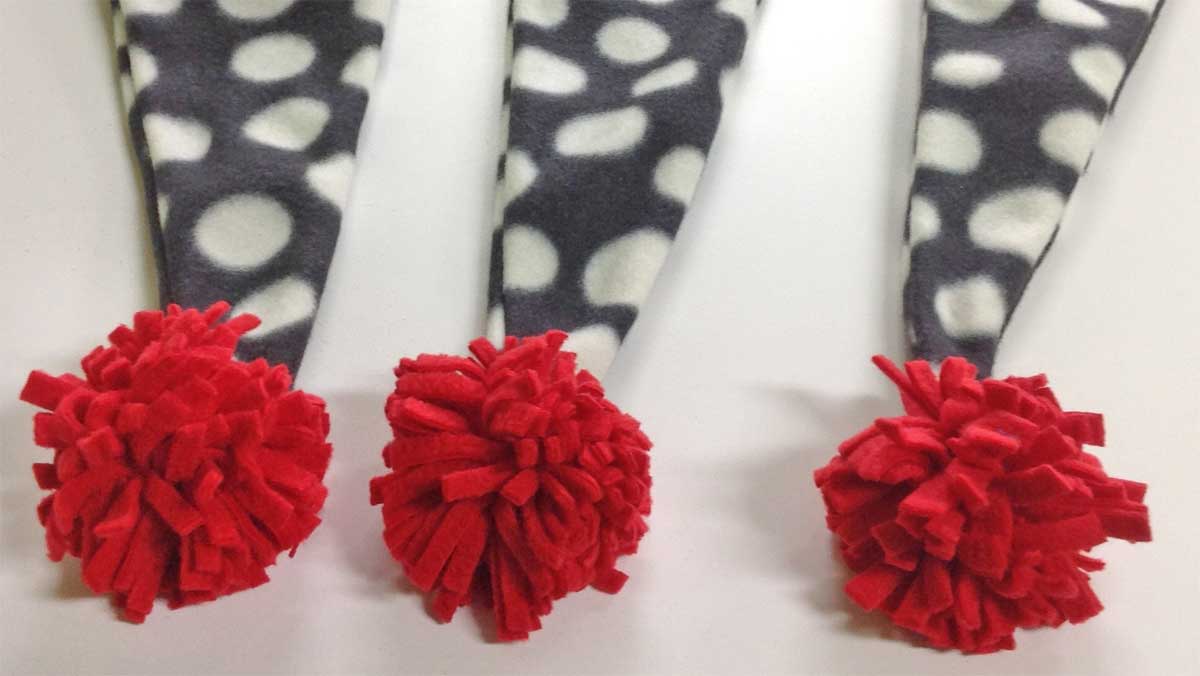
Fleece makes great pompoms because it doesn’t fray, so all you have to do is cut. Decide on the finished size of your pompom and cut 30 fleece strips ¼” wide by the length you determined. Cut an extra ¼” strip about 8” long. So, for a 4” pompom, you’ll need thirty 4” x ¼” strips and one ¼” x 8” strip.

Stack up the like-size strips directly on top of each other and use the longer strip to tightly tie the center of the stack together; knot securely. Fluff up the pompom and use the longer strip end to attach the pom to the hat—either in the seam as you’re constructing it or threaded into a tapestry needle and attached after construction.

If desired, clip the ends of the pompom strands at an angle.


~Linda Griepentrog is the owner of G Wiz Creative Services and she does writing, editing and designing for companies in the sewing, crafting and quilting industries. In addition, she escorts fabric shopping tours to Hong Kong. She lives at the Oregon Coast with her husband Keith, and three dogs, Yohnuh, Abby, and Lizzie. Contact her at .

Tagged With: hong kong finish, piping, pompoms, tips

July 3, 2020

Serger Piping

Pipe it Right

Perhaps you’ve never looked beyond the standard foot on your serger to see the other possibilities of this mighty little overlocker. Did you know you can actually make and install foolproof piping?

Check your instruction manual or with your dealer to see about getting a piping or cording foot for your model of machine. It’s either a metal or plastic foot with a groove on the underside, which is the secret to the process. Depending on your serger brand, you may be able to get different sizes of the grooved feet, like 3mm and 5mm (referring to the diameter of the cord that will go into the piping).

The piping foot can also insert ready-made piping if you prefer not to make your own.

Check your serger’s instruction manual for specific setting for your machine. The following are general instructions.

Making Piping

  1. Determine the length of cording needed for your project and add 6”. Cut the fabric strips the same length.
  2. Cut a strip of fabric about 2” wide and on the bias grain if your piping will be going around a curve or a corner. Plaids and stripes look great cut on the bias as well. If the piping is simply being applied to a straight edge, cut the strip on the crosswise grain. Piece the strips together with a diagonal seam to achieve the final length needed and press the joining seams open.
  3. Center the cord length in the center of the strip wrong side and fold over the upper fabric so the raw edges meet. Leave about a 3” tail of cord extending from the initial end of the mix, so you can hang onto it behind the foot.
  4. Set the serger for either a 3-thread or 4-thread stitch, with a fairly open length.
  5. Slide the cord end under the foot and nestle it into the groove, then pull the end behind the foot until you get to the wrapped fabric portion. Put the foot down and stitch! The groove guides the cord with precision, the blades trim off the fabric edges and give you an even seam allowance. Voila!

Inserting piping

  1. Set the serger stitch length to a standard length (about 2.5mm).
  2. Place the piping between the two layers of project fabric, either matching the seam allowance edges, or with the cord along the seam allowance. Slide the layers under the foot and again place the piping tail extending behind the foot. Start stitching about 1” from the covered piping end if you need to finish the end upon completion. If the piping end goes into a seam, then start at the end.
  3. Keeping the layer edges together and the piping in the foot groove, sew the seam, encasing the piping between the layers.
  4. If your project has a corner, stop serging about 2” before the corner and clip into the piping seam allowance (only) at the exact corner location. Shape the piping around the corner, but continue to serge straight off the end of the seam area. Remove the item from the serger, shape the piping around the corner, and reinsert the project into the serger at a right angle to the previously serged seam. Start serging again on the next side, and repeat at each corner.
  5. If your piping project is continuous, like a rectangular pillow, stop serging about 2” before the place you began and finish the joining using your conventional machine.

PHOTO CREDITS: All photos courtesy of Bernina, used with permission


~Linda Griepentrog
Linda is the owner of G Wiz Creative Services and she does writing, editing and designing for companies in the sewing, crafting and quilting industries. In addition, she escorts fabric shopping tours to Hong Kong. She lives at the Oregon Coast with her husband Keith, and two dogs, Yohnuh and Abby. Contact her at .

Did you enjoy this article?
Are you an ASG member?
This field is for validation purposes and should be left unchanged.

Tagged With: overlock, piping, serger

Become a Member

Join the only national organization dedicated to Advancing Sewing as an Art and Life Skill.

Join Now button

Blog Article Categories

  • ASG Conference
  • Chapter Stories
  • Embroidery
  • Fitting
  • Learn to Sew
  • National Sewing Month
  • Products, Books, & Patterns
  • Projects
  • Quilting
  • Sewing
  • Sewing Techniques
  • Sewing Tips
  • Sewing Tours
  • Videos
  • Disclaimer
  • Privacy Policy

American Sewing Guild
National Headquarters
9660 Hillcroft, Suite 230
Houston TX 77096
713-729-3000 | 713-721-9230 Fax
www.ASG.org

ASG wordcloud - education, conference, discounts, videos, special offers, tours and more

Copyright © 1998–2025 · American Sewing Guild · All Rights Reserved