American Sewing Guild (ASG)

Visit our blog Visit the ASG Facebook page Visit ASG on Pinterest Visit ASG's YouTube channel Visit ASG on Instagram
  • Home
  • Join ASG
    • Join Online
    • Chapter Locations
    • Member Benefits
    • Member Brochure
    • Join by Mail
  • Conference & Education
  • Resources
    • Contests & Awards
    • Giving Back
    • Hall of Fame
    • Links
    • Travel and Tours
    • Measurement Chart
  • Shop
    • ASG Store
    • Chapter Products
    • Video Resources
  • Blog
  • About
    • About Us
    • Donate to ASG
    • ASG Sensitivity Statement
    • FAQ’s
    • Start a Chapter
  • Contact
  • Member Login
    • Login First!
    • Members Only
    • Leadership Only
    • Website FAQ’s
    • Logout
  •  

March 1, 2024

Sew Much Fun Tour: Hong Kong

Sew Much Fun Hong Kong
December 3-11, 2024

Travel is good for the soul…and it’s good for the fabric stash as well. Who among us hasn’t Googled “fabric stores” when we’re headed to a new city? Or even a new country? We have a never-ending sense of curiosity and seem to be afraid of “missing something.”

Hong Kong Sew Much Fun tour 2024

Get ready to pack your bags and broaden your horizons. We’re thrilled to announce that our Sew Much Fun Tours are back in action and we’re jetting off to a favorite destination – the vibrant city of Hong Kong. This journey promises not only a feast for your soul but also a delightful addition to your fabric collection. We’ll be shopping markets for fabric, notions, jewelry, beads, and more. There will be a behind-the-scenes tour of a costume shop, visits to designer outlets, a Tai Chi lesson, and much more. It’s time to get back on the road, or in the air. There’s fabric out there calling your name!

I’m happy to be a part of that by escorting my 22nd tour to Hong Kong this December 3-11, along with my friend Pauline Richards. We’ve done this tour together for many, many years and know a lot about the alleyways of the city, and where to find most anything you could want in the way of fabric, trims, buttons, etc. And, if we don’t know where to find it, we know who to ask.

Tour Information/Registration Form

This year we’re doing something a bit different than in previous years. In the past, many of you have used award miles for the trip, or you wanted to go early or stay longer, or you wanted to go on a different flight from your home city, so we said “OK, let’s offer the tour without airfare so group members can do that.” This year, you can book your own airfare. We’ll tell you which flight we’re taking if you’d like the security of being with your guides, but you have the option for other arrangements.
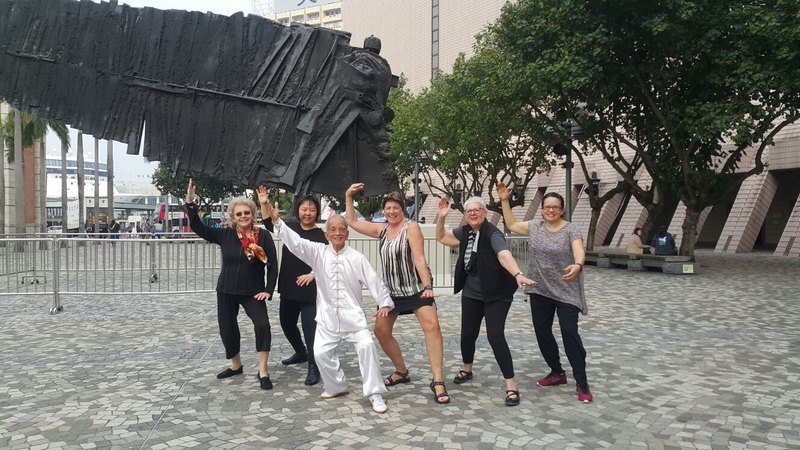
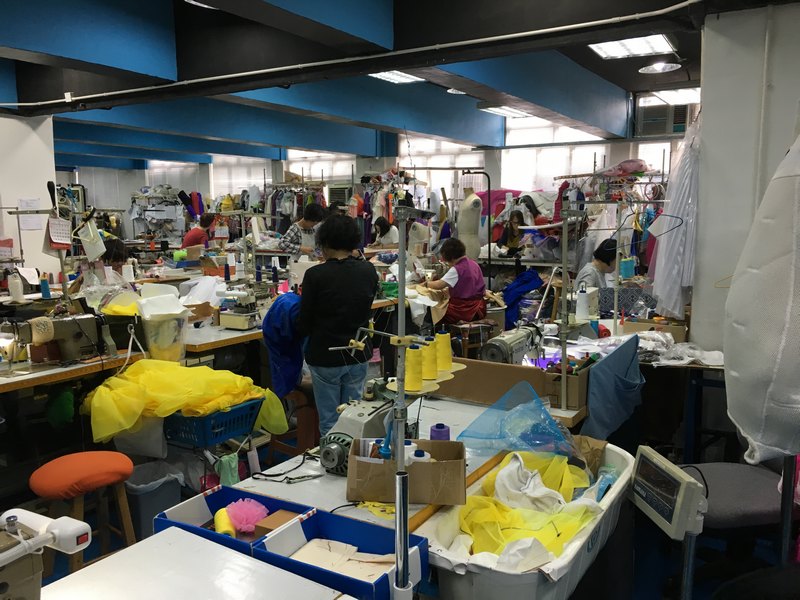
Hong Kong tour of costume shop
Honk Kong tour pic

If the idea of an Asian jaunt intrigues you, view our Information/Registration Form to find out more or sign up to join us. And if you have tour questions, feel free to email or call me at the number listed on the registration form.

We hope you can join us on this adventure!
Linda Griepentrog


~Linda Griepentrog is the owner of G Wiz Creative Services and she does writing, editing and designing for companies in the sewing, crafting and quilting industries. In addition, she escorts fabric shopping tours to Hong Kong. She lives at the Oregon Coast with her husband Keith, and three dogs, Yohnuh, Abby, and Lizzie. Contact her at .

March 1, 2024

Charitable Sewing: Cause and Effect

Sewing teddy bearsWe all love to sew but sometimes you want to switch up your sewing projects beyond your own clothes, quilts, or placemats. What do you do? Look for opportunities to share you sewing skills with others in need.

Donating your time and talents is a selfless act. While your donation makes a direct impact in another’s life, the benefits to you are just as important. Giving is in our nature and those that do experience a sense of personal satisfaction and feelings of self-worth. These feelings can result in lower blood pressure, lower depression rates, and longer life expectancy. Additionally, research has found that donating activates the pleasure center in your brain and results in improved happiness, joy, and contentment.

ASG Chapters are known for their charitable sewing nature and almost always have numerous charitable sew-ins, events, and more that are geared towards community needs. However, if you either can’t participate, or would like to spend time doing more, there are myriad national charity organizations that welcome sewn items. It’s just a matter of connecting, learning about their needs, and matching up your sewing skills to help fulfill the need.

Below is a list of some (by no means all) national and international organizations that welcome sewn items.

  • American Hero Quilts: patriotic quilts for wounded military veterans.
  • Binky Patrol: blankets and quilts for children who need comfort.
  • Capes for Kids: super-hero capes for children in shelters.
  • Charlotte’s Purpose: Wrapped in Love project for burial gowns and layettes for stillborn infants made from wedding gowns.
  • Days for Girls: bags and hygiene supplies for menstruating girls around the world.
  • Doll Adoption Program: dolls for children in shelters.
  • Dress a Girl Around the World: dresses for girls in need.
  • Giving Doll: handmade dolls for hospitalized children.
  • Little Dresses for Africa: dresses for girls in Africa.
  • Newborns in Need: blankets, quilts, bibs, etc. for newborn babies.
  • Operation First Response: backpacks and cot quilts for hospitalized wounded soldiers.
  • Prayers & Squares: quilts for those in need of comfort.
  • Project Linus: blankets and quilts for kids in need.
  • Project Smile: stuffed animals for children in need.
  • Quilts for Kids: quilts for children in need.
  • Quilts of Honor: patriotic quilts for active military and veterans.
  • Quilts of Valor: patriotic quilts awarded to military veterans.
  • Ryan’s Case for Smiles: pillowcases for hospitalized children with serious illnesses.
  • Sew Much Comfort: adaptive clothing for injured military veterans’ needs.
  • Sew Powerful Purses: purses to hold hygiene supplies for girls in Zambia.
  • Sleeping Bag Project: sleeping bags for the homeless.
  • Stitchin’ for Kids: sewn gifts for children with extended hospital stays.
  • Threads of Love: clothing and blankets for premature and sick infants.
  • Traveling Pillowcases: pillowcases for kids in shelters.

Think Local

Shelter dogNo matter how small your community, it’s very likely that you can put your sewing expertise to use in a charitable way. Call your local animal shelter to see if they can use pet beds, blankets, scarves, or leashes. Contact a local hospital to offer specialty bags for post-surgery patients, blankets or quilts for dialysis and chemo patients, or even drawstring bags for patients to keep their possessions nearby while bedridden.

If you have a children’s hospital, think not only of blankets and quilts, but toys, stuffed animals, and accessories to keep kids entertained during long stays.

Hospice groups are often in need of colorful gowns to add cheer to patients’ days—easy projects for even beginners.

Homeless shelters and those for domestic abuse victims offer sewing opportunities galore, as often the residents have very little to nothing of their own. A sewn shirt, pants or dress, or even a tote could be a life changer, especially if there might be a job interview down the road to recovery. Or simple survival items like hats, mittens, and scarves can be lifesavers.

The Basics

Sewing friendsSewing projects for charity can be something you do alone or with your group of ASG friends so there’s a social aspect to it as well. Of course, more hands make the task not only more fun, but also faster.

  • Choose quality fabrics and avoid the temptation to use up “ugly” fabrics in your stash. People in need, for whatever reason, need to feel appreciated and dignified.
  • If you’re making large quantities of items, note that some manufacturers may donate items for use in the charitable sewing efforts. It never hurts to ask.
  • Be sure to double check the rules for each organization regarding their accepted donations. For example, many do not accept items from homes with smokers, or those tainted with pet hair, due to potential allergies. Other groups specify fabric types for donated items, or the construction process (i.e. no tied quilts, etc.). Some groups are in need of things of a specific size, for either garments, blankets or quilts.
  • Some organizations may have deadlines for donations that correspond with things like international shipping schedules, so be sure to double check how they need to receive goods.
  • Choose items to make as a group that can be broken into smaller tasks for assembly line construction. For example, on pillowcases, one person can cut trim strips, another can serge seams, etc.

Hearts

However you choose to share your sewing skills, whether it’s on your own, with an organized event, remember that your creativity and talents are just as beneficial to you as they are to others.


~Linda Griepentrog is the owner of G Wiz Creative Services and she does writing, editing and designing for companies in the sewing, crafting and quilting industries. In addition, she escorts fabric shopping tours to Hong Kong. She lives at the Oregon Coast with her husband Keith, and three dogs, Yohnuh, Abby, and Lizzie. Contact her at .

February 23, 2024

Hideaway Ideas for Small Sewing Spaces

As creative as we are with our sewing skills, sometimes we also have to get creative with our sewing space. A large, dedicated sewing room is every sewist’s dream, but finding the perfect sewing furniture for small spaces can be challenging, especially if it needs to blend with your living room, dining room, or bedroom decor and may need hidden away when not in use. Your local sewing store will usually have wonderful choices, but we also found some other sources for multifunctional spaces.

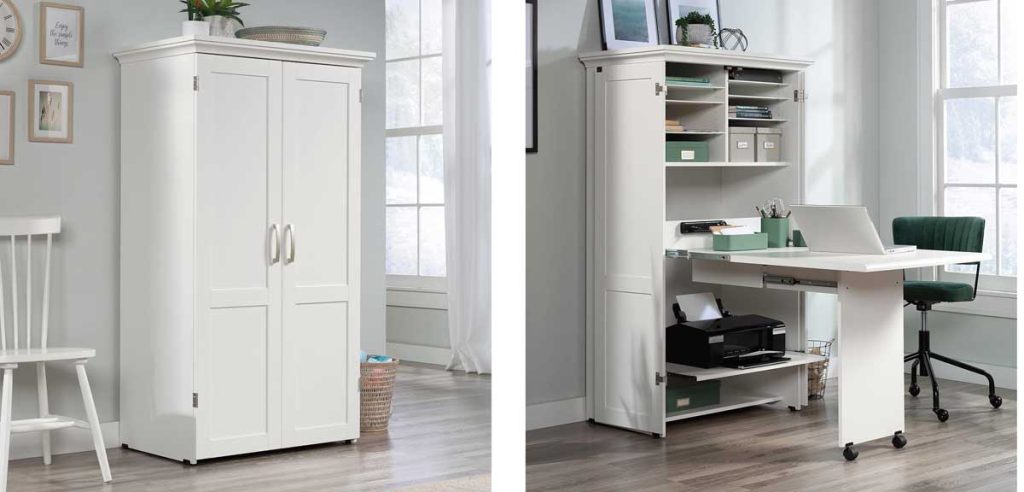
Sauder Craft and Sewing Armoire

When the doors are closed on this armoire, it’s just a stylish cabinet in your room. Open the doors to reveal a slide-out table for your sewing machine and 6 adjustable shelves to use for storage and comes in several different finishes to blend with your decor. The armoire is available from various online resources such as Home Depot, Walmart, Amazon, and more. Visit the Sauder website to see all of their furniture options. Assembly required.

If you purchase from one of our Amazon links, we may earn a small commission at no additional cost to you.

Sauder Craft Armoire

IKEA

IKEA, known for its affordable furniture, offers possibilities for creating a customized and efficient sewing space with pieces that can be repurposed to create a work area that suits your needs.

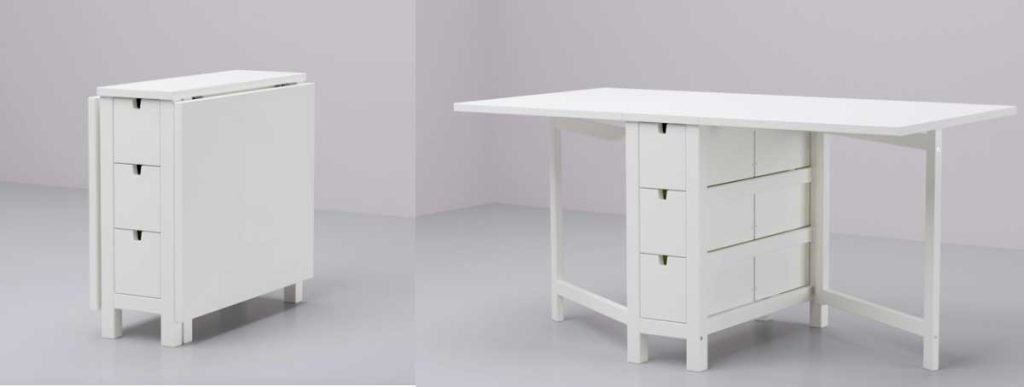
  • Foldable NORDEN Gateleg Table: Maximize space with the NORDEN gateleg table. When folded down, it’s compact enough to sit against the wall, but when expanded, it offers a large workspace for cutting fabric or as a work area. Mounting casters to the bottom enhances mobility and flexibility. Comes in white or birch.

IKEA NORDEN Gateleg table

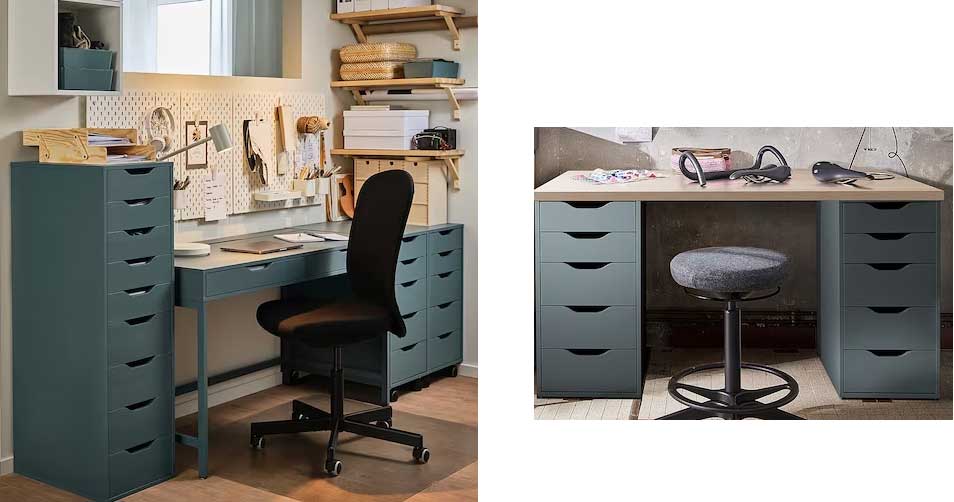
  • LINNMON tabletop and ALEX drawers. Combine two or more ALEX drawer units as table legs, then place the LINNMON tabletop on them. This creates a sturdy and spacious surface for your workspace.

Ikea furniture


Better Homes & Gardens Modern Farmhouse Sewing Table

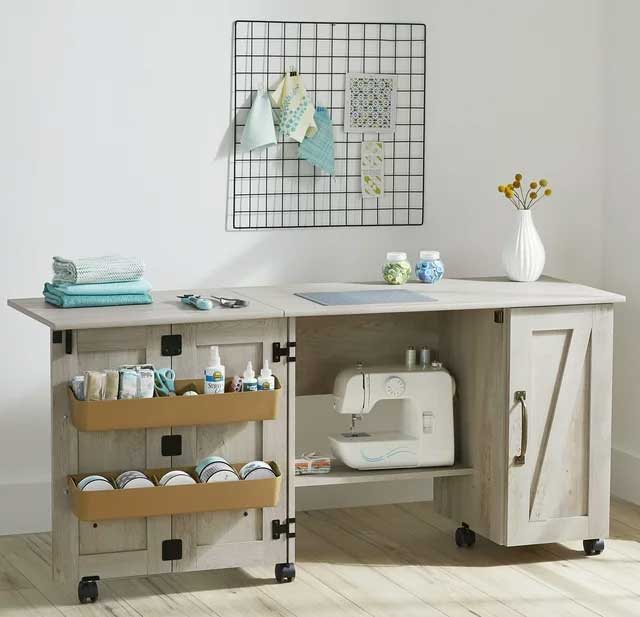
When this cabinet is closed, your machine and storage areas are hidden and the extension folds down flush to the cabinet. It takes up a small footprint and looks like a small sideboard in your room.

Better Homes & Gardens Farmhouse Sewing Table

DIY with Lumber and Paint

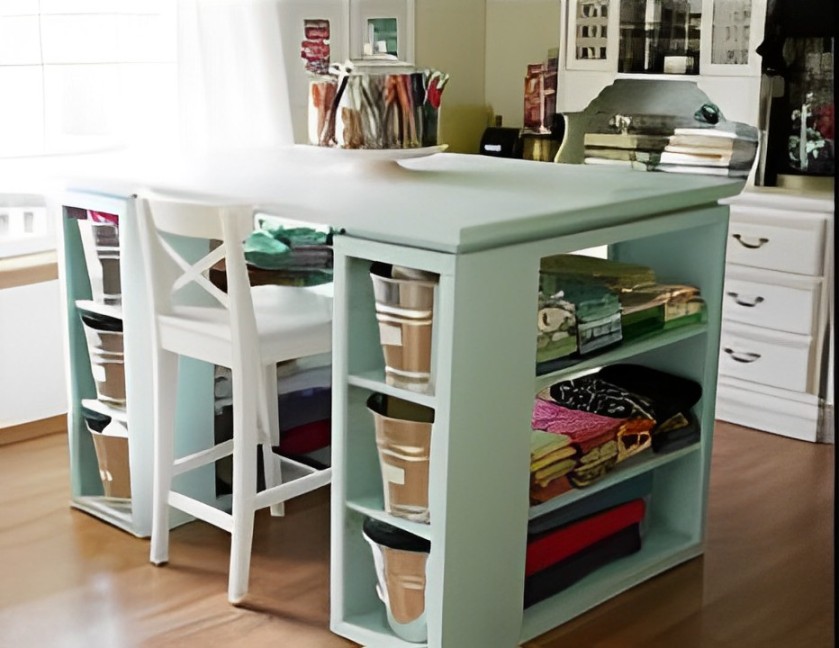
This sewing station can be made with DIY products from a big box store, or with pre-fab bookshelves. Add an MDF or laminated top and paint in your favorite color. Tip: some bookshelf units (including the BILLY bookshelves from IKEA) have doors available so that you can hide your supplies.

Image from Pinterest. Click for additional pictures and dimensions.

Slide and Hide

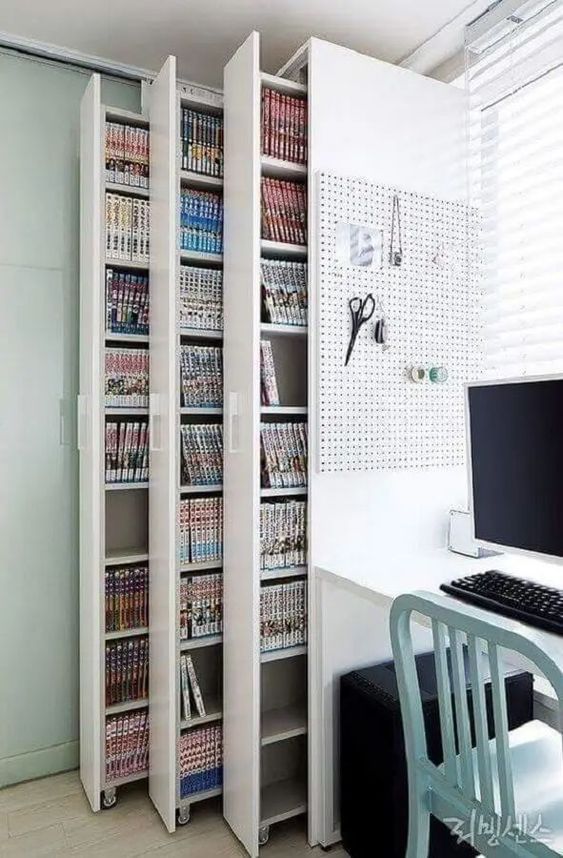
Small spaces need big solutions. “Cabinet filler” organizers are often found in the kitchen next to a wall or refrigerator. They can be wide or narrow and easily slide out on wheels to quickly choose what you need, then slide back in to be hidden away. These cabinets offer plenty of storage in a small footprint and can easily be customized with one or more sliders as needed.

Image from Pinterest user Craft-O-Maniac.com.

Whether you’re a seasoned seamstress or just starting out, organizing your sewing space to what’s comfortable for you and to what fits in your budget and home is key to unlocking your creativity and maximizing efficiency. Hopefully, these ideas will help you turn every project into a satisfying and enjoyable journey!


Did you enjoy this article?
Are you an ASG member?
This field is for validation purposes and should be left unchanged.


February 16, 2024

Presser Foot Fun: Non-Stick Machine Feet

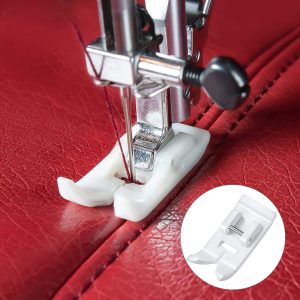
Non-Stick Zigzag Teflon Sewing Machine Presser Foot
Non-Stick Zigzag Teflon Sewing Machine Presser Foot available on Amazon.

Nothing is more frustrating than uneven stitching—your thread stitches can go from long to short in an instant, ruining your line of topstitching or seaming. In severe cases, the wickedly short stitches can damage fragile fabrics by creating a hole, and some fabrics don’t take kindly to ripping out stitching and beginning anew.

Stitching in one place isn’t a normal option, but sometimes you can end up doing so accidentally. This phenomenon often occurs on fabrics that tend to stick to the presser foot, sometimes causing things to come to a complete standstill. Vinyls, plastics, foams, laminated fabrics, suedes and leathers are the most frequent culprits as they can actually adhere to the bottom of metal presser feet. Add in a bit of warmth from the sewing machine light and voila—a sudden slowdown.

The solution: Always test-stitch and switch presser feet if there’s an issue.

Many sewing machine companies make non-stick presser feet specifically to handle these pesky fabrics. Depending on the brand of machine you own, you may be able to buy multiple types of non-stick feet for your machine, including those for zigzagging, straight stitching, decorative stitching or zipper insertion. Some non-stick feet can also accommodate a built-in dual-feed mechanism. Check with your dealer or look for generic non-stick feet for the same purposes.

If a non-stick foot isn’t available for your machine model, or you prefer not to purchase one, but still need a little gliding power, try this: Purchase some frosted tape the width of your presser foot base and cover the bottom of a regular foot with the tape. Use the handwheel to perforate the needle hole in the tape and carefully trim the tape to clear the needle area for stitching. Peel off the tape when you’re done with your project.

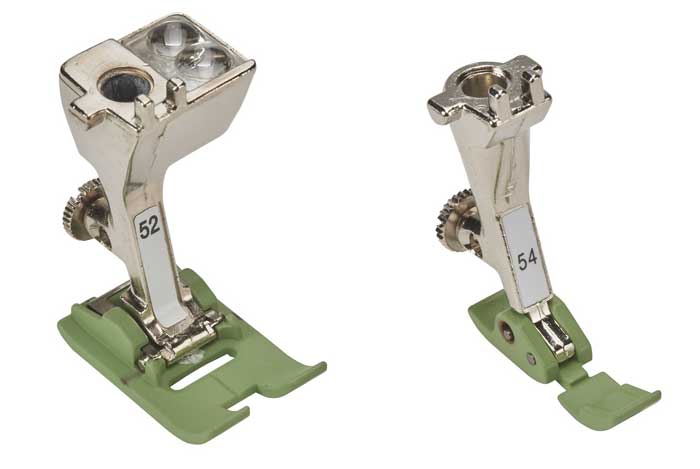
Examples of non-stick feet from Bernina

A Close Cousin…a Roller Foot

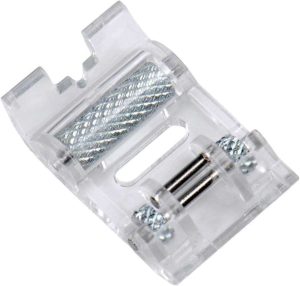
Roller presser foot available from Amazon.

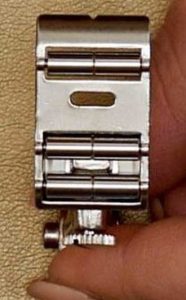
A close cousin to the non-stick foot is a roller foot. This unique foot serves the same purpose as the non-stick foot and upon careful examination, you’ll see that it has one or more tiny rollers built into it. The roller mechanism keeps the foot just slightly above the machine feed dogs for easier feeding.  Some roller feet are made from metal, others from non-stick material. Like its non-stick counterparts, the roller foot helps eliminate uneven stitching on sticky fabrics as it simply rolls over the surface without allowing any adhesion that can create uneven stitches.

Think of a roller foot like you think of snow tires for your car—a little bit of extra traction to keep things moving smoothly.

Underside of a Bernina roller foot

Note that some roller feet have smooth rollers, while others have cross-hatching for gripping the fabric surface. If you have a very delicate fabric, like chiffon or Lycra, it’s best to opt for smooth rollers to avoid imprinting or potential snagging.

Beyond Sticky

Both the roller foot and the non-stick foot can be used not only with those fabrics that tend to stick and cause uneven stitching, but they can be used with equal aplomb on bulky and “spongy” fabrics like bouclé, tweed suiting, bulky wool coatings and any type of fabric with an uneven surface or heavy nap. The rollers on the roller foot will glide over the surface irregularities without snagging or having the presser foot toes hang up on loose threads in a bulky weave.

If you’re stitching on paper for cardmaking, a roller foot can also be helpful for more even feeding, particularly on textured and novelty papers. Handmade papers, and those with seeds and natural materials incorporated are ideal to pair with either a roller foot or non-stick foot for effortless stitching.


~Linda Griepentrog is the owner of G Wiz Creative Services and she does writing, editing and designing for companies in the sewing, crafting and quilting industries. In addition, she escorts fabric shopping tours to Hong Kong. She lives at the Oregon Coast with her husband Keith, and three dogs, Yohnuh, Abby, and Lizzie. Contact her at .

Did you enjoy this article?
Are you an ASG member?
This field is for validation purposes and should be left unchanged.

February 9, 2024

Sew an Easy Sleeve Placket

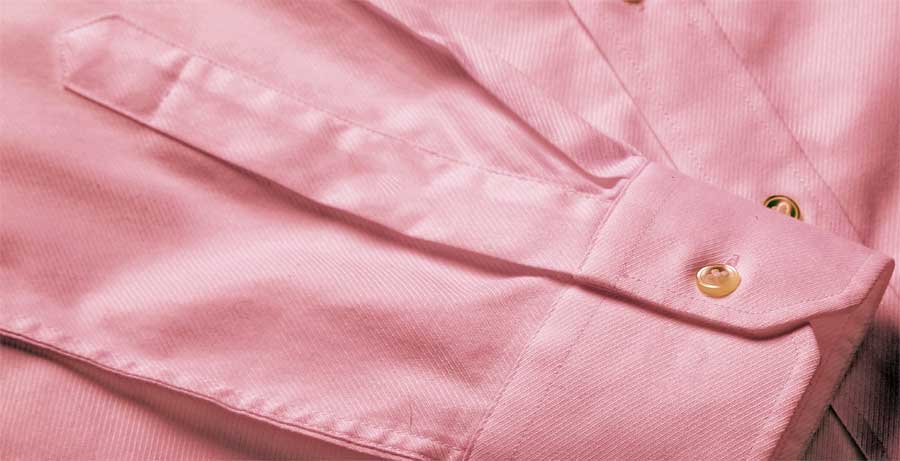
A sleeve placket is that nifty little opening at the bottom of a sleeve, skillfully stitched to let your hand slip through with ease. Typically, you’ll spot it on shirts or blouses, and it’s usually topped off with a neat cuff. Beyond its practicality, the placket can also be a real style statement. Ever thought of mixing things up with contrasting fabric for the cuff and placket?

Sleeve placket

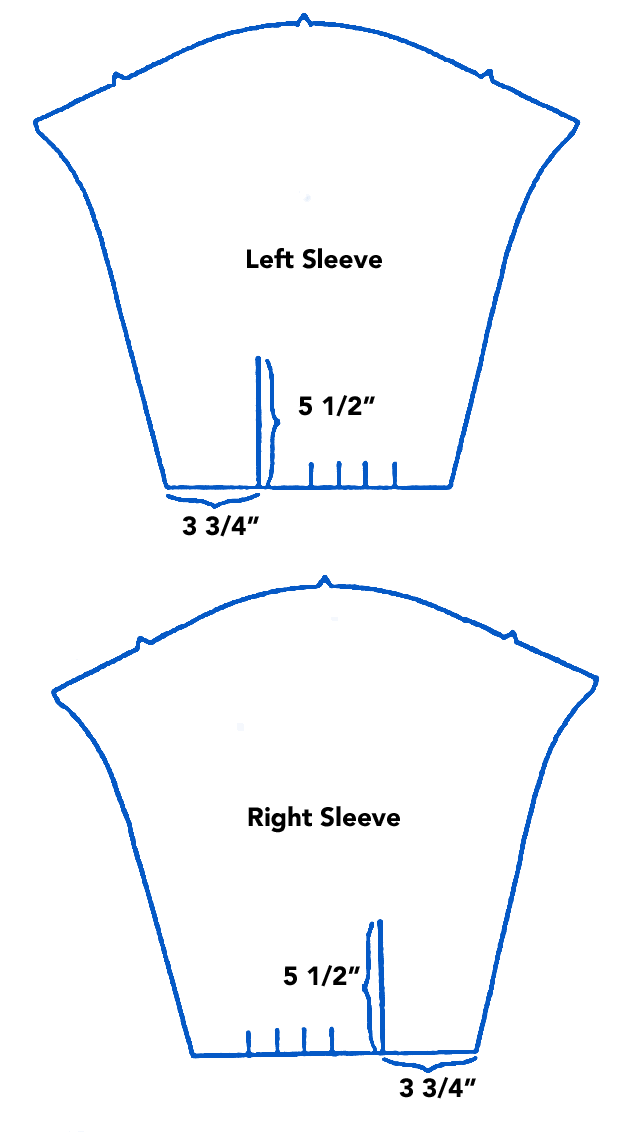
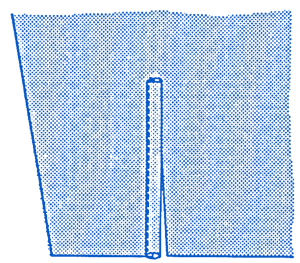
1: When making the placket, remember that the slash is on the sleeve back. Begin by marking the slash lines on sleeves. At the lower edge of own sleeve, measure 3 3/4” (9.5 cm) from one side edge, opposite the pleat markings. At the point, draw a slash line 5 1/2 (14 cm) long. Repeat this procedure with the second sleeve, measuring from opposite edge. This will give you a right and a left sleeve. (Figure 1)

Figure 1
Figure 1

2: Cut each sleeve on the slash line. Then cut two pieces of fabric on the straight of grain, 6 3/8” x 1 1/2” for under the sleeve packets.

3: With wrong sides of the under-sleeve placket together, fold under in half lengthwise and press.

4: On each long side of placket, fold 1/4” (0.6 cm) to the wrong side and press. (Figure 2)

Figure 2
Figure 2

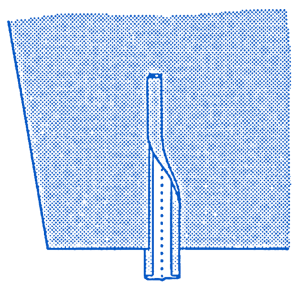
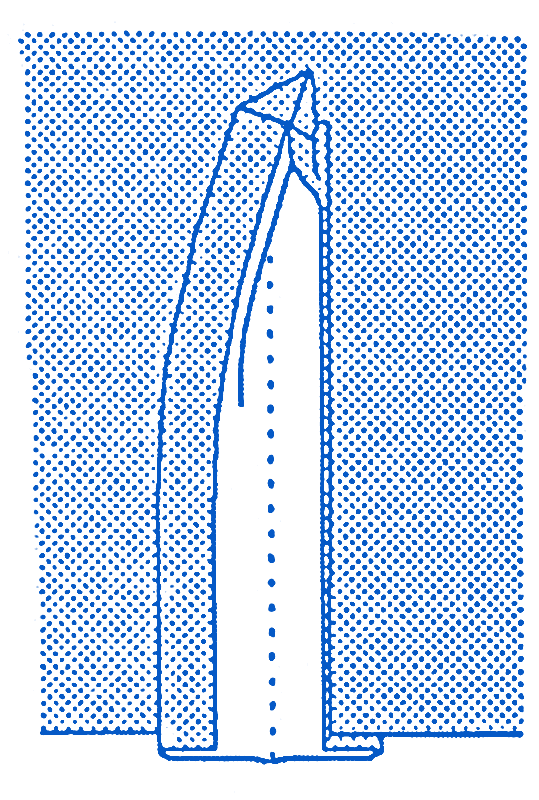
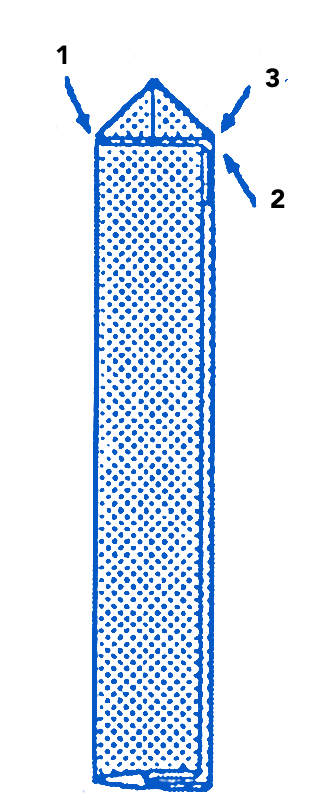
5. Insert the back side of slash on the sleeve between folds of the under-sleeve placket, matching cut edges inside, as illustrated. (Figure 3)

Figure 3
Figure 3

6. Pin in position and edgestitch on under-sleeve placket as illustrated, being sure to catch placket in the stitching on the underside. Trim the excess placket even with lower edge of the sleeve.(Figure4)

Figure 4
Figure 4

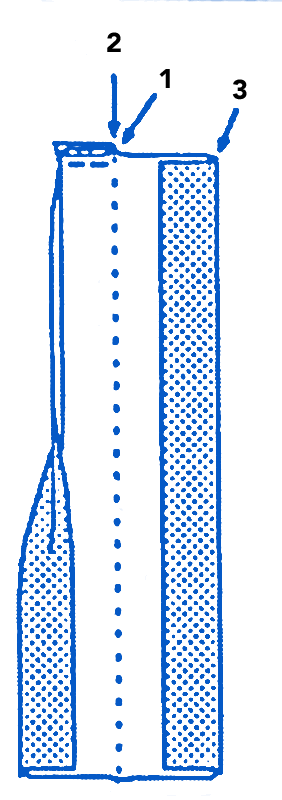
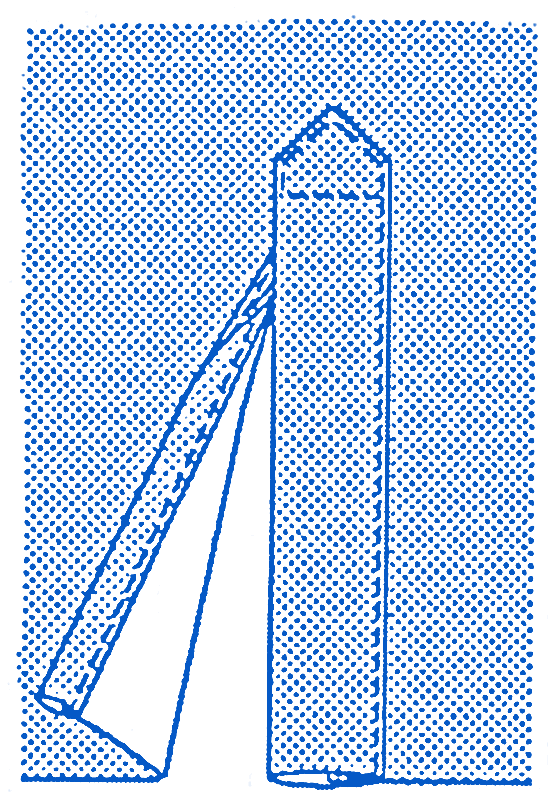
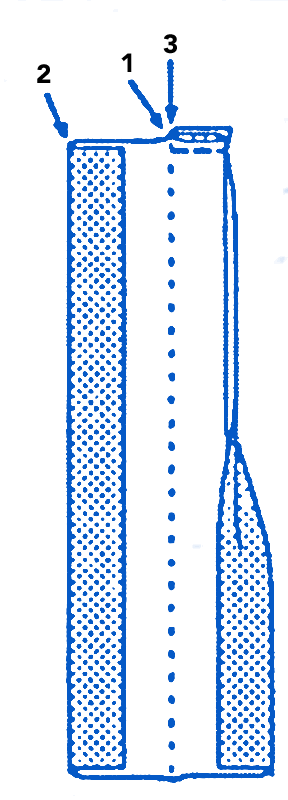
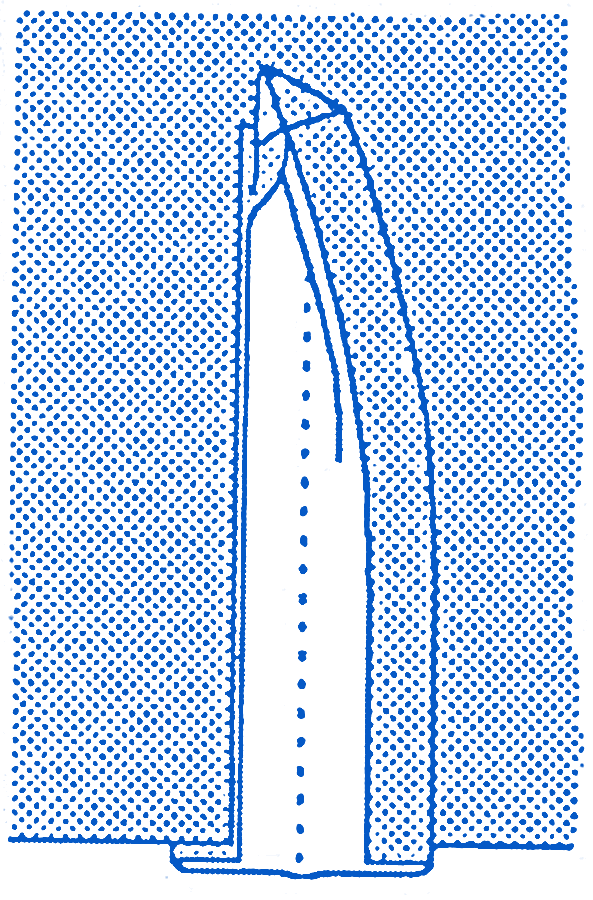
7. Fold each of the 6 3/8” x 4” (cut on the straight of grain) sleeve plackets wrong sides together on center foldline and press in crease #1.

8. With wrong sides together, fold cut edge on each side to meet crease #1. Press, forming creases #2 and #3. (Figure 5)

Figure 5
Figure 5

9. Trim 1/2″ (1.3 cm) from the side edges.

Right Sleeve

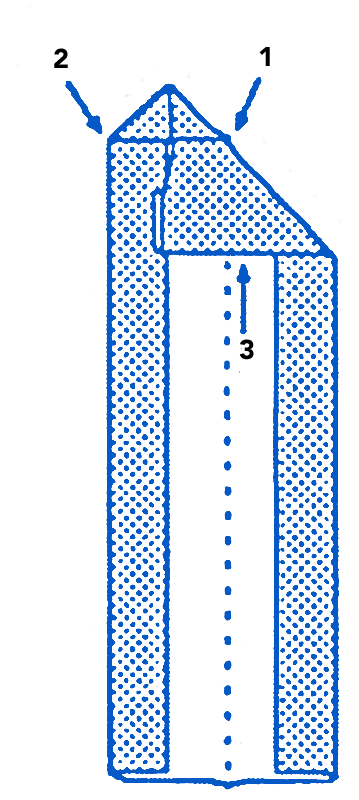
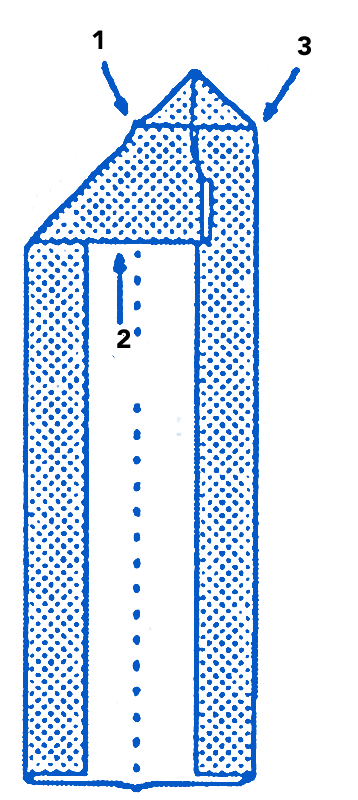
10. For placket on right sleeve, fold placket right sides together, taking care to match crease #2 to crease #1. Stitch across upper edge with a 1/8″ (0.3 cm) seam allowance. (Figure 6)

Figure 6
Figure 6

11. Turn right side out and form the point of the placket by matching the seamline to the trimmed edge. (Figure 7)

Figure 7
Figure 7

12. With wrong sides together bring crease #3 to crease # 2 and arrange the corners of placket. Press. (Figure 8)

Figure 8
Figure 8

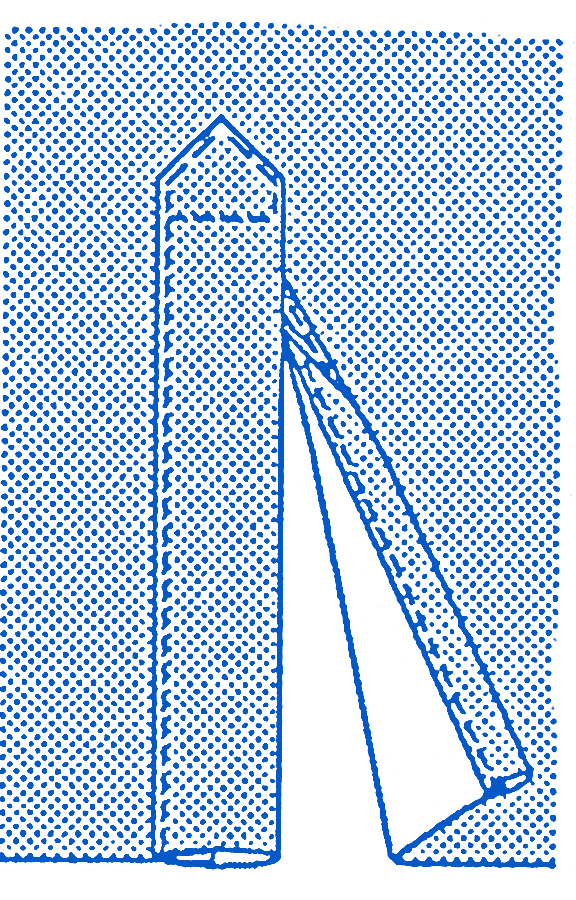
13. Insert front side of sleeve slash between the folds of the placket, matching cut edges inside as illustrated. (Figure 9)

Figure 9
Figure 9

14. Pin in position and edgestitch on the placket, sewing around the box, and continuing to lower edge of sleeve, being sure to catch the placket in the stitching on underside. Trim excess placket even with the lower edge of sleeve. (Figure 10)

Figure 10
Figure 10

Left Sleeve

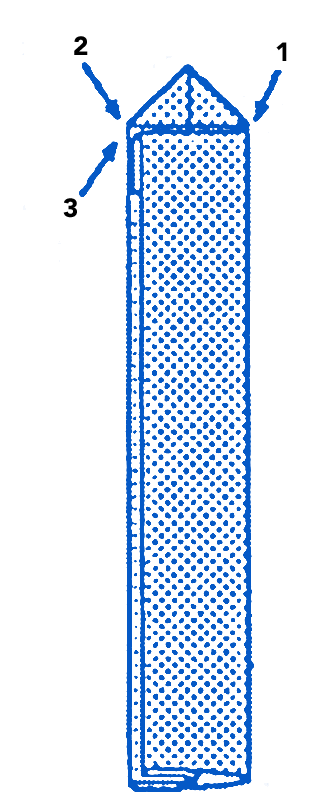
15. For placket on the left sleeve, fold placket right sides together, matching crease #3 to crease #1. Stitch across upper edge with a 1/8″ (0.3 cm) seam allowance. (Figure 11)

Figure 11
Figure 11

16. Tum right side out and form point of placket by matching the seam line to the trimmed edge. (Figure 12)

Figure 12
Figure 12

17. With wrong sides together, bring crease #2 to crease #3 and arrange the corners of the placket. Press. (Figure 13)

Figure 13
Figure 13

18. Insert front side of sleeve slash between folds of placket, matching cut edges inside. (Figure 14)

Figure 14
Figure 14

19. Pin in position and edgestitch on the placket, sewing around the box, and continuing to lower sedge of sleeve, being sure to catch placket in stitching on underside. Trim excess placket even with lower edge of sleeve. (Figure 15)

Figure 15
Figure 15


~Reprinted with permission

Did you enjoy this article?
Are you an ASG member?
This field is for validation purposes and should be left unchanged.

  • « Previous Page
  • 1
  • …
  • 11
  • 12
  • 13
  • 14
  • 15
  • …
  • 82
  • Next Page »

Become a Member

Join the only national organization dedicated to Advancing Sewing as an Art and Life Skill.

Join Now button

Blog Article Categories

  • ASG Conference
  • Chapter Stories
  • Embroidery
  • Fitting
  • Learn to Sew
  • National Sewing Month
  • Products, Books, & Patterns
  • Projects
  • Quilting
  • Sewing
  • Sewing Techniques
  • Sewing Tips
  • Sewing Tours
  • Videos
  • Disclaimer
  • Privacy Policy

American Sewing Guild
National Headquarters
9660 Hillcroft, Suite 230
Houston TX 77096
713-729-3000 | 713-721-9230 Fax
www.ASG.org

ASG wordcloud - education, conference, discounts, videos, special offers, tours and more

Copyright © 1998–2025 · American Sewing Guild · All Rights Reserved