American Sewing Guild (ASG)

Visit our blog Visit the ASG Facebook page Visit ASG on Pinterest Visit ASG's YouTube channel Visit ASG on Instagram
  • Home
  • Join ASG
    • Join Online
    • Chapter Locations
    • Member Benefits
    • Member Brochure
    • Join by Mail
  • Conference & Education
  • Resources
    • Contests & Awards
    • Giving Back
    • Hall of Fame
    • Links
    • Travel and Tours
    • Measurement Chart
  • Shop
    • ASG Store
    • Chapter Products
    • Video Resources
  • Blog
  • About
    • About Us
    • Donate to ASG
    • ASG Sensitivity Statement
    • FAQ’s
    • Start a Chapter
  • Contact
  • Member Login
    • Login First!
    • Members Only
    • Leadership Only
    • Website FAQ’s
    • Logout
  •  

February 19, 2021

Back to Basics: Machine Embroidery

Machine embroidery is one of the hottest ways to personalize your sewing and add your unique touch to your handmade items as well as store bought purchases. It can help turn a ho-hum item into a one-of-a-kind masterpiece. We must warn you, however, this aspect of sewing is definitely addictive and, unfortunately, can be quite expensive.

Needle

To get started, you need an embroidery machine. Most of the major manufacturers have a number of models that range in price from less than $400 to, well, let’s just say more than the cost of a car. Some of the models are embroidery only, while others are combo machines that allow you to do all your sewing as well as embroidery. Which brand should you buy? There are good arguments to be made for all of them, but perhaps the best choice is to buy one from a reputable dealer in your area. A dealer can provide both lessons and regular maintenance on your machine which can be better than the few dollars you save from buying online.

Hoops

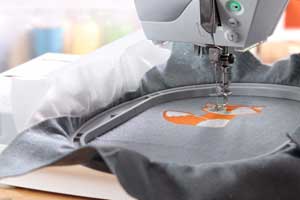
One of the features that can influence your decision is hoop size. A hoop is used to hold the fabric and moves it in the machine so the design can be stitched. Many of the entry level machines come with only 4” x 4” hoops.  That is the size of the design area that can be stitched on your item. This is a great size for over the pocket designs on t-shirts or children’s clothing, but if your intent is to embroider elaborate designs on jacket backs, then look for a machine that can accommodate larger designs. Hoop sizes are getting larger each year, with a 16” hoop currently one of the largest in the home sewing market. Machines have embroidery arms to hold the hoops and are programmed for specific movements and cannot accommodate just any size hoop.  So just because the manufacturer makes a larger size hoop doesn’t mean that a particular machine can use the larger size. Always check the specs for a particular machine.

The basic hoop is composed of an inner and outer plastic ring that generally fit together to hold the surface to be embroidered. While most of these hoops have screws to tighten the outer hoop over the inner one, in recent years more innovative hoops have come on the market. Some machines can use magnetic hoops that rely on strong magnets to hold the stitching surface in place and prevent hoop marks from being left on the surface. Others are spring loaded to make the hooping process easier.

Stabilizers

Buy on Amazon (affiliate link)

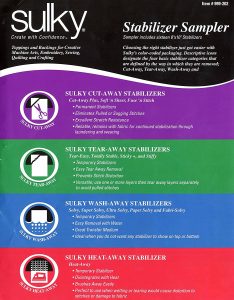
Stitching a design on a fabric adds not only weight to the fabric, but also stress as the needle  and threads continues to perforate and pull. While some heavy fabrics can handle this without any help, most would do well to have a stabilizer for added support. A stabilizer is a specially made backing that generally goes in the hoop with the fabric to help support the stitches and prevent the fabric from distorting. Choosing the perfect stabilizer can be a daunting task with so many manufacturers, weights, sizes, and styles.  Generally speaking, most experts will recommend using what’s called a “cutaway” stabilizer for most embroidery. As the name implies, the excess stabilizer that is used on the back of the fabric is cut away after the design is stitched and the remainder stays in the item. This provides the added support that is often needed not only through the stitching process but through multiple washings afterward.

While this support after the item is stitched is important, many embroiderers dislike the look and feel of the cutaway stabilizer. The extra support can hinder the smooth drape of a fabric and the leftover edges can irritate skin when the back of the design comes in contact with sensitive areas. When a lighter hand is preferred, a “tear-away” stabilizer can be used. The tear away is more loosely constructed and tears easily where the needle perforates it. This provides a cleaner look to the interior but sacrifices long term stability.

There are also stabilizers specifically designed for use on the right side of the fabric. These stabilizers are intended to prevent stitches from sinking into plush fabrics and getting lost. These “wash-aways” or water soluble ones are for temporary use only and disappear when placed in water. They are also used in free-standing lace—but that’s another discussion.
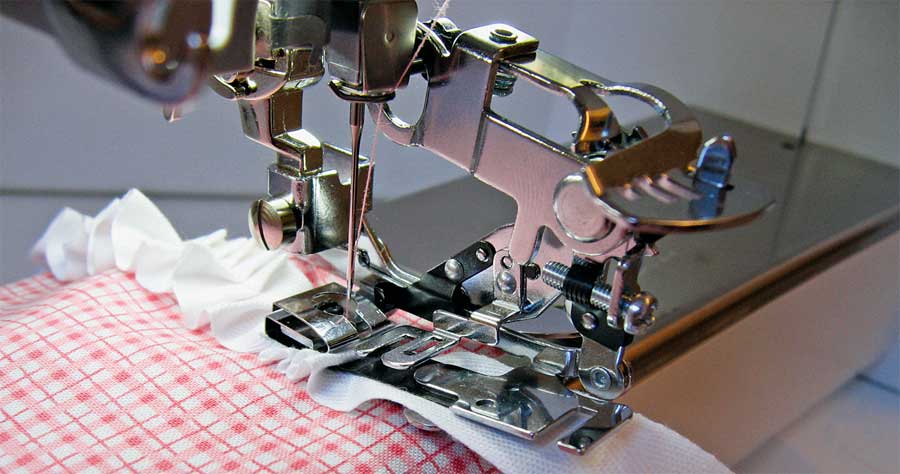
Needles & Threads

While it may be enticing to try to use regular sewing thread to embroider, for best results specially made embroidery thread gives the best results. These threads come in a multitude of colors and have an added sheen that regular sewing thread lacks. Most designs are meant to be stitched with a 40 weight thread. Using a different weight of thread can change how a design stitches out as well as how the final result will look. A thicker, heavier weight thread (30 or less) can make the design too dense and cause thread breakage or bunching up of threads while stitching. A lighter weight can cause gaps in coverage and allow fabric colors to show through the stitching. Threads can be made of cotton, polyester, rayon, and metallic. The current recommendation is a polyester thread. Changes in manufacturing methods give the new polyesters the luster of rayons but with more durability. Estimated shelf life for polyester thread is about 100 years. Rayons are beautiful, but do not hold their color when bleached; and cottons create lint that is harmful to the machine.

Most embroidery designs use a special bobbin thread instead of a matching thread in the bobbin. This thread is a lighter weight than the top thread, and can be purchased on cones or pre-wound bobbins. Always be sure to check with your manufacturer to determine if pre-wounds are recommended for your particular machine.

When using the 40 weight thread, a 75/11 needle  size is generally used.  Ball point, jersey, or stretch needles can be used on knits, while a universal or embroidery needle works well on wovens. Embroidery machines stitch at about 1,100 stitches per minute and can build up heat due to the friction of the rapid and continuous stitching. This wears out needles quickly and requires frequent changing of needles after a few hours of stitching to prevent their bending and breaking.

Embroidery Designs

Ghee’s Garden Embroidery Designs. ASG Members: get your discount code on the Special Offers page of the ASG.org Members area.

Embroidery machines require a specifically created computerized design before anything can be stitched out. Some machines come with generic designs like flowers, animals, holiday motifs, etc.  Other machines are themed with Disney, Pixar, and even Star Wars motifs.  In addition to the designs found in the machine, most manufacturers also sell designs that can be transferred to their machines through both direct and wireless computer links, flash drives, or older specialty cards. A quick search of the internet will also bring up a multitude of sites that sell these digitized designs. Before buying from an outside source, it is important to know the format, or language that your particular machine uses. ART, DST, EXP,  HUS, JEF, PCS, PES, SEW, VIP, VP3, and XXX are just some of the designations you may see. Buying the incorrect format is like speaking to someone in a foreign language. The machine won’t be able to translate to stitch out the design.

In addition to the format and size of the design, it is also important to know the stitch count. The stitch count is the number of stitches needed to produce the design. If a design is extremely dense with a high number of stitches used to create it, some of the smaller machines may not be able to handle that much data for stitching it out.

It’s also a good idea to remember that not all digitized designs are created equal. Many digitizers will offer free samples of their designs so you can test them out and see for yourself the quality of their work. You will soon learn which designers are your favorites and produce designs that meet your needs and budget. And if you are a bit of a computer geek and want a challenge, there are digitizing programs for the home embroiderer to create their own designs. You can take your drawing and turn it into your own one of a kind design.

Machine embroidery is a great way to challenge your creativity and expand the possibilities of your sewing projects. And if the embroidery bug has bitten, be sure to check out the ASG neighborhood groups that are springing up across the country. With many of them now online, these neighborhood groups welcome members from outside their normal chapter territory. They are an excellent source of inspiration and embroidery knowledge.


~Rosemary Fajgier

Did you enjoy this article?
Are you an ASG member?
This field is for validation purposes and should be left unchanged.

Tagged With: embroidery thread, hoops, machine embroidery, stabilizer

February 12, 2021

To Boldly Go Where No Quilt Has Gone Before

This is the story of my little lap quilt that ended up across the country, helping people.

I’m sure all sewists can relate to seeing a certain fabric that catches their eye and the excitement of seeing that it’s on clearance! JoAnn’s had Star Trek fabric for $3.00 a yard and I had to buy it. As a 12 year old, I loved Star Trek so I brought it home and there it sat, in my stash, for several years. Then COVID-19 happened and everything shut down, so I used my new-found free time to sew and vowed to use some of my stash. Like many, I made masks, but I also needed to do something creative and fun. I came across the Star Trek fabric and went to work. In a few days I had a nice lap quilt in red and black, quilted with embroidered stars, but it really didn’t fit my decor. I decided to ask my son, Andrew, if any of his friends would like a science fiction quilt. He thought about it and came up with a plan. He wanted to put it up for auction on Twitter for charity.

I really didn’t think anyone would pay much for it, but anything for charity is good. Since the pandemic had caused food insecurity for so many, we chose Philabundance. After five days on Twitter, the winning bid was $125.00 from a young man in California named Josh. I was so happy that the quilt would feed people and make Josh happy.

Then something exciting occurred — Josh and Andrew were contacted by William Shatner. Yes, “the” William Shatner… the REAL CAPTAIN KIRK! Mr. Shatner told Josh he was lucky to get the quilt and wished that he had seen it sooner so that he could have bid on it and put it in his children’s charity auction. Josh was so sweet, he donated the quilt for the auction! I boxed the quilt up and sent it to Mr. Shatner’s company in April of 2020 and included a note about the quilt. And since Josh was so nice, I made him a new Star Trek quilt to replace the donated one.

The pandemic continued and I kept busy, not thinking much about the quilt. In early November, Andrew received the following tweet from Mr. Shatner:

@yoda have you seen the current bid price? Your mother should go into business!

I couldn’t believe it! Now don’t think that I am vain enough to believe that my sewing skills are worth that much. It may have something to do with the fact that the quilt was signed by William Shatner – Captain Kirk himself – on the label.

I was so excited and shared this story with my friend, Dianna Kelly, and she mentioned it at our Sew What group Zoom meeting. I hadn’t followed up on the bidding because I just didn’t think it would go any higher … but then Beverly Betz found this:

Final bid $ 905.00! I am beyond thrilled that my sewing hobby has helped children and provided food for those who are struggling. The takeaway here is a reminder that what we do as sewists is now being looked at in a different light since the pandemic started. Whether it’s quilts, masks, or caps for friends, family or strangers, what we create is making a difference in the world. So to paraphrase Mr. Spock from Star Trek  — live long and prosper — and keep sewing.


~Lynda Harrison, ASG Member

Did you enjoy this article?
Are you an ASG member?
This field is for validation purposes and should be left unchanged.

Tagged With: Captain Kirk, charitable sewing, quilt, sewing, Star Trek, William Shatner

February 11, 2021

ASG Board Member: Carolyn Chen

Welcome to Carolyn Chen, our newest member on the ASG National Board of Directors!

Carolyn has been an ASG member since 2001 in the Nassau-Queens, NY chapter and held offices of President, Newsletter Editor, Treasurer, and Secretary. More recently she served as president of the Salt Lake City Chapter.

Carolyn learned to sew as a 4-H member in Long Island, New York. Having the solid foundation with the 4-H training, she additionally credits the many classes she has attended through ASG Conferences and various stitching expos with elevating her skills and creative pursuits.

On her day jobs, Carolyn has held engineering and management positions which gave her experience in project planning, meeting deadlines, public speaking and communicating with team members.  Over the years of living through roller-coasters of company buyouts and mergers, she decided to explore alternative professions as a backup and signed up for two semesters at the Maison Sapho School of Dressmaking and Design in New York City, in 2008. There, she studied French dressmaking, design by draping, and hand embellishment techniques in the European traditions. The curriculum was demanding and educational, yet was an exercise in intellectual submission.

At the Maison Sapho School, I quickly realized that the headmistress expected work to be done by traditional methods, so all of the nifty tips picked up at ASG conferences had to be ignored for class homework. For example, the use of fusibles was forbidden and passionately demeaned.

Carolyn retired to Salt Lake City, Utah in 2011 where there is very strong crafting and DIY community. Joining the Salt Lake City ASG chapter, as well as the Knitting Guild, and Wasatch Woolpack Handspinners (yarn spinning) made the cross-country move very enjoyable for her and she now enjoys sharing creative ideas with others. A trivia joke amongst her friends is, “How many guilds does Carolyn belong to and how many offices does she hold?”

Coming out of retirement in 2016 to support her nuclear family (husband and dog) when an in-law became terminally ill, she found that working cut back on her social daytime craft networking and neighborhood group participation. However, it was nice to have more disposable income for Stash Accumulation.  The problem now is that  it isn’t just fabric, it’s yarn, raw materials, and dyes to make yarn. You have all been asked, “How many sewing machines do you own?” Carolyn also has to answer, “How many spinning wheels and looms do you own?”

For Carolyn, every bit of fiber training comes in handy as there is crossover in all of her craft disciplines. Understanding ease in garments, taking measurements, pattern drafting, piecing, fabric characteristics for intended use, and construction for stability get put to use in sewing, knitting, weaving and spinning a finished product.

Carolyn’s second retirement was welcomed at the end of 2019 which gave her more time to work on that SABLE: Stash Accumulation Beyond Life Expectancy, and more time to devote to the American Sewing Guild on the Board of Directors.  With all of her talent, she is sure to be an asset to our national board.

We’re glad to have you with us, Carolyn!


February 5, 2021

Rockin’ those Ruffles

Ruffler footIf you dig deep into the drawers in your sewing cabinet, you might find a rather strange looking attachment called a ruffler. This funny looking attachment hasn’t changed much in the decades since its invention—perhaps yours is generic or maybe brand specific.

If you’re not a fan of pulling up basting threads to gather, the ruffler will be your new BFF, as it can both precisely gather and make perfect pleats and tucks. In addition, it can do those tasks while attaching that layer to a flat base fabric—all at once.

Photo courtesy of Bernina

Sew Many Parts

Photo courtesy of Bernina

The ruffler attaches to your machine like other presser feet. Several parts are the secret to successful ruffling, so double check your owner’s manual for their location on your attachment. The fork arm that has to be positioned over the needle bar to enable the ruffler to do its work. In addition, there is a depth adjuster (either a screw or a dial) and it controls the depth of the gathers or pleats. There’s also a spacer that works in conjunction with the depth adjuster to count stitches and determine the fullness spacing. On most rufflers, the spacer has number designation like 1, 6, 12 or 0. If it’s set to 1, there will be a tuck every stitch; if it’s set to 6, there will be a tuck every sixth stitch, etc.

Ruffler Spacer | Photo courtesy of Bernina

The ruffler has a blade with tiny sharp teeth to move the fabric and there’s also a separator blade to keep the ruffling separate from any base fabric you might be attaching it to. Most rufflers offer several threading guides to allow for proper positioning of the stitches from the ruffle raw edge.

Stitch Length

In addition to changing the ruffler depth and spacer settings, note that the ruffles, pleats and tucks are also determined by the stitch length setting. So, because of all the variables associated with this attachment, it’s imperative to test stitch to get a look you like. Make some samples using your project fabric and vary the stitch length, but keep the depth the same, and keep the stitch length the same, but vary the depth.

2.5 length, 1 stitch
2.5 length, 6 stitches
2.5 length, 12 stitches

Planning Ahead

  • Unlike using gathering threads, the ruffler’s fullness is not adjustable once it’s stitched, so test stitching is important for each project, as the fabric weight can affect the outcome as well.
  • Be sure to finish the edge/edges of the fabric you’re ruffling prior to running it through the ruffler. Ruffles can be single- or double-layer depending on the fabric weight. If you’re attaching the ruffle to a base fabric in the same operation, wait to finish the edges together after the application.
  • Because the ruffler allows you to create yards of tucked, pleated or gathered fabric quickly, it’s ideal for big projects like curtain ruffles, costumes, full skirts, pillows, etc.
  • Make yourself a sample notebook using various fabrics and various ruffler settings so you have a starting place for future projects, and a good reference for how the look changes with numerous adjustments. And, it goes without saying, that you’ll want to consult your owner’s manual and the attachment instruction book for complete details of the operations and settings on your particular machine.

~Linda Griepentrog
Linda is the owner of G Wiz Creative Services and she does writing, editing and designing for companies in the sewing, crafting and quilting industries. In addition, she escorts fabric shopping tours to Hong Kong. She lives at the Oregon Coast with her husband Keith, and two dogs, Yohnuh and Abby. Contact her at .

Did you enjoy this article?
Are you an ASG member?
This field is for validation purposes and should be left unchanged.

Tagged With: ruffler, ruffles, sewing ruffles

January 29, 2021

Slick Tricks: Working with Laminated Fabrics

If you’re looking to make that perfect raincoat, try one of the great laminated fabrics on the market today. Colorful cottons with a clear coating are ideal for rainy weather attire, and a host of other projects from cosmetic bags to totes and aprons.

And you have options—laminated cottons come with either a matte finish or a glossy finish, depending on the brand and the desired look. In many instances, the same print is available in a non-laminated version, so that you can use it for facings, hood linings, binding, etc.

Although they do require some care when sewing, there’s nothing off-putting about these fun fabrics. Just be sure to purchase a laminated cotton, as opposed to traditional oilcloth fabric which has a heavier mesh base and is best suited for home décor items.

The coating on laminates makes them water resistant (not waterproof), and it keeps seam allowances from fraying. Some coatings are lightweight and others a bit heavier, so select the fabric by the intended use. Softer coatings are ideal for garments, as they’re more flexible than heavier ones.

Preparation

Photo courtesy of Cloud9 Fabrics

When choosing a pattern, look for simple lines and few seams, as well as raglan sleeves vs. set-in. There’s no room for error with laminates, so be sure the pattern fits you.

When you cut out your project, opt for pattern weights instead of pins, unless you keep them only within the seamlines as the marks are permanent.

Mark with chalk or soap slivers and never a tracing wheel, as that can damage the coating.

Sewing

There are some helpful notions for stitching these sticky fabrics. Spring clips, such as Wonder Clips, help hold layers in place without pinning, as do coated paperclips.

If sticking is an issue, opt for a non-stick presser foot, or put tape on the bottom of a regular foot to keep it moving. Sticking becomes an issue usually only if you’re sewing with the right side up, otherwise, the fabric should move smoothly under the foot.

Adjust the stitch length to slightly longer than normal and use a small needle to avoid large holes in the fabric.

Pressing isn’t an option for most laminates, so keep the iron away. To keep the seams flat, finger-press, then topstitch, either open or with seam allowances to one side. Topstitching is also recommended for all edges to keep them flat.

Photos courtesy of Cloud9 Fabrics

Finishing

If your raincoat requires buttonholes, interface the area with a sew-in interfacing (not fusible) and use the setting on your machine that produces a buttonhole with simply straight stitching around the slit. Any dense satin stitching can damage the fabric.

For hems, there’s no need to finish the edge as the lamination keeps the fabric from fraying—just turn up the hem evenly, clip it in place and sew one or two rows of stitching evenly from the folded edge.

On a tote, bound edges work perfectly—not only are they easy to do, but they also reduce the bulk of multiple laminate layers on turned-and-stitched edges.


~Linda Griepentrog
Linda is the owner of G Wiz Creative Services and she does writing, editing and designing for companies in the sewing, crafting and quilting industries. In addition, she escorts fabric shopping tours to Hong Kong. She lives at the Oregon Coast with her husband Keith, and two dogs, Yohnuh and Abby. Contact her at .

Did you enjoy this article?
Are you an ASG member?
This field is for validation purposes and should be left unchanged.

Tagged With: laminated fabric, learn to sew, raincoat, sewing, sewing tip

  • « Previous Page
  • 1
  • …
  • 48
  • 49
  • 50
  • 51
  • 52
  • …
  • 82
  • Next Page »

Become a Member

Join the only national organization dedicated to Advancing Sewing as an Art and Life Skill.

Join Now button

Blog Article Categories

  • ASG Conference
  • Chapter Stories
  • Embroidery
  • Fitting
  • Learn to Sew
  • National Sewing Month
  • Products, Books, & Patterns
  • Projects
  • Quilting
  • Sewing
  • Sewing Techniques
  • Sewing Tips
  • Sewing Tours
  • Videos
  • Disclaimer
  • Privacy Policy

American Sewing Guild
National Headquarters
9660 Hillcroft, Suite 230
Houston TX 77096
713-729-3000 | 713-721-9230 Fax
www.ASG.org

ASG wordcloud - education, conference, discounts, videos, special offers, tours and more

Copyright © 1998–2025 · American Sewing Guild · All Rights Reserved