American Sewing Guild (ASG)

Visit our blog Visit the ASG Facebook page Visit ASG on Pinterest Visit ASG's YouTube channel Visit ASG on Instagram
  • Home
  • Join ASG
    • Join Online
    • Chapter Locations
    • Member Benefits
    • Member Brochure
    • Join by Mail
  • Education & Classes
  • Resources
    • Contests & Awards
    • Giving Back
    • Hall of Fame
    • Links
    • Travel and Tours
    • Measurement Chart
  • Shop
    • ASG Store
    • Chapter Products
    • Video Resources
  • Blog
  • About
    • About Us
    • Donate to ASG
    • ASG Sensitivity Statement
    • FAQ’s
    • Start a Chapter
  • Contact
  • Member Login
    • Login First!
    • Members Only
    • Leadership Only
    • Website FAQ’s
    • Logout
  •  

February 11, 2021

ASG Board Member: Carolyn Chen

Welcome to Carolyn Chen, our newest member on the ASG National Board of Directors!

Carolyn has been an ASG member since 2001 in the Nassau-Queens, NY chapter and held offices of President, Newsletter Editor, Treasurer, and Secretary. More recently she served as president of the Salt Lake City Chapter.

Carolyn learned to sew as a 4-H member in Long Island, New York. Having the solid foundation with the 4-H training, she additionally credits the many classes she has attended through ASG Conferences and various stitching expos with elevating her skills and creative pursuits.

On her day jobs, Carolyn has held engineering and management positions which gave her experience in project planning, meeting deadlines, public speaking and communicating with team members.  Over the years of living through roller-coasters of company buyouts and mergers, she decided to explore alternative professions as a backup and signed up for two semesters at the Maison Sapho School of Dressmaking and Design in New York City, in 2008. There, she studied French dressmaking, design by draping, and hand embellishment techniques in the European traditions. The curriculum was demanding and educational, yet was an exercise in intellectual submission.

At the Maison Sapho School, I quickly realized that the headmistress expected work to be done by traditional methods, so all of the nifty tips picked up at ASG conferences had to be ignored for class homework. For example, the use of fusibles was forbidden and passionately demeaned.

Carolyn retired to Salt Lake City, Utah in 2011 where there is very strong crafting and DIY community. Joining the Salt Lake City ASG chapter, as well as the Knitting Guild, and Wasatch Woolpack Handspinners (yarn spinning) made the cross-country move very enjoyable for her and she now enjoys sharing creative ideas with others. A trivia joke amongst her friends is, “How many guilds does Carolyn belong to and how many offices does she hold?”

Coming out of retirement in 2016 to support her nuclear family (husband and dog) when an in-law became terminally ill, she found that working cut back on her social daytime craft networking and neighborhood group participation. However, it was nice to have more disposable income for Stash Accumulation.  The problem now is that  it isn’t just fabric, it’s yarn, raw materials, and dyes to make yarn. You have all been asked, “How many sewing machines do you own?” Carolyn also has to answer, “How many spinning wheels and looms do you own?”

For Carolyn, every bit of fiber training comes in handy as there is crossover in all of her craft disciplines. Understanding ease in garments, taking measurements, pattern drafting, piecing, fabric characteristics for intended use, and construction for stability get put to use in sewing, knitting, weaving and spinning a finished product.

Carolyn’s second retirement was welcomed at the end of 2019 which gave her more time to work on that SABLE: Stash Accumulation Beyond Life Expectancy, and more time to devote to the American Sewing Guild on the Board of Directors.  With all of her talent, she is sure to be an asset to our national board.

We’re glad to have you with us, Carolyn!


February 5, 2021

Rockin’ those Ruffles

Ruffler footIf you dig deep into the drawers in your sewing cabinet, you might find a rather strange looking attachment called a ruffler. This funny looking attachment hasn’t changed much in the decades since its invention—perhaps yours is generic or maybe brand specific.

If you’re not a fan of pulling up basting threads to gather, the ruffler will be your new BFF, as it can both precisely gather and make perfect pleats and tucks. In addition, it can do those tasks while attaching that layer to a flat base fabric—all at once.

Photo courtesy of Bernina

Sew Many Parts

Photo courtesy of Bernina

The ruffler attaches to your machine like other presser feet. Several parts are the secret to successful ruffling, so double check your owner’s manual for their location on your attachment. The fork arm that has to be positioned over the needle bar to enable the ruffler to do its work. In addition, there is a depth adjuster (either a screw or a dial) and it controls the depth of the gathers or pleats. There’s also a spacer that works in conjunction with the depth adjuster to count stitches and determine the fullness spacing. On most rufflers, the spacer has number designation like 1, 6, 12 or 0. If it’s set to 1, there will be a tuck every stitch; if it’s set to 6, there will be a tuck every sixth stitch, etc.

Ruffler Spacer | Photo courtesy of Bernina

The ruffler has a blade with tiny sharp teeth to move the fabric and there’s also a separator blade to keep the ruffling separate from any base fabric you might be attaching it to. Most rufflers offer several threading guides to allow for proper positioning of the stitches from the ruffle raw edge.

Stitch Length

In addition to changing the ruffler depth and spacer settings, note that the ruffles, pleats and tucks are also determined by the stitch length setting. So, because of all the variables associated with this attachment, it’s imperative to test stitch to get a look you like. Make some samples using your project fabric and vary the stitch length, but keep the depth the same, and keep the stitch length the same, but vary the depth.

2.5 length, 1 stitch
2.5 length, 6 stitches
2.5 length, 12 stitches

Planning Ahead

  • Unlike using gathering threads, the ruffler’s fullness is not adjustable once it’s stitched, so test stitching is important for each project, as the fabric weight can affect the outcome as well.
  • Be sure to finish the edge/edges of the fabric you’re ruffling prior to running it through the ruffler. Ruffles can be single- or double-layer depending on the fabric weight. If you’re attaching the ruffle to a base fabric in the same operation, wait to finish the edges together after the application.
  • Because the ruffler allows you to create yards of tucked, pleated or gathered fabric quickly, it’s ideal for big projects like curtain ruffles, costumes, full skirts, pillows, etc.
  • Make yourself a sample notebook using various fabrics and various ruffler settings so you have a starting place for future projects, and a good reference for how the look changes with numerous adjustments. And, it goes without saying, that you’ll want to consult your owner’s manual and the attachment instruction book for complete details of the operations and settings on your particular machine.

~Linda Griepentrog
Linda is the owner of G Wiz Creative Services and she does writing, editing and designing for companies in the sewing, crafting and quilting industries. In addition, she escorts fabric shopping tours to Hong Kong. She lives at the Oregon Coast with her husband Keith, and two dogs, Yohnuh and Abby. Contact her at .

Did you enjoy this article?
Are you an ASG member?
This field is for validation purposes and should be left unchanged.

Tagged With: ruffler, ruffles, sewing ruffles

January 29, 2021

Slick Tricks: Working with Laminated Fabrics

If you’re looking to make that perfect raincoat, try one of the great laminated fabrics on the market today. Colorful cottons with a clear coating are ideal for rainy weather attire, and a host of other projects from cosmetic bags to totes and aprons.

And you have options—laminated cottons come with either a matte finish or a glossy finish, depending on the brand and the desired look. In many instances, the same print is available in a non-laminated version, so that you can use it for facings, hood linings, binding, etc.

Although they do require some care when sewing, there’s nothing off-putting about these fun fabrics. Just be sure to purchase a laminated cotton, as opposed to traditional oilcloth fabric which has a heavier mesh base and is best suited for home décor items.

The coating on laminates makes them water resistant (not waterproof), and it keeps seam allowances from fraying. Some coatings are lightweight and others a bit heavier, so select the fabric by the intended use. Softer coatings are ideal for garments, as they’re more flexible than heavier ones.

Preparation

Photo courtesy of Cloud9 Fabrics

When choosing a pattern, look for simple lines and few seams, as well as raglan sleeves vs. set-in. There’s no room for error with laminates, so be sure the pattern fits you.

When you cut out your project, opt for pattern weights instead of pins, unless you keep them only within the seamlines as the marks are permanent.

Mark with chalk or soap slivers and never a tracing wheel, as that can damage the coating.

Sewing

There are some helpful notions for stitching these sticky fabrics. Spring clips, such as Wonder Clips, help hold layers in place without pinning, as do coated paperclips.

If sticking is an issue, opt for a non-stick presser foot, or put tape on the bottom of a regular foot to keep it moving. Sticking becomes an issue usually only if you’re sewing with the right side up, otherwise, the fabric should move smoothly under the foot.

Adjust the stitch length to slightly longer than normal and use a small needle to avoid large holes in the fabric.

Pressing isn’t an option for most laminates, so keep the iron away. To keep the seams flat, finger-press, then topstitch, either open or with seam allowances to one side. Topstitching is also recommended for all edges to keep them flat.

Photos courtesy of Cloud9 Fabrics

Finishing

If your raincoat requires buttonholes, interface the area with a sew-in interfacing (not fusible) and use the setting on your machine that produces a buttonhole with simply straight stitching around the slit. Any dense satin stitching can damage the fabric.

For hems, there’s no need to finish the edge as the lamination keeps the fabric from fraying—just turn up the hem evenly, clip it in place and sew one or two rows of stitching evenly from the folded edge.

On a tote, bound edges work perfectly—not only are they easy to do, but they also reduce the bulk of multiple laminate layers on turned-and-stitched edges.


~Linda Griepentrog
Linda is the owner of G Wiz Creative Services and she does writing, editing and designing for companies in the sewing, crafting and quilting industries. In addition, she escorts fabric shopping tours to Hong Kong. She lives at the Oregon Coast with her husband Keith, and two dogs, Yohnuh and Abby. Contact her at .

Did you enjoy this article?
Are you an ASG member?
This field is for validation purposes and should be left unchanged.

Tagged With: laminated fabric, learn to sew, raincoat, sewing, sewing tip

January 27, 2021

Native American Sewing with ASG member, Debbie Baker

In this 30 minute interview, American Sewing Guild member, Debbie Baker, talks with Sheryl Belson about her journey into learning about her heritage with the Choctaw Nation and learning to make Choctaw apparel, including the meaning behind the designs.


~Sheryl Belson

Tagged With: Choctaw Nation, Native American sewing

January 22, 2021

Idea Board: Off-Grain Fringe Techniques

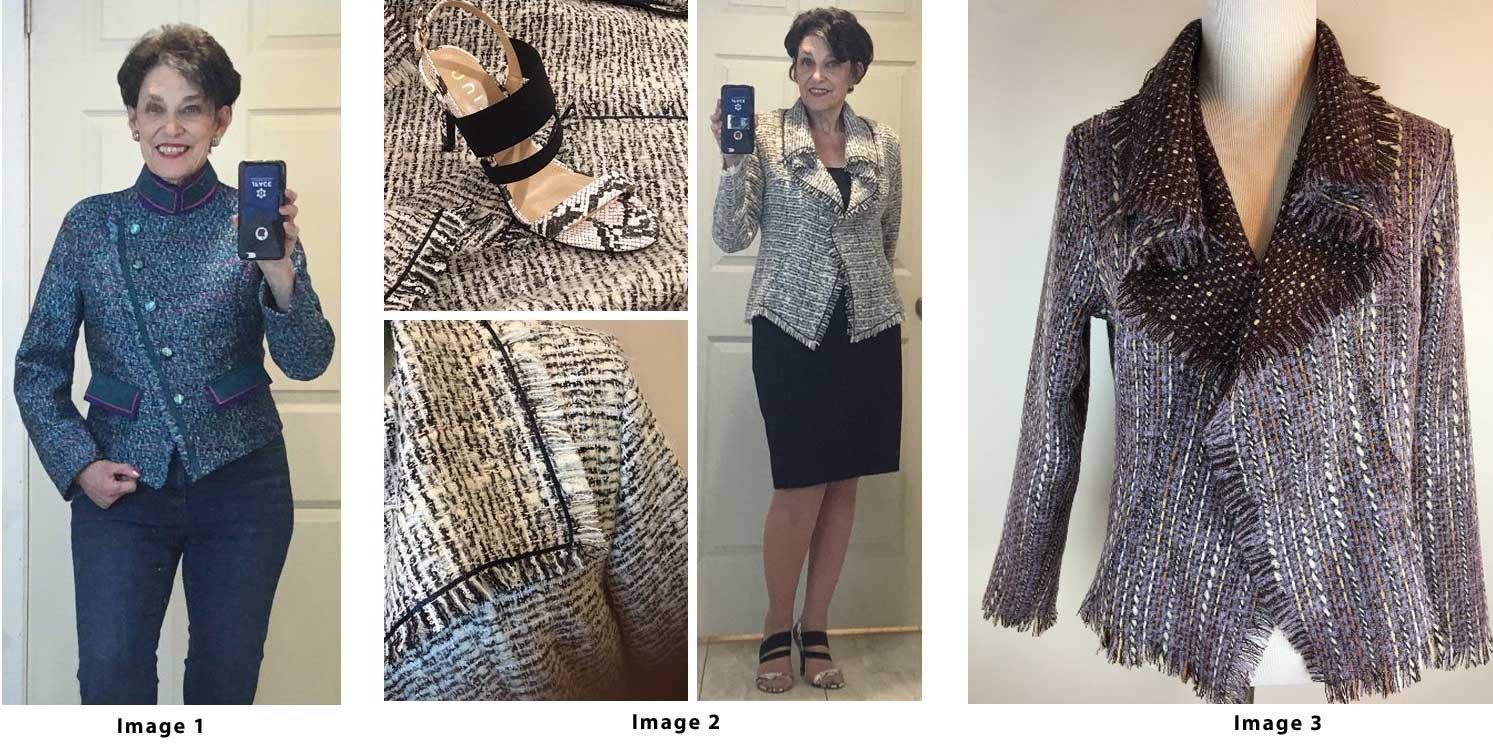
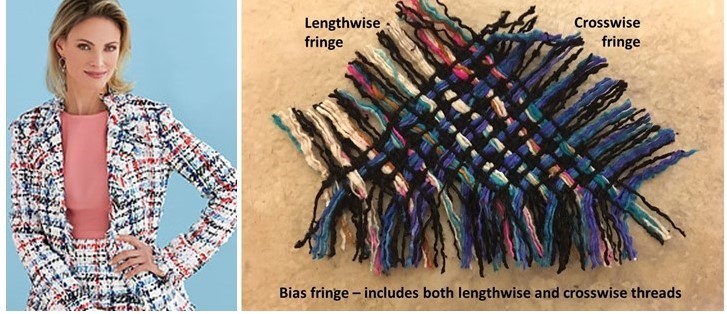
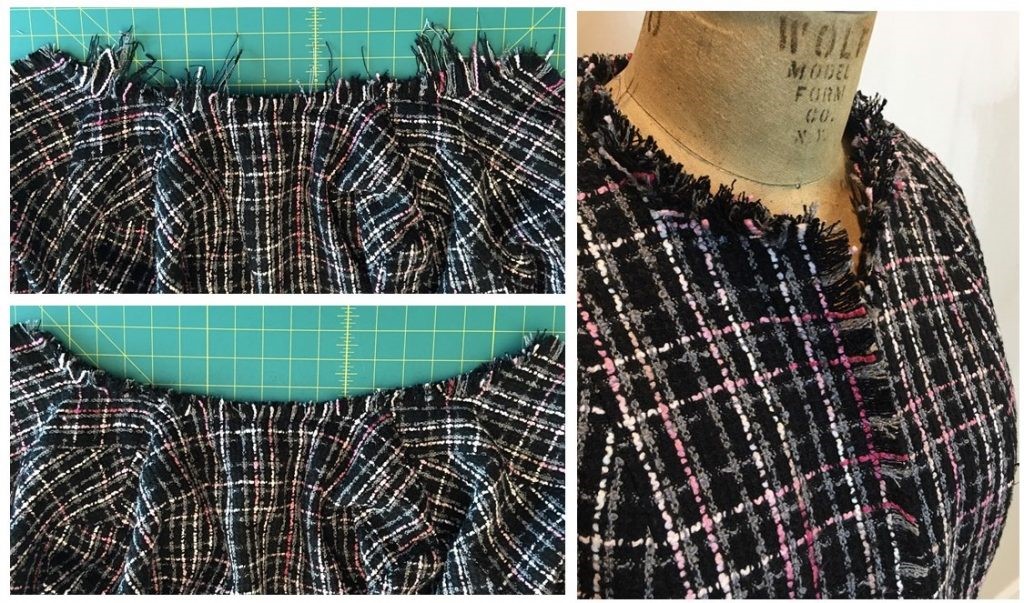
Fringe, whether you choose to love it or leave it, has undoubtedly stood the test of time. Dating back to 3000 B.C. in Mesopotamia, fringe became popular as a fashion embellishment in the 1920’s, then resurfaced again in the 50’s, and came full circle in the 60’s, 70’s and 80’s. Popular again today, it can be casual and trendy or utterly timeless, like in the garments shown here. Enjoy some ideas from Nancy Nix-Rice on these beautiful fringe accents.


On a multi-color tweed jacket, fringed along the off-grain center edge,  I added a top-stitched band of Ultrasuede to both stabilize the edge and emphasize the diagonal line. Carefully snipping – at about 1” intervals – from edge to seamline parallel to the crossgrain threads allowed the fringe to shape off-grain. (Image 1)

On the Itch to Stitch Hvar cardigan, I eliminated the double layer front in favor of a soft cascade effect. I zigzagged 1/8” black satin ribbon along the seamline to define the inner edge of the fringe, slipping the ribbon through an opening in the loose weave to bring it to the opposite side of the fabric at the bottom of the cascade. (Image 2)

On a second iteration of the Hvar, I used a serpentine stitch to stabilize that endpoint of the fringe. The stitches melded invisibly into the deep tweed texture. (Image 3)

I expected that to be the end of my fringe-fest. Then Butterick came out with this gem – Pattern 6738 – that included directions for creating a fuller, more color-balanced effect by fringing on the true bias. That is especially helpful since many fabrics fringe to a very different looks along the crosswise vs lengthwise grain. (Image 4)

Image 4 (Butterick 6738)

I didn’t actually make that pattern because I already had a black/gray/pink jacket in a bag in the closet – half-finished because of that very issue. The jewel neckline needed that bias technique in its curved areas and the front and hem edges needed an inset layer for a fuller look. Problem solved, and here is the result! (Image 5)

Image 5

~Nancy Nix-Rice

Did you enjoy this article?
Are you an ASG member?
This field is for validation purposes and should be left unchanged.

Tagged With: embellishment, fringe, garment sewing

  • « Previous Page
  • 1
  • …
  • 49
  • 50
  • 51
  • 52
  • 53
  • …
  • 83
  • Next Page »

Become a Member

Join the only national organization dedicated to Advancing Sewing as an Art and Life Skill.

Join Now button

Blog Article Categories

  • ASG Conference
  • Chapter Stories
  • Embroidery
  • Fitting
  • Learn to Sew
  • National Sewing Month
  • Products, Books, & Patterns
  • Projects
  • Quilting
  • Sewing
  • Sewing Techniques
  • Sewing Tips
  • Sewing Tours
  • Videos
  • Disclaimer
  • Privacy Policy

American Sewing Guild
National Headquarters
9660 Hillcroft, Suite 230
Houston TX 77096
713-729-3000 | 713-721-9230 Fax
www.ASG.org

ASG wordcloud - education, conference, discounts, videos, special offers, tours and more

Copyright © 1998–2025 · American Sewing Guild · All Rights Reserved