American Sewing Guild (ASG)

Visit our blog Visit the ASG Facebook page Visit ASG on Pinterest Visit ASG's YouTube channel Visit ASG on Instagram
  • Home
  • Join ASG
    • Join Online
    • Chapter Locations
    • Member Benefits
    • Member Brochure
    • Join by Mail
  • Conference & Education
  • Resources
    • Contests & Awards
    • Giving Back
    • Hall of Fame
    • Links
    • Travel and Tours
    • Measurement Chart
  • Shop
    • ASG Store
    • Chapter Products
    • Video Resources
  • Blog
  • About
    • About Us
    • Donate to ASG
    • ASG Sensitivity Statement
    • FAQ’s
    • Start a Chapter
  • Contact
  • Member Login
    • Login First!
    • Members Only
    • Leadership Only
    • Website FAQ’s
    • Logout
  •  

November 13, 2019

How to make your own bias tape

Bias tape is most often used to finish the edges of garments, especially along curved edges like armholes and necklines. But it can also be used as a decorative element on garments (think pockets and hems for example) or on other projects, like handbags, quilts, table runners and Christmas stockings. You can purchase packaged bias tape, but it’s very easy to make your own with a Bias Tape Maker tool. This short video will show you how easy is it to DIY your own bias tape.

https://www.asg.org/wp-content/uploads/2019/11/Bias_Tape_Tool_Tutorial_HQ.mp4

~© ASG: Thank you to Sheryl Belson, ASG Plano Chapter

Tagged With: bias tape

November 8, 2019

Button and Buttonhole Positioning

Button & Buttonhole Placement on the ASG blog
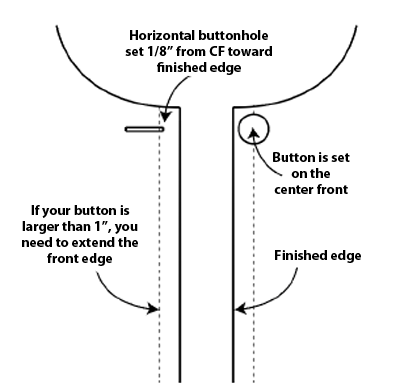
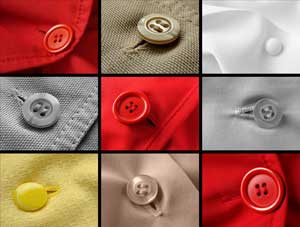
Button and buttonhole placements can sometimes be confusing. If the button and buttonhole are placed incorrectly, the garment may be too tight, too loose, or create gaping. The number of buttons on the garment is suggested on your pattern envelope, but it’s up to your personal preference or need. A good guide to start placing your buttons vertically is to keep in mind your body’s pressure points. Pressure points are where your body may put strain on the garment and may be your bust, belly, or even the hip if you are making a button front dress or skirt.

Button Placement

Once you have identified your pressure point(s), mark these on your muslin or sloper (block) pattern for future reference.

  • Decide how many buttons to use.
  • Lay your pattern or muslin flat, mark the center front and your pressure points.
  • Place your highest and lowest buttons on the muslin.
  • Measure the distance between your top and bottom buttons.
  • Divide this distance between the number of buttons you will use. If you use 5 buttons, divide by 4. You will always divide by one less button, because that is the number of actual spaces between your buttons.
  • Determine if the button placement falls on your pressure point(s). If not, you may want to adjust the position slightly to hit that sweet spot.

Buttonhole Position

Now that you have the button position, you need to determine if you want vertical or horizontal buttonholes. Horizontal buttonholes will need a facing deep enough to fit the entire length of the buttonhole. I have seen some patterns where the facing is too narrow for horizontal buttonholes. Vertical buttonholes allow for button play. This means if the button is not set exactly in the measured spot, there is room for the button to move up and down within the hole.

The distance between center front and the finished edge of your garment is generally 5/8”. This is okay if your button is 7/8” or smaller. If the button is larger, you will need to extend the distance from CF to the finished edge of your garment.

Buttonhole Size

To figure out what size buttonhole to use, some machines have a button hole foot that the button sits on the back carriage and the machine will make a buttonhole to that size. Or you have a machine that is computerized and you can adjust for your button size. The general rule of thumb is, the buttonhole needs to be 1/8” bigger than the button, for ease of going through the hole.

  • 1/2” button uses a 5/8” buttonhole
  • 5/8” button uses a 3/4” buttonhole
  • 3/4” button uses a 7/8” buttonhole

Good Buttonhole Practices

When making a vertical buttonhole, the button and buttonhole will be placed exactly at center front. In the case of horizontal buttonholes, the button is set at center front, but the hole is started 1/8” away from center, toward the finished edge. If your garment needs a button at the top edge, I start at 5/8” down for the button placement, but you can decide how far down, depending on the width of your button. But never start a buttonhole higher than ¼” below the neck edge.

  • Always make a test buttonhole with the same thickness as your garment, Top fabric, bottom fabric and interfacing. Make sure your button will pass through the hole easily.
  • Buttons are set on the left front and buttonholes on the right front for women’s garments

Something that I do for jackets, especially for horizontal buttonholes, is to set all the buttonholes along the edge of your fabric BEFORE cutting out the front body. This allows for checking the placement without chancing ruining the garment and works best for bound button holes because the inside opening is usually hand finished.


~© Annalisa T, Alameda County Chapter

Tagged With: buttonholes, buttons, sewing

November 1, 2019

Guide for Seam Finishes

You have all of your supplies ready, you’ve adjusted your pattern, cut your fabric and you’re ready to start sewing. Before you sit down at the machine, have you thought about the best seam finish to use for your fabric? This post will help you to choose the best method to assure your seams are perfect.

Fabrics & Best Seam Finishes

  • Learn what searm finishes to use on different fabrics
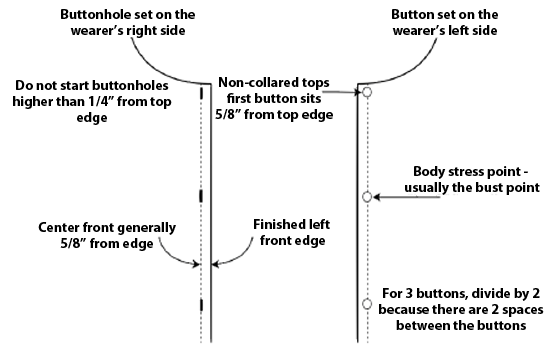
Batik: Flat fell seam or sew with a plain seam and serge together
  • Batting: Butt the raw edges together and hand overcast with basting thread to get the width you need.
  • Beaded Fabric: Finish with a product like Great Seams as in Hong Kong finish. Eliminate facings. Finish the neck and armholes with bias silk charmeuse or line your garment, making the attachment at the neck and shoulders.
  • Boiled Wool: Sew seams and clip curves. Press seams open and top-stitch on each side from the right side using a wide double needle or top-stitch each side separately from 1/8” to 1/4” allowance from the seam. Trim to your top-stitching.
  • Brocade: Press seams open and overlock separately, even if lined. Use a Hong Kong finish with lightweight silk or bind separately with double fold bias.
  • Burnout: Finish with a narrow French seam.
  • Charmeuse: Use flat fell or French seam on serger.
  • Chiffon: Use a narrow French seam. On long vertical seams, sew with tiny zig-zag stitches to prevent drawing up.
  • Corduroy: Serge seams separately or flat fell the seams.
  • Crinkle: Sew with a tiny zig-zag.
  • Damask: Sew flat fell seams.
  • Denim: Sew a straight seam. Serge one seam allowance and trim the other without turning under. Overlap the serger seam allowance onto trimmed seam allowance and topstitch. This forms a fake flat fell seam that is less bulky.
  • Dupioni: Serged or traditional flat fell; serge and press open.
  • Faux Fur: None
  • Faux Leather: Use a fake flat fell seam or finger press open and top stitch from the right side, straddling the seam. Trim close to stitching.
  • Faux Suede: Lightweight ultra suede seams can be simply pressed open. Other faux suede’s can be top-stitched with a double needle or treated with a fake flat fell seam.
  • Flannel: Straight stitch or flat fell seam
  • Fleece: Sew with a straight seam and finger press open. Top-stitch or serge.


  • Gabardine: Press seam open and serge each side separately with a woolly nylon in lower looper; flat fell; or Hong Kong bound.
  • Georgeette: French seam.
  • Jersey: For lightweight knits, sew the seam, press to one side and top-stitch 1/4’ from seam. Trim extra fabric away. For invisible seams on wool jersey, zig-zag and press open.
  • Mudcloth: Flat fell or bind with double bias.
  • Rayon: Flat Fell or press open and serge.
  • Slinky: Four thread serge with Woolly Nylon in lower looper. Use differential feed if needed.
  • Sweater Knits: Stabilize horizontal seams and neckline using 1/4” clean elastic. Sew seams with small zig-zag then four thread serge. You can also sew with a lightening stitch and bind with Great Seams.
  • Tencel: Flat fell or press open and serge separately.
  • Velvet: Press open, pink or or serge separately.

© Sunny Kent, ASG Inland Empire Chapter

Tagged With: fabric, seams, sewing

October 25, 2019

Stay “Sew” Safe Online – Safety Starts at Home

October is National Cybersecurity Awareness Month, the perfect time to launch our new series of articles and tips to help you stay “sew” safe online!

With internet connected smartphones, computers, laptops, iPads, televisions, security systems — and even some of our sewing machines are capable of connecting to the internet — it’s more important than ever to take ongoing steps to keep ourselves protected. Here are a few tips to get started:

  • Operating System Updates: Keeping your operating systems up to date, whether that’s Windows, Mac OS, iOS, Android or something else, is your first line of defense. This includes computers, laptops and mobile devices. Most of these devices will update automatically or at least alert you that an update is available. If you receive a screen that says an update is available for your operating system, smile, mash that update button and yell “LET’S DO THIS!”
  • Software Updates: While the operating system is what runs your device, software is what makes your device do what you want it to do. It could be a word processing program, an email program, security software, or that game of Solitaire you love to play while drinking your morning cup of joe. If your software doesn’t update automatically, try looking for a “Check for Updates” choice (often found under the Help menu).
  • Browser Updates: Browsers refer to what you use to connect to the internet, such as Chrome, Internet Explorer, Firefox, Safari, etc. An up-to-date browser will help to protect you while you surf online. It won’t hide that new pattern or notion that you’re having delivered to your home though.
  • Secure your home’s Wi-Fi: You should protect your wi-fi connection as fiercely as your guard your fabric stash. Your home’s wireless router is a potential weak spot in your security. Whether you purchased your own router or you received your modem/router from your internet service provider (ISP), check to be sure that you are not using the equipment’s default username and password (which is often admin/password). If you’re not sure how to check this, it may be time to get out the manual, make a call to your ISP, or promise your favorite teen a new home-sewn item for helping you out.


  • Avoid clicking on suspicious emails, even if it looks like it came from someone you know. If an email looks like a scam and quacks like a scam – I mean, duck – it probably is a scam. Or duck. Doesn’t matter. Sew a holiday outfit for the duck but don’t invite it in to your home.
  • Protect your devices with antivirus software and anti-malware (or total internet security that combines both) software. This software is like a technology flu shot. Nothing can guarantee that your equipment won’t get infected, but this does a great job of slamming the door on potential problems.
  • Never click and tell. Make your online friends ooh and ahh with pics of your new handcrafted outfit, but no one online needs to know what you spent on your new embroidery machine or that you are leaving the house right now to head to the fabric store (tell all about it when you get back though!). Many don’t realize that seemingly random details are all that criminals need to know to target you, your loved ones and your physical belongings—online and in the real world.

Watch for more online tips and information on how to keep your fabulous, creative self “sew” safe online!


~© Janice Blasko, ASG Webgoddess

October 18, 2019

Care and Feeding of your Sewing Machine

As much as we love sewing, some tasks aren’t quite as much fun as others, but they’re no less important. One of those tasks–cleaning your sewing machine. If you allow dust, lint and thread to build up in the machine, you’re asking for trouble, so make a point to clean it on a regular basis. But how?

How often do I need to clean my machine?

Experts advise cleaning every 10-12 hours of use, or more often if you’re using fuzzy fabrics like fleece, wool, quilt batting, etc.

In addition to the machine manual, you’ll need a few helpful tools. Look for the machine’s lint brush (or a small paintbrush), a soft cloth, pipe cleaners, Q-Tip, tweezers, a screwdriver (if needed) and perhaps treat yourself to a mini vacuum attachment. Or, if you prefer, look for disposable sewing machine cleaning brushes.

First and foremost, consult your instruction book for the care specifics of your model. Then, unplug the machine before you begin. Remove the needle and presser foot to allow easy access to the innards of the machine where the accumulations can easily go unnoticed.

Up Top

Once you’ve removed the needle and presser foot, take off the machine’s throat or needle plate. This can be done by pushing a button, lifting a lever or unscrewing it, depending on the machine brand. Doing this exposes the machine feed dogs (those little teeth that move the fabric), thread cutter (if you have one) and other movable parts. And, very likely, some packed-in lint as well.

Gently brush the lint out from under the sewing machine's throat platLint comes from the fabric we sew, the thread we use and from the dust in the environment, including those loyal pets who watch us create at the machine.

Use the brush, tweezers and/or a pipe cleaner to pull out the gobs of lint throughout the entire area. Lift the feed dogs to remove lint packed underneath them. Avoid the temptation to simply blow lint out with your breath or with canned air, as both not only introduce unwanted moisture into the machine, but they can imbed the dust bunnies further into the machine’s mechanism. The use of canned air can also void some machine warranties. Gently lift it out one whisp at a time.

Don’t forget to clean the area above the presser foot, as lint often accumulates there as well and sometimes up into the light area if it’s accessible.

Fold the soft cloth and clean between the tension disks to dislodge any bits that might be hidden as a result of thread breakage while sewing.

Down Below

Remove the bobbin case (if you have one) and open the bobbin area per your instruction manual. Pay close attention to the process, as you’ll be putting it back together in reverse order. Remove lint or any errant thread bits in that entire area, including inside and outside the bobbin case.

If your machine requires oil, now is the time to do it, once lint is removed and the moving parts are visible. Carefully follow the instruction manual for where and how to lubricate and use ONLY sewing machine oil for the task.

Clearning and oiling the bobin case

Finishing up

When you’re done with the cleaning tasks, reassemble the parts and plug the machine back into the power source. If you oiled it, run it for a while without thread or bobbin to work the oil into the parts. This is a great time to put in a new needle as well.

Use a barely damp cloth to wipe down the outside of the machine to remove any visible stains. You probably didn’t mean to touch the machine after eating chocolate.

Call in the Pro

Regular machine cleaning is essential to successful sewing, but so is a yearly or bi-yearly check-up from your dealer. They can get to the internal workings that you can’t reach, and their work goes beyond cleaning. So, don’t skip it…it’s like your personal health check-up.


~Linda Griepentrog
Linda is the owner of G Wiz Creative Services and she does writing, editing and designing for companies in the sewing, crafting and quilting industries. In addition, she escorts fabric shopping tours to Hong Kong. She lives at the Oregon Coast with her husband Keith, and two dogs, Yohnuh and Abby. Contact her at .

Tagged With: bobbin case, cleaning, machine cleaning, sewing machine

  • « Previous Page
  • 1
  • …
  • 65
  • 66
  • 67
  • 68
  • 69
  • …
  • 82
  • Next Page »

Become a Member

Join the only national organization dedicated to Advancing Sewing as an Art and Life Skill.

Join Now button

Blog Article Categories

  • ASG Conference
  • Chapter Stories
  • Embroidery
  • Fitting
  • Learn to Sew
  • National Sewing Month
  • Products, Books, & Patterns
  • Projects
  • Quilting
  • Sewing
  • Sewing Techniques
  • Sewing Tips
  • Sewing Tours
  • Videos
  • Disclaimer
  • Privacy Policy

American Sewing Guild
National Headquarters
9660 Hillcroft, Suite 230
Houston TX 77096
713-729-3000 | 713-721-9230 Fax
www.ASG.org

ASG wordcloud - education, conference, discounts, videos, special offers, tours and more

Copyright © 1998–2025 · American Sewing Guild · All Rights Reserved