


Most frequently we as sewers take pains to try and dutifully hide our zippers under flaps, flies, or laps but fashion has recently said it’s OK to see the zipper. In fact, it’s become a prominent stand-out, in-your-face detail both front and back. But how do you put a zipper on the outside and make it look cool? Read on for details.
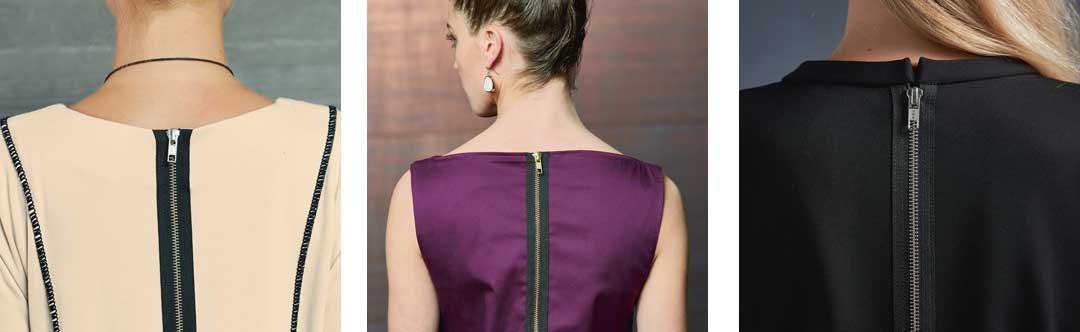
Exposed zippers can be tone on tone to match the garment, or a bold contrast for emphasis. Look for zippers with wider than normal tape widths for added punch, and don’t forget that some zipper companies offer decorative zipper tapes like polka dots, stripes, camouflage, animal prints and other patterns. And for evening, there’s always a gold and silver tape. Zipper teeth can also be holographic and contrasting metal for notoriety.
If you want a longer than normal zipper, consider purchasing zipper by the yard, trim to length and add your own fun pull. If you’re putting an exposed zipper all the way up the back of a dress from the hem to neckline, remember you’ll be sitting on it at some point, so best to avoid those with large sport-like teeth.
Back/Front Installation
Before you insert an exposed zipper, it’s a good idea to reinforce the opening area with narrow strips of fusible interfacing applied to the seam allowance on the right side (yes, the right side) of the zipper opening area. This helps prevent any stretching (especially on knits) or rippling.
- If there is a center seam, sew it up to the zipper opening lower edge and press it open. Leave the area open where the zipper will be applied. If there’s no seam, sew a line of stitching ½” from each side of the center marking where the zipper will be applied. At the lower opening, clip diagonally into the seam allowances, but not beyond.
- Press the opening seam allowances to the garment outside and the lower triangular point as well.
- Place narrow water-soluble basting tape on the underside of the zipper tape edges and finger-press the zipper into place over the opening. If any seam allowances poke out from under the zipper tape, trim so that all edges are hidden under the finished tape edges. On the underside, the folded back edges should clear the actual zipper teeth. Turn under the lower ends of the zipper tape and pin in place over the triangle.
- Using a zipper foot, sew along the outer edges of the zipper tape on both sides, and across the bottom. Stitch again closer to the teeth if needed, catching the folded edges on the underside. Either or both stitching lines can be done with a straight or zigzag stitch, and with matching or contrasting thread. {photo: exposed zipper with zigzag stitching (crop off extra pulls); credit line: Photo courtesy of Bernina}. If you’re using a gold or silver zipper tape, choose either matching metallic thread, or invisible thread for no-show stitching.
- Once the zipper is applied, finish off the upper neckline edge according to the pattern instructions, applying a binding or facing.
Separated Exposure

Occasionally you may choose to use a separating zipper as a closure, but with the entire zipper tape on the garment outside.
In this instance it’s best to follow the pattern instructions, but the upper garment edge is totally finished prior to the zipper application, so the tape is lapped over the finished edge before stitching. The opposite half of the zipper is applied to the other half of the garment in alignment for closing. On both sides of the zipper, turn under any unfinished tape ends before stitching.
Creative Idea
What doubles the fun of an exposed zipper? Use decorative stitches to sew along the zipper tape edges.
All photos used with permission.
~Linda Griepentrog
Linda is the owner of G Wiz Creative Services and she does writing, editing and designing for companies in the sewing, crafting and quilting industries. In addition, she escorts fabric shopping tours to Hong Kong. She lives at the Oregon Coast with her husband Keith, and two dogs, Yohnuh and Abby. Contact her at gwizdesigns@aol.com.
