


Getting button and buttonhole placement right is crucial—misplaced buttons can lead to gaping, pulling, or a garment that just doesn’t fit right. While your sewing pattern may suggest how many buttons to use, the final choice is yours, based on fit, style, and functionality. A great starting point? Your body’s pressure points—the areas where your garment may experience the most strain, such as the bust, belly, or hips (especially with button-front dresses or skirts).
Button Placement Tips
- Identify Pressure Points
Use a muslin or sloper (block) to locate your pressure points. Mark these on the fabric or pattern for future use. - Decide on the Number of Buttons
Refer to your pattern as a guide, but feel free to adjust based on your personal style or coverage needs.
Mark Key Positions
- Lay the muslin or pattern flat.
- Mark the center front and the pressure points.
- Place your top and bottom buttons first.
Evenly Space the Buttons
- Measure the distance between the top and bottom buttons.
- Divide that space by the number of buttons minus one (e.g., if you want 5 buttons, divide by 4) to calculate even spacing.
Double-Check Placement
- Make sure one of your buttons falls directly on each pressure point. If not, adjust the spacing slightly to ensure support where needed.
Buttonhole Orientation
With button placement set, choose between vertical or horizontal buttonholes:
- Horizontal Buttonholes
These are more secure because the button can move slightly side-to-side within the hole. Make sure your facing is wide enough to accommodate the full length of the buttonhole—some patterns don’t allow for this. - Vertical Buttonholes
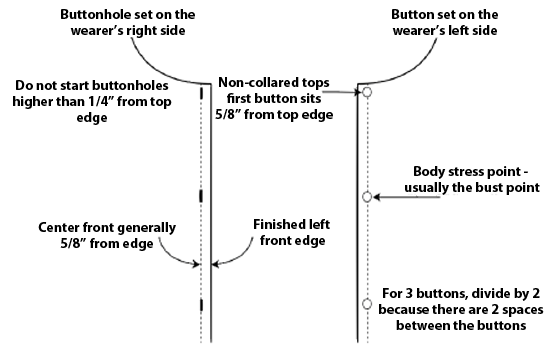
These are typically centered along the center front. They’re good when your button placement is precise, as there’s less wiggle room.
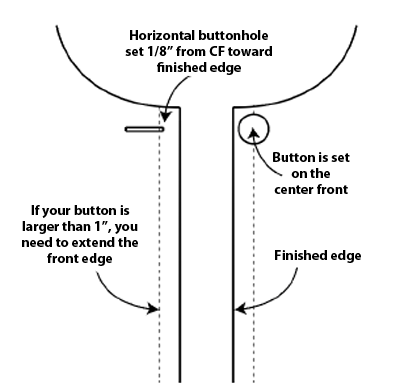
Note: The distance from the center front (CF) to the finished edge is usually 5/8”. This works well for buttons up to 7/8” wide. If you’re using larger buttons, you’ll need to increase this distance accordingly.
Buttonhole Sizing
Many sewing machines have an automatic buttonhole foot or settings to adjust size. If you’re setting it manually, follow this rule of thumb:
- Buttonhole = Button size + 1/8″
This extra bit allows the button to pass through the hole easily.
Quick Guide:
- 1/2″ button → 5/8″ buttonhole
- 5/8″ button → 3/4″ buttonhole
- 3/4″ button → 7/8″ buttonhole
Best Practices for Beautiful Buttonholes
- Vertical Buttonholes: Align both the button and the hole exactly at center front.
- Horizontal Buttonholes: Place the button on center front but begin the hole 1/8” toward the finished edge.
- Top Button Placement: Start about 5/8” down from the neckline, depending on button size. Never place a buttonhole closer than 1/4” from the edge of the neckline.
- Test First: Always sew a test buttonhole using a fabric sandwich that mimics your final garment—including interfacing.
- Women’s Garments: Buttons go on the left, buttonholes on the right.
Women’s clothing buttons on the left, while men’s button on the right, primarily due to historical reasons. In the past, women were often dressed by servants who were typically right-handed, making it easier for them to button clothing on the left. Men, on the other hand, typically dressed themselves, and the button placement on the right was more convenient for self-dressing. Do you have to follow this rule? Absolutely not! Place your buttons and buttonholes on whichever side is most convenient for you.
Bonus Tip for Jackets
When making jackets—especially with horizontal or bound buttonholes—consider stitching all buttonholes along the fabric edge before cutting the front piece. This gives you room to adjust placements and helps prevent mistakes, particularly with hand-finished bound buttonholes.
More Information
For more information about buttonholes, refer to these articles:
~ Based on an article by Annalise T.
