American Sewing Guild (ASG)

Visit our blog Visit the ASG Facebook page Visit ASG on Pinterest Visit ASG's YouTube channel Visit ASG on Instagram
  • Home
  • Join ASG
    • Join Online
    • Chapter Locations
    • Member Benefits
    • Member Brochure
    • Join by Mail
  • Conference & Education
  • Resources
    • Contests & Awards
    • Giving Back
    • Hall of Fame
    • Links
    • Travel and Tours
    • Measurement Chart
  • Shop
    • ASG Store
    • Chapter Products
    • Video Resources
  • Blog
  • About
    • About Us
    • Donate to ASG
    • ASG Sensitivity Statement
    • FAQ’s
    • Start a Chapter
  • Contact
  • Member Login
    • Login First!
    • Members Only
    • Leadership Only
    • Website FAQ’s
    • Logout
  •  

May 2, 2025

Upcycled Cardigan

With shifts in the garment and fabric industries which ultimately decreases the range of fabrics available as yardage, resale and thrift stores emerge as a great source of materials for special sewing projects.

It was a contest to make best use of Pantone’s 2024 color of the year – Peach Fuzz – that had me searching through the resale racks for an item that included that color plus some kind of surface interest- shine, drape, texture, or jacquard perhaps. A V-neck pullover sweater combined the perfect color with a purl-stitch surface. A plan immediately took shape – open the center front, add a banded finish, and find some interesting embellishment.
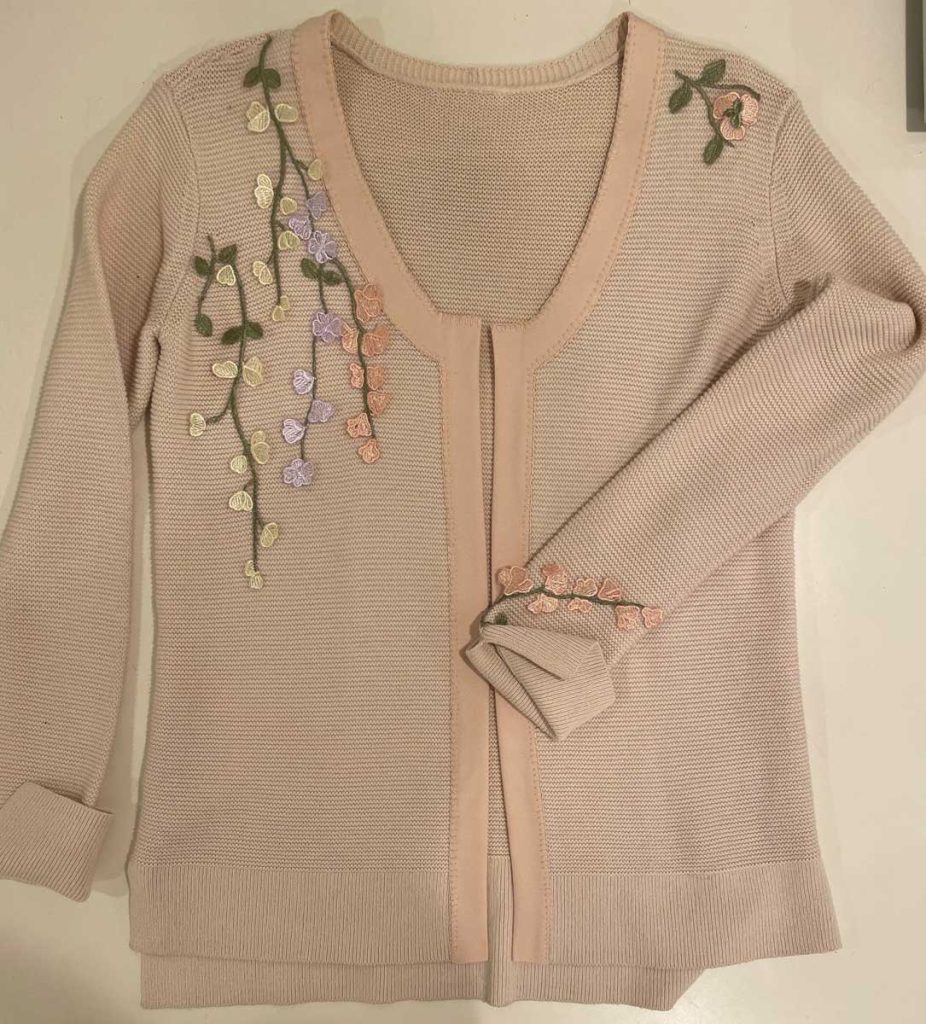
Finsihed cardigan

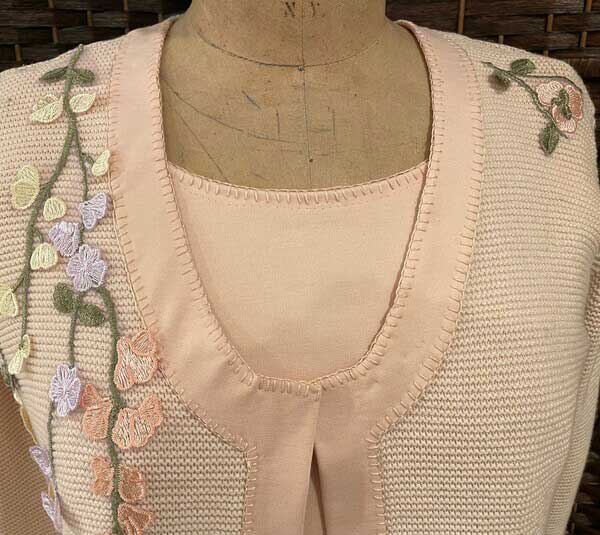
To create the cardigan shape, I reinforced the center front of the sweater (wrong side) with 1/2″ fusible tape on the wrong side, stay-stitched approximately 1/8″ on either side of the center front and split the fabric to create an open edge. 

Pamela’s Patterns #108 (New Versatile Twin Set) provided the pattern piece for the front band and facing, modified to fit the existing neckline shape, barely overlap the center front edge, and extend beyond to create a bit of overlap.
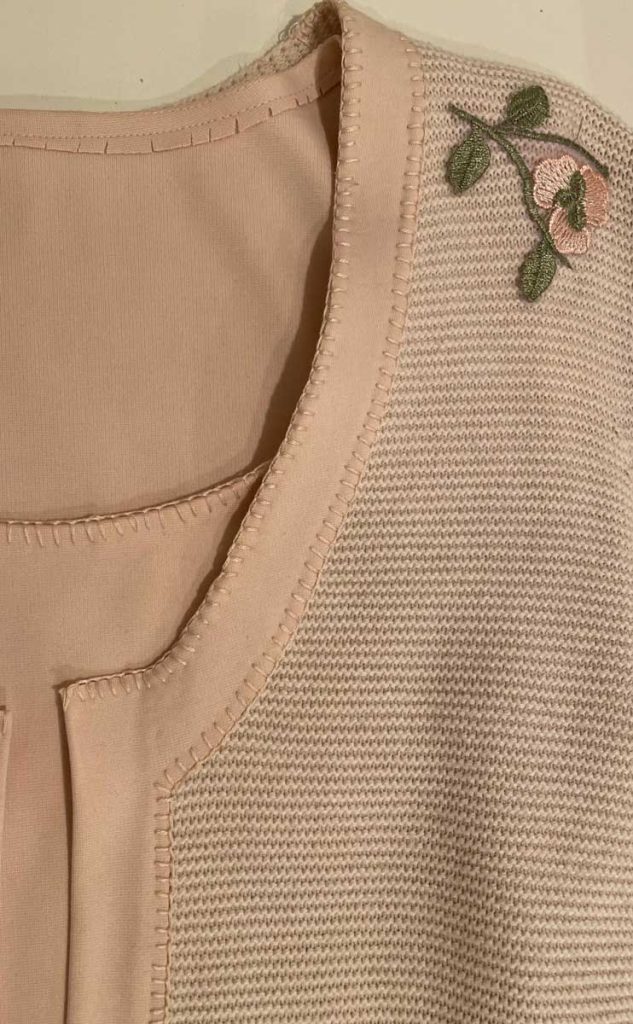
To avoid the bulk of enclosed seams, I cut the bands from a color-matched ponte knit (ST Ponte available at NancyNixRice.com) and trimmed away the seam allowances, knowing that the fabric wouldn’t ravel.

The lapped edges of the band pieces were temporarily secured to the sweater with ¼” Double Sided Fusible Stay Tape from Emma Seabrook. (I’m fairly certain I couldn’t sew at all without that product.) The free edges of the outer band and the facing were also fused together, and all the edges were secured in place with a hand-sewn blanket stitch using 3 strands of color-matched embroidery floss. 
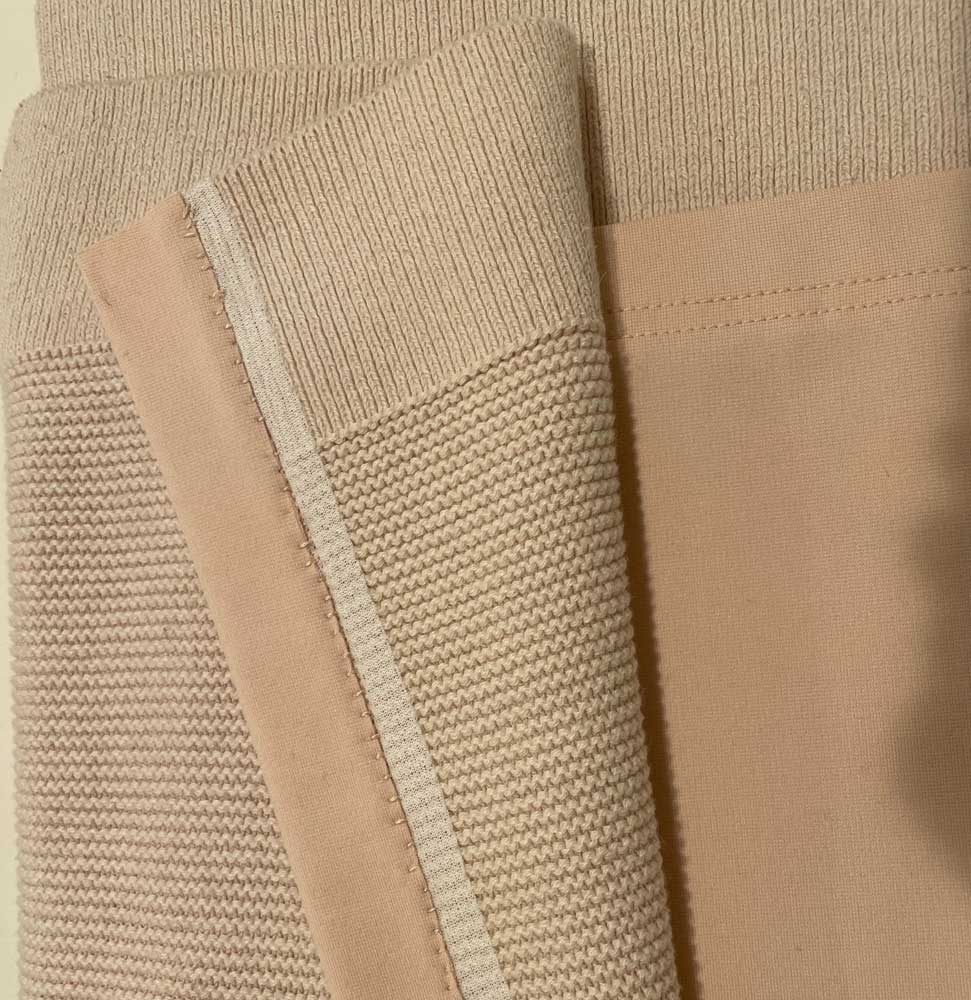
The matching ponte shell is sewn exactly per the instructions, then finished with the same (slightly imperfect) blanket stitch around the scoop neckline.
So far, so good. But the combo still needed a bit of oomph. Searching my neighborhood Joanne Fabrics for some appropriate embellishment, I hit paydirt: a bolt of ultra-sheer tulle embroidered with pastel floral motifs that included Peach Fuzz!!
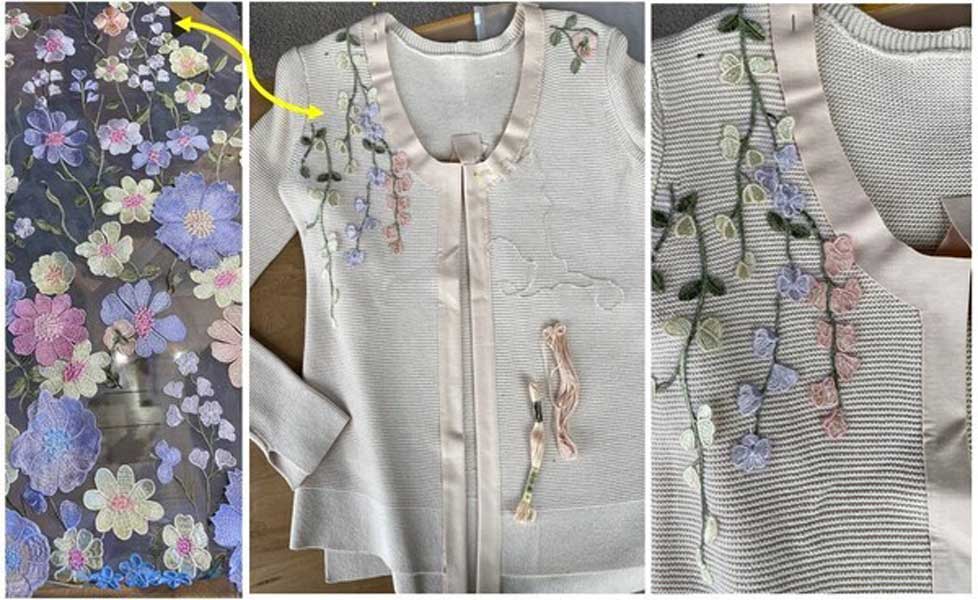
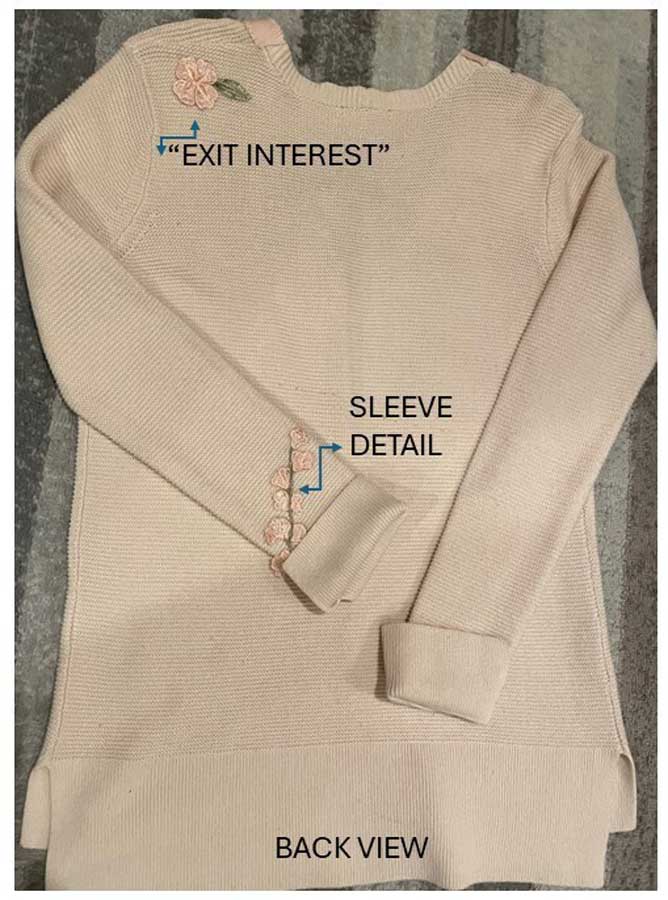
Three-eighths yard of that fabric yielded the perfect vines and buds to cut out and hand applique onto the upper bodice of the sweater. By stitching down only the green stems, I could keep the buds and leaves un-secured, for a fully 3-D effect. A sprinkling of blossoms carried the decorative effect onto one cuff and one back shoulder for a truly designer finish.
What treasures-in-the-making are lurking in your local resale outlets?  Maybe some inspiration in the 2025 Color of the Year: Mocha Mousse.


~Nancy Nix-Rice is an image and wardrobe consultant who specializes in helping sewists make optimal wardrobe choices. You can subscribe to her newsletter at https://bit.ly/3SRtPoq

April 25, 2025

It’s all in the Bag(making)

You may be well versed in garment-making techniques, but maybe not so much for things like bag making. While some techniques can cross over, others are specific to bags and totes. Let’s explore a few of those.

Structure is key to bag making. You need to create a firmness not found in any garment, as the project has to support not only its own weight, but the weight of the contents as well, all without buckling or sagging.

Inner support is key. Firm interfacings, battings, fleeces and foams are ideal candidates to create the inner structure. Your bag pattern will likely make recommendations pertinent to the style, so be sure to read those before selecting the innards. All of these structural materials come in both fusible and sew-in varieties, depending on the fabric you’re using, and a bit of testing will help you determine the right option to get the feel and stability you need. Note that some bag materials like vinyls, some faux leathers and furs cannot be used with fusible products.

Whatever you use for the inner support, it’s a good idea to keep it out of the bag seams, so trim the outer edges either before fusing, or after basting in place. Trimming reduces bulk and makes smoother seams. Topstitching bag seams can help to keep them flat and crisp.

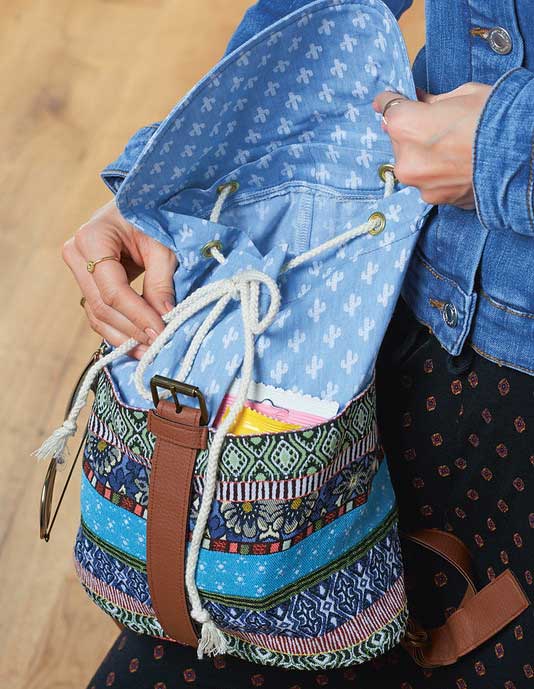
Choose the appropriate hardware for the bag design. There are hundreds of types of hardware items available for bag making, in a variety of colors and finishes. Eyelets and grommets are a popular choice. They can be used alone, or in combination with snap hooks, drawstrings, laces, etc.

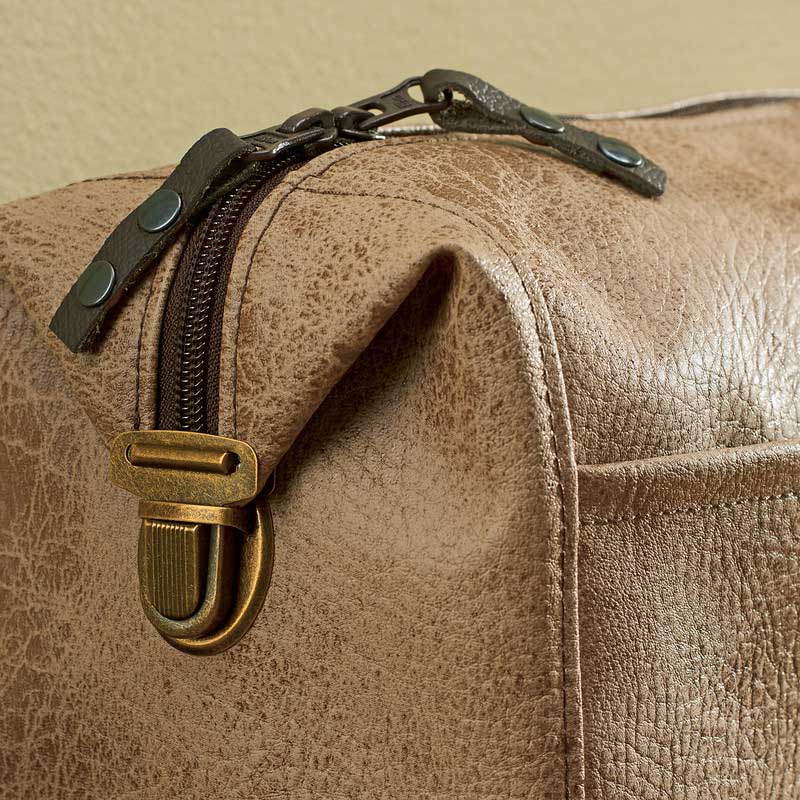
Most bags have some type of closure for security—either a zipper, drawstring, buckle, slip lock or magnetic snap. A single bag can have more than one closing mechanism for added safety.

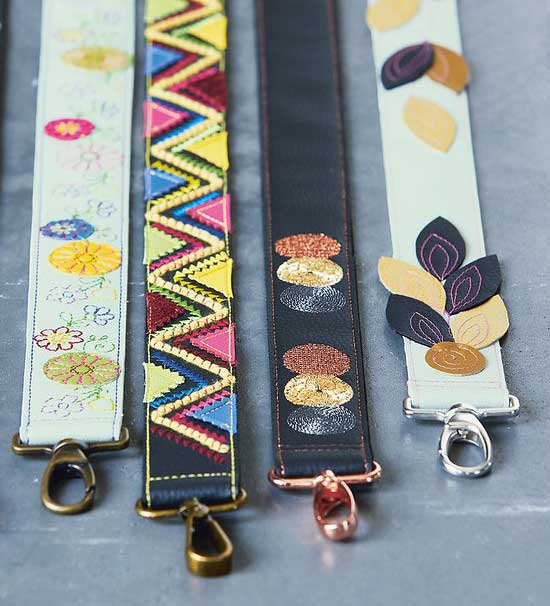
Chances are if you’re making a tailored bag, you’ll need hooks of some sort to hold a strap on. If you make detachable straps, you can get myriad looks for a single bag. Just look for snap hooks in a style and size compatible with your bag. Making detachable straps is your chance to embellish to your heart’s desire using appliqués, decorative stitching, trims or embroidery stitches.

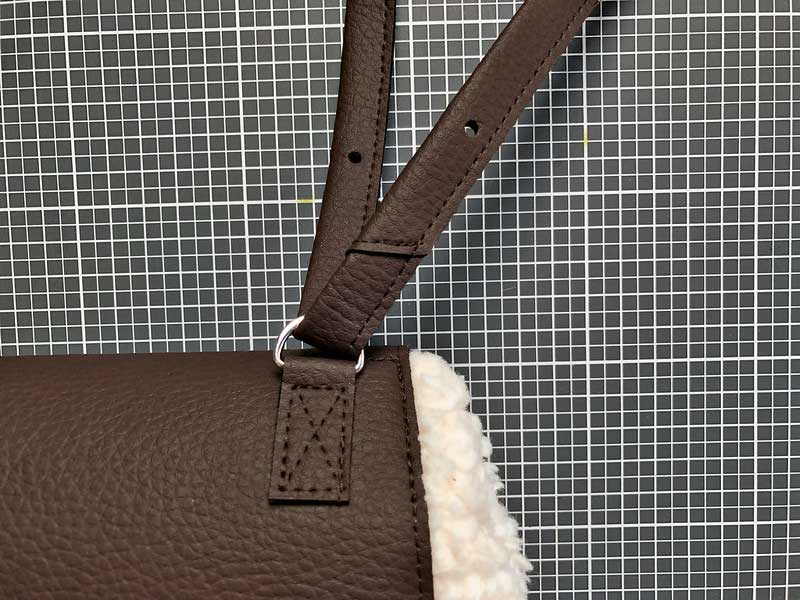
Those straps can attach to the bag with D-rings or rectangular rings.

Strap with D-Ring Strap Guide
Strap Attached with D-Ring and Snap Hook

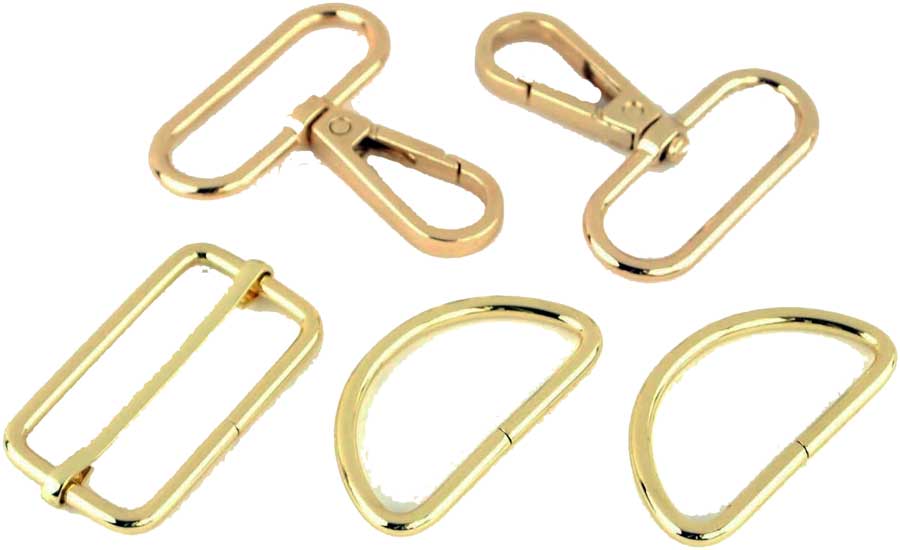
The company that designed your bag pattern may offer hardware kits like this kit from Amazon by Sallie Tomato (affiliate link), so you’re sure to have everything you need to complete the project, from hooks and D-rings to buckle sliders.

Kit available on Amazon, by Sallie Tomato (affiliate link)

Super Stitching

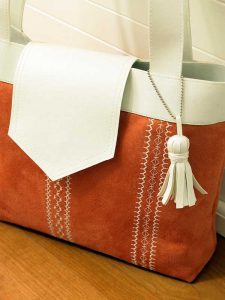
Handbags and totes are a great place to showcase some of the decorative stitches in your machine that you might not use on a garment. A flap or strap can be embellished with a single stitch, or multiple rows of different stitches. Just be sure to stabilize the area behind your stitching lines before you sew to keep things flat.

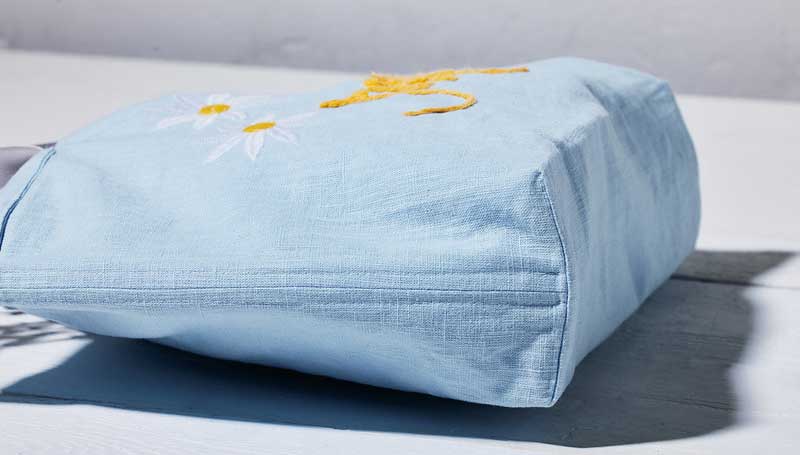
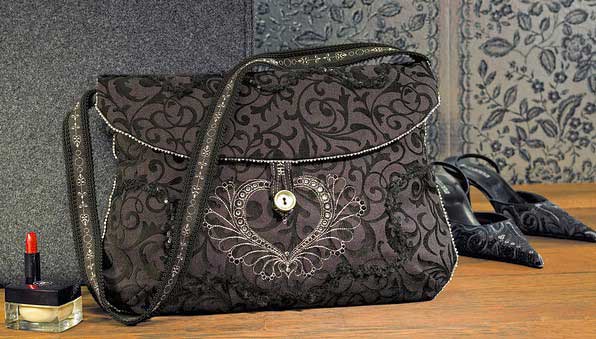
Or use a portion of the bag to showcase a favorite embroidery motif.

So, whatever bag pattern you select for your project, be sure to read through the directions before starting it, as there may be some new techniques you’re not familiar with, and for the best results, use the products suggested by the designer.

Unless otherwise noted, all images courtesy of Bernina of America, with permission.


~Linda Griepentrog is the owner of G Wiz Creative Services and she does writing, editing and designing for companies in the sewing, crafting and quilting industries. In addition, she escorts fabric shopping tours to Hong Kong. She lives at the Oregon Coast with her husband Keith, and three dogs, Yohnuh, Abby, and Lizzie. Contact her at .

April 18, 2025

No More Gaping! A Guide to Button and Buttonhole Placement That Works

Getting button and buttonhole placement right is crucial—misplaced buttons can lead to gaping, pulling, or a garment that just doesn’t fit right. While your sewing pattern may suggest how many buttons to use, the final choice is yours, based on fit, style, and functionality. A great starting point? Your body’s pressure points—the areas where your garment may experience the most strain, such as the bust, belly, or hips (especially with button-front dresses or skirts).

Button Placement Tips

  • Identify Pressure Points
    Use a muslin or sloper (block) to locate your pressure points. Mark these on the fabric or pattern for future use.
  • Decide on the Number of Buttons
    Refer to your pattern as a guide, but feel free to adjust based on your personal style or coverage needs.

Mark Key Positions

  • Lay the muslin or pattern flat.
  • Mark the center front and the pressure points.
  • Place your top and bottom buttons first.

Evenly Space the Buttons

  • Measure the distance between the top and bottom buttons.
  • Divide that space by the number of buttons minus one (e.g., if you want 5 buttons, divide by 4) to calculate even spacing.

Double-Check Placement

  • Make sure one of your buttons falls directly on each pressure point. If not, adjust the spacing slightly to ensure support where needed.

Buttonhole Orientation

With button placement set, choose between vertical or horizontal buttonholes:

  • Horizontal Buttonholes
    These are more secure because the button can move slightly side-to-side within the hole. Make sure your facing is wide enough to accommodate the full length of the buttonhole—some patterns don’t allow for this.
  • Vertical Buttonholes
    These are typically centered along the center front. They’re good when your button placement is precise, as there’s less wiggle room.

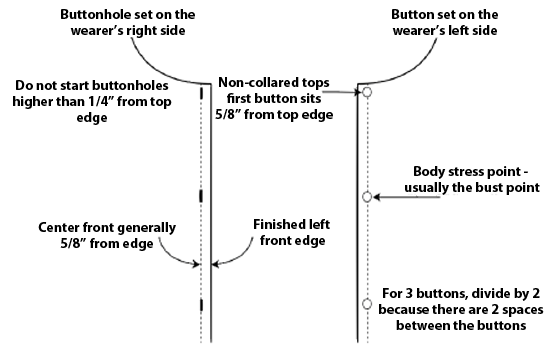
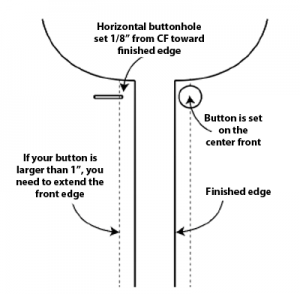
Note: The distance from the center front (CF) to the finished edge is usually 5/8”. This works well for buttons up to 7/8” wide. If you’re using larger buttons, you’ll need to increase this distance accordingly.

Buttonhole Sizing

Many sewing machines have an automatic buttonhole foot or settings to adjust size. If you’re setting it manually, follow this rule of thumb:

  • Buttonhole = Button size + 1/8″
    This extra bit allows the button to pass through the hole easily.

Quick Guide:

  • 1/2″ button → 5/8″ buttonhole
  • 5/8″ button → 3/4″ buttonhole
  • 3/4″ button → 7/8″ buttonhole

Best Practices for Beautiful Buttonholes

  • Vertical Buttonholes: Align both the button and the hole exactly at center front.
  • Horizontal Buttonholes: Place the button on center front but begin the hole 1/8” toward the finished edge.
  • Top Button Placement: Start about 5/8” down from the neckline, depending on button size. Never place a buttonhole closer than 1/4” from the edge of the neckline.
  • Test First: Always sew a test buttonhole using a fabric sandwich that mimics your final garment—including interfacing.
  • Women’s Garments: Buttons go on the left, buttonholes on the right.

Women’s clothing buttons on the left, while men’s button on the right, primarily due to historical reasons. In the past, women were often dressed by servants who were typically right-handed, making it easier for them to button clothing on the left. Men, on the other hand, typically dressed themselves, and the button placement on the right was more convenient for self-dressing. Do you have to follow this rule? Absolutely not! Place your buttons and buttonholes on whichever side is most convenient for you.

Bonus Tip for Jackets

When making jackets—especially with horizontal or bound buttonholes—consider stitching all buttonholes along the fabric edge before cutting the front piece. This gives you room to adjust placements and helps prevent mistakes, particularly with hand-finished bound buttonholes.

More Information

For more information about buttonholes, refer to these articles:

  • Buttonhole Basics
  • Buttons: Attachment Antics

~ Based on an article by Annalise T.

April 11, 2025

Factory Secrets: Sewing Tips You’ll Actually Use

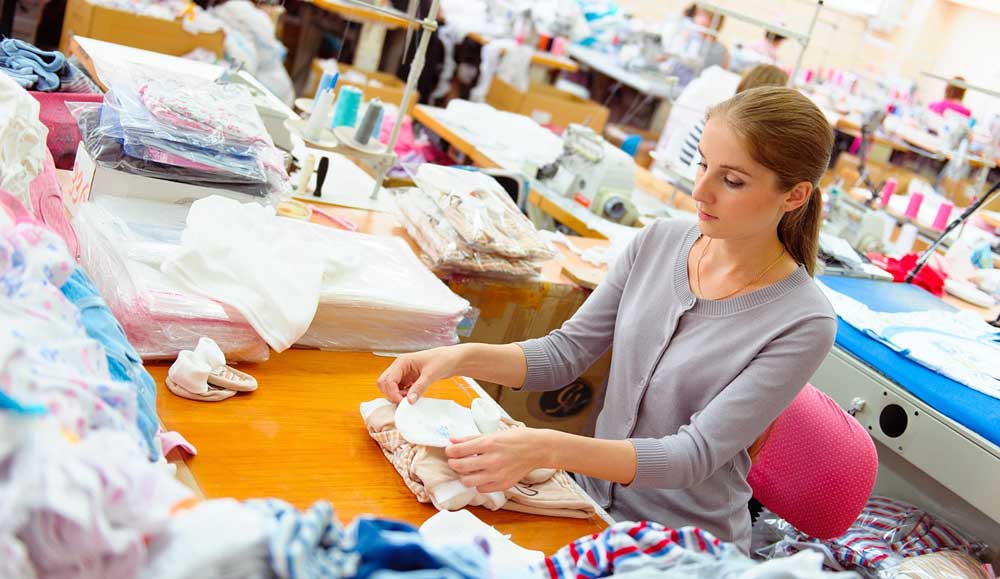
As home sewers, not many of us get a chance to see sewing in a production setting, but for five years I was in charge of a small sewing “factory”. There are many similarities to our own sewing rooms, but also many differences. Some factory findings can be transferred to our personal sewing efforts to help save time and money.

Before you cut out your project, looks through the pattern pieces and see if you can simplify the design. For example, can you change a sew-on facing to a cut-on one and perhaps even create a self-interfacing? That simple change saves both sewing and likely fusing time, and perhaps fabric as well.

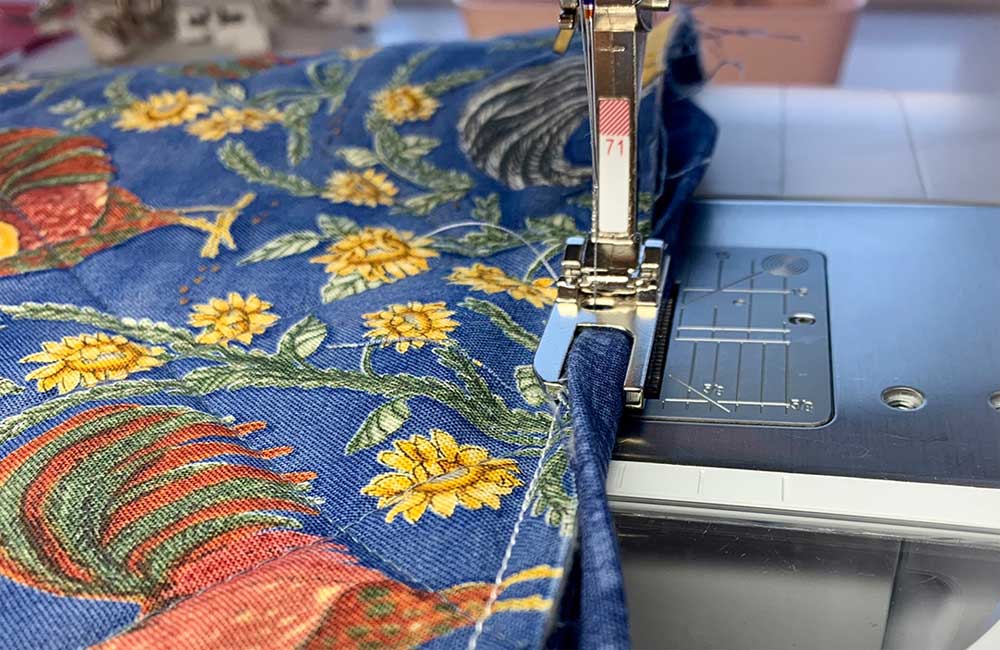
Whether you’re making 10,000 pairs of Levi jeans, or 50 tote bags for a charity project, or a single shirtwaist dress, nothing saves time like chain piecing. If you’re a quilter, you’re probably already familiar with the concept used to create multiple blocks. If not, it simply means that you feed in the next pieces to be sewn continuously without stopping or manually cutting threads. If you have a presser-foot lifter, it’s even easier. Not only a timesaver, but also a thread saver.

This effort means that you won’t be necessarily following the pattern guidesheet, which usually has us making “units”, but instead you’ll be challenging yourself to see how many pieces you can sew together before stopping to press or cut them apart (a built-in thread cutter makes it even easier). For example, when sewing a garment, you could sew both side seams of a skirt, then feed in a sleeve underarm seam, a bodice side seam, the other sleeve seam, the remaining bodice side seam, then a collar and/or facing in a continuous chain. You’re saving time for sure, and lots of thread as you’re not stopping between to pull out new threads before the next seam is sewn. In a factory, there is a specific amount of thread allocated to each item and each step of the production process.

Take note of a huge factory timesaver in choosing where/how to position your cut pieces. The closer you can get the cut pieces to where they’ll be sewn, the less time and motion is involved in the process. In a factory, both of those factors influence cost. An example—place the cut pieces of your project on the bed of your machine instead of on the table next to it. Pieces destined for sewing together should be place right sides together at the machine so you don’t have to fumble with them prior to sewing.

Sew without pins whenever possible. The time it takes to remove pins while seaming adds up and will slow down your continuous sewing. If you feel compelled to pin, place the pins inside or outside of the seamline, so they don’t need to be removed as you sew.

Image courtesy of Bernina

If you have specialty presser feet available for your machine, learn to use them as they will not only make your life easier, but they also save time as they’re designed for the specific task at hand. Bias binders, piping feet, narrow hemmers, folders, etc. are examples of these single-function attachments.

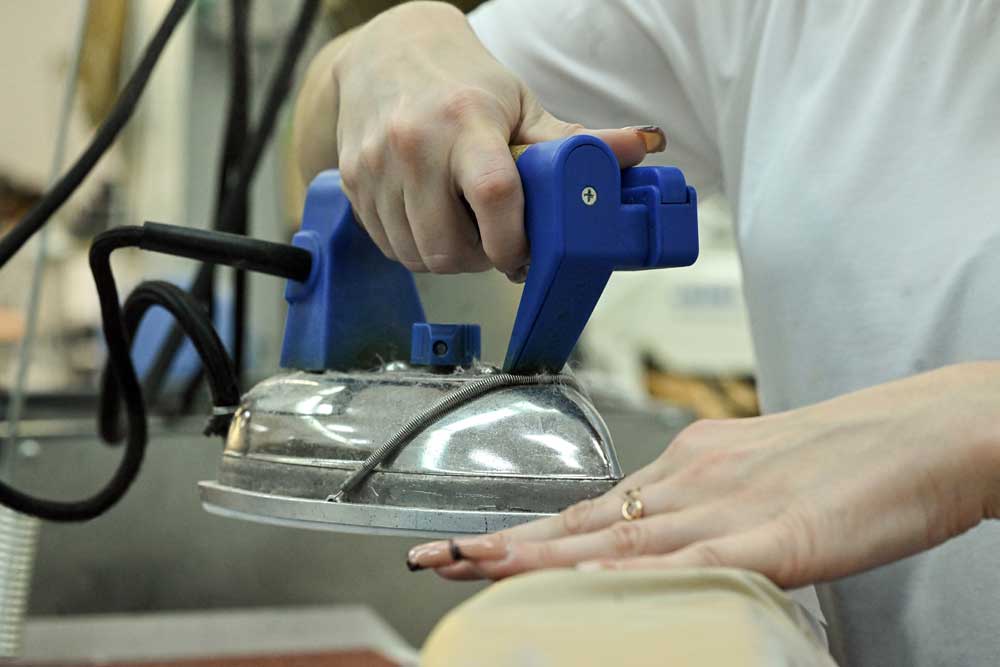
Contrary to our home sewing mantras, most factory work does not include pressing as you go; most likely, if at all, it’s done at the very end of a project. A single final press is the culmination of the sewing process.

If you’re making quantities of a single item, like for a charity or a craft sale, choose a non-directional fabric that doesn’t require matching, and select fabrics that can utilize the same color thread. Both of those things are timesavers.

Whether or not you choose to implement any of these techniques gleaned from production sewing is up to you. Saving bits of time may not be that important to you if you’re savoring the creative sewing process, but if you’re making a hundred of the same item and are bored to tears, time saved is welcome.


~Linda Griepentrog is the owner of G Wiz Creative Services and she does writing, editing and designing for companies in the sewing, crafting and quilting industries. In addition, she escorts fabric shopping tours to Hong Kong. She lives at the Oregon Coast with her husband Keith, and three dogs, Yohnuh, Abby, and Lizzie. Contact her at .

April 4, 2025

Sewing to Fit Your Body Style

How often have you been attracted to a style or a pattern and made up a garment with disastrous results? Maybe it fit, but you did not like how it looked on … or when you tried it on, it felt strange. Or, maybe it took so much altering to get it to fit that you were sick of the garment before you even finished it. Any of these scenarios might make you think, “What did I do wrong?” The answer is: Nothing! You simply selected an incorrect style for your body shape.

As a seamstress, you have the knowledge, the ability, and the resources to make any garment you wish and have it fit. Are you happy with the results? Not always.

A perfect fitting garment starts with the selection of the correct pattern-a pattern that has the same lines as the body and repeats its shape. So why not start with a pattern that is your body shape? You’ll be able to eliminate all the pattern alterations and time-consuming fitting sessions. You’ll know that your garment will fit and that you will enjoy wearing it.

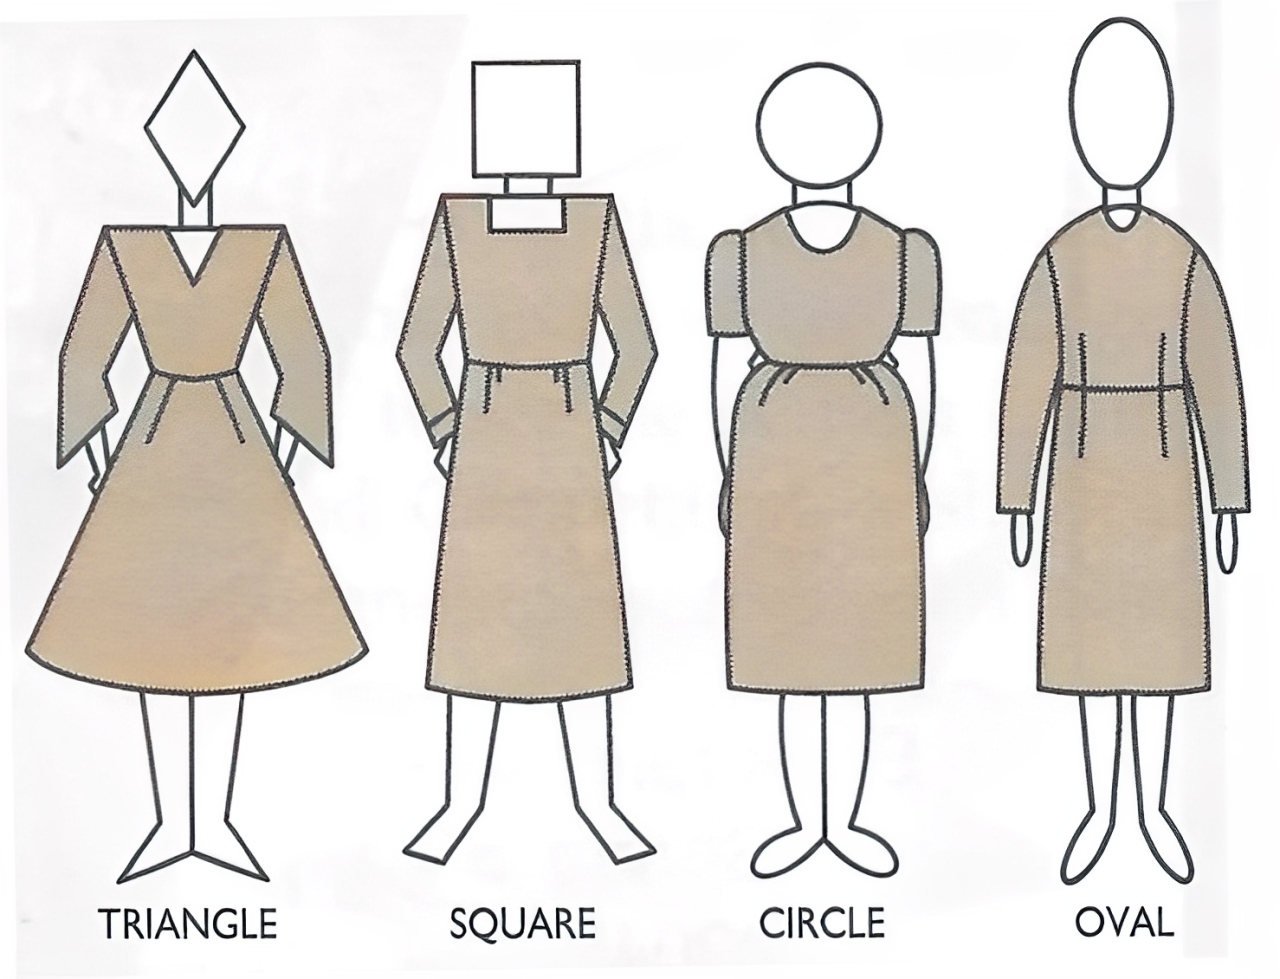
The Body Shape Concept says there are four body shapes-triangle, square, circle, and oval-each one unique and each one beautiful.

Body Shapes

There are also four styles of garment-triangle, square, circle, and oval. When the shape of your clothing matches the shape of your body, the effect is harmony-a pleasing arrangement of parts. When you achieve harmony with your wardrobe, the effect is terrific-not just to others but to yourself.

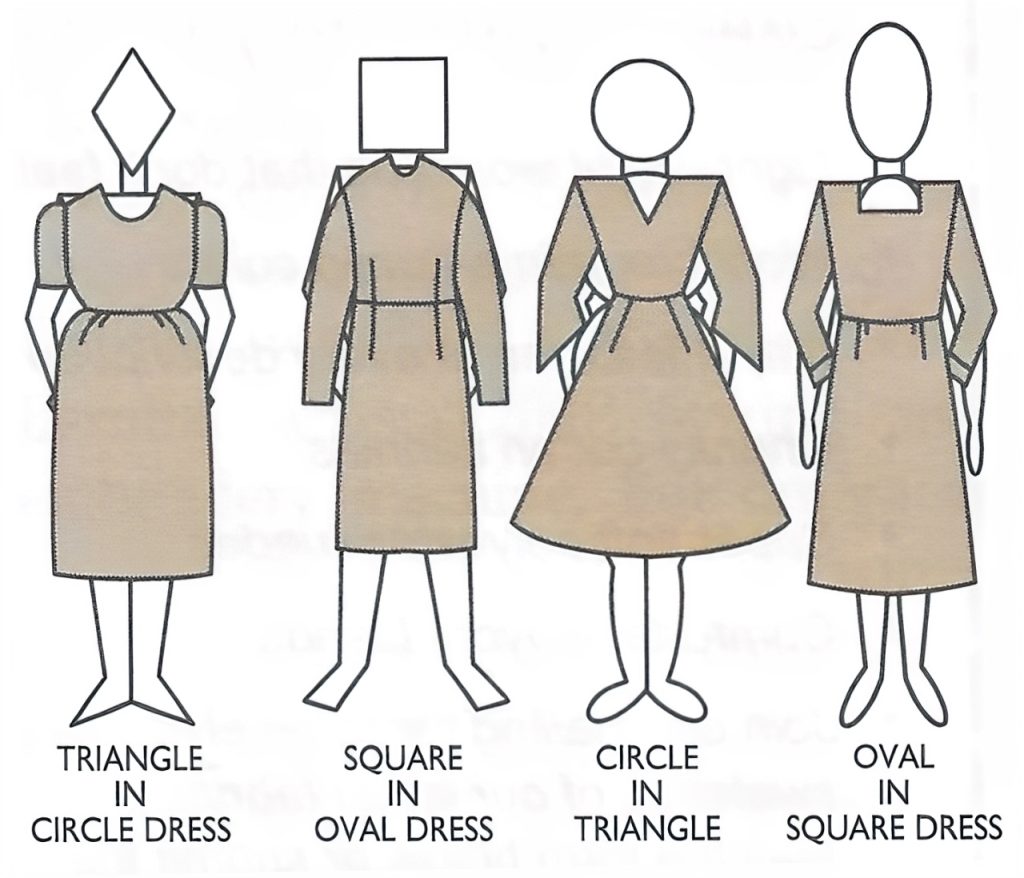
When you recognize your body shape and repeat it in your silhouette; any figure problem you have will take care of itself. That sense of being “together” is far more powerful than whether your hips are larger than your bust. There is so much power in creating harmony that people just don’t see or remember imperfections.

Here is an example of what happens when you use a pattern that is not your body shape.

Yes, you can alter, alter, alter to get any style to fit; however you will not achieve the results you are hoping for. By the time the garment fits, the original design lines will have been distorted and you will wonder what happened.

Each of the four body shapes has very distinct characteristics: The triangle body shape is angular and asymmetrical with unusual proportions.

  • You have a V-shaped rib cage.
  • You have a small waistline or small in proportion to your hips.
  • Your legs are full through the knees.
  • If you have extra weight, it will be in your derriere and thighs.

The square body shape has straight lines giving it a squared-off, no-non- sense sporty look.

  • You have a straight rib cage with little or no waistline indentation.
  • You have a flat derriere.
  • You have straight slim legs.
  • If you have extra weight, it will be in your torso.

The circle body shape is rounded and feminine with graceful curves.

  • You have or once had a definite waistline.
  • You have full upper hips, derriere, and thighs.
  • You have large calves and thin ankles.
  • If you have extra weight, it will be in your upper arms, rib cage, and upper hips.

The oval body shape is balanced, symmetrical and uncomplicated, giving it a look of subtle sophistication.

  • Your shape flows smoothly from the rib cage to waist to hips in a gentle line.
  • You have a flat derriere.
  • Your legs are gently shaped.
  • If you have extra weight, it will be in your front torso.

Although you can change your size, you can’t change your shape… and there is no reason to. Your unique contours give you character.

When the shape of your clothes matches your contours, you’ve got style. There is a special quality that emanates from people who accept themselves. Knowing how to dress increases self-confidence. If you feel alive in your clothes, you’ll exude your own special attractiveness. Beauty is made from dressing with style. Your body shape, no matter what it is, can always be dressed beautifully.

Look for the true, the good, and the beautiful…and there you are!


~Darlene Miller is the author of “Your Shape, Your Clothes, and You—Secrets of a Successful Wardrobe” (out of print)

  • 1
  • 2
  • 3
  • …
  • 82
  • Next Page »

Become a Member

Join the only national organization dedicated to Advancing Sewing as an Art and Life Skill.

Join Now button

Blog Article Categories

  • ASG Conference
  • Chapter Stories
  • Embroidery
  • Fitting
  • Learn to Sew
  • National Sewing Month
  • Products, Books, & Patterns
  • Projects
  • Quilting
  • Sewing
  • Sewing Techniques
  • Sewing Tips
  • Sewing Tours
  • Videos
  • Disclaimer
  • Privacy Policy

American Sewing Guild
National Headquarters
9660 Hillcroft, Suite 230
Houston TX 77096
713-729-3000 | 713-721-9230 Fax
www.ASG.org

ASG wordcloud - education, conference, discounts, videos, special offers, tours and more

Copyright © 1998–2025 · American Sewing Guild · All Rights Reserved