American Sewing Guild (ASG)

Visit our blog Visit the ASG Facebook page Visit ASG on Pinterest Visit ASG's YouTube channel Visit ASG on Instagram
  • Home
  • Join ASG
    • Join Online
    • Chapter Locations
    • Member Benefits
    • Member Brochure
    • Join by Mail
  • Conference & Education
  • Resources
    • Contests & Awards
    • Giving Back
    • Hall of Fame
    • Links
    • Travel and Tours
    • Measurement Chart
  • Shop
    • ASG Store
    • Chapter Products
    • Video Resources
  • Blog
  • About
    • About Us
    • Donate to ASG
    • ASG Sensitivity Statement
    • FAQ’s
    • Start a Chapter
  • Contact
  • Member Login
    • Login First!
    • Members Only
    • Leadership Only
    • Website FAQ’s
    • Logout
  •  

December 15, 2023

Chapter Inspiration: Atlanta, Start with Art

Have you ever found yourself captivated by a piece of art and wondered how you could take pieces of what it made you see or feel into other areas of your life… maybe your sewing life? That was the foundation for the American Sewing Guild’s Atlanta chapter’s Start with Art annual President’s challenge this year.

In January, they put 6 famous paintings out to the membership for a vote to choose which would be the basis for the challenge. The winner was Gustav Klimt’s Portrait of Adele Bloch Bauer aka Woman in Gold painting. The rules were simple: make anything you like using any aspect of the painting as your inspiration. Entries could be a garment, a bag, a quilt … anything! And inspiration could be from the colors, shapes, emotion, history, or whatever ignited the creative spark.

Portrait of Adele Bloch Bauer, aka Woman in Gold
Gustav Klimt, Portrait of Adele Bloch Bauer aka Woman in Gold,
Public domain, via Wikimedia Commons

Simultaneously, they began to explore building collaborative relationships with local universities that had a fashion or textile design degree program. They discovered that the Director of the Textile Design program at Kennesaw State University (KSU) was very interested in building a relationship with us and loved the Start with Art challenge idea. A collaboration was born!

The students in the program were assigned to join in the challenge as a graded project. Chapter members stepped into the classroom for 2-1/2 weeks to work alongside the students as they designed and created their projects. The members were delightful to have the opportunity to assist and guide them with all sorts of design and construction steps. One student in particular was thrilled to be guided by a member on how to make the corner of her purse turn out squared! It was rewarding to share so many tips and techniques that members knew after years of sewing experience that were able to help those emerging sewists on what is hoped to be a lifelong sewing journey.

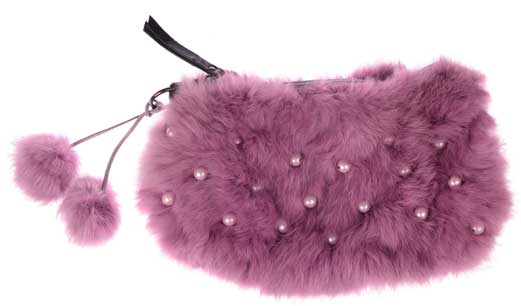
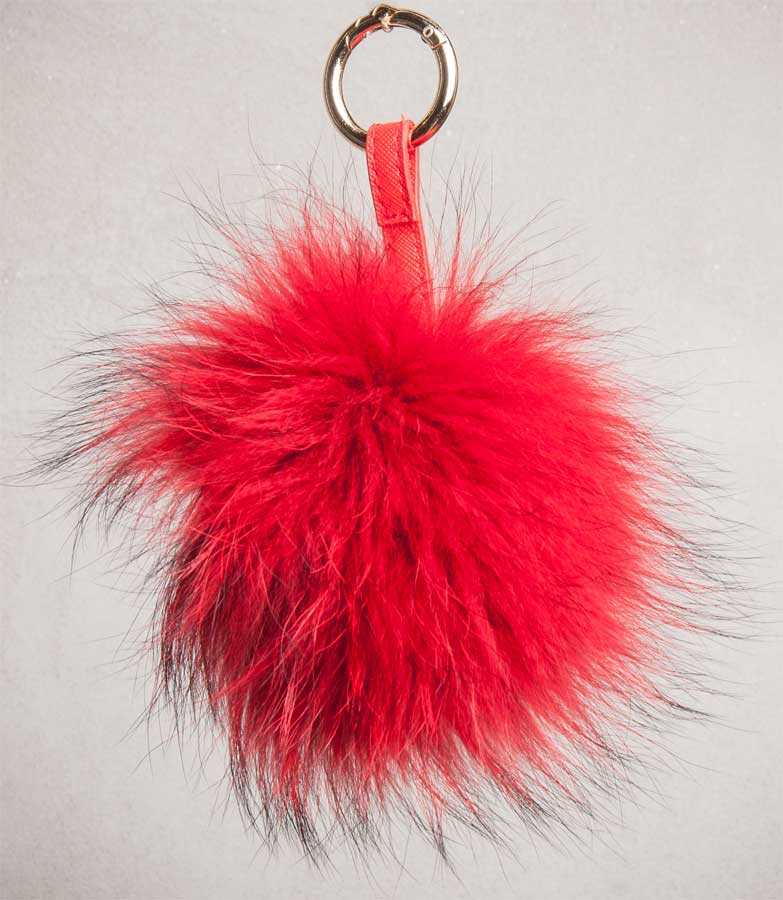
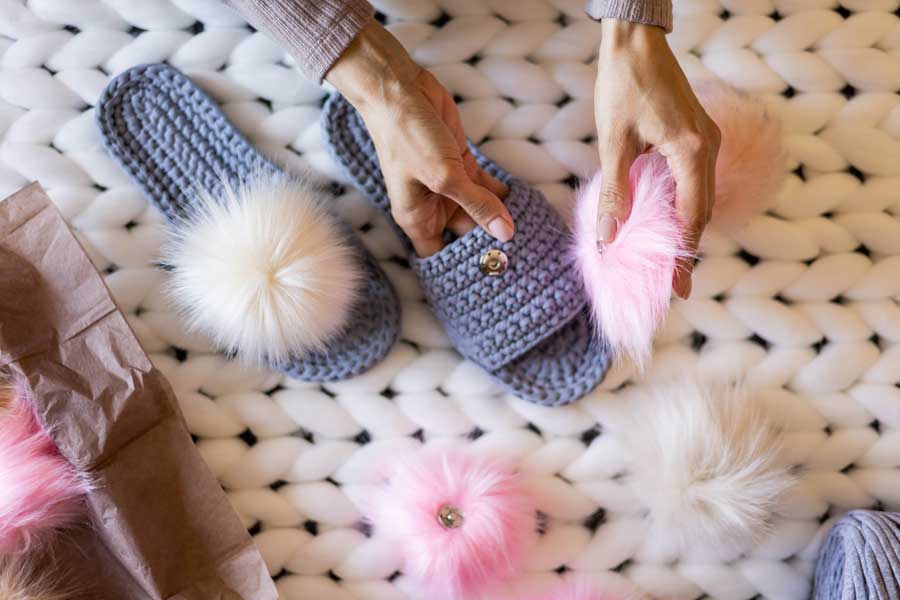
Finally, the big reveal day arrived. Ten ASG members had entered the challenge, and the KSU teachers had curated 8 students to be presented at the chapter’s annual meeting.  It was so exciting to see each one and hear the story of the direction each individual’s inspiration had taken them—some were inspired by the history, some the name, some the shapes, and some reflected Klimt’s style overall. Members were equally inspired by each other as they were by the students. Everyone involved poured heart and soul into their work and it definitely showed.

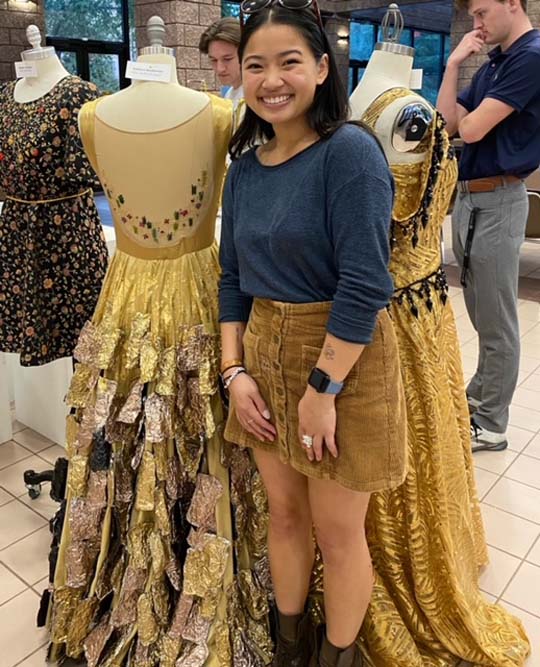
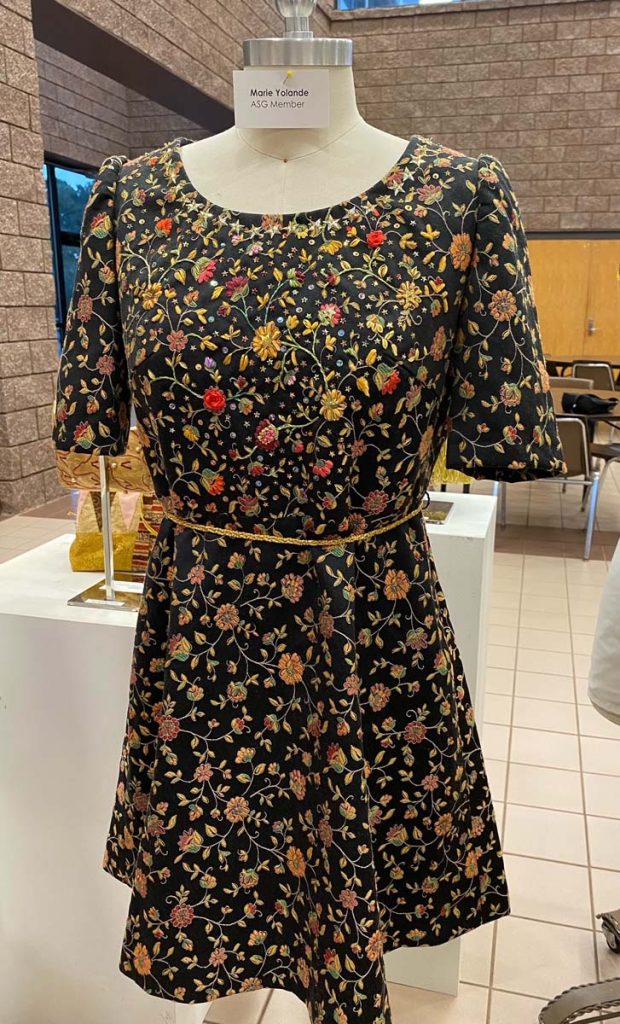
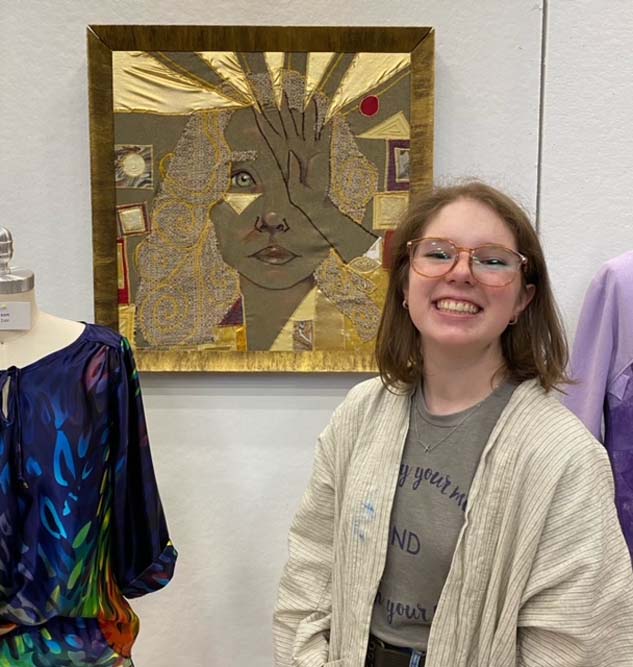
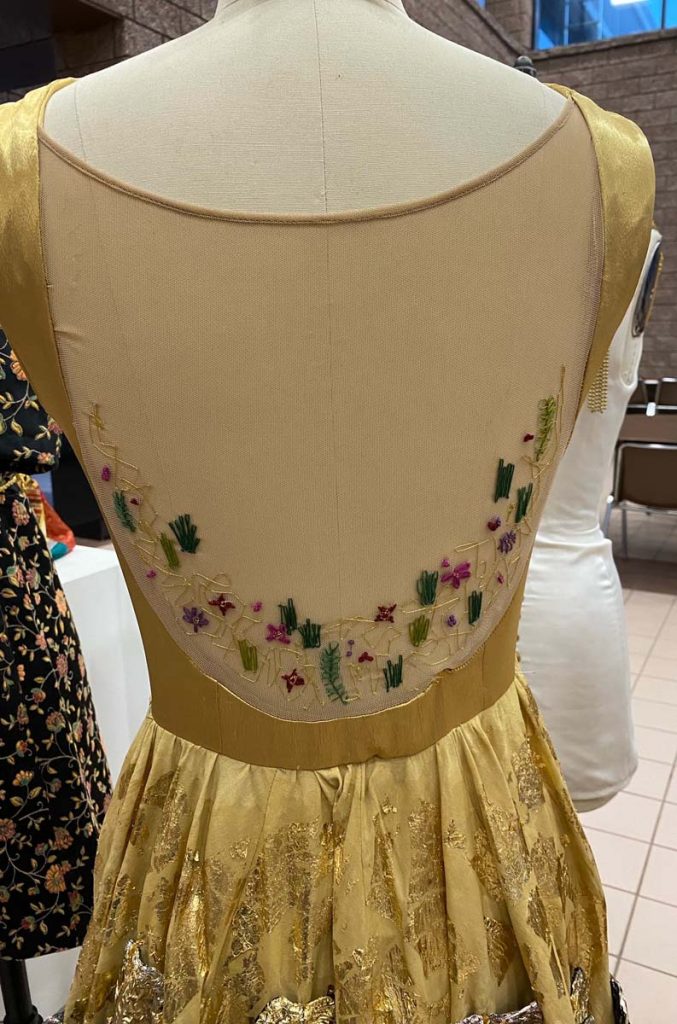
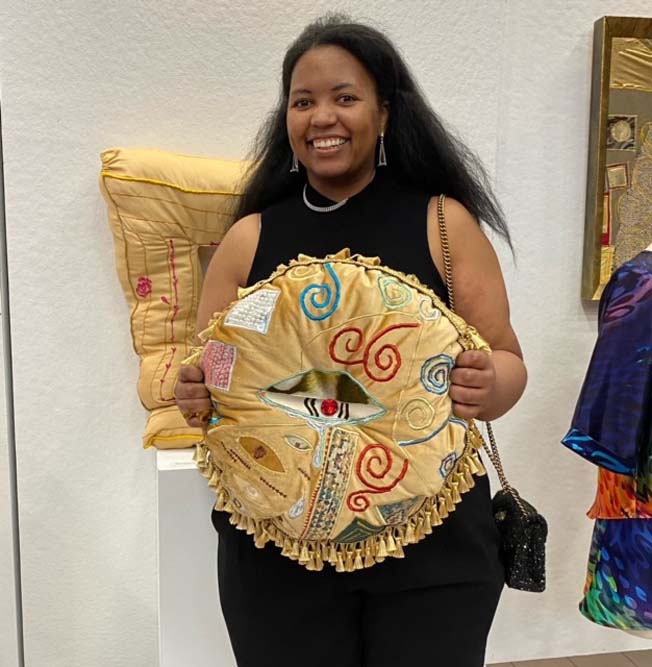
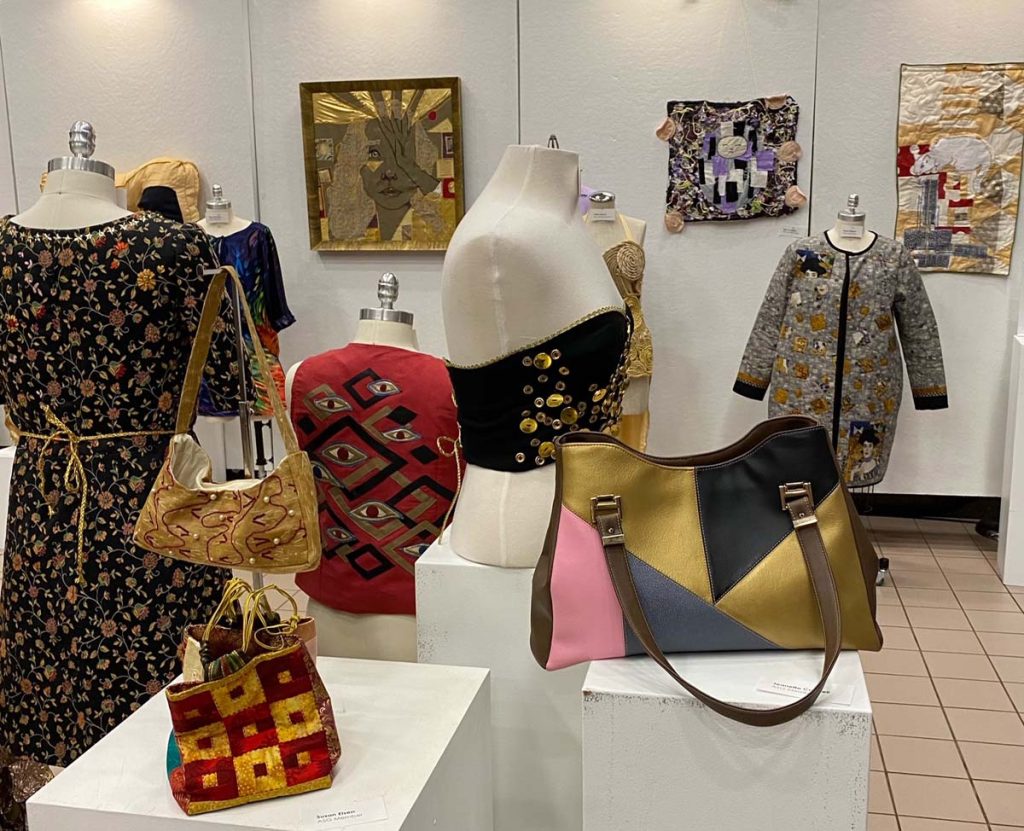
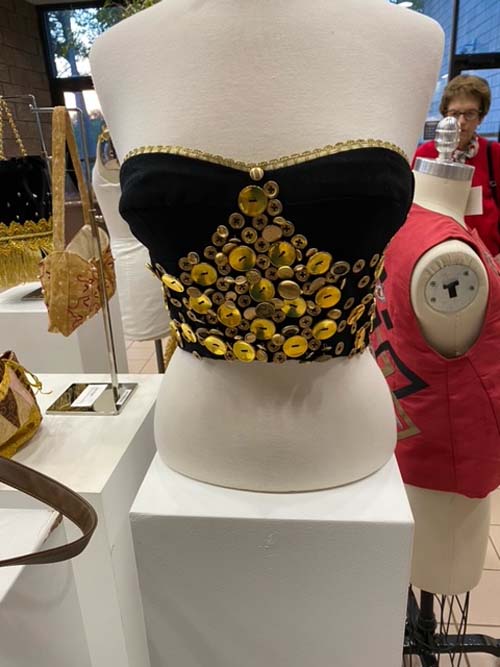
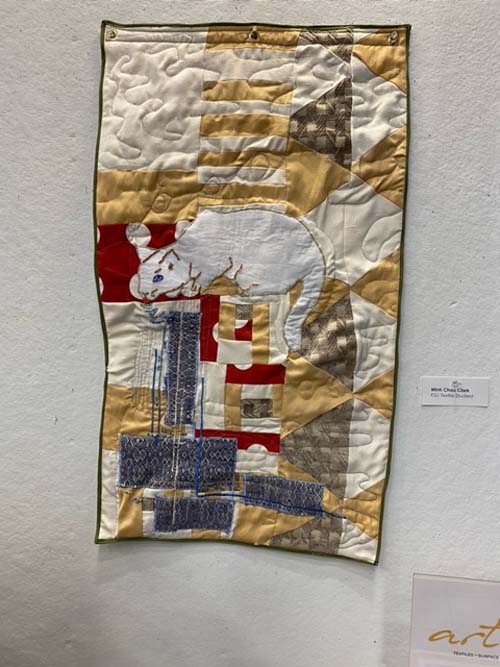
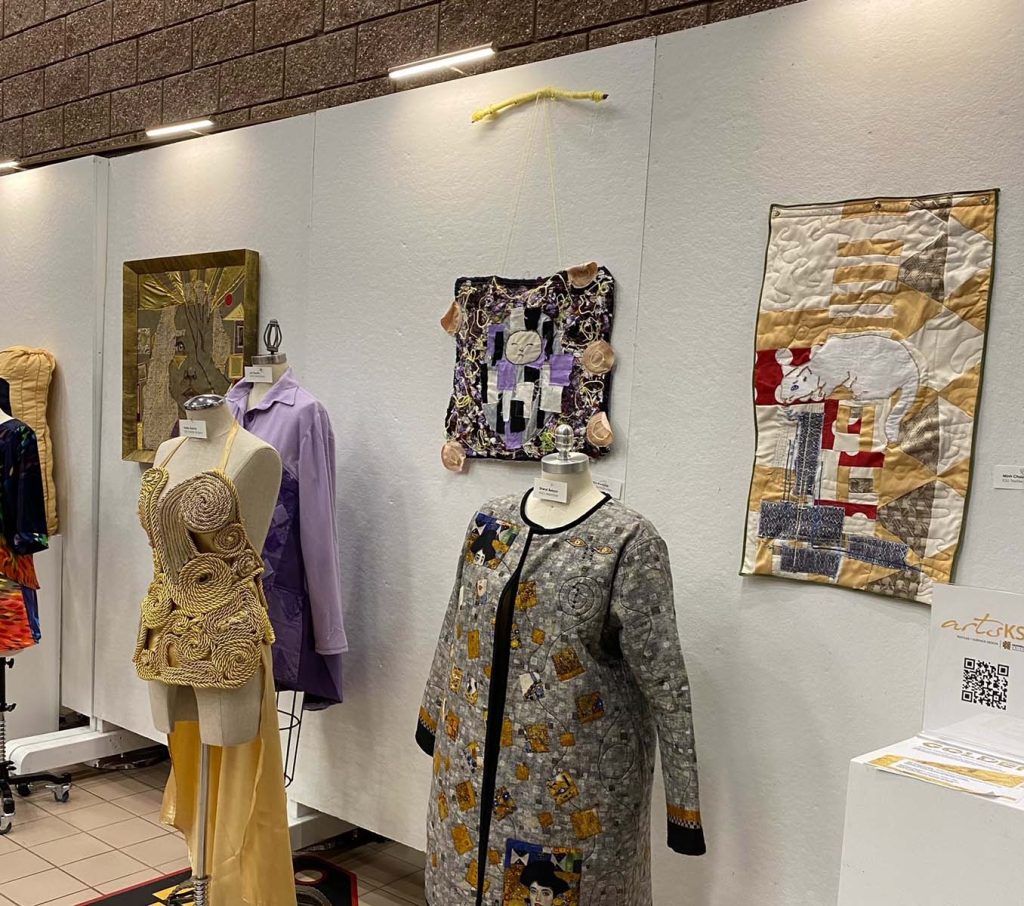
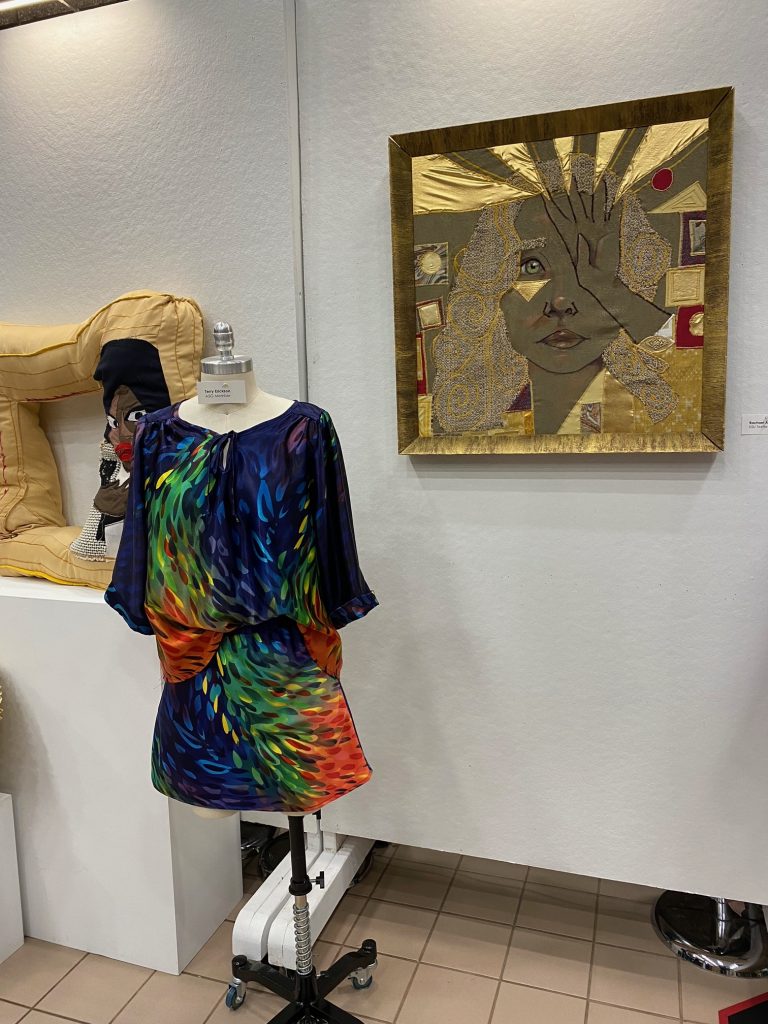
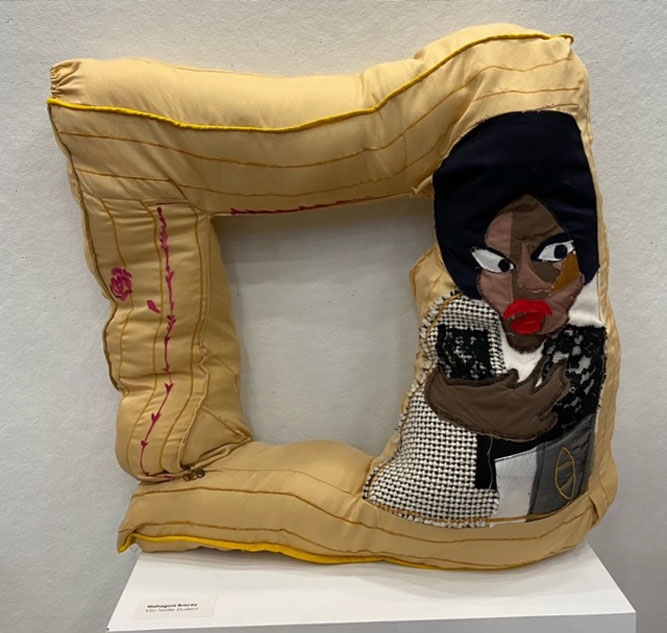
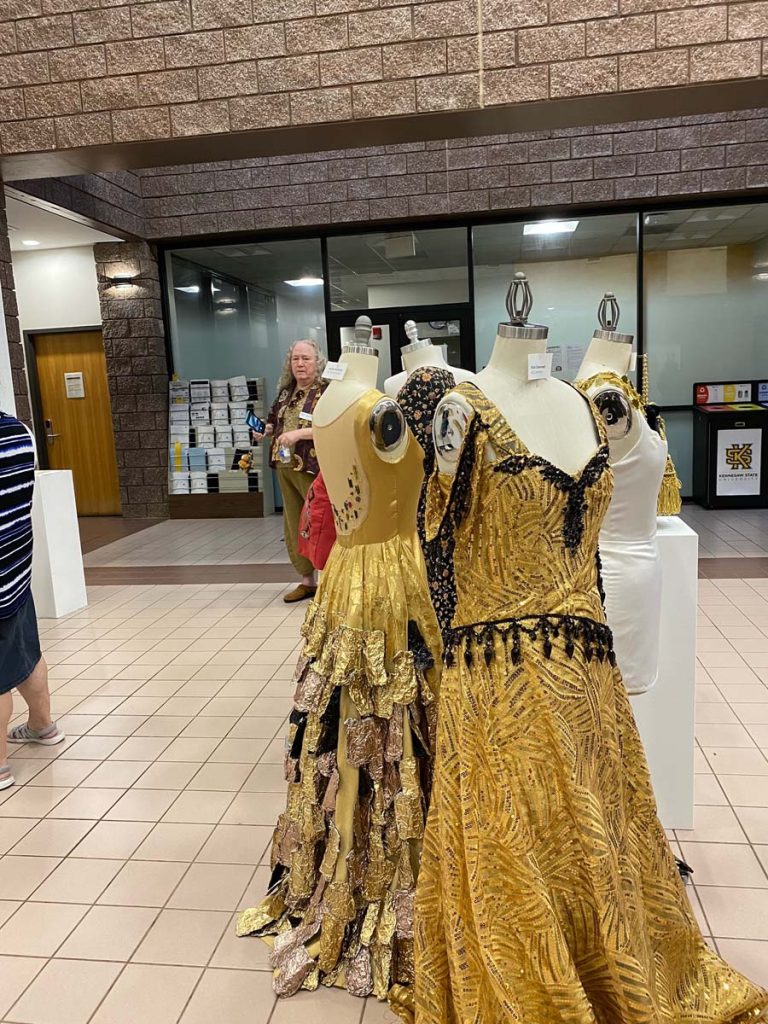
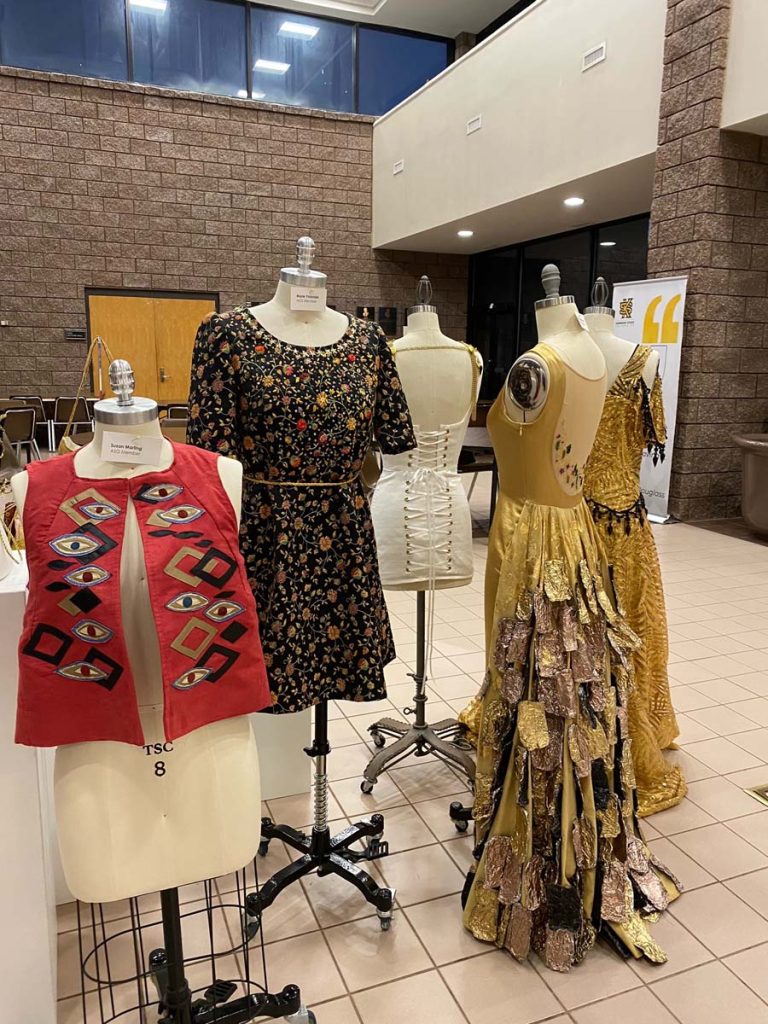
At the end of the meeting, all of the ASG member entries went to KSU to be combined in a joint 2-week exhibit with 12 of the student’s creations. The pictures in this article were taken during the opening reception of the exhibit.

The chapter reports that the Start with Art challenge was almost a year in the making, but was definitely worth the time. Not only were creative boundaries stretched,  they forged what will hopefully be an ongoing relationship with younger budding sewists in the KSU Textile Design degree program.


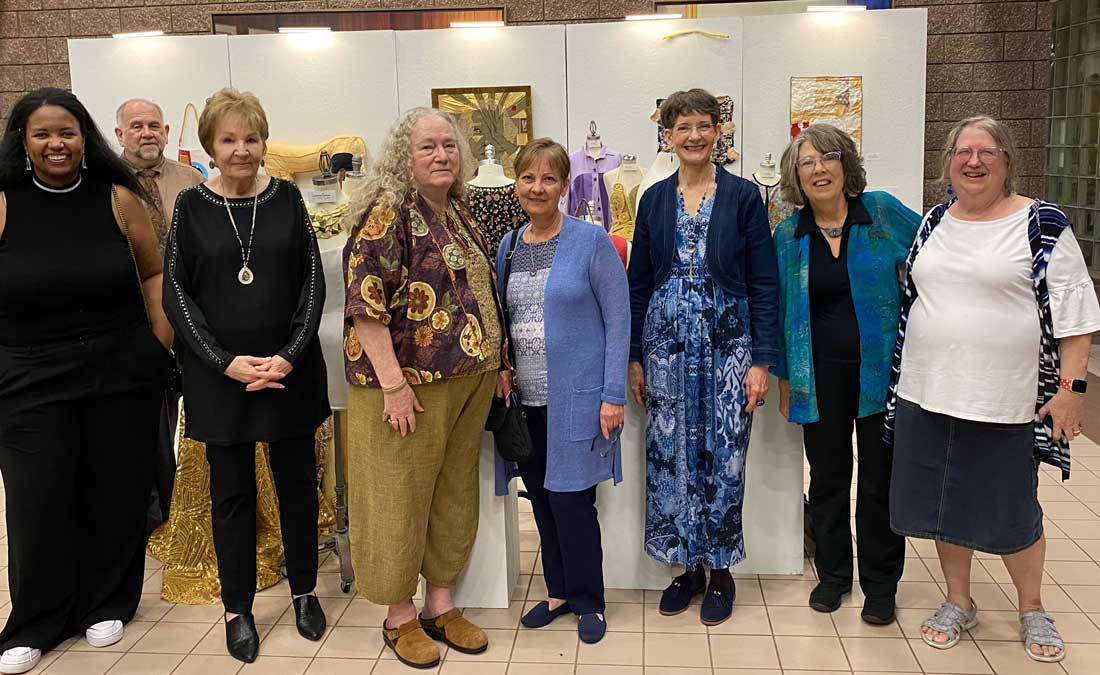
~Shared by Sheryl Belson, ASG Atlanta 2023 Chapter President

December 8, 2023

Quick Gifts

It never fails that the closer we get to the holidays, there’s more to do, and time can get crunched. But if you need quick gifts for friends or family, your sewing skills can come in handy to save the day. The two items detailed in today’s ASG blog post are great for almost anyone on your gift list… and you can whip them up in a short time, likely from what you have in your stash or with a quick trip to the fabric store.

Bracelet Trio

Quick Gifts - bracelets

Make them match, make them different; give one, two or three—the choice is yours.

What you Need

Bracelet blanks on Amazon.

  • Your local craft store (or online resource) will likely have wooden bracelet blanks. They come in varying widths and with rounded or flat surfaces, depending on the desired look. Choose them singly or in sets.
  • Fabric glue
  • Fabric strips at least 1” wide
  • Matching or contrasting threads, regular or topstitching weight
  • Topstitching needle, if using heavier threads
  • Spring clips
  • Bias tape maker (1/2”) (optional)
    • Learn how to make your own bias tape
    • Watch a video on making bias tape

Preparation

  1. Cut the fabric strips 1” wide across the fabric width (42”-60”). Use different fabrics or all the same, depending on the number of bracelets you’re making and desired finished look.
  2. Bias tape maker
    Bias tape maker from Amazon.

    Press under the long raw edges of the fabric strips to create ½”-wide folded strips. Option: Use a bias-tape maker to make the folded strips, following the manufacturer’s instructions.

  3. Edgestitch the fabric strips using a slightly longer than normal stitch. Press the strips flat.

Assembly

  1. Place one short end of a fabric strip inside the bracelet and glue in place. Allow to dry.
  2. Wrap the strip tightly around the wooden bracelet and continue with successive wraps, overlapping the previous strip ever so slightly. The wooden bracelet should not be visible. Pull the strip snugly to avoid any gaps. Use spring clips to hold the wraps in place and add dots of glue randomly to secure the wrapping.
  3. Continue wrapping to cover the entire bracelet surface. If you run out of strip length, trim so that the end is on the inside of the bracelet and glue the strip end in place. Begin a new strip where the old one left off by initially gluing the end and clipping in place.
  4. Once the entire bracelet is covered, trim the end of the fabric strip so that it will be on the bracelet inside; glue and clip in place.

Bracelet Tips

Bracelet made with fringed trim


  • Use the decorative stitches on your sewing machine to embellish the fabric strips prior to folding.
  • For a more casual look, cut narrower strips and fringe the edges.
  • Wrap with pre-made flat trim for the quickest bracelet ever. Think metallic!

Covered Hangers

Perfect for guys or gals, these fun hangers add a bit of fun to anyone’s closet.

Covered hangers

What you Need

  • Plastic hangersWire or plastic hangers (if you don’t have any, try these from Amazon)
  • 1/4 yard fabric (for each)
  • Matching thread
  • Pattern tracing paper
  • Ribbon/trim (optional)
  • Fusible web (optional)

Preparation

  1. Trace around the hanger shape up to the neck hook. Add 3/8” for seam allowances on all the edges.
  2. Cut two pieces of fabric the shape of the pattern created in step 1.
  3. To embellish the hanger, stitch any ribbons or trims in place on the single-layer fabric as desired.

Assembly

  1. Place the hanger cover pieces right sides together and sew the side angles together, leaving open the neck hole.
  2. Turn the cover right side out and press the edges. On the neck and lower edges, press under the seam allowance to the wrong side.
  3. Carefully insert the hanger hook through the lower cover edge. Pin together the pressed-under lower edges and hand-stitch closed. When covering metal hangers, the lower edges can be fused together instead of stitched, but do not fuse the edges when using a plastic hanger as it may melt.
  4. To finish, tie a ribbon around the hanger neck and/or wrap the hook portion in ribbon to totally cover it. Hand-stitch (or glue) the ribbon ends in place after wrapping.

Hangers can be covered with bandannas or scarves instead of fabric off the bolt.


~Linda Griepentrog is the owner of G Wiz Creative Services and she does writing, editing and designing for companies in the sewing, crafting and quilting industries. In addition, she escorts fabric shopping tours to Hong Kong. She lives at the Oregon Coast with her husband Keith, and three dogs, Yohnuh, Abby, and Lizzie. Contact her at .

Did you enjoy this article?
Are you an ASG member?
This field is for validation purposes and should be left unchanged.

December 1, 2023

Faux Fur PomPoms

Pompoms on a purseDo you have scraps of faux fur leftover from other projects? Or maybe you have other fur items you’d like to repurpose into something else? Try making just 2 pompoms, and you may become “pompom crazy!” A major symptom: embellishing everything in sight with puffy little faux fur pompoms.

At a glance, tracing circles on fur scraps may appear to be a child’s craft…and it very well could be. On the other hand, high-fashion furriers use pompoms as zipper pulls, whimsical embellishments, to finish the ends of a scarf, and so much more.

Pompom hat

Let’s get started!

  • Trace the pattern on the fur backing, or simply trace a 4″ round lid, cup, etc. on to the back of the fur piece (Figure 1).

PomPom pattern
Figure 1 (click for pdf pattern)

  • With a snipping motion—and cutting through the backing only—cut out the circle.
  • Set your machine stitch for a long, wide zigzag stitch (4W,4L).
  • You’ll need 13 inches of strong cord such as twine, yarn, or a double strand of ordinary sewing thread.

Because fur is so forgiving, thread color matching is unnecessary so use whatever color of thread is currently in your machine.

  • Using the zig-zag setting, stitch close to the edge with the backing side up and the cord, twine or doubled sewing thread centered under the zigzag stitching (Figure 2).

Figure 2

  • Sew completely around the circle, back-tacking at start and finish.
  • Grasp cord ends and pull up gathers (Figure 3).

Figure 3

As if by magic, a puffy ball forms. Tie off the cord, leaving ends long enough for securing the pompom to whatever you embellish.

If your pom-pom needs some pouf, stuff lightly with cotton balls.

Pompom keychainFor a Zipper Pull

  • Tie a pompom to a zipper pull. just as furriers do on S5.000 jacket.

For a Hair Tie

  • Secure a pompom to an elastic hair band for a pony tail with panache.

For a Velvet/Fur Tie

  • A length of black velvet cord and two pom-poms. one black. one white, equals a hair tie with star quality.

For a Neck Accessory

  • For a fabulous holiday look, wear the above velvet! fur tie at the neck of a silk shirt.

For Everything

Pompoms on slippers

  • Add fur pompom to everything: a knit cap, scarf ends, shoe tops, draw cord ends, shoe ties, or slippers.
  • Sprinkle a faux fur jacket or wearer with fur pompoms.
  • Use as buttons.
  • To change the size of the pompom, just change the size of the circle.

~Based on an article by Donna Salyers, Fabulous Furs

Did you enjoy this article?
Are you an ASG member?
This field is for validation purposes and should be left unchanged.

Tagged With: faux fur, pompom

November 17, 2023

The Fringe/Tailor Tacking Foot

Fringe/Tailor Tacking Foot

Foot Fun

You probably have lots of presser feet for your machine(s), but truth be told, we use only a few of them regularly: straight stitch foot, zigzag or satin stitch foot, and the zipper foot. What about all those others lingering in the accessory box? Let’s take a look at one rather funky one—the fringe (or tailor tack) foot.

This unique foot has a vertical bar in the middle. When you sew a wide zigzag, the elevated loops slide off the back of the foot. Check with your dealer for a machine-specific one or look for a generic version that will fit.

Fringe foot
Fringe Foot

This foot was originally designed for machine tailor tacks—those tiny thread groupings that mark darts and other design details on a garment. But creative types have gone beyond the tailor tacks for some creative uses and hence the alternate name for this foot—fringe foot.

Tailor Tacking

To use this foot for marking, simply sew through both layers of the cut garment pieces and the paper pattern using a wide zigzag and a very short stitch length. Sew four or five times to mark dots. Gently pull the paper up and separate the garment layers, then clip the threads between. The threads clearly mark the details and stay in until they’re sewn, then they’re easily removed.

Tailor Tacking

Bridge Seam

This specialty foot can be used to create a decorative seam. Loosen the upper thread tension and set the machine for a wide zigzag with a short length (test-stitch). Place the garment pieces right sides together and sew along the seam line. Once the seam is sewn, gently pull the layers apart and press the seam allowances open. The thread loops are now flattened and span the seam edges to create a narrow opening. The seam can be left that way, or you can topstitch each side for added stability. This type of seam is primarily decorative and shouldn’t be used in areas of high stress.

Bridge Seam

Faux Fagoting Decorative Stitch

If you’ve sewn the bridge seam, don’t stop there—add another decorative touch. Switch presser feet to a straight stitch or all-purpose foot and set the machine for a straight stretch stitch. This goes two stitches forward and one stitch backward, creating a prominent straight stitch. Hold both sides of bridged stitch flat and sew down the center, being careful not to catch the fabric edges. As you sew, the backward and forward motion of this stitch groups together the bridge stitches into little “bundles.”

Faux Fagoting Decorative Stitch

Border Issues

The bridge stitch, whether bundled or plain, makes a perfect center for creating a wider border. Sew a wide decorative stitch on each side of the openwork, using your mirror-imaging function for symmetry. The decorative stitch should barely touch the bridge stitches.

Fun Fringes

This foot can be used to make either eyelash fringe (cut on one side) or looped fringe, either on a fabric base or on the project edge. When sewn on fabric, multiple rows can be sewn side by side to create a loopy texture (think lion’s mane), or the looped stitches can be used to outline an appliqué.

Outline an appliqué

When sewn as an edge finish, the fringe (either cut or looped) can be combined with a decorative stitch.

Edge finish

Set up your machine for the widest zigzag and hand turn the wheel to be sure the needle clears the bar. Use a contrast thread in the bobbin. Set the stitch length to the desired density and test-stitch to be sure the loops easily slide off the back of the bar. Sew the fringe line, then change presser feet and sew along one edge anchoring the stitch loops. From the wrong side, pull out the contrast bobbin thread and use a pin to pull the fringe loops to the right side. The loops can be left as-is, or cut to make eyelash fringe.

To sew a fringed edge, use the same machine set-up, but place a piece of removable stabilizer along the finished project edge. Sew the fringe catching the stabilizer on the right edge. Straight or decoratively stitch the fringe edge in place, remove the bobbin thread, then remove the stabilizer. The fringe can be left looped or cut.

Sewing a fringed edge (left) and decoratively stitch the fringe edge (right).

Heavy Weights

You can use a slightly heavier thread weight, either solid or variegated. But, be sure to test-stitch first to be sure that the stitch density and heavier thread will allow the thread loops to easily slide off the back of the vertical bar—otherwise, you get an unsightly jam-up. Adjust either for smooth stitching.

Most of the images in this article were provided compliments of Bernina.


~Linda Griepentrog is the owner of G Wiz Creative Services and she does writing, editing and designing for companies in the sewing, crafting and quilting industries. In addition, she escorts fabric shopping tours to Hong Kong. She lives at the Oregon Coast with her husband Keith, and three dogs, Yohnuh, Abby, and Lizzie. Contact her at .

Did you enjoy this article?
Are you an ASG member?
This field is for validation purposes and should be left unchanged.

November 10, 2023

Couture Sewing: Working on the Bias Grain (preview)

You can take advantage of the bias grain in couture garments in two ways:

  1. Garment sections or entire garments can be cut on the bias grain to create interesting effects in the drape, fit, and visual design of the garment, or
  2. Bias-cut fabric strips can be used to bind edges and to create piping for both decorative and functional purposes.

Madame Vionnet said, “There are three grains: lengthwise, crosswise, and bias. We must understand them all.”

The fear of working on the bias was ingrained in many of us at an early age. Some sewing teachers spoke of it as the enemy, never to be understood and to be kept at a distance. The bias is not a disease—it is a grain of cloth that when respected, can be used to your advantage to produce remarkable results.

The bias does, at times, have a mind of its own, but with understanding comes control. Couture is about bias. When you can handle bias, you are couture!

  • Bias hangs “thinner” than both straight and crossgrain.
  • Bias doesn’t ravel.
  • Bias doesn’t wrinkle.
  • Bias is soft and rounded.
  • True bias is the grain that runs at a
  • 45-degree angle to the lengthwise and crosswise grains.

When working on the bias, the fabric must be perfectly grained up and the bias line established.

The full article is in the Members area of the website. CLICK HERE to read the full article. Not a member? Join online!


  • « Previous Page
  • 1
  • …
  • 13
  • 14
  • 15
  • 16
  • 17
  • …
  • 82
  • Next Page »

Become a Member

Join the only national organization dedicated to Advancing Sewing as an Art and Life Skill.

Join Now button

Blog Article Categories

  • ASG Conference
  • Chapter Stories
  • Embroidery
  • Fitting
  • Learn to Sew
  • National Sewing Month
  • Products, Books, & Patterns
  • Projects
  • Quilting
  • Sewing
  • Sewing Techniques
  • Sewing Tips
  • Sewing Tours
  • Videos
  • Disclaimer
  • Privacy Policy

American Sewing Guild
National Headquarters
9660 Hillcroft, Suite 230
Houston TX 77096
713-729-3000 | 713-721-9230 Fax
www.ASG.org

ASG wordcloud - education, conference, discounts, videos, special offers, tours and more

Copyright © 1998–2025 · American Sewing Guild · All Rights Reserved