American Sewing Guild (ASG)

Visit our blog Visit the ASG Facebook page Visit ASG on Pinterest Visit ASG's YouTube channel Visit ASG on Instagram
  • Home
  • Join ASG
    • Join Online
    • Chapter Locations
    • Member Benefits
    • Member Brochure
    • Join by Mail
  • Conference & Education
  • Resources
    • Contests & Awards
    • Giving Back
    • Hall of Fame
    • Links
    • Travel and Tours
    • Measurement Chart
  • Shop
    • ASG Store
    • Chapter Products
    • Video Resources
  • Blog
  • About
    • About Us
    • Donate to ASG
    • ASG Sensitivity Statement
    • FAQ’s
    • Start a Chapter
  • Contact
  • Member Login
    • Login First!
    • Members Only
    • Leadership Only
    • Website FAQ’s
    • Logout
  •  

November 25, 2022

Service Sewing: Not too old to take on new challenges

Jan Letkowski has proven that no matter how long you’ve been sewing, you are never too old to take on new challenges and learn new techniques. Known for her exquisitely tailored clothing since coordinating fashion shows for Harper’s Fabrics in the 80s and 90s, plus many decades of sewing for her family and charity, Jan is now making seasonal liturgical banners up to 18 feet long for the St. Charles Borromeo parish in Gladstone.

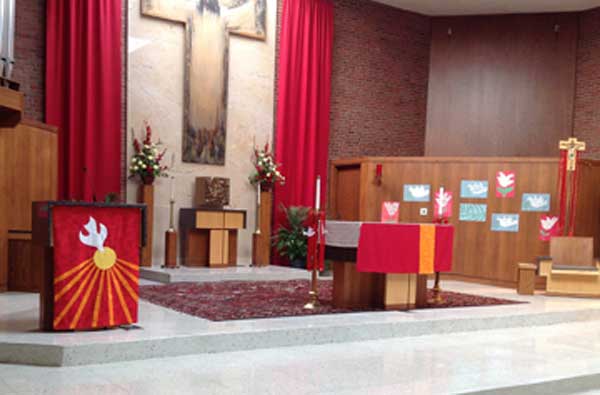
The red banner for Pentecost was her first project, and features applique on the lectern banner. This banner is used for Pentecost Sunday and Confirmation Masses.

Red banner on lectern

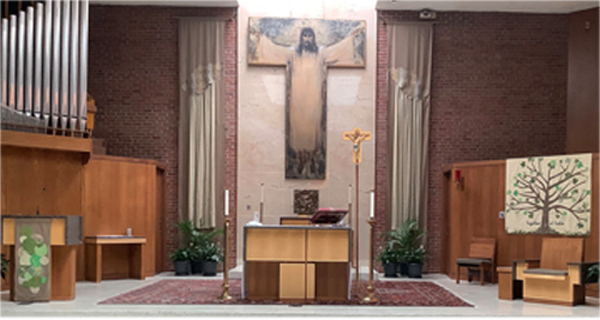
Ordinary Time is the longest period of the liturgical season and is represented by the color green. Jan chose to create the long panels with layered fabrics that complement the color of the marble and the Risen Christ Painting. The base fabric is purchased drapery panels stitched together to the length needed. Fabric with pleated stripes is attached underneath to result in a fluid design. The large banner called Together at Table represents a tree with leaves in various shades of green and prints. The branches were wrapped around batting and attached to the base to give a dimensional effect. The banner on the lectern is created with circles of all the fabrics used in this set.

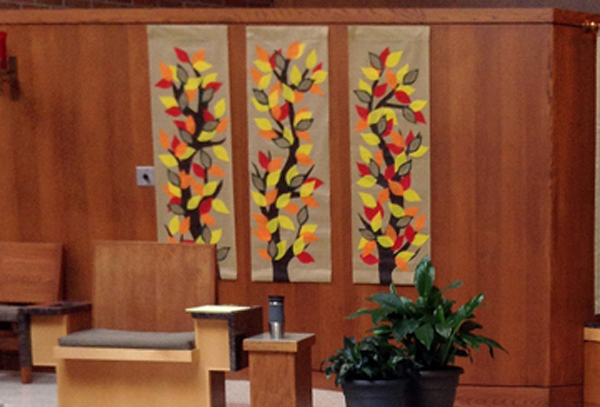
Students contributed autumn-colored paper leaves to the triptych of banners on a tan background.  The leaves are colored paper glued to paper like backing.

Banners

Particularly magnificent, the dark navy Advent banners are made from polyester dupioni with jelly roll strips sewn together and appliqued on for the gradated sections. Metallic vinyl ribbon was used for the stars, and the gold curve was achieved with two rows of gold double fold binding. The binding was unfolded and hand sewn to the base, with the creases in the tape adding interest to the design. These 17+ feet long banners are lined with matching polyester lining.

Advent banners

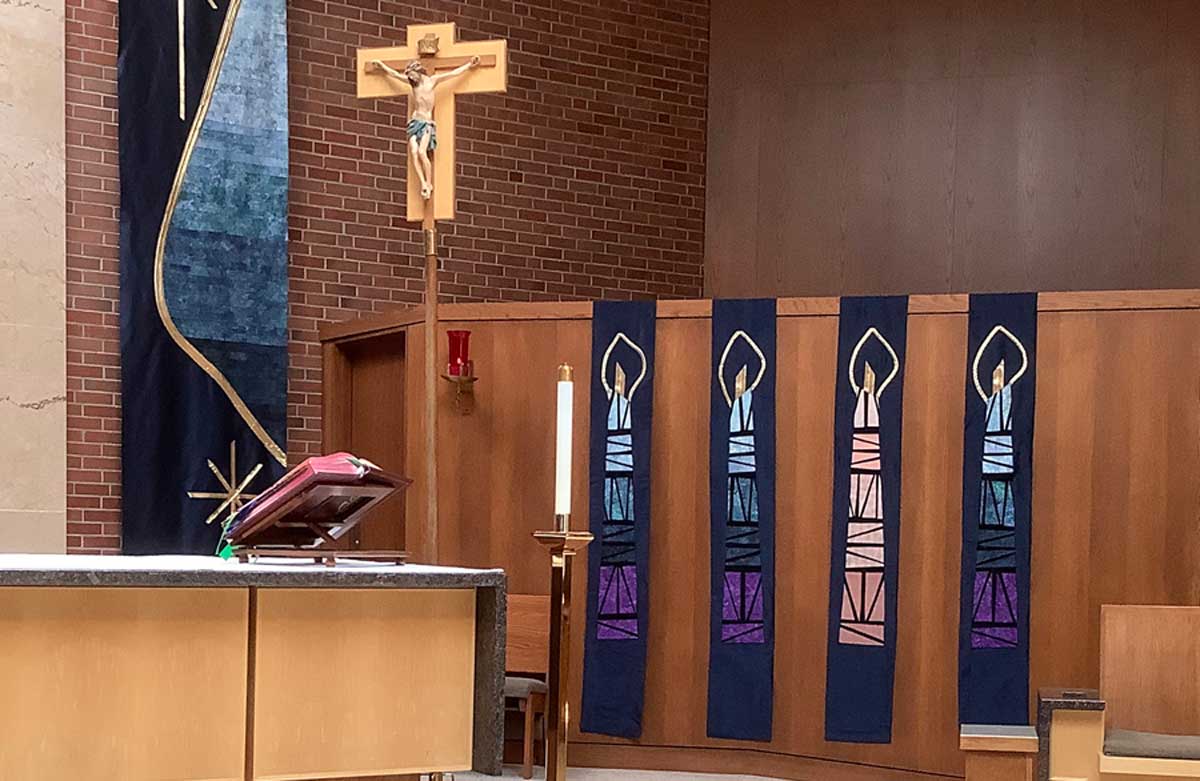
Student scholars also helped create the designs of the four coordinating Advent candles. They arranged shapes onto a black background to create a stained-glass look, and Jan appliqued them in place and added the flames made from the same gold trim used on large banners.

As a final service to the church, Jan is creating a notebook documenting the creation and care of the banners, to ensure they will be bright and beautiful for a long time.

Editor’s Addition:

Are you looking for some direction on making liturgical items? We’ve found a few sources of information, fabrics, and instructions to help:

  • https://www.churchlinens.com/
  • https://blog.ecclesiasticalsewing.com/
  • https://www.newliturgicalmovement.org/2017/10/the-art-of-making-altar-linens-as.html

~Thanks to Phyllis Carlyle for sharing this information. Jan Letkowski is a decades long leader of the Northland Neighborhood Group  of the Kansas City, MO ASG chapter

Did you enjoy this article?
Are you an ASG member?
This field is for validation purposes and should be left unchanged.

November 18, 2022

Sewing in Circles

Image courtesy of Bernina

In everyday life, the phrase “going in circles” doesn’t necessarily have a positive connotation, but for creative sewers going in circles can be loads of fun! Those decorative and utility machine stitches are ideal for circular sewing, and there’s an attachment made just for that. But never fear, if your machine doesn’t have an available attachment, you can still do it.

Attachments

Many machine brands offer a circular sewing attachment—a calibrated slider with a vertical pin to mark the circle center.

Image courtesy of Bernina

The attachment screws to the base of the machine and the sliding rule adjusts the circle radius to the size needed for circular sewing. Depending on the brand, you may be able to stitch up to a 15”-diameter circle.

Remember high school geometry? The radius of the circle is one-half its diameter (the distance across the widest point).

Stitching

The fabric you’re embellishing needs to be stabilized for stitching, so choose a stabilizer that suits the fabric. Though a hoop isn’t required for circular stitching, it’s helpful and it can hold temporary stabilizer in place. Add an extra bit of stabilizer at the circle center as it will be secured to the center pin and no wobbling is a must.

Image courtesy of Bernina

Select a stitch of choice—anything from straight to the wildest decorative varieties. One note of caution—because you’re stitching in a circle, the joining point stitches may not be exactly matching, so perhaps make a plan to cover them if needed with something like beads, buttons, tassels, etc.  Creating overlapping circles is one way to solve this. If you stitch partial circles, or arcs, this isn’t an issue as there are no joinings.

Image courtesy of Bernina

Sewn circles can be used to embellish all kinds of projects from totes to garment sections and also trimmed for craftier applications like coasters or mats. Circles can be used alone or combined with machine embroidery motifs to make beautiful medallions.

Image courtesy of Janome
Image courtesy of Bernina

Circles can also be combined with appliqués.

If stitching arcs, the stitched rows can end in a seam for security, or all threads can be pulled to the back at the end of stitching line and tied off to anchor.

The circle attachment can be used with almost any foot you have for the machine, and with any needle type, including double and triple needles. Use it with regular, embroidery or novelty threads.

Making it Happen

It’s best to start your project with a full bobbin, as some attachments limit access to the bobbin area. And, for best visibility, use an open-toe or clear foot for stitching.

If your machine isn’t in a cabinet, use an extension table to create a large flat area so the fabric doesn’t drag while stitching.

Image courtesy of BabyLock

Follow the manufacturer’s instructions for attaching the circle stitcher to the machine. Adjust the slider so that the center pin is the desired radius distance from the needle and tighten in place as directed. With right sides up, push the fabric circle center down onto the pin, then place the safety top in place to hold the fabric firmly in place. The fabric should be able to pivot easily on the pin.

Leave a long thread tail to allow for tying and begin stitching. Keep the fabric flat while you sew the circle, and don’t push or pull—just let the machine feed the fabric to form the circle. Stop the stitching at the exact beginning point of the stitching, pull threads to the back and tie off to secure. To stitch concentric rows, begin in the middle and work outward. Move the slider to the desired spacing between rows and retighten. Do not take the fabric off the center pin until all concentric circles are complete.

DIY Circle Sewing

If you don’t have a circle stitcher attachment, use a thumbtack with a flat head and tape it securely to your machine base with the point up. The distance from the needle to the tack point will be the circle radius. Position the fabric as noted for the attachment and secure it in place with a firm pencil eraser placed over the tack to allow the fabric to pivot freely.

Image courtesy of Husqvarna Viking

~Linda Griepentrog is the owner of G Wiz Creative Services and she does writing, editing and designing for companies in the sewing, crafting and quilting industries. In addition, she escorts fabric shopping tours to Hong Kong. She lives at the Oregon Coast with her husband Keith, and three dogs, Yohnuh, Abby, and Lizzie. Contact her at .

Did you enjoy this article?
Are you an ASG member?
This field is for validation purposes and should be left unchanged.

Tagged With: circle stitcher, circles

November 11, 2022

Project: Advent Calendar

An Advent calendar with pockets that holds cards suggesting the day’s special activity or a special treat is a popular tradition with children of all ages. The first Advent calendars originated as early as the 19th century and was used to mark the countdown in December to Christmas. Advent calendars are 24 or 25 days beginning December 1 and ending December 24 or 25.  ASG member, Sara Scheil, shared the instructions for one she made one for her children.

Materials

  • 21″ x 36″ piece of sturdy fabric (quilted fabrics work well for this)
  • 6″ – 10″ of solid color coordinating fabric. A fabric with body will work best.
  • 21″ of 3/8″ wood doweling
  • Approximately 30″ of cord or fabric tube for a hanger
  • Card stock and fabric paint in contrasting color

Instructions

Edge finish the quilted fabric on all sides (serge with a overlock stitch or bind with a narrow bias tape).

Fold down the top edge 1″ and stitch along the edge to form a casing for the dowel rod. Include the cord or fabric tube used for the hanger in this stitching by positioning the ends at each outer edge on the underside of the calendar.

On the solid colored fabric, using a ruler and fabric marker or chalk pencil, draw lines to make the pocket rectangles 3″ high and 3 1/4″ wide. Edge finish with the serger using a narrow stitch such as a rolled hem. Pinking the edges could be a substitute. Make 25 rectangles for the pockets.

On each pocket, paint, embroider, or applique the numbers 1 through 25 for the days of the calendar.

Optional: You may wish to title your calendar. Consider painting the words “Advent Calendar” on a rectangle approximately 3″ high and at least 12″ long of the solid fabric. Edge finish and topstitch on the upper 4″ space of the calendar.

Layout the 25 pockets on the calendar using the suggested measurements as a guide. Secure with washable glue stick. Let dry. Top-stitch the 3 sides of each rectangle by stitching each row with a continuous vertical and horizontal stitching line. Day 25 will be done separately in a “U” shape, of course.

Cut card stock into pieces 2″ high and 2″ wide. On the cards, record activities that your family enjoys or that are important to you during this season. Alternatively, you can include small gifts or candies in each pocket.

Card/Pocket Ideas

  • Play Christmas music
  • Put up the Christmas tree
  • Drive around to see the lights and decorations
  • Make Christmas cookies
  • Read the Christmas story
  • Look at photos from previous Christmas seasons
  • Hang stockings
  • Visit Santa
  • Special treat
  • Craft supplies
  • Pieces of a larger toy set given in a few pieces each day (LEGO’s are great for this)
  • Chocolates
  • Small jewelry or accessory items

Sara shares that her children would race to the calendar each morning to read the card. The surprise of what the day’s activity would be was very exciting. Seeing what day of the month it was not only taught them about the calendar sequence but avoided repetitive questions about when Christmas would be here. The activities they chose encouraged family togetherness and reminders of the meaning of the holiday.


~ This project is adapted from an article by Sara Scheil published in a previous issue of Notions.

Did you enjoy this article?
Are you an ASG member?
This field is for validation purposes and should be left unchanged.


Tagged With: project, sewing

November 4, 2022

How Bad Is It To…

We all have our idiosyncrasies and shortcuts to help our sewing go faster and easier, but are some of those things harmful to the final product?

How bad is it to sew over pins?

Pretty Bad

sewing over pins

While technically you can sew over pins that are placed perpendicular to the seamline, it’s better not to as several bad things can happen. Firstly, the needle may hit the pin resulting in a broken needle. If not broken, damaged beyond use. Shards from a broken needle can fly and injure you, and bits can become lodged in the machine’s bobbin mechanism. Secondly, the pin may bend and become lodged in the bobbin mechanism causing damage. Hitting a pin can also hurt the timing on the machine, necessitating a service call. It’s fine to sew up to the pin, but remove the actual pin before crossing it.


How bad is it to mark my fabric with an ink pen?

Really Bad

Marking fabric with an ink pen can lead to some catastrophic results. Some inks are permanent and could show through the finished project, especially if used on light colors. But perhaps worse, during washing or dry cleaning, the ink can run, permanently discoloring the project fabric. There are many types of pens and pencils designed specifically for use on fabric, so they are much better choices. Many are easily removable so there’s no risk of damage. So, don’t grab the Sharpie® when you really want the FriXion®.


How bad is it to watch TV/listen to music, an audio book or podcast while I sew?

Not Bad at All

Sewist with headphones

As long as you can still concentrate on your project directions, it’s fine to zone out with another relaxing option. If you’re watching something compelling on TV, it may slow your sewing a bit as you don’t want to miss something captivating in the plot.


How bad is it not to preshrink my fabric?

Really Bad to Not So Bad

This topic is one of the most controversial in sewing, as there are die-hards on both sides of the arguments. Depending on the fiber content and how you plan to care for the project, the answer may swing to the other end of the pendulum. For garment sewers, preshrinking fabric is sometimes a rite of passage held over from school home economics classes. If you don’t preshrink, obviously fit is affected should the fabric shrink during care, so the “rule of thumb” is to pretreat the fabric as you plan to care for the garment. Some fabrics are fine with normal laundering, others, like wools, are best being steam pressed, either at home or by a drycleaner.

Some fabrics, like denim and handwovens, may experience residual shrinkage, meaning that they continue to shrink, so pretreating more than once is desirable.

Unless the label states that it’s washable, do not wash wool fabrics, as they can not only shrink a lot, but also felt, changing the original hand of the fabric irreversibly.

The subject of preshrinking divides the quilting community. Some like to ensure no later shrinkage, others like the feel of unwashed fabrics showcased in a quilt. If a quilt is washed, it tends to pucker up a bit anyway, depending on the fabric and batting used, and that look is not necessarily a negative. Long story short for quilters—it’s a matter of opinion, but be consistent throughout the project to avoid any surprised later.


How bad is it to not backstitch at the beginning and end of seams?

Kinda’ Bad

It’s ideal to cross a seam with another seam to secure it, but in many cases that’s not possible. If you don’t backstitch at the beginning and ending of a seam, it can begin to pull out. Some machines can be programmed to backstitch automatically, others offer a lockstitch that will simply stitch in place or greatly reduce the stitch length to anchor seam ends.

Some places, like the pointed end of a dart, are best not backstitched so as not to build up a heavier stitching line. At the end of a dart, simply shorten the stitch length starting about ½” before the end to secure the stitches. This technique works anywhere you don’t want the added bulk and/or visibility of backstitching—like on sheer fabrics.

If you’re topstitching, don’t backstitch, as the build-up of stitches will show. Instead, pull the top thread to the underside and tie off with the bobbin thread to secure.


~Linda Griepentrog is the owner of G Wiz Creative Services and she does writing, editing and designing for companies in the sewing, crafting and quilting industries. In addition, she escorts fabric shopping tours to Hong Kong. She lives at the Oregon Coast with her husband Keith, and three dogs, Yohnuh, Abby, and Lizzie. Contact her at .

Did you enjoy this article?
Are you an ASG member?
This field is for validation purposes and should be left unchanged.

November 3, 2022

Anyone Can Win Contest Entries 2022

View the entries from the 2022 Anyone Can Win contest.

First Place First Place Second Place Second Place First Place - JR First Place - JR Second Place - JR Second Place - JR
  • « Previous Page
  • 1
  • …
  • 24
  • 25
  • 26
  • 27
  • 28
  • …
  • 82
  • Next Page »

Become a Member

Join the only national organization dedicated to Advancing Sewing as an Art and Life Skill.

Join Now button

Blog Article Categories

  • ASG Conference
  • Chapter Stories
  • Embroidery
  • Fitting
  • Learn to Sew
  • National Sewing Month
  • Products, Books, & Patterns
  • Projects
  • Quilting
  • Sewing
  • Sewing Techniques
  • Sewing Tips
  • Sewing Tours
  • Videos
  • Disclaimer
  • Privacy Policy

American Sewing Guild
National Headquarters
9660 Hillcroft, Suite 230
Houston TX 77096
713-729-3000 | 713-721-9230 Fax
www.ASG.org

ASG wordcloud - education, conference, discounts, videos, special offers, tours and more

Copyright © 1998–2025 · American Sewing Guild · All Rights Reserved