American Sewing Guild (ASG)

Visit our blog Visit the ASG Facebook page Visit ASG on Pinterest Visit ASG's YouTube channel Visit ASG on Instagram
  • Home
  • Join ASG
    • Join Online
    • Chapter Locations
    • Member Benefits
    • Member Brochure
    • Join by Mail
  • Conference & Education
  • Resources
    • Contests & Awards
    • Giving Back
    • Hall of Fame
    • Links
    • Travel and Tours
    • Measurement Chart
  • Shop
    • ASG Store
    • Chapter Products
    • Video Resources
  • Blog
  • About
    • About Us
    • Donate to ASG
    • ASG Sensitivity Statement
    • FAQ’s
    • Start a Chapter
  • Contact
  • Member Login
    • Login First!
    • Members Only
    • Leadership Only
    • Website FAQ’s
    • Logout
  •  

August 12, 2022

Triple Straight Stitch

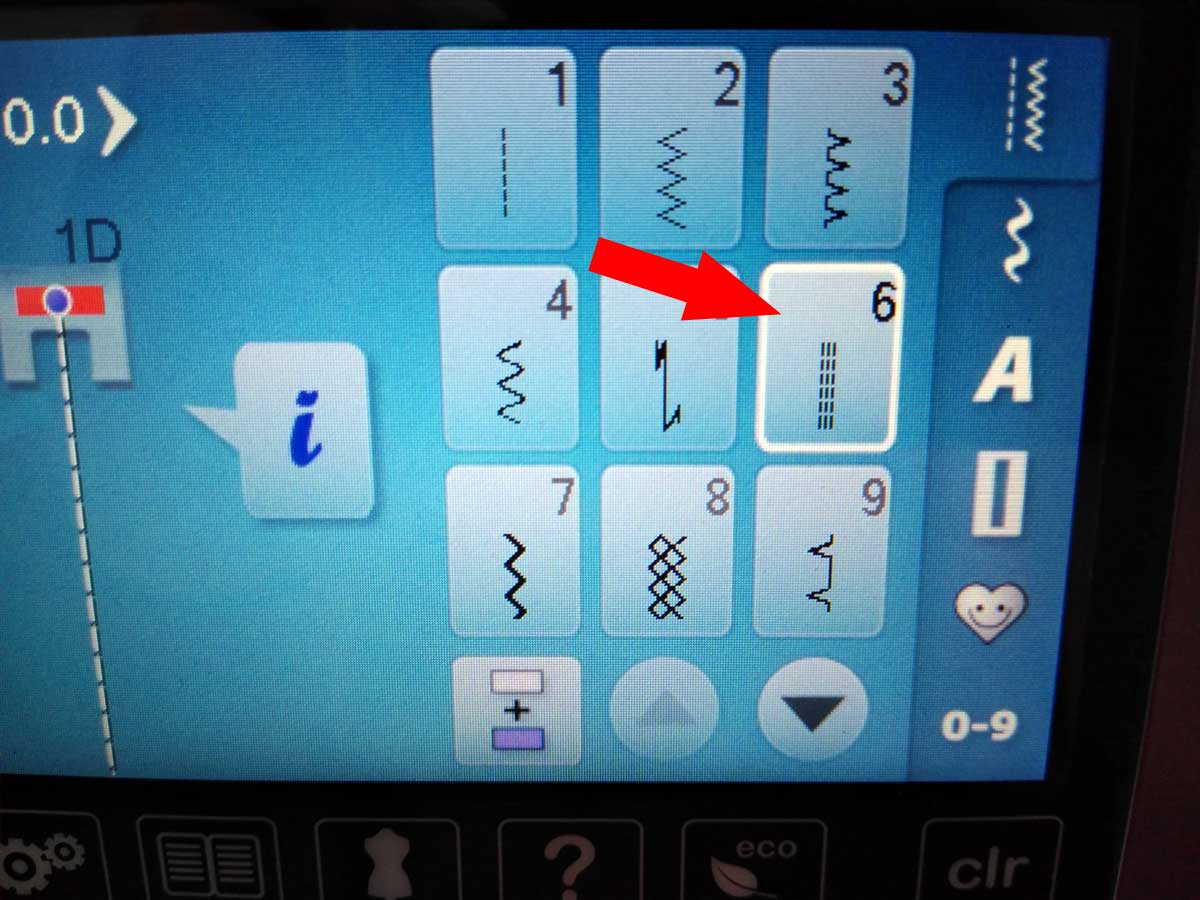
Often overlooked because the machine icon doesn’t really look like the actual stitch, the triple straight stitch is a fun one, both for utility use and for embellishments. Depending on the machine brand, the stitch may also be called a straight stretch stitch or a backstitch.

On the stitch screen or dial, it appears as three rows of straight stitching side by side. But in fact, that’s not how it sews out. Instead, it’s really three stitches on top of each other with the needle penetrating the same hole at each end of the stitch. Whether your machine sews it as two stitches forward and one back, or one stitch forward, one stitch back and another stitch forward depends on the brand, but the look is the same—a bold straight stitch.

Triple straight stitch on the machine

What’s it for?

Because the machine is sewing back and forth to create this stitch, there is some inherent stretch built into it. It’s great for sewing seams or hems in knit fabrics to maintain flexibility without popping stitches, as often happens with just a regular straight stitch. And ideal as well for use on leggings or swimwear where stretch is needed for fit.

It’s also perfect for use where there is extra reinforcement needed, like on tote bag handles, pant crotches, armhole seams, etc. Outdoor gear is another perfect place to utilize this stitch. It’s essentially three times as strong as an ordinary straight stitch.

Because the stitches are sewn on top of each other, it still allows you to press a seam allowance open and flat.

With the backward and forward motion of the machine as it sews out this stitch, it’s a good idea to slow your sewing speed, using either the speed regulator or a lighter touch on the foot pedal.

Beyond the Basics

Even though its intended purpose is for utility use, this stitch can take on a totally new persona when used decoratively.

Like most machine stitches, you can vary the look by changing the stitch length. While the default length might be ideal for sturdy seam sewing, lengthening it makes it ideal for other uses.

The triple straight stitch is ideal for topstitching. You can sew a well-defined and prominent line of stitches to accent a seam, garment edge or outline an appliqué. Because you’re getting three stitches on top of each other, the stitching line appears heavy without having to invest in a heavy weight or novelty thread and a specialty needle. You can simply sew with the same thread you used to construct the garment, or a contrast.

You can even sew this stitch with metallic thread. Or, use a shiny rayon or polyester embroidery thread for a bit of extra sheen. Opt for a variegated thread for an even more interesting look.

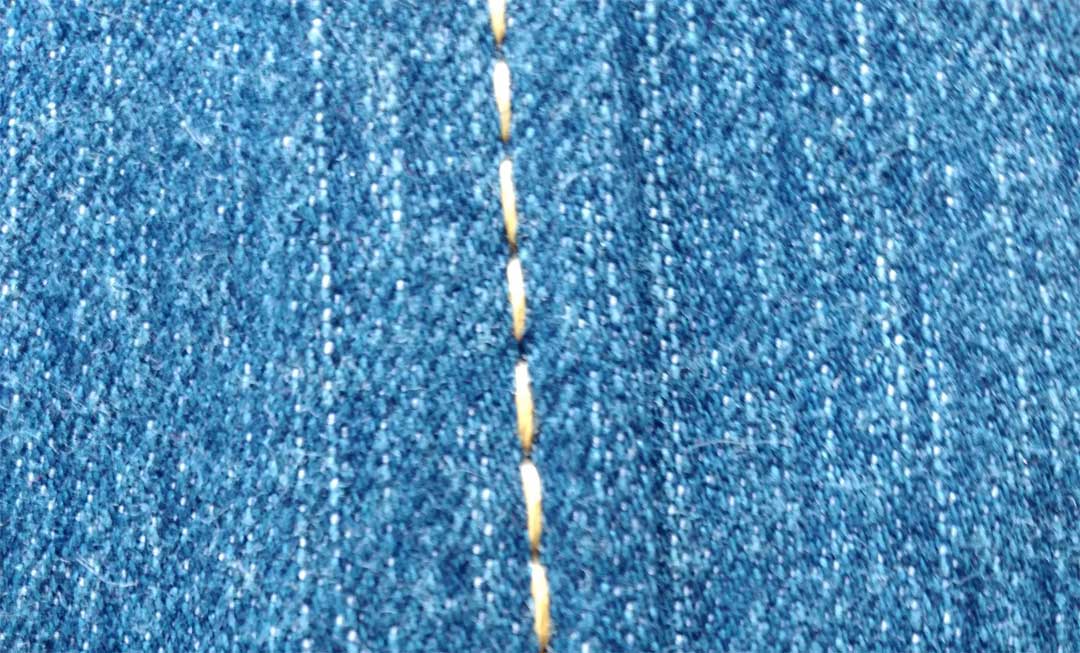
When used on denim, the triple straight stitch can mimic the topstitching found on ready-to-wear jeans.

Topstitching on jeans

In addition to topstitching, the stitch can be used to create designs on its own—from free-flowing curves to a precise grid, as shown in the photos below.

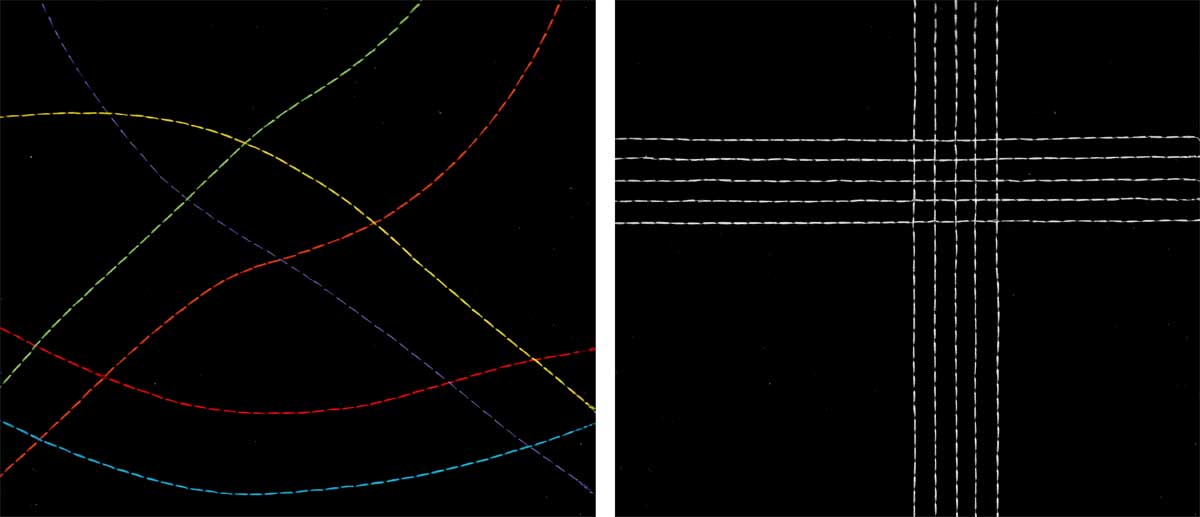
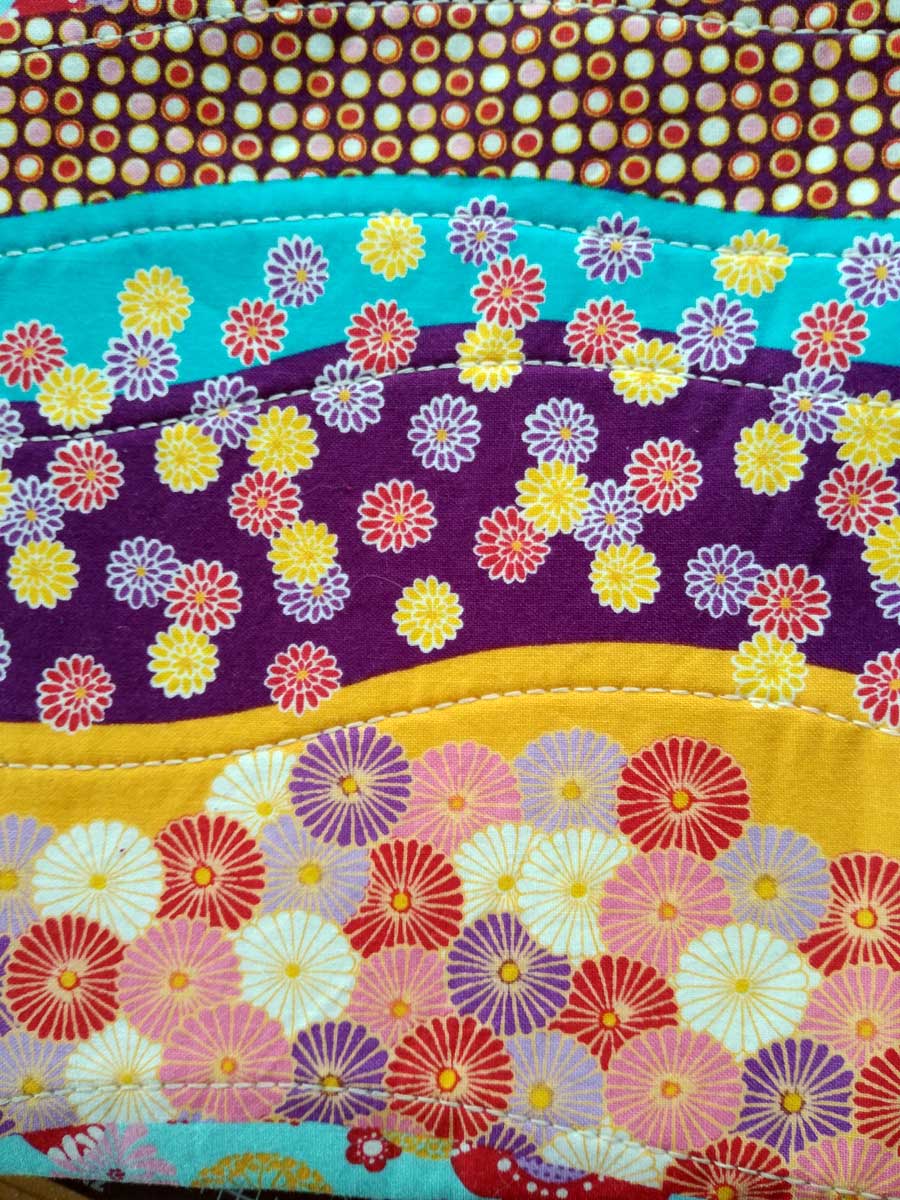
When used with white thread on a dark background, this stitch can look similar to Sashiko stitching. It’s also ideal for quilting, whether following the design in a printed fabric for accent or sewing in channels or grids. It can also be used as an outline for pieced motifs, as shown in the next image.

One note of caution: Because the fabric moves forward and backward as it forms this stitch, stick to gentle curves as opposed to tight curves which are harder to control.

And, there’s more…

You can sew the triple straight stitch with a double needle to create perfectly aligned stitch lines, or with a wing needle to leave tiny holes often used by heirloom sewers as accents and for attaching other trims. In both instances, it’s a good idea to sew slower than normal for consistent stitching.

If you add width to this stitch, you get an entirely different stitch—a triple zigzag—which is great for embellishing as well, as the three threads make the stitch much more prominent than a simple zigzag.

Think you might need a little play time with this great stitch?


~Linda Griepentrog
Linda is the owner of G Wiz Creative Services and she does writing, editing and designing for companies in the sewing, crafting and quilting industries. In addition, she escorts fabric shopping tours to Hong Kong. She lives at the Oregon Coast with her husband Keith, and two dogs, Yohnuh and Abby. Contact her at .

Did you enjoy this article?
Are you an ASG member?
This field is for validation purposes and should be left unchanged.

Tagged With: learn to sew, sewing machine, stitches, triple stitch

August 10, 2022

What I’m Sewing: Sinclair Patterns Bondi 22

ASG Member, Kim Caywood, shares her experience making the Bondi 22 Knit Classic Fitted T-shirt from Sinclair Patterns:

Sinclair Patterns Bondi 22 Knit Classic Fitted T-shirt
Sinclair Patterns Bondi Knit Classic Fitted T-shirt pattern link

Q: Item Created 
A. Top

Q. Independent Pattern Designer
A.
Sinclair Patterns

Q. Name and Number of Pattern
A.
Bondi 22

Q. Fabric Used:
A. Double Brushed Poly

Q. Special Embellishments/Notions Used
A. None

Q. Skill level required?
A.
Confident Beginner

Q. Are the instructions easy to follow?
A.
As with all Sinclair patterns the instructions are easy to follow with well written text and photos to match. There are step by step instructions.

Q. Are you pleased with the finished result? Did it meet your expectations?
A.
This top more than meets my expectations! I have made several tops with this pattern because it’s such a simple pattern to make

Q. Did it look like the picture?
A.
Yes it looks just like the picture

Q. Did you make any modifications in the pattern?
A.
No modifications were made to the pattern. They also offer two sleeve add-on patterns. One is puffed sleeves and the other is flared.

Q. Are there any changes you would have made?
A. This pattern is great just the way it is.

Q. Did the pattern teach you any unique or special techniques?
A.
I learned how to make a V-neck.

Q. Would you make this again?
A.
Most definitely

Q. Would you recommend this pattern to others?
A.
Yes I would. I have found Sinclair Patterns to have the best fit. They offer all their patterns in Petite, Regular and Tall.

Editors Note: This pattern comes in in sizes up to a 4X


~Kim Caywood, ASG member

Tagged With: patterns, t-shirt

August 8, 2022

ASG Fashion Show 2022 – San Antonio

August 5, 2022

Project: A Summer Hammock (preview)

Relax in your backyard with a book, enjoy a cup of coffee on the porch, or swing peacefully as you bond with nature at your favorite campsite in a colorful, decorative hammock. It’s said that hammocks guarantee an amazing sleep experience, whether it’s an afternoon nap, or a full night’s rest. Simple to sew, this hammock is made using decorator fabric for the hammock front and is lined with sturdy canvas. Closet-pole rods and nylon rope support the hammock.

Making the Hammock


The complete version of this article is available on the ASG Members Only blog and requires member login.
CLICK HERE to read the full article. Not a member? Join online!

Tagged With: canvas, hammock, sewing project

July 29, 2022

Make It With Wool Contest Entry: Coat & Dress

I joined ASG during Covid, having been motivated by a rediscovered ASG flyer. I had been given the flyer some years prior at the ASG booth at the Sewing and Stitchery Expo in Puyallup, WA where I had been wearing my WA State winning Make it With Wool (MIWW) garment and was approached by the chapter President who strongly recommended I join. Covid’s isolation gave me the impetus to seek out an avenue to engage with others sharing a common interest. The Silverdale, WA chapter was the perfect fit and I joined 3 Neighborhood Groups and soon was Zoom meeting with a fabulous and talented community of sewists.

It Started With Wool

Make it With Wool entryMy primary interest is garment sewing, especially with wool fabric and fibers. Wool is a wonderful fabric and fiber to create with. I crochet, knit, felt, needle felt and sew with wool. The wool coat and dress described in this article were specifically made for this year’s Make it With Wool contest, an annual competition that promotes the beauty and versatility of wool by showcasing wool’s unique qualities in a variety of garment designs and details.

Inspiration: A tribute

The inspiration for the coat came from the beautiful coat created by designer Gabriela Hearst and worn by Jill Biden at the inaugural ball. The classic double breasted princess seam design, color, and theme set the foundation for the vision of the coat. Taking this example, a Vogue pattern (7144) was selected with a similar design.

The coat and dress feature varying design details and a variety of calla lily embellishments, a symbol of both sympathy and promise. The garments hoped to recognize and give tribute to the loss of so many to Covid and the promise of recovery by all the heroic efforts of our first responders, medical personnel and caregivers.

The decisions in bringing those details together into a coordinated and cohesive ensemble required exploring and experimenting with possible options. The process started with inspiration, settling on a detail, and then producing samples to determine their appropriate application in the garment. Many samples were prepared that never made their way into the final garment: boned interfaced bodice support, a lace collar, crocheted collar, a beaded crochet collar, felted calla lily, knitted cording, bobbin embroidery to name a few.

Making the Coat

Felting the Wool

The inspiration
The inspiration

The calla lilies embroidered on the coat are an original graphic, digitized, and designed to repeat the pattern along the hem and upper back. The calla lilies on the coat’s lapel were created from felted worsted wool, sewn, shaped and hardened to closely match the specie’s flowers and leaf. The spadix, the center detail, was knitted with wool yarn, it’s stable shape made possible by utilizing feather quills from my geese. The 100% wool coat fabric was machine felted in several 2 yard batches. To lessen the fabric’s distortion and stretch during the machine felting (top loader only), the 2 yard fabric pieces are zig-zag stitched along the cut edge into a cylinder. Several pairs of flip flops aid the agitation. The smallest hot water setting is selected and a very small amount of wool fabric soap as well as baking soda is added to the tub. Three cycles are generally required to get the desired thickness and degree of felting. The spin cycle is stopped each time to again lessen distorting the fabric. The fabric was then air dried and shaped to accept the pattern layout.

Decorative Elements

The silk piping accents the princess seams and aids in the shaping and fit of the coat. The brocade lining is edged with a binding of the same silk fabric adding interest and detailing to the coat. A calla lily silver charm was added at the inside collar to further the theme of the coat. The coat hem was weighted at the front opening and at the back vent to result in a better hang at these openings. Bound button holes were used to add interest and a favored technique for quality garments. Vintage dome shank buttons adorn the double breasted closure. A valuable couture technique outlined in Claire Shaeffer’s new book, Couture Tailoring, A Construction Guide to Women’s Jackets was used to secure the non-buttoning shank buttons, resulting in their holding firmly and not flopping. The upper lapel fabric matches the fabric of the accompanying dress. The many details and embellishments are subtle, requiring closer examination and appreciation for their added value to the harmony and cohesion of the coat.

Making the Dress

The dress is my original design. The coat required a fitted dress to comfortably adhere to its silhouette. The bodice was the starting point. I find that for my body type, princess seams to be more conducive to a good fit. The bodice has a dropped waist to promote a more vertical line. I envisioned a simple but elegant silhouette with subtle intricate embellishments and design details. The dress is 100% Italian Super 150 Double Faced wool. In a self drafted design that required repeated fittings and numerous handlings, the off-white color of the fabric proved challenging to keep from soiling.

Sleeves

The extended cap sleeves were a new detail I wanted to incorporate into the original design. They required precise drafting and fitting to the bodice, since nearly no ease is offered in the sleeve cap. The grain and hang of the sleeve and their precise rotation in the armscye was critical for a proper fit. The 2-piece sleeve seams are also piped, accentuating the detail and adding structural support. A sleeve head was used between the sleeve cap and the extension.

Pleats

The front reverse pleats and the back “skirt pleats” were added to allow more movement while still maintaining the dress silhouette. They provided a subtle interest and animation in the carry of the dress.

Appliqué

The piped and 7-piece collar brings attention to the neck line and invites inspection of the subtly appliquéd 4-piece calla lilies below. The 4 piece appliqué is fashioned after a stained glass design. The appliqués are layered and applied on both the front and back bodice. The calla lilies appliquéd on the back bodice span the invisible zipper, requiring both sides of the exposed appliqué be finished. A clear plastic snap securely holds the tip of the calla lily in place once the zipper is closed.

Underlining

The dress is underlined with cotton voile. BIG MISTAKE! Normally, I use silk organza as an underlining but because the fashion fabric was so lightweight, I wanted more structure to support the bodice and front and back panels. Both the cotton and wool fabrics were washed prior to their laying out and cutting. The issue was the added shrinkage of the cotton underlining when the dress seams were pressed. It resulted in the wool fabric hanging or bagging between the vertical seams. The fix required removing all vertical seams, lessening the cotton voile seam allowances to remove the pull and bagging of the wool fabric. Removing all attachments of the cotton voile to the dress hem resulted in a smoother panel and seam. It was a major remake while being major lesson learned. The dress is now fully lined with silk charmeuse. The lining has a 3″ hem and is attached with thread chains to the same seam in the dress.

The final dress design was a progression and evolution of its details. The individual details, the piping, the extended cap sleeves, the front inverted and back skirt pleats, the pieced and piped collar, the buttoned cuffs, the calla lily appliqués and their extension over the invisible zipper all coalesced into a cohesive and harmonious well fitting dress.

The Contest

The coat and dress ensemble won at the Make It With Wool National Adult Division competition that was held January 20-23, 2022 in San Diego, CA. Twenty one state contestants competed in the contest. The top 6 placings were:

Adult Winner – Kim Vogley, Washington
Adult 2nd place – Becky Piette, Wisconsin
Adult 3rd place – Kelsey Clear, Michigan
Adult 4th place – Brenda Richardson, Arizona
Adult 5th place – Erin Hyde, Florida
Adult 6th place – Diane Spain, Oregon

Learn more about Make It with Wool at https://makeitwithwool.com/welcome


~Kim Vogley, ASG Silverdale, WA Chapter

Did you enjoy this article?
Are you an ASG member?
This field is for validation purposes and should be left unchanged.

Tagged With: Make It With Wool, sewing, wool

  • « Previous Page
  • 1
  • …
  • 27
  • 28
  • 29
  • 30
  • 31
  • …
  • 82
  • Next Page »

Become a Member

Join the only national organization dedicated to Advancing Sewing as an Art and Life Skill.

Join Now button

Blog Article Categories

  • ASG Conference
  • Chapter Stories
  • Embroidery
  • Fitting
  • Learn to Sew
  • National Sewing Month
  • Products, Books, & Patterns
  • Projects
  • Quilting
  • Sewing
  • Sewing Techniques
  • Sewing Tips
  • Sewing Tours
  • Videos
  • Disclaimer
  • Privacy Policy

American Sewing Guild
National Headquarters
9660 Hillcroft, Suite 230
Houston TX 77096
713-729-3000 | 713-721-9230 Fax
www.ASG.org

ASG wordcloud - education, conference, discounts, videos, special offers, tours and more

Copyright © 1998–2025 · American Sewing Guild · All Rights Reserved