This is the story of my little lap quilt that ended up across the country, helping people.
 I’m sure all sewists can relate to seeing a certain fabric that catches their eye and the excitement of seeing that it’s on clearance! JoAnn’s had Star Trek fabric for $3.00 a yard and I had to buy it. As a 12 year old, I loved Star Trek so I brought it home and there it sat, in my stash, for several years. Then COVID-19 happened and everything shut down, so I used my new-found free time to sew and vowed to use some of my stash. Like many, I made masks, but I also needed to do something creative and fun. I came across the Star Trek fabric and went to work. In a few days I had a nice lap quilt in red and black, quilted with embroidered stars, but it really didn’t fit my decor. I decided to ask my son, Andrew, if any of his friends would like a science fiction quilt. He thought about it and came up with a plan. He wanted to put it up for auction on Twitter for charity.
I really didn’t think anyone would pay much for it, but anything for charity is good. Since the pandemic had caused food insecurity for so many, we chose Philabundance. After five days on Twitter, the winning bid was $125.00 from a young man in California named Josh. I was so happy that the quilt would feed people and make Josh happy.
Then something exciting occurred — Josh and Andrew were contacted by William Shatner. Yes, “the” William Shatner… the REAL CAPTAIN KIRK! Mr. Shatner told Josh he was lucky to get the quilt and wished that he had seen it sooner so that he could have bid on it and put it in his children’s charity auction. Josh was so sweet, he donated the quilt for the auction! I boxed the quilt up and sent it to Mr. Shatner’s company in April of 2020 and included a note about the quilt. And since Josh was so nice, I made him a new Star Trek quilt to replace the donated one.
The pandemic continued and I kept busy, not thinking much about the quilt. In early November, Andrew received the following tweet from Mr. Shatner:
@yoda have you seen the current bid price? Your mother should go into business!
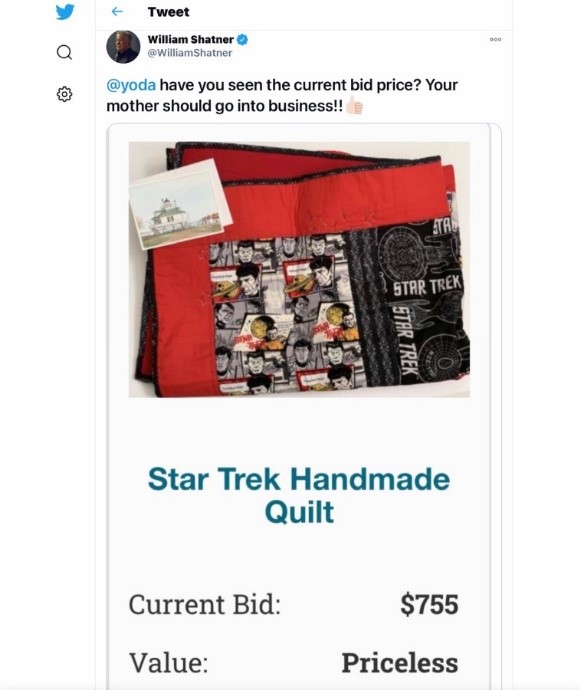
I couldn’t believe it! Now don’t think that I am vain enough to believe that my sewing skills are worth that much. It may have something to do with the fact that the quilt was signed by William Shatner – Captain Kirk himself – on the label.
I was so excited and shared this story with my friend, Dianna Kelly, and she mentioned it at our Sew What group Zoom meeting. I hadn’t followed up on the bidding because I just didn’t think it would go any higher … but then Beverly Betz found this:
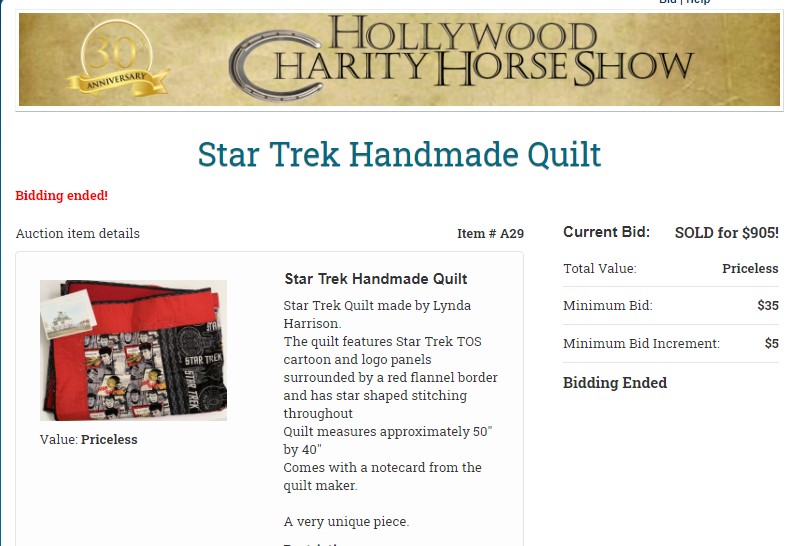
Final bid $ 905.00! I am beyond thrilled that my sewing hobby has helped children and provided food for those who are struggling. The takeaway here is a reminder that what we do as sewists is now being looked at in a different light since the pandemic started. Whether it’s quilts, masks, or caps for friends, family or strangers, what we create is making a difference in the world. So to paraphrase Mr. Spock from Star Trek — live long and prosper — and keep sewing.
~Lynda Harrison, ASG Member