American Sewing Guild (ASG)

Visit our blog Visit the ASG Facebook page Visit ASG on Pinterest Visit ASG's YouTube channel Visit ASG on Instagram
  • Home
  • Join ASG
    • Join Online
    • Chapter Locations
    • Member Benefits
    • Member Brochure
    • Join by Mail
  • Education & Classes
  • Resources
    • Contests & Awards
    • Giving Back
    • Hall of Fame
    • Travel and Tours
    • Measurement Chart
  • Shop
    • ASG Store
    • Chapter Products
    • Video Resources
  • Blog
  • About
    • About Us
    • Donate to ASG
    • ASG Sensitivity Statement
    • FAQ’s
    • Start a Chapter
  • Contact
  • Member Login
    • Login First!
    • Members Only
    • Leadership Only
    • Website FAQ’s
    • Logout
  •  

January 9, 2026

Chinese Knot Button

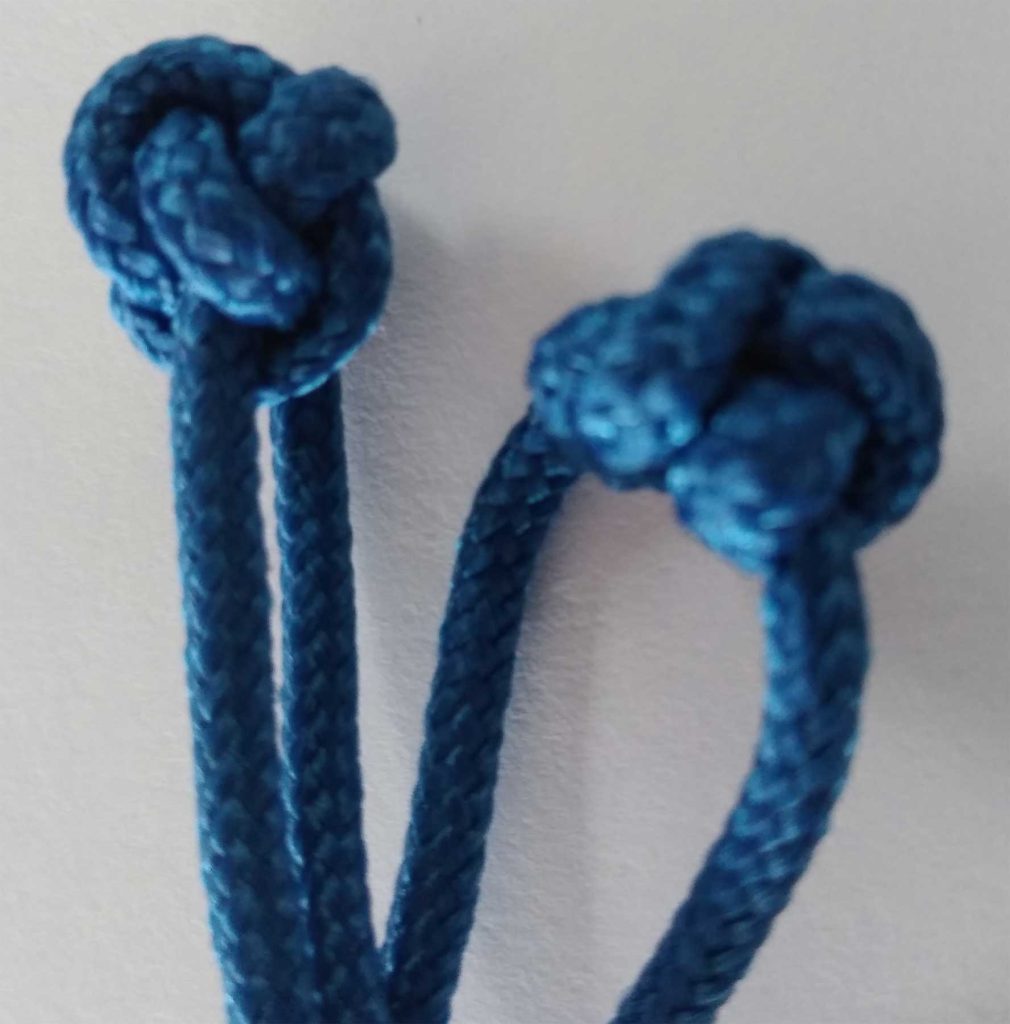
There’s nothing quite as elegant as a knotted button and loop closure. This traditional Chinese knot has been used for centuries, and you can custom make them to coordinate with special garments. In addition to being used as a functional closure, these interwoven balls of cord can be used for necklaces, earrings and other types of embellishment as well.

Getting started

To get started, choose a ready-made cord about ¼” diameter. Satin cord works well, as does woven rayon or metallic. Note that if the cord has a filler (light padding), it makes a more attractive ball. Velvet cord can also be used to create slightly larger balls. You’ll need 12”-18” per button, depending on the thickness.

If you’re using the ball button for a home décor use, you can use cable cord or a larger tubular cord to make a much bigger button than you would for a garment closure. You can also use rope for a nautical look. Chinese knot buttons are great for incorporating into drapery tie-backs or as elegant slipcover closures.

Another option is to make your own fabric tubing. To do this, cut a length of bias fabric (silk is ideal) 1 ½” wide. Fold the cord in half right sides together—matching raw edges—and add a narrow strip of lightweight batting under the folded fabric. Stitch along the cord length using a ¼” seam, catching the batting in the stitching. Use your favorite turning tool to turn the stuffed cord right side out and then smooth into shape.

In addition to the cord or tubing, you’ll need matching thread, scissors, a hand needle and a fray stopper or fabric glue for finishing the cord ends.

Ready, set, weave

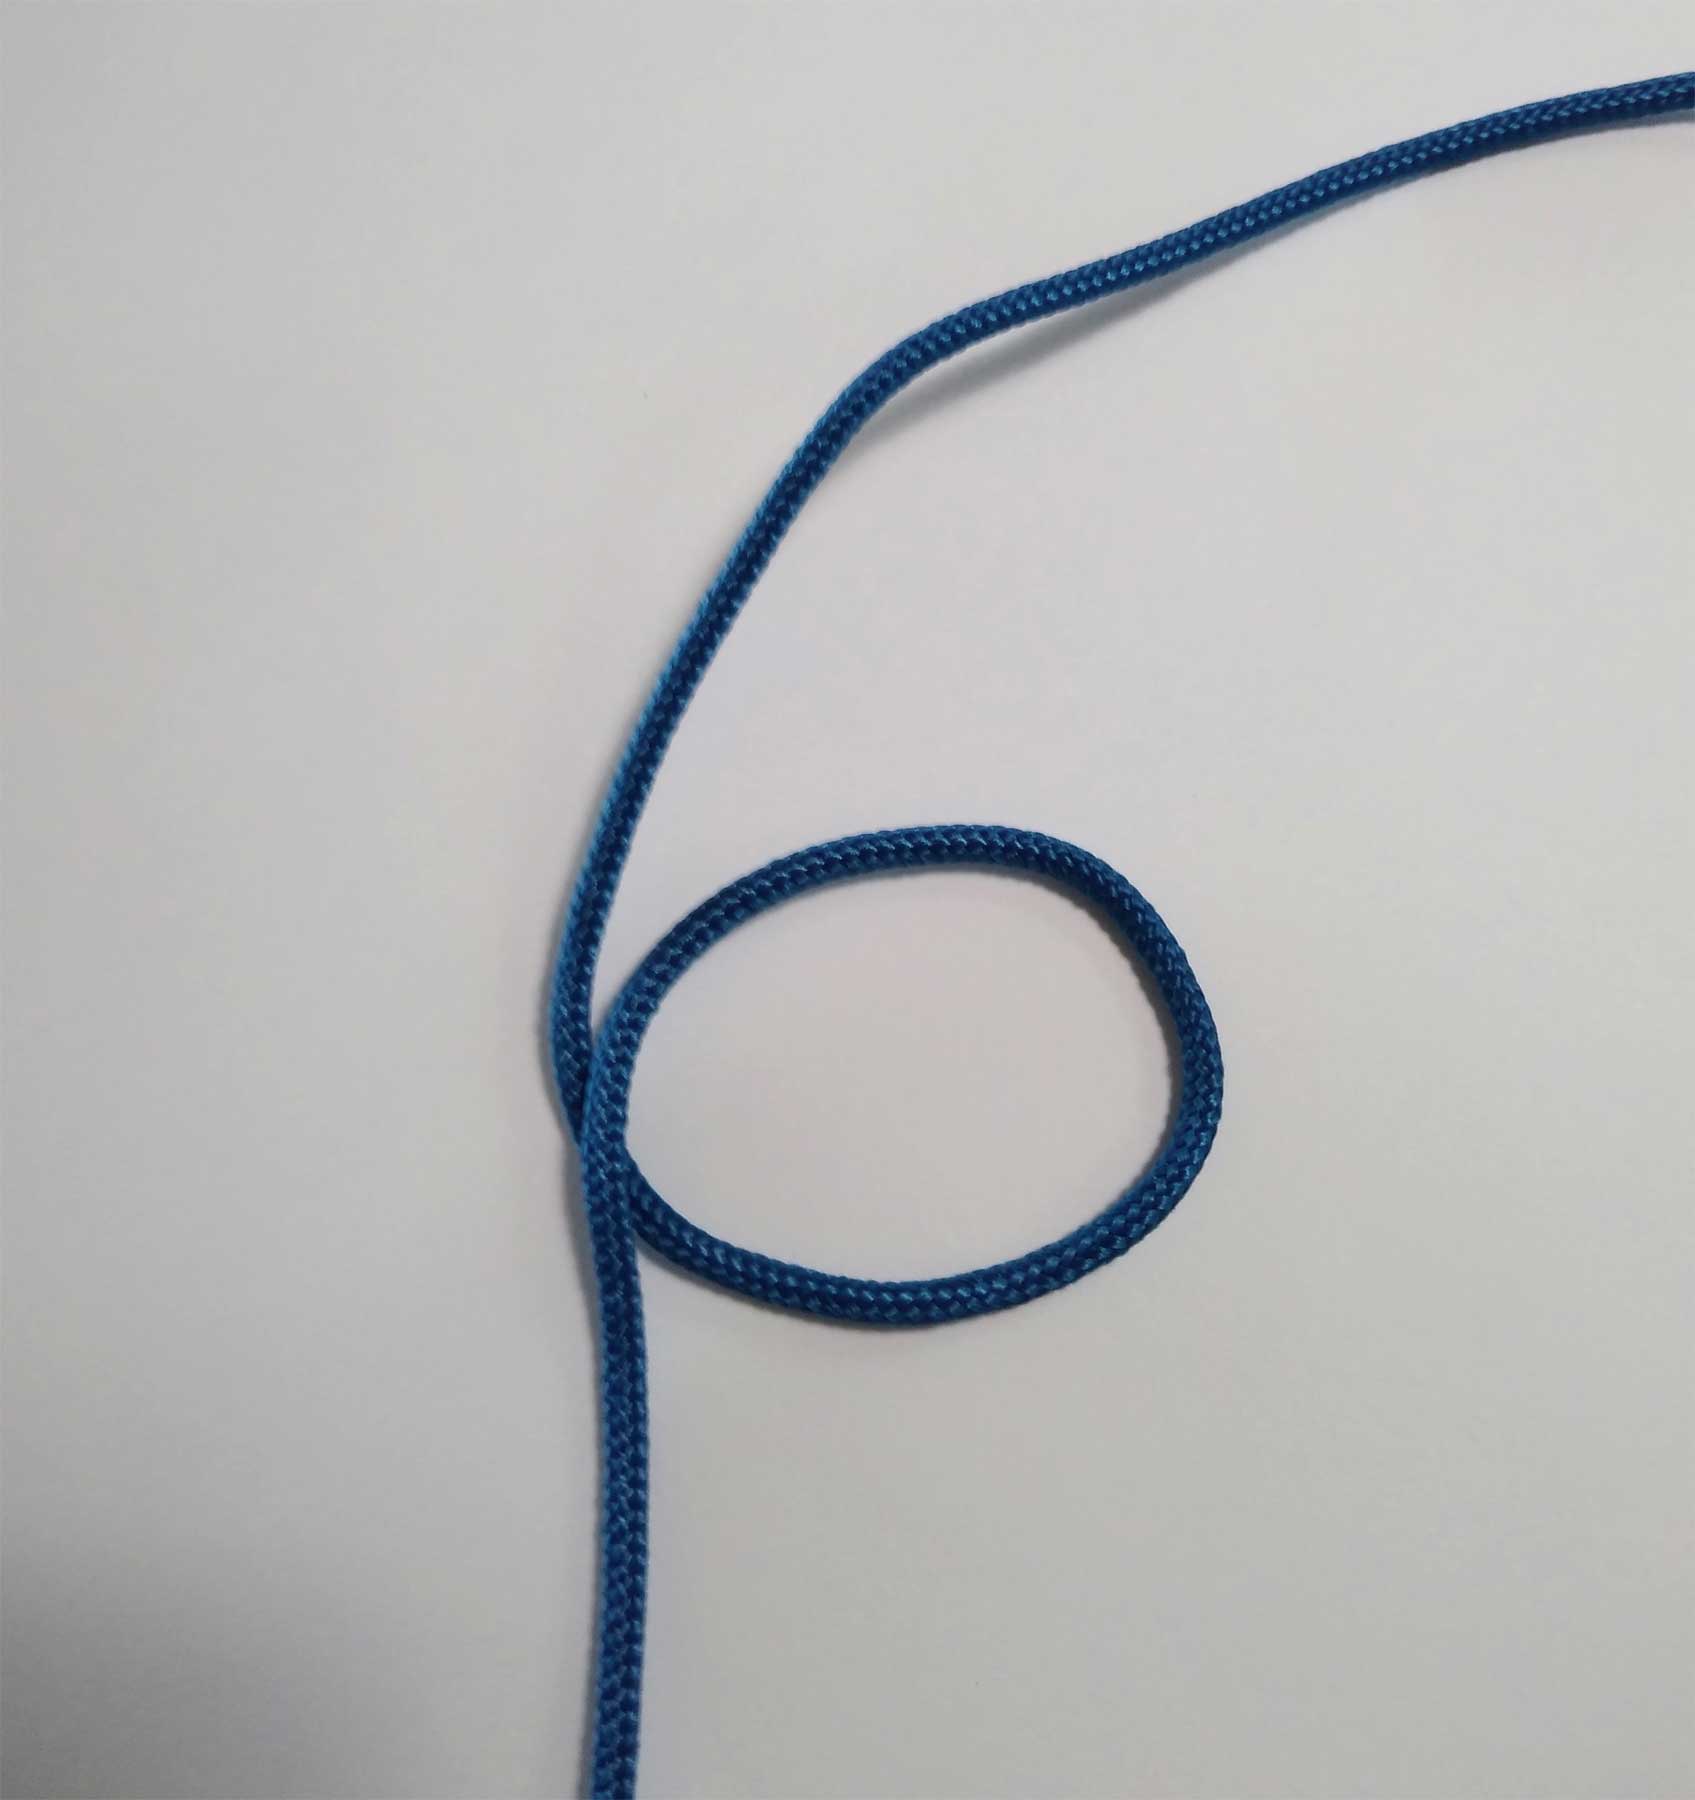
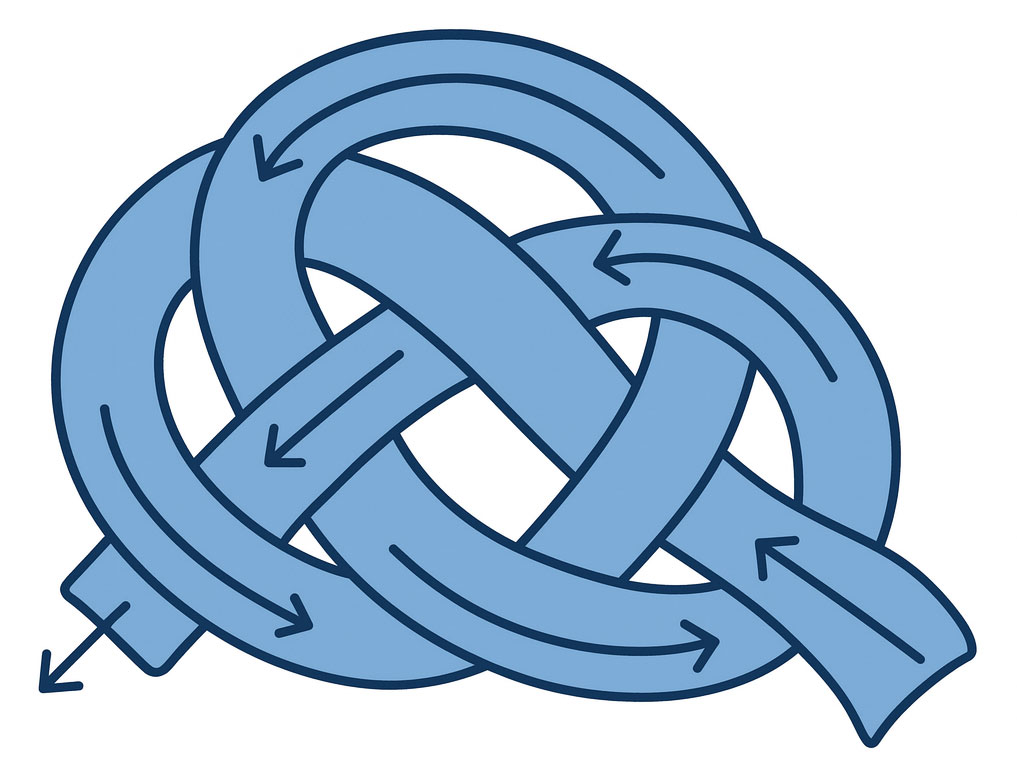
  1. Begin by folding the cord into a loop with one end OVER the opposite end.

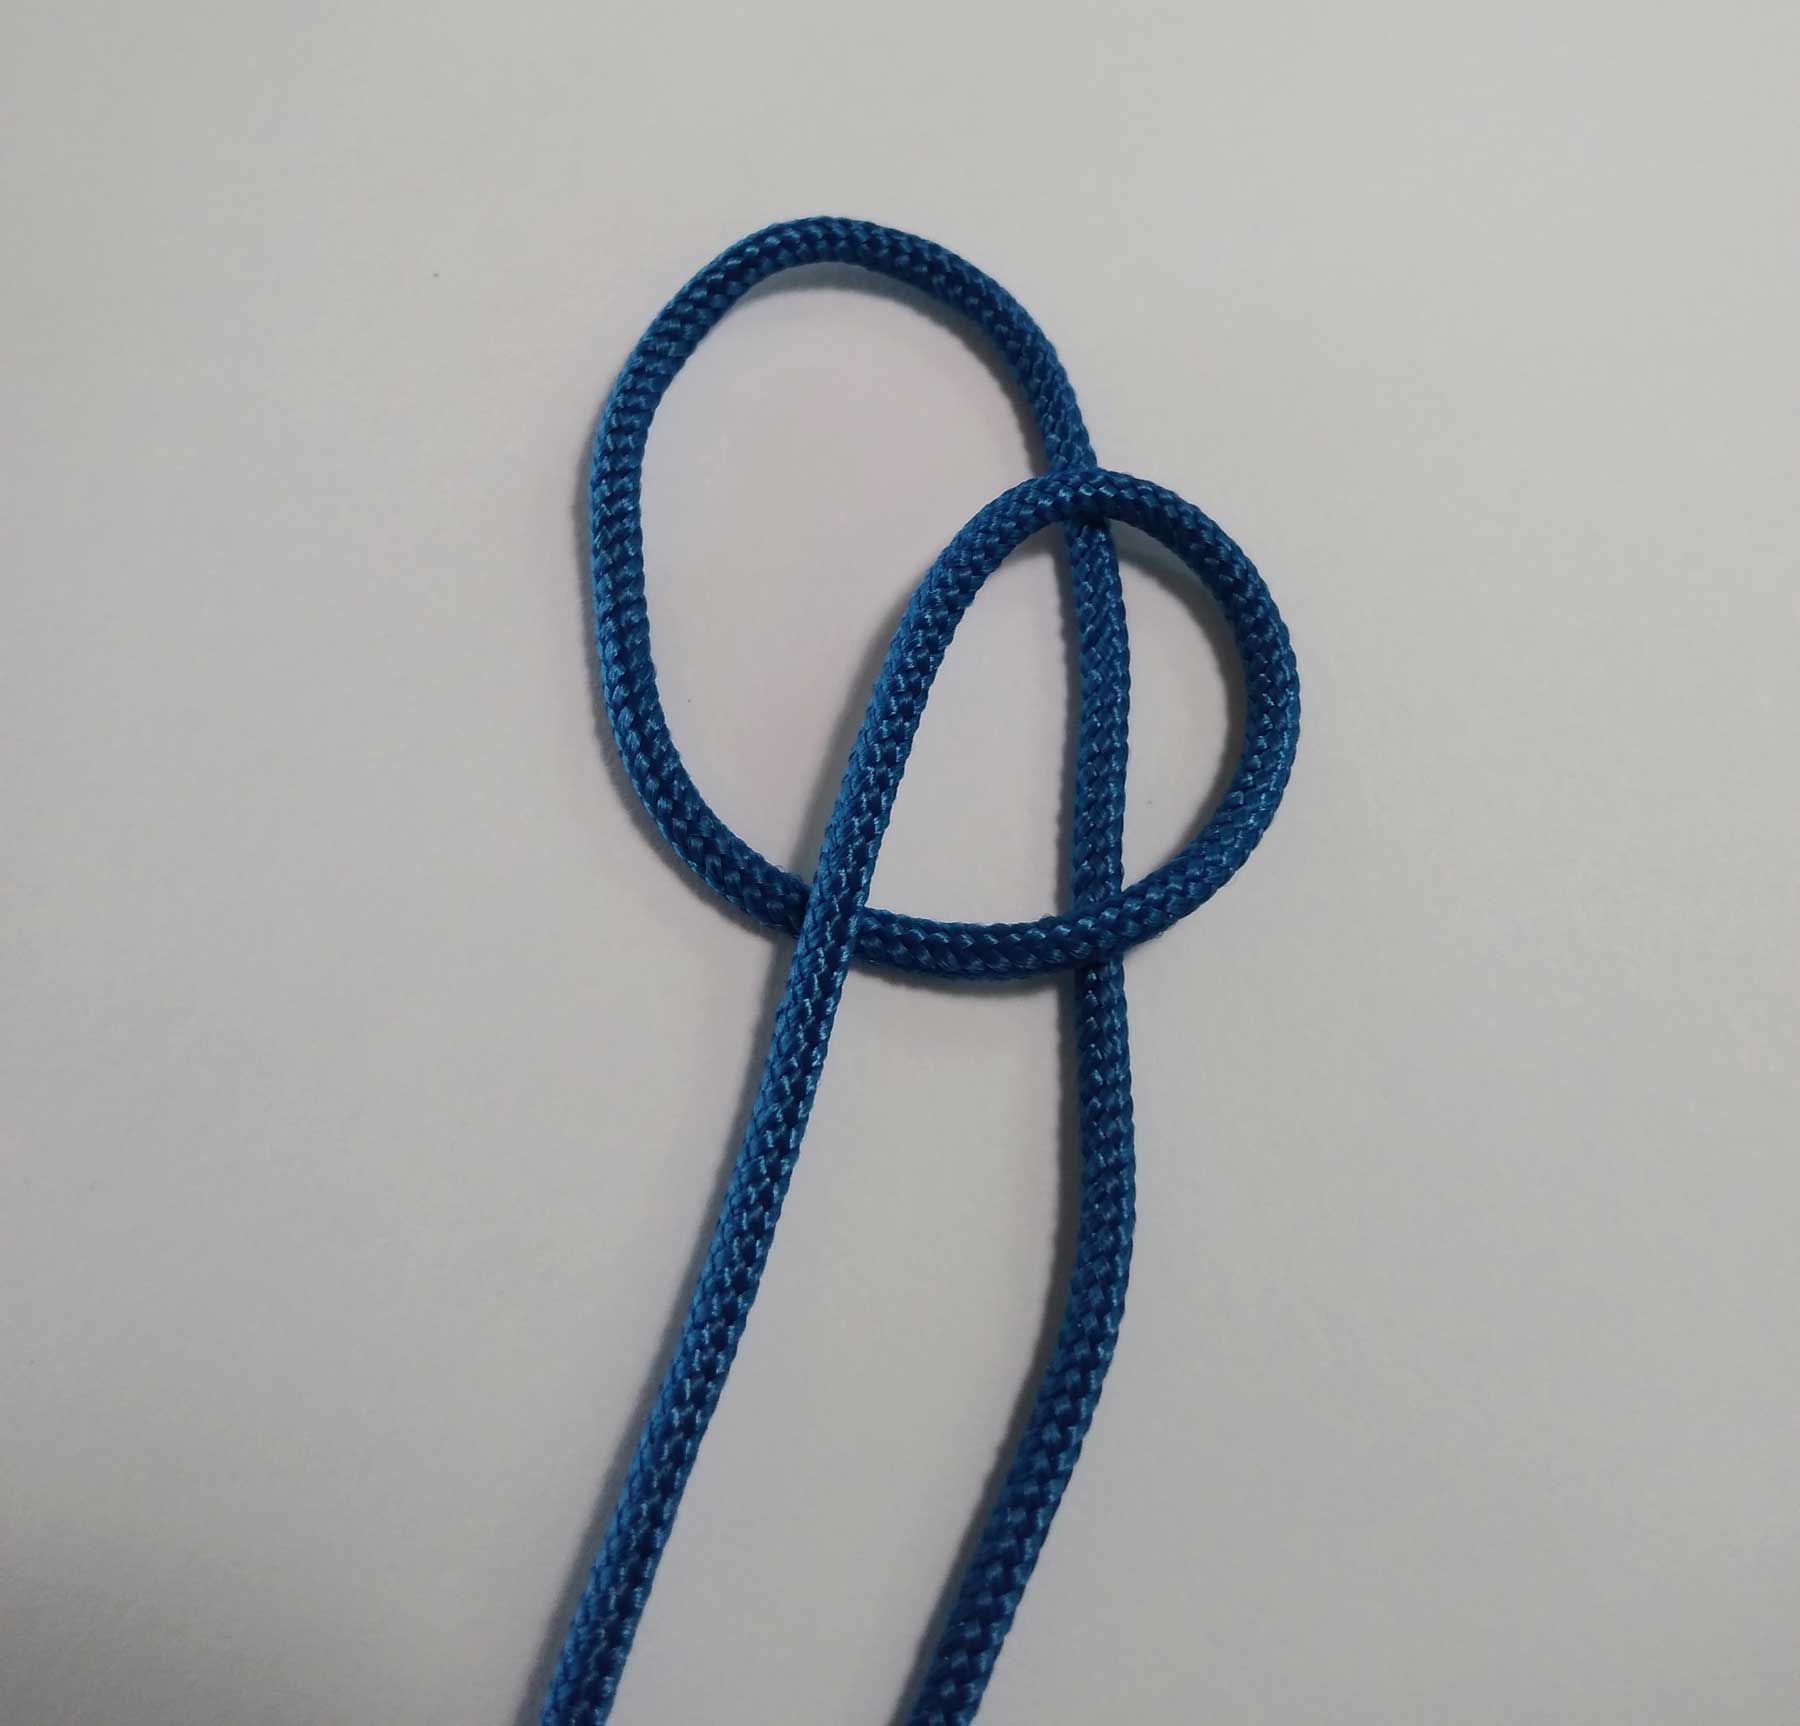
2. Make a second loop behind the first one forming a pretzel shape.

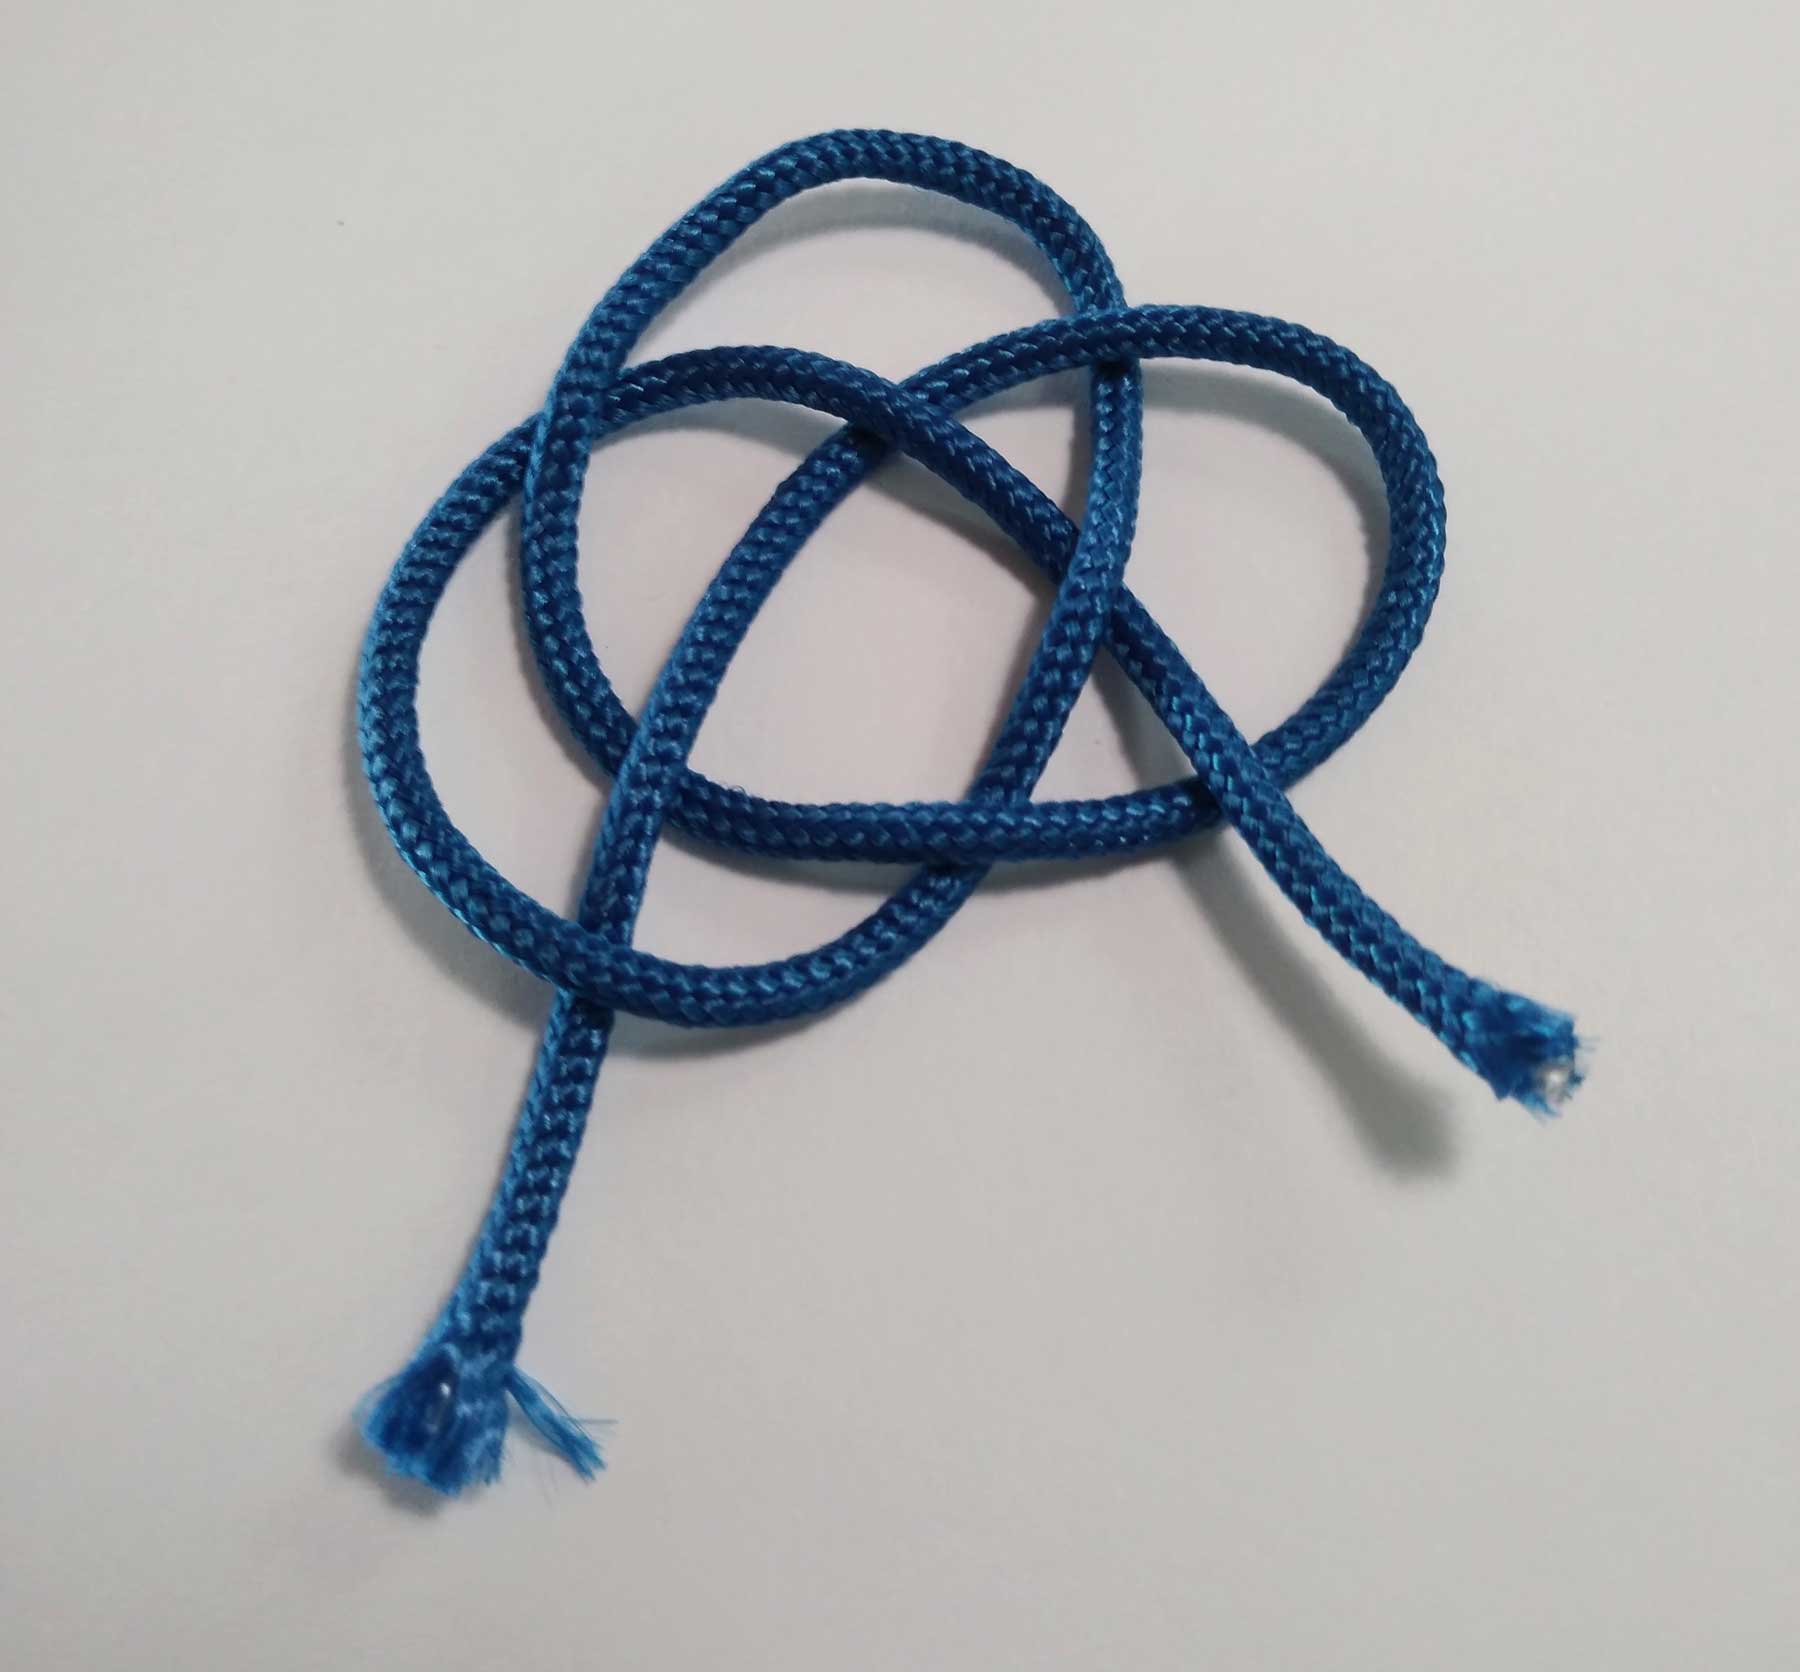
3. Weave the second end of the cord over and under each cord in the pretzel pattern to create a sustainable knot shape. Note that it’s the over/under intertwining pattern that holds the cords together.

4. To shape the knot, gently coax each loop and pull to snug them together. If you pull too fast, the shape of the ball will be wonky.

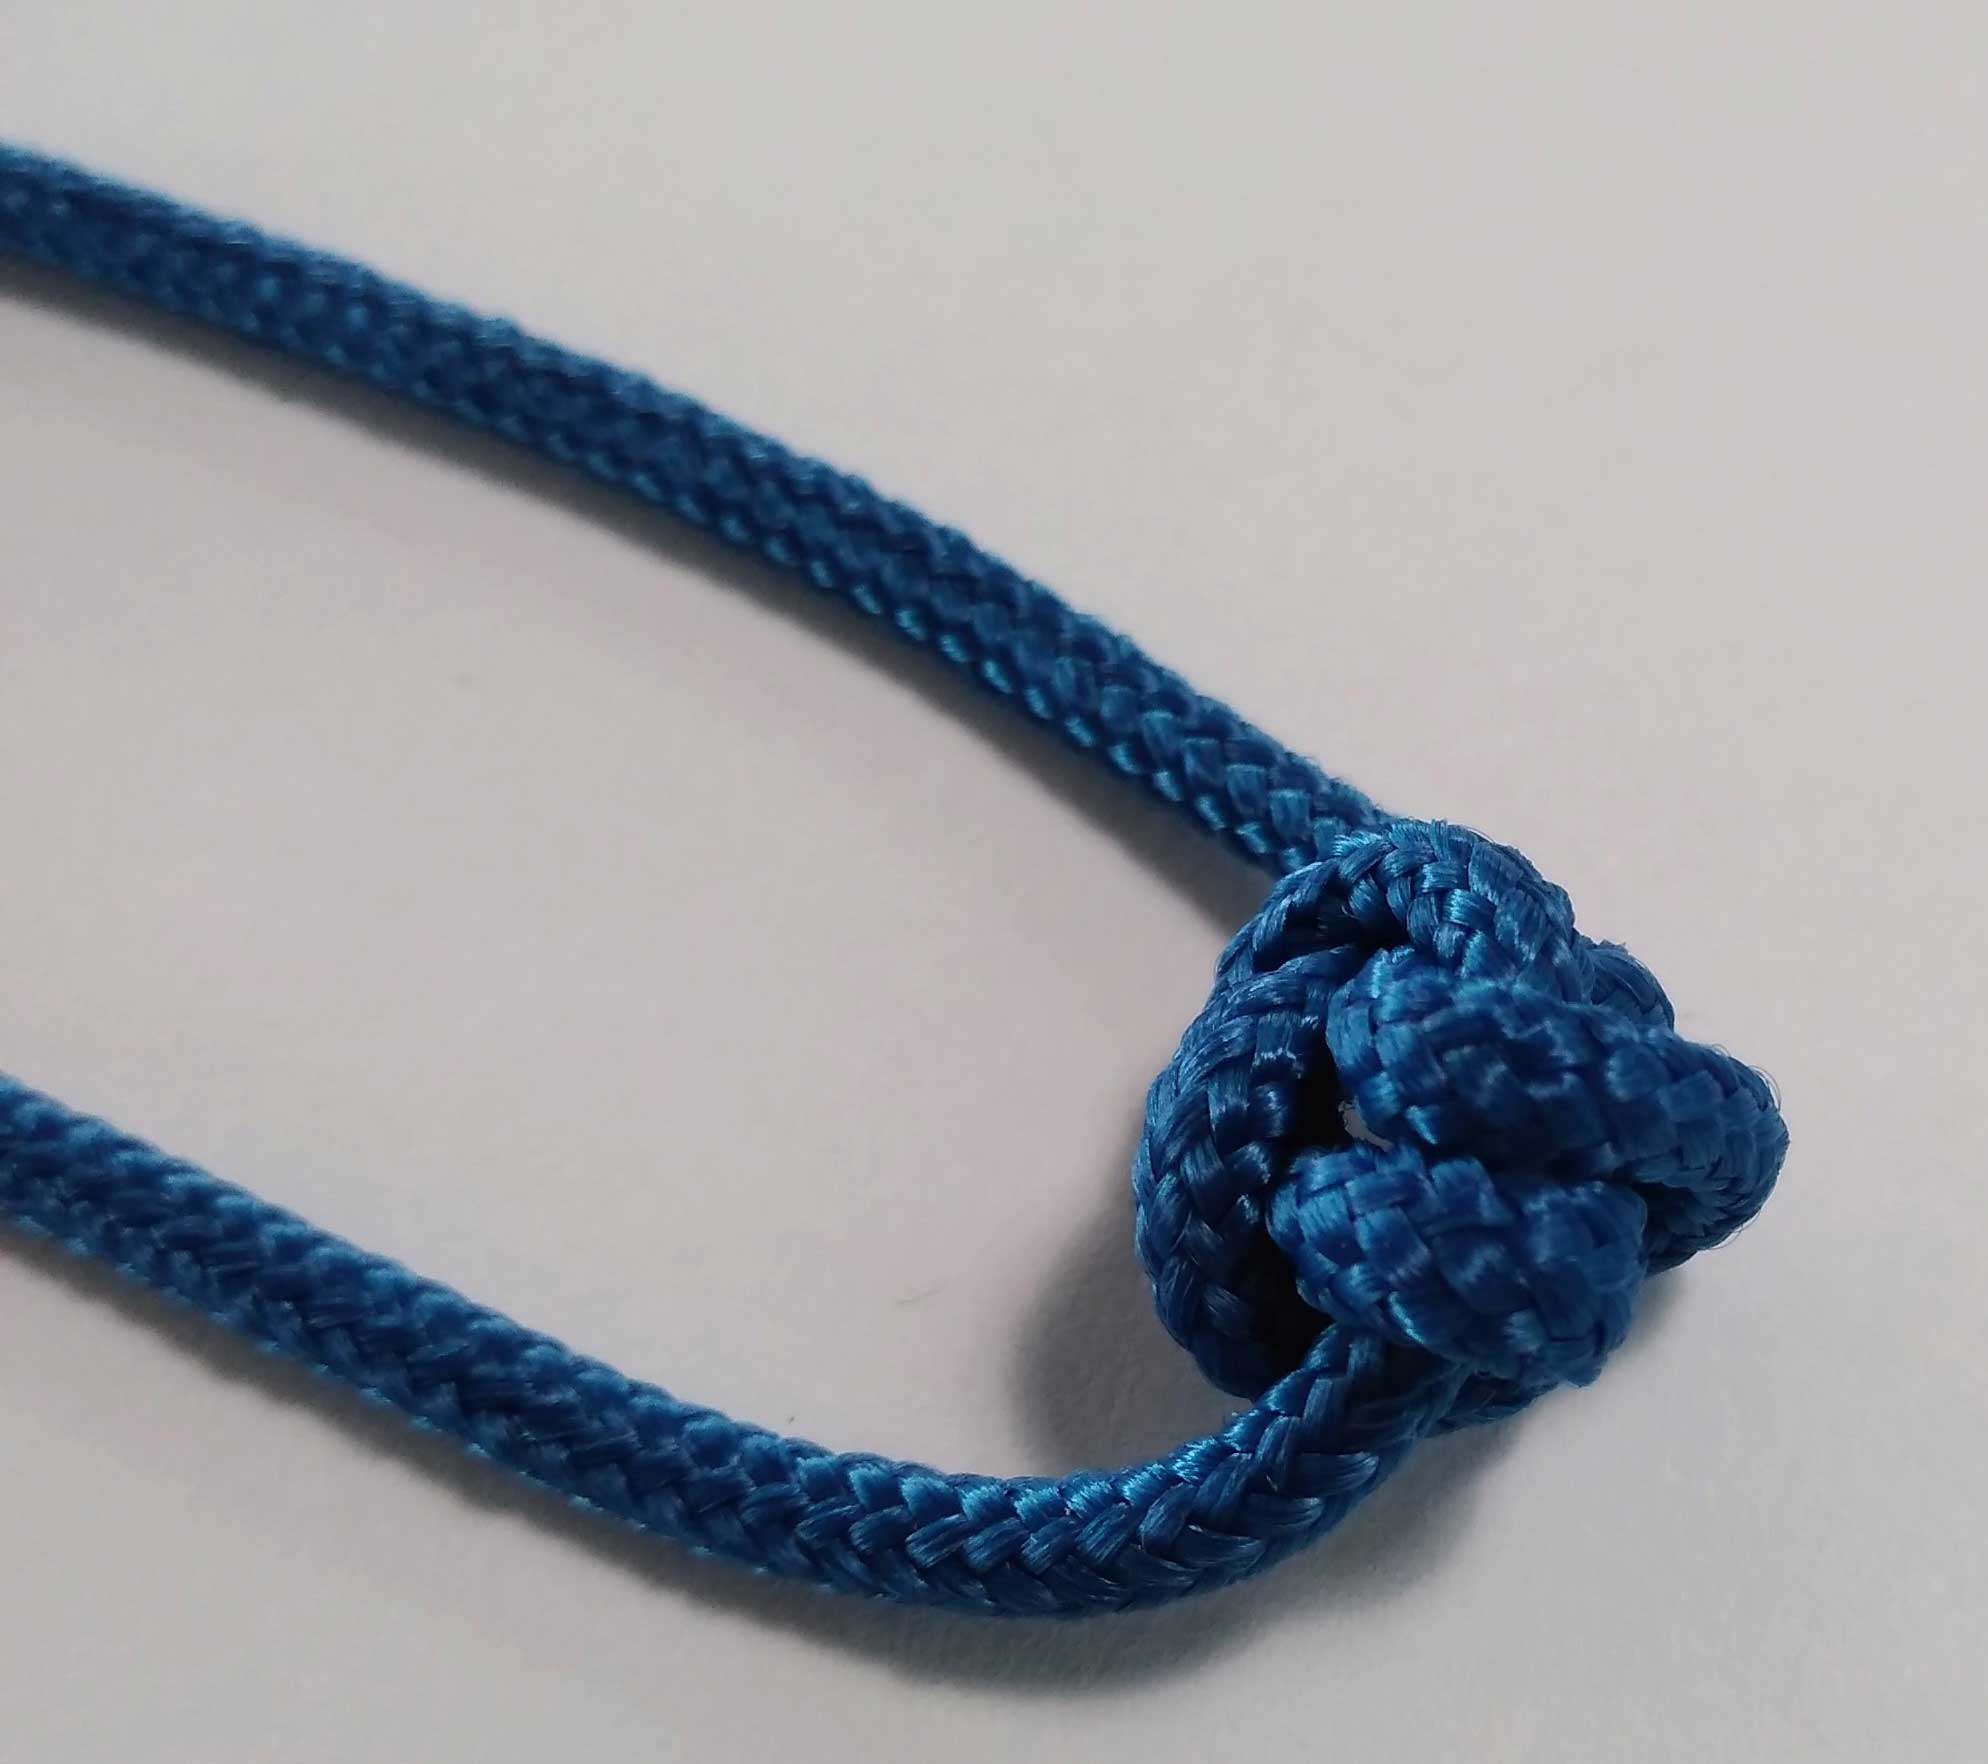
5. Pull up to get the ball shape or leave looser for a flatter button.

Finishing

Once you have the button in a pleasing shape, trim the ends of the cording about ¾” from the knot. If the cord or fabric tube ends are ravelly, add a bit of fray preventer or fabric glue to secure them.

Sew the cord ends together and tuck them into the knot underside to secure. Leave the threaded needle attached to sew the button to the project.

Wrap the thread around the thread shank you created in that process to make an attractive finish for the button application.

Use ball buttons with loops on the opposite side of the closure, as they’re too bulky for a traditional buttonhole.


~Linda Griepentrog is the owner of G Wiz Creative Services and she does writing, editing and designing for companies in the sewing, crafting and quilting industries. In addition, she escorts fabric shopping tours to Hong Kong. She lives at the Oregon Coast with her husband Keith, and three dogs, Yohnuh, Abby, and Lizzie. Contact her at gwizdesigns@aol.com.

November 21, 2025

From Sweater to Fall Foliage on Display

Who doesn’t love a bit of fall color? 

If you’ve followed my blog posts for any length of time, you know that I love repurposing things in unexpected ways, and this sweater wreath is the perfect project for that mantra.

Get started by gathering some fall-color-no-longer-worn sweaters from your closet, from friends, or visit thrift stores. Look for color gradations or stripes within the sweater so you have more tonal options from a single pick.

If the sweaters are wool, throw them in the washer and dryer to felt them, creating a denser fabric to work with.

Supplies

  • One 10-12” wicker wreath form
  • Assorted fall color sweaters
  • Assorted fall color felt
  • Assorted fall color threads
  • Assorted fall color felt balls, 1- 1½” diameter
  • Fusible web
  • Hot glue/glue gun
  • Large bow (optional)

Putting it together

  1. Download some free leaf shapes from the Internet. One site is https://worldofprintables.com/leaf-template/. Oak and maple shapes are ideal, but any basic leaf shapes will work.
  2. Trace the leaves onto the paper side of the fusible web and rough-cut the shapes.
  3. Following the manufacturer’s instructions, fuse the shapes to the wrong side of the sweaters, positioning them according to your color selection and varying placement for interest.
  4. Cut out the sweater leaves on the drawn lines.
  5. Peel off the protective paper and fuse the leaf shapes to a contrasting felt color. Cut out the shapes ¼” from the sweater edges, leaving a narrow felt border around each leaf.
  6. Using a straight stretch stitch or a narrow zigzag stitch, detail the leaf veining to mimic the natural leaf configuration. A narrow zigzag shows up better on bulkier fabrics.
  7. Position the leaves as desired on the wreath form and glue in place.
  8. Group together multiple felt balls and glue in place among the leaves.
  9. Let the glue dry thoroughly before moving the wreath.
  10. Add a bow if desired.

Options: Instead of all leaf shapes, cut some pumpkins, witch hats or turkey shapes to add to the mix.

Don’t throw away the sweater scraps—they’re ideal for another project—perhaps some winter mittens! The sweater ribbing is perfect to use as-is for the cuffs on mittens.


~Linda Griepentrog is the owner of G Wiz Creative Services and she does writing, editing and designing for companies in the sewing, crafting and quilting industries. In addition, she escorts fabric shopping tours to Hong Kong. She lives at the Oregon Coast with her husband Keith, and three dogs, Yohnuh, Abby, and Lizzie. Contact her at gwizdesigns@aol.com.

Tagged With: fall, felting, project

June 7, 2024

DIY Needle Sorting Pincushion

Needle Cushion

The thrill of selecting a pattern, snagging that perfect fabric, and retreating to your personal haven of creativity to craft a spectacular piece is unrivaled. Whether gorgeous garment, cozy quilt, chic handbag, or comfy pillow, the journey is the reward. But sometimes we just need that immediate ‘sew’-phoria from a quick and easy project. This project takes a humble tuna can and gives it a recyled life as a super-handy organizer cushion for your sewing machine needles. And the best part? Each section is labeled for different needle sizes and types. No more guessing games of “what size needle is this?”

Materials

  • Empty tuna can-6 1/2 oz. size
  • 1/4 yd. decorator fabric
  • 1 1/3 yards 1/8″ ribbon
  • Perle cotton or similar cord
  • 24″ small cable cord for piping
  • Fiber fill, scraps of batting, or other pincushion filler
  • 6″ square of iron-on tear away Stabilizer

Cut from Fabric

  • 24″ x 1″ crossgrain strip to cover cord for piping
  • 4 1/2 ” circle
  • 9″ circle
  • 3″ x 22″ strip for puffing
  • 3″ x 11%” strip for lining

Cut

  • 24″ Cable Cord
  • 30″ Perle cotton
  • Eight 6″ pieces of 1/8″ Ribbon

Sew

Puffing Strip

  1. Snap on a gathering foot. Set stitch length for approximately 2 to 1 fullness. Try stitch length 5, tension 7, and sew a practice sample. Measure it before and after stitching. If it gathers up to half the original size, you have 2 to 1 fullness. Adjust length and tension as needed. The longer the length and tighter the tension the more fabric will gather. Because softer fabric gathers more easily, prewash fabric that is stiff with sizing.
  2. Gather both long edges of 3″ x 22″ puffing strip, stitching 5/8″ from the edge. The feed teeth are what make the gathering foot gather. You must have the fabric under the entire width of the presser foot. This is the reason for a full 5/8″ seam allowance on each edge. Do not help the fabric by pulling it from behind or holding it beside the foot as this flattens the gathers as they try to form. It is easy to make beautiful even gathers if you keep your hands in front of the foot.
  3. Piping – Snap on a piping foot. Return the tension and stitch length to normal. Make 24″ of piping by wrapping the 1″ wide strip of fabric around the cable cord and placing it in the groove on the underside of the foot, raw edges to the right. Stitch with a straight stitch.
  4. Sew piping to one long edge of the puffing strip with a 5/8″ seam allowance. Lay the piping on top of the puffing strip, right sides together. The raw edges won’t match, but there is no need to pin as long as the piping is laying in the groove on the underside of the foot. Simply keep the edge of the puffing strip at the 5/8″ guideline, and the piping will be guided as you stitch. Adjust your needle position slightly to the left to cover the previous stitching. Trim seams to less than 1/4″.
  5. To sew the remaining piping around the 4 1/2″ circle, clip the piping seam allowance to the stitching and sew with the piping foot and 1/4” seam allowance. Set the needle stop down on your sewing machine to make it easier to stitch those tight curves. For less bulk at the overlap, pull out and cut off 1/2″ of the cord at the beginning and end of the circle so you can lap “cordless” piping at the ends.
  6. Sew the lining strip to the piped edge of the puffing strip by placing the lining right sides together with the piped puffing strip. The piping foot will find the piping right through the fabric. Trim seam close to stitching.
  7. Sew the other edge of the puffing to the piped circle, right sides together with the circle on the top. Begin sewing 5/8″ from the end of the puffing strip and sew completely around following the piping. Trim seam close to stitching.
  8. Snap on the regular sewing foot. Sew up the side seam to form a circle. Trim seam.
  9. Turn the piece right side out. It should look a little like a miniature chef’s hat.
  10.  Slip the tuna can inside and pull the lining over the edge.

Cushion

  1. Fold the 9″circle to form eight pie wedge sections. Mark these sections by pressing to create creases.
  2. Center a piece of stabilizer under the circle. Make a small buttonhole in the very center. Cut the buttonhole open with the buttonhole chisel. Write, stitch, or embroider the different needle sizes in each section with your writing sewing machine. Include size 90, 80, 70, 60, Wing, Twin, Stretch, Jeans, Embroidery, or other sizes and types you use most.
  3. Bartack the ribbon ends at the outer edge of the circle at each of the eight markings like spokes on a wheel. Pull opposite ribbon ends through the buttonhole in the center. Tie those ends to secure.
  4. Snap on a narrow braiding foot. Select a narrow zigzag, slip the perle cotton into the guide on the foot. Zigzag over the cord, being sure not to catch it with the zigzag going all the way around the outside edge of the circle at a 3/8″seam allowance. Drop the feed teeth and stitch in place at the beginning and the end to secure.
  5. Pull up the ends of the cord to gather. Put stuffing inside the circle in a doughnut form. Stuff firmly. Tie the cord ends tightly. Pull up the ribbons through the center of the stuffing and secure.
  6. Poke the cushion snugly into the covered tuna can and stick in needles! Remember not to save needles that have been used for one garment or more. And anytime you have a machine problem, change the needle and rethread.

~ Project used with permission from “America Sews with Sue Hausmann”

October 20, 2023

Project: Doris’s Adult Bib

Is there ever a day that goes by that you aren’t thankful for your sewing skills? Not here.

Doris
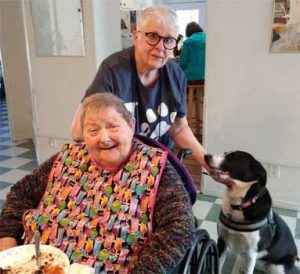
When I first moved to my small coastal town, I discovered that the post office does not deliver mail to the town’s residents. “What?” But the more I thought about it, there was an opportunity for exercise and walking the mile-and-a-half circuit to the post office with at least one of our dogs, to retrieve the mail. Along the way early on in the adventure, I passed an adult care home and a lady was sitting on the covered porch in her wheelchair calling out “doggie, doggie!” So, I went up to the porch with the dog and we started to chat. I asked her how many people stopped to talk to her, and she replied “no one, but you.”

Over the four years I’ve lived here, on the morning walk to get the mail, I always wonder if Doris will be out on the porch…some days she’s there, other days not, mostly dependent on the weather. One day we were talking and I asked her when her birthday was—turns out it’s 10 days after mine! Hmmm…what can one do in celebration for someone who is not mobile and living in an adult care facility?

I had an “aha” moment and decided to sew up 10 fleece hats, telling her to keep her favorites and share the others with the staff and other residents (who occasionally sit on the porch as well). Those were a big hit and she’s been sporting several throughout the months when there’s a chill in the air. But I decided my next project for her would be an adult bib—winner, winner, chicken dinner as they say! I’m currently making her third bib, this year to celebrate her 81st birthday.

It takes less than an hour to make and choosing fun prints is easy as pie. You probably have everything you need in your stash. So, today I’m sharing with you how to make Doris’s bib! Think about reaching out to someone in your own community who may need a bit of cheer—the project is super easy, takes only a yard of fabric, and you can make it up in less than an hour.

Doris’s Bib

Adult bibChoose a washable and colorful busy print in a darker color to hide food spills, etc. There can be a theme to the fabric, like food motifs, or a sports print, or simply a favorite color that you’ve learned of through chatting. Doris’s favorite colors are pink and purple, and she has Crocs in both hues.

What you’ll need for each bib:

  • 1 yard print fabric
  • 1 package of double-fold bias tape (at least 3 ½ yards)
  • 1” hook-and-loop tape
  • Matching thread
  • Pattern tracing paper
  • Bib pattern (PDF format)

Making the bib

  1. Trace the upper bib shape from the bib pattern (link above). Continue the center front line so it’s 27” long, then draw a line perpendicular to the center front line at the bottom. Extend the side edge straight down to match the bottom line. Using a saucer, round the lower outer corner for easier binding. Label the center front.
  2. Refold the fabric to the width of the bib and pin the pattern center front to the fold. Pin the remaining pattern edges in place and cut out.
  3. Starting at the back tab, bind the bib edges. Use a narrow zigzag to ensure catching both the upper and lower bias tape edges. Place the needle in the down position to make it easier to adjust the bias tape around the narrow tab curves. Be sure the bib edge is inserted all the way into the bias tape.
  4. Press the bib edges to shape.
  5. Sew the hook portion of the fastener to the wrong side of the overlapping neck tab, and the loop section to the right side of the underlapping tab.

Some options:

  • Add a pocket from the extra fabric.
  • Choose a second print and make the bib reversible.
  • Make the bib from terry cloth fabric, but be sure to pre-shrink it. Choose an extra-wide bias tape due to the fabric thickness.
  • For a waterproof version, use vinyl fabric. It’s easy to clean with just a wipe.

This bib is also suited for groups needing a community service project—even beginner sewers can make it up easily. Set up an assembly line of cutters, binders and fastener attachers for mass production.


~Linda Griepentrog is the owner of G Wiz Creative Services and she does writing, editing and designing for companies in the sewing, crafting and quilting industries. In addition, she escorts fabric shopping tours to Hong Kong. She lives at the Oregon Coast with her husband Keith, and three dogs, Yohnuh, Abby, and Lizzie. Contact her at gwizdesigns@aol.com.

This field is for validation purposes and should be left unchanged.
Did you enjoy this article?
Are you an ASG member?

August 18, 2023

Fiber Fun Scarves

Thread lace made on water soluble stabilizer
Thread lace made on water soluble stabilizer. Photo courtesy of Sulky.

If you love fabric, there’s also a good chance that you love fibers of all kinds—yarns, novelty threads, ribbons, trims, cords, etc. Assuming that’s the case and perhaps you have some of those things in your stash, making your own scarves is a fun way to showcase a medley of those fun fibers.

Here’s what you need:

  • Two pieces of water-soluble stabilizer in the length and width you want your finished scarf. Fringe can overhang the length of the stabilizer. Self-adhesive types make the process easier.
  • Assorted yarns, threads, ribbons, trims serger chains and/or fabric bits to fill the stabilizer size. The patterning can be random or planned, dense or sparse, depending on the desired finished look.
  • Thread for stitching. Lots of options—embroidery thread, all-purpose thread, metallic thread, novelty thread, etc.; solid color or variegated.
  • Temporary spray adhesive if your stabilizer isn’t adhesive backed.

About the Stabilizer

Water-soluble stabilizer comes in several styles and weights—some are clear and film-like (think kitchen plastic wrap), others are more paper-like. For this project, the clear or slightly opaque stabilizers provide better visibility than the denser ones. Unless you plan dense stitching, the lighter weight ones work fine.

  • Some stabilizers are self-adhesive, meaning you can peel away a paper backing to expose the sticky side.
  • To make any water-soluble stabilizer sticky, use an allover temporary spray adhesive.
  • Water-soluble stabilizer came up to about 20” wide, depending on the brand and the packaging. For this project, that width is more than generous. Some water-soluble stabilizers are actually marketed as toppers for embroidery, but they will work fine for this project.

Yarns and threads on water-soluble stabilizer. Photos courtesy of Sulky.

Design Notes

Fabric strip add-ins will fray less if they’re cut on the bias. But, if you like a frayed look, cut them on the straight grain. You can even fringe them before securing.

  • It’s not required to have ribbons, trims and yarn—you can simply create a scarf using stitching all over the stabilizer. If you opt for this technique, use a single layer of heavier stabilizer.
  • You can use multiple types and colors of threads to stitch together your scarf.
  • Want a bit more texture in your scarf? Incorporate wool yarn—it can shrink when you’re rinsing out the stabilizer and make a most interesting surface texture.

Yarns & thread layed out on water soluble stabilizer.

Making the Project

  1. Pink scarf made with fiber artLay out one length of stabilizer on a large table. Remember, the stabilizer should be the length you want the finished scarf, excluding any fringe. If your stabilizer is self-adhesive, place that side up.
  2. If your stabilizer isn’t self-adhesive, spray the exposed surface with temporary spray adhesive. It’s a good idea to cover your work surface with paper before layout, to protect from overspray.
  3. Cut the yarns, threads, etc. to the finished scarf length and position them on the stabilizer in a pleasing pattern. To keep the scarf shape, use a sturdy ribbon or trim along the outer edges. The design can be free-form and the strands can overlap, twist, etc. or they can be placed parallel to each other, or in a grid pattern depending on the desired look. You can throw in some fabric bits, stranded sequins or beads too. {pic of yarns laid out}
  4. If you want the scarf ends to be fringed, extend the length of the strands beyond the stabilizer length the desired distance on both ends.
  5. Spray the remaining length of stabilizer with temporary spray adhesive (if it’s not self-adhesive) and place that piece face down on your arranged fibers. Finger-press the layers together to encase all the yarns.
  6. Stitch the layers together. For the best stability of the finished scarf, stitch every ¼” or so. Stitching lines can go horizontally, vertically, diagonally and combinations of those, created either free-motion or using the presser foot. Just be sure to catch all the yarns in at least one direction. If you added beads or sequins, stitch near or over them carefully to avoid breaking a needle.
  7. Sew continuous lines of stitching, without breaking the thread at the scarf ends. This technique is much faster and there are fewer thread ends to deal with. You can secure all the embellishments and keep going until you finish covering the entire surface with thread.
  8. Once you’re satisfied with the look of the scarf, thoroughly rinse away the stabilizers following the manufacturer’s instructions. More than one rinsing may be needed.
  9. Lay the scarf out flat on a towel to dry. Trim and knot the fringe if needed.


~Linda Griepentrog is the owner of G Wiz Creative Services and she does writing, editing and designing for companies in the sewing, crafting and quilting industries. In addition, she escorts fabric shopping tours to Hong Kong. She lives at the Oregon Coast with her husband Keith, and three dogs, Yohnuh, Abby, and Lizzie. Contact her at gwizdesigns@aol.com.

This field is for validation purposes and should be left unchanged.
Did you enjoy this article?
Are you an ASG member?

  • 1
  • 2
  • 3
  • …
  • 5
  • Next Page »

Become a Member

Join the only national organization dedicated to Advancing Sewing as an Art and Life Skill.

Join Now button

Blog Article Categories

  • ASG Conference
  • Chapter Stories
  • Embroidery
  • Fitting
  • Learn to Sew
  • National Sewing Month
  • Products, Books, & Patterns
  • Projects
  • Quilting
  • Sewing
  • Sewing Techniques
  • Sewing Tips
  • Sewing Tours
  • Videos
  • Disclaimer
  • Privacy Policy

American Sewing Guild
National Headquarters
9660 Hillcroft, Suite 230
Houston TX 77096
713-729-3000 | 713-721-9230 Fax
www.ASG.org

ASG wordcloud - education, conference, discounts, videos, special offers, tours and more

Copyright © 1998–2026 · American Sewing Guild · All Rights Reserved