American Sewing Guild (ASG)

Visit our blog Visit the ASG Facebook page Visit ASG on Pinterest Visit ASG's YouTube channel Visit ASG on Instagram
  • Home
  • Join ASG
    • Join Online
    • Chapter Locations
    • Member Benefits
    • Member Brochure
    • Join by Mail
  • Education & Classes
    • Virtual Conference: Member Registration
    • Virtual Conference: Non Member Registrationo
  • Resources
    • Contests & Awards
    • Giving Back
    • Hall of Fame
    • Travel and Tours
    • Measurement Chart
  • Shop
    • ASG Store
    • Chapter Products
    • Video Resources
  • Blog
  • About
    • About Us
    • Donate to ASG
    • ASG Sensitivity Statement
    • FAQ’s
    • Start a Chapter
  • Contact
  • Member Login
    • Login First!
    • Members Only
    • Leadership Only
    • Website FAQ’s
    • Logout
  •  

September 11, 2026

Quilting Your Own Fabric

How many times have you vowed to not acquire any more fabric until you use up (at least some) what you have in your stash? I’ve said it many times, and the commitment has lasted only until the next sale or caring friend who says, “Do you know anyone who would like…? (and the word fabric is in the same sentence).”

Grainline Studio Tamarack Jacket

Recently I was with a friend who was making Grainline Studio’s Tamarack Jacket, and it looked like a fun project. Something a bit different from my standard coastal attire sweatshirt dé jour. I searched the stash and realized I didn’t have enough of any single suitable fabric to make the entire jacket, but I did have one piece that would work for the lining. So pattern mixing to the rescue!

One of my favorite color combinations, and likely not shared by many, is orange and hot pink. I had a groovy knit dress back in the late ‘60s and that color combo always made me happy. So, lo and behold there were several related pieces in the stash to combine for the jacket—one enough for sleeves, another for the fronts and yet another for the back.

But I needed to quilt them. Easy-peazy! If you’ve never quilted your own fabric, let me just take you through the simple process.

  • Using a removable marker, trace the rough shape of your pattern piece onto the outer fabric layer. If there are multiple pieces to be cut from the same fabric, leave 2” between the traced pieces.
  • Choose your batting carefully—too thick of a batting and you’ll look like the Michelin Man. A thin cotton batting, or even flannel works best for garment sewing. Check the label of the filler as some battings and flannels can shrink up to 6% which wreaks havoc with garment fitting.
  • Be sure to preshrink—run flannel yardage through the washer and dryer; soak cotton batting in hot water, pat out excess moisture and roll in a towel, then hang to dry. If you prefer using a dryer, put it into a lingerie bag or pillowcase to avoid damage… and be sure to clean your lint filter!
  • Layer the backing fabric wrong side up, then the batting, then the outer fabric right side up. Generously pin the layers together. If you prefer, use a temporary spray adhesive to hold the backing and outer fabric flat against the batting. Be sure the fabric/batting layers are smooth and wrinkle free. If you’re using multiple fabrics in the project like I did, you’ll have separate pieces to layer and quilt.
layering fabric
  • Set the machine for a slightly longer than normal stitch length (3-3.5). Install a new needle and if you have one, use a walking foot. A quilting guide is helpful for spacing. The thread can be matching or contrasting depending on the desired finished look. The bobbin thread can match the top thread, or not.
  • Begin by marking a line down the center of your largest pattern piece then decide how far apart you want the quilting lines to be. I chose 1 1/2”, but you can go wider or narrower. Stitch on the initial line you drew extending the stitches about 1” outside the drawn perimeter. Continue drawing lines across the entire pattern piece or use your quilting guide to measure the distance from your needle and align the guide with the previous row of stitching. Always stitch in the same direction on the fabric (the quilting guide can extend to the left or right of the foot) and from the center of the piece outward.
  • Continue stitching across the entire pattern shape.
  • Lay the paper pattern back on the quilted section and cut out the piece. Note that you likely will not be cutting exactly on your original drawn lines as there is some “take up” when quilting and the joined fabric layers will pull up slightly.
  • Quilt and cut each garment section, remembering that you need both a right and left garment half so be sure to flop over the pattern piece.
  • If your fabric has a pattern to it, that could provide a fun quilting pattern, so you don’t have to simply use vertical or horizontal lines. I quilted along the fabric print waves on my jacket front.

Inside Scoop

If your mom told you that your sewn garments should look as nice on the inside as they do on the outside, consider binding the quilted seam edges—a nice finish to hide the multi-layer adventure.

Choose a fun print or solid and cut 2”-wide bias strips for binding. Press the strip in half, then press each raw edge to the center forming a double fold. Apply the binding to the seam edges, either totally by machine, or finish by hand.

Bound Edges
Bound Seam
Bound Slit Opening

~Linda Griepentrog is the owner of G Wiz Creative Services and she does writing, editing and designing for companies in the sewing, crafting and quilting industries. In addition, she escorts fabric shopping tours to Hong Kong. She lives at the Oregon Coast with her husband Keith, and three dogs, Yohnuh, Abby, and Lizzie. Contact her at gwizdesigns@aol.com.
September 4, 2026

Never Stop Learning: Why Experienced Sewists Still Can Benefit From Education

There is a wonderful moment in every sewing enthusiast’s journey when the basics begin to feel natural. Seams are straighter, zippers are less intimidating, and pattern instructions no longer read like a foreign language. Over time, we build a reliable collection of techniques and develop our own preferred ways of working.

However, becoming accomplished does not mean there is nothing left to learn. Experience can make education even more valuable: a longtime sewist can quickly recognize why a new technique works and how it might solve a familiar problem more effectively.

Fall Virtual Conference

That spirit of continued growth is at the heart of this year’s Fall Virtual Conference, taking place September 24–26, 2026. The conference offers six online classes covering garment fitting, construction, embellishment, and creative reuse—proof that there is always another skill to explore or a familiar skill to examine from a fresh perspective.

Experience Is a Foundation, Not a Finish Line

Sewing knowledge is never truly complete. Fabrics and equipment evolve, pattern companies use different drafting styles, and teachers develop new approaches to longstanding challenges. Our bodies and wardrobe needs change, too. What fit and worked ten years ago may need to be reconsidered today.

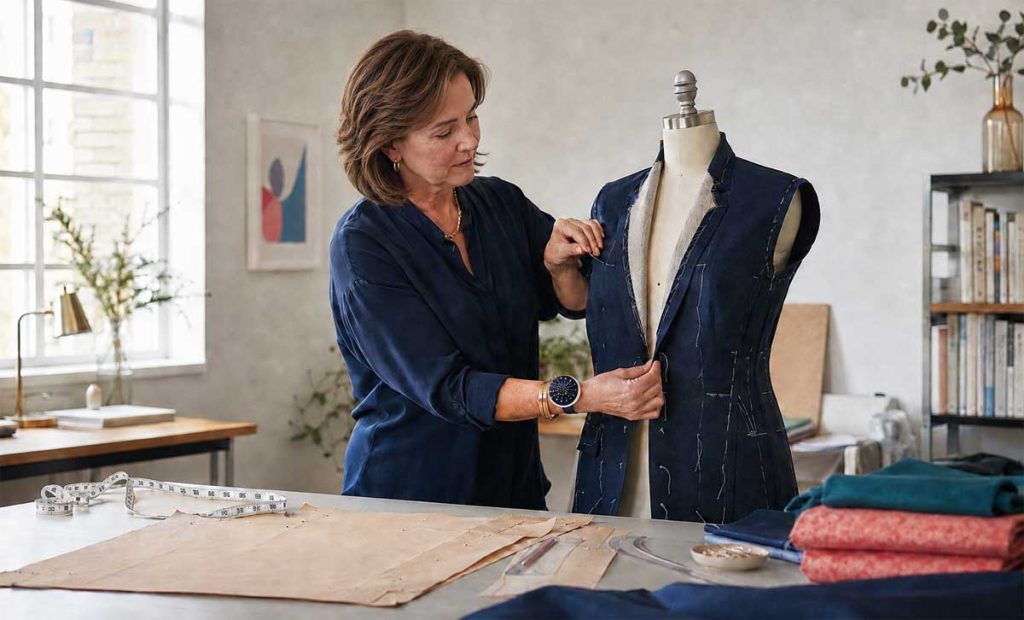
Two conference sessions address fitting from complementary directions. Progressive Fit: An Approach to Pattern Success with Susan Lazear focuses on a more reliable path toward a well-fitting garment, while Pants: Beyond the Basics—Efficient Workflow for Fitting with Jennifer Stern-Hasemann tackles one of garment sewing’s most persistent challenges. A better order of adjustments, clearer way to read wrinkles, or improved method for evaluating a muslin may eliminate hours of trial and error.

The conference also includes Pattern Hacks: A “Baker’s Dozen” of Fitting Tips & Techniques with Pam Howard. Pattern “hacking” encourages us to see a commercial pattern as a starting point rather than a fixed set of pieces. Small changes can improve comfort, proportion, or style and transform a familiar pattern into something uniquely suited to the wearer.

A Fresh Look at Familiar Tools

Continuing education is not only about learning something completely new. Sometimes it reveals capabilities in tools we already own.

In Master Techniques—Machine Embroidery on Clothing with Joi Mahon, participants can explore how embroidery becomes part of a garment rather than simply an added decoration. Placement, stabilization, scale, and design all affect whether embroidery looks thoughtfully integrated. An experienced sewist may understand construction beautifully but still discover better ways to plan embroidery before the first seam is sewn.

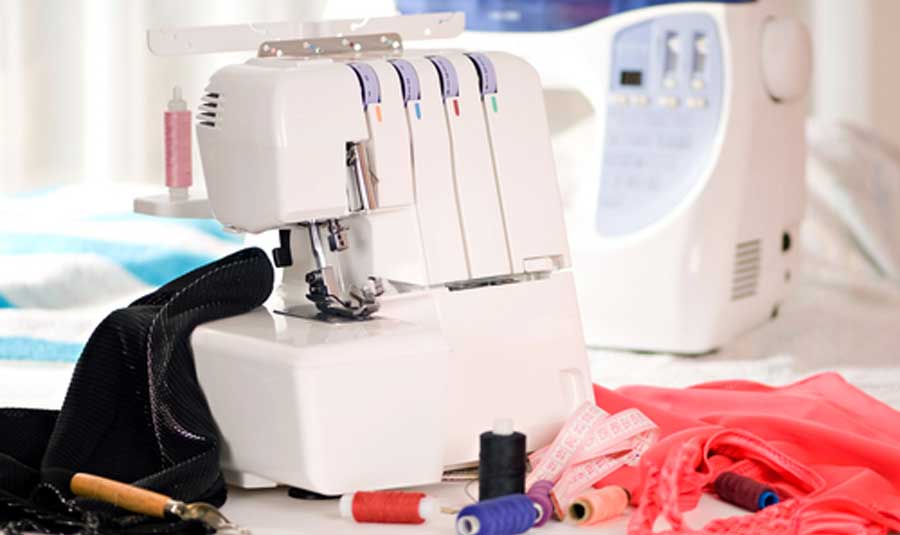
Likewise, Serging Beyond the Basics with Joanne Banko offers an opportunity to move past using the serger only for seam finishing. Learning additional applications can improve efficiency, expand design options, and inspire us to use specialty feet, stitches, or settings we have overlooked.

Serger

Creativity Grows When We Step Outside Routine

Longtime sewists will become highly efficient, but routine can quietly narrow creativity. We reach for the same fabrics, silhouettes, and construction methods because we know they work. Education interrupts that pattern in the best possible way.

BORO: Making Something Out of Nothing with June Colburn brings a different creative perspective to the conference. Rooted in resourcefulness, boro-inspired stitching invites us to layer, mend, combine, and celebrate materials that might otherwise be discarded. For a sewist accustomed to precise construction, this freer approach may open a new direction for personal expression.

Learning Also Restores Momentum

Every sewer experiences periods when enthusiasm fades. Projects feel repetitive, fitting frustrations pile up, or unfinished garments become discouraging. A class can provide the spark that gets us moving again. An instructor’s demonstration can make a difficult task seem manageable, while learning with others reminds us that every sewist encounters challenges!

The virtual format makes that renewal especially accessible. Classes can be enjoyed from home, without travel or the need to transport machines and supplies. Replays will be available for 30 days (you must register before the conference), allowing you to revisit demonstrations, pause for notes, or watch again while trying a technique.


You can register for individual sessions at $35/class for members, or $45/class for non-members. Buy all six classes for the cost of five!


Perhaps the greatest benefit of ongoing education is not any single technique, but the reminder that sewing still holds surprises. No matter how many garments we have completed, there is another approach to fitting, another use for a machine, another creative tradition, or another teacher who can help us see our work differently.

Experience gives us confidence. Continued learning keeps that confidence flexible, curious, and alive. Join ASG online September 24–26 and give yourself the pleasure of discovering what your next stitch can teach you!

Fall 2026 Virtual Conference Registration

MEMBER REGISTRATION
NON-MEMBER REGISTRATION

August 28, 2026

DIY Tassel Tricks

Who doesn’t love a fun tassel to decorate a new project? Sure, you can buy tassels of all sorts, but why do that when you can create your own custom pieces.

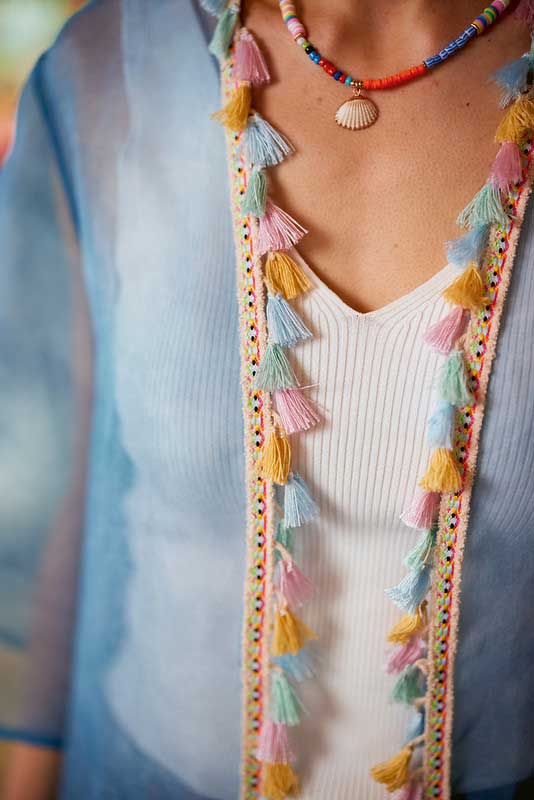
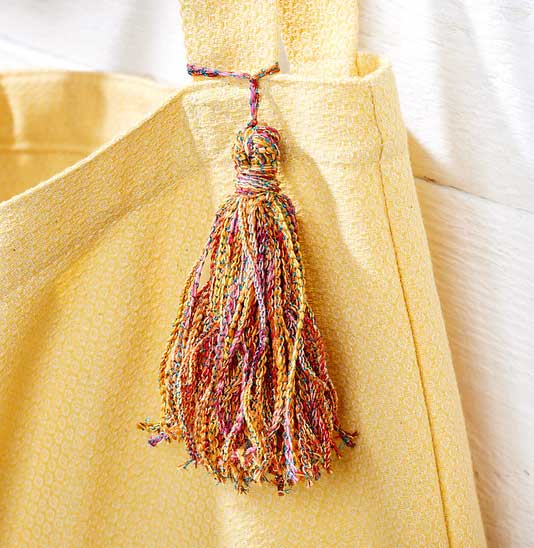
Tassels on a jacket

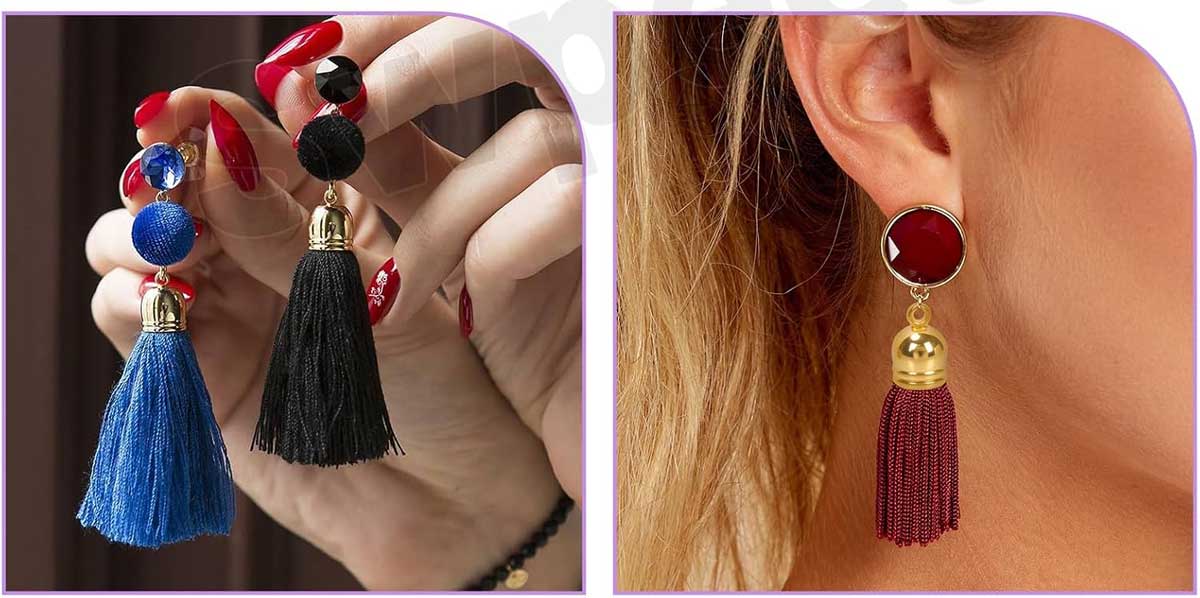
Tassels can be used for all kinds of things—from zipper pulls to tote bag adornments. String several tiny ones together for an innovative necklace or belt. Tie them onto packages as an accent or add a wire to create sweeping earrings.

Thread types

Tassels can be made from all kinds of strands—solid or variegated threads of any weight or type, yarns, trims, baby rickrack, skinny suede strips, raffia, tiny cords, etc.—anything flexible enough to wrap and tie. Use one kind of thread, or multiple strands of various threads. And, don’t stop there—add in some beads, charms, etc. for extra embellishment or combine thread colors and textures for more interest.

Wrap and go

There are several different ways to make tassels, including using some readymade tools designed specifically for the process.

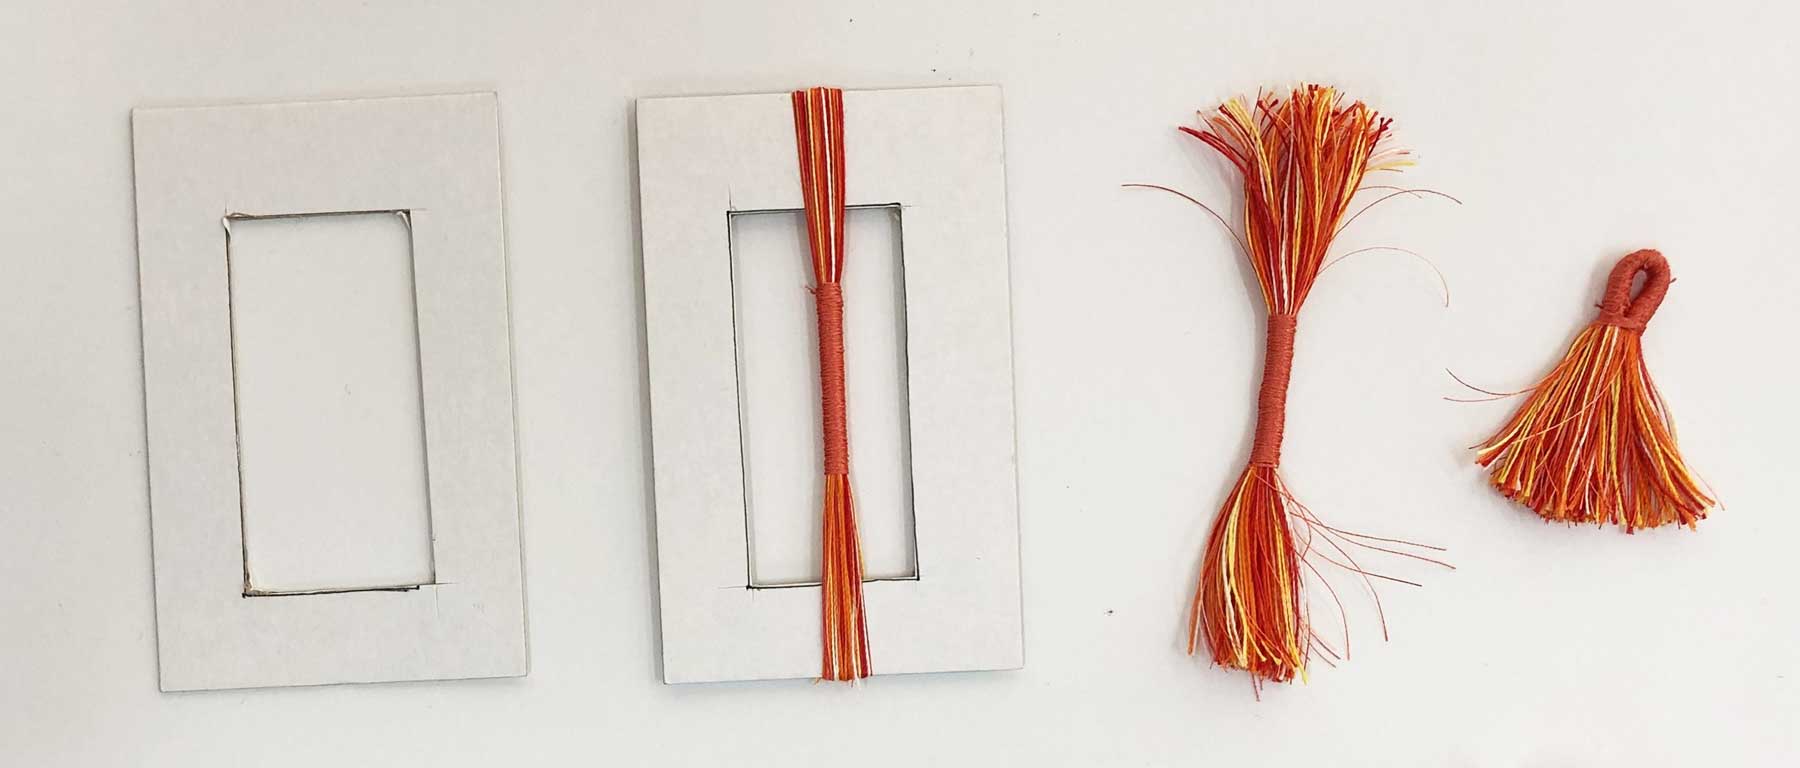
A simple tassel can be made using cardboard or a piece of sturdy foam as the template for wrapping. Cut the cardboard to the desired finished height of your tassel and 3”-4” wide.

Closely wrap threads around the cardboard until you create a bundle with half the desired fullness you like. Push the threads together tightly. Holding the bundle firmly, slide it off the cardboard, wrap a separate piece of thread tightly around the tassel a short distance from the top, and tie off.

Do not trim the ends of the wrapping strand but instead continue wrapping the ends around the tassel top, then tie off again and bury the thread ends into the tassel wrapped portion. Thread another strand through the folded upper loop to use as a hanger or attachment to your project. Cut the lower looped edges and trim as needed, or leave the ends looped.

Fold and go

This method works best for thinner thread tassels. Similar to the wrap-and-go method above, the fold-and-go method uses a piece of cardboard with the center cut out. Wrap thread about the cardboard to the desired fullness (half of the finished look), then use your sewing machine to stitch the center of the strands together using a dense satin stitch. Leave the thread ends long enough to weave back into the wrapped area. Cut the ends of the wrapped tassel strands and fold the tassel in half. Using a wider, dense satin stitch, sew the edges of the wrapped areas together forming a loop at the upper edge. Thread a strand through the top for hanging or attaching to the project.

Easy peasy

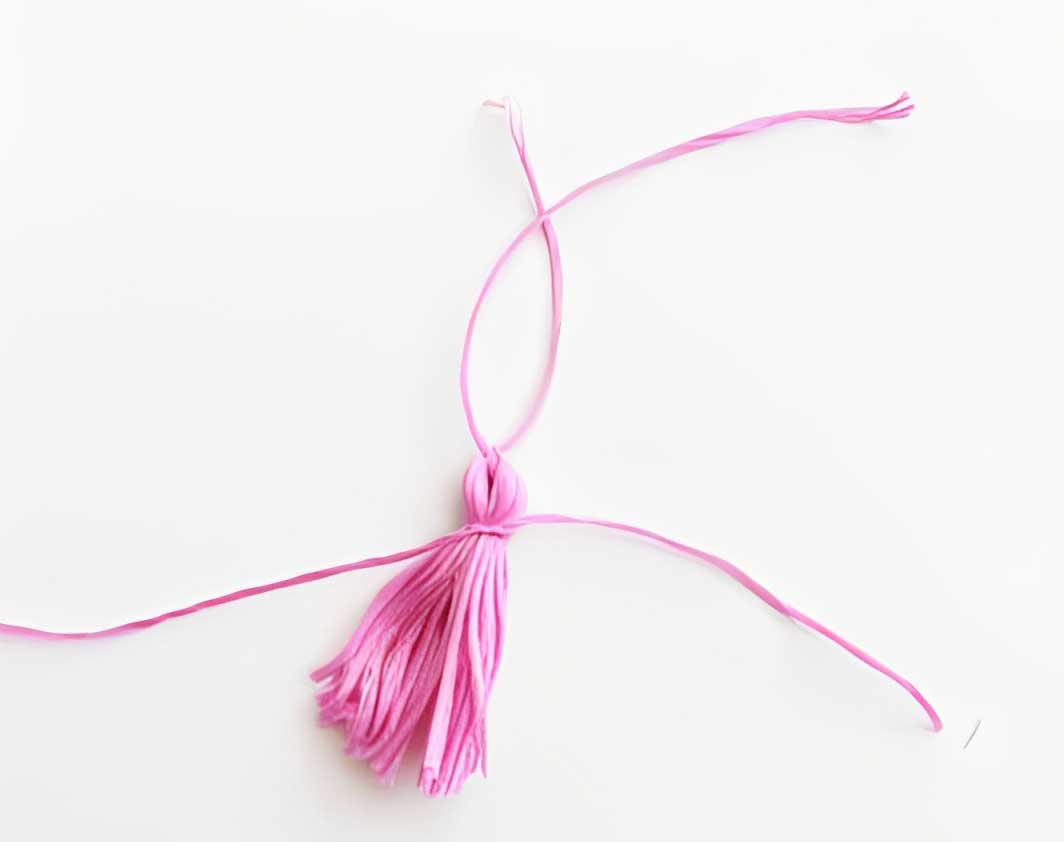
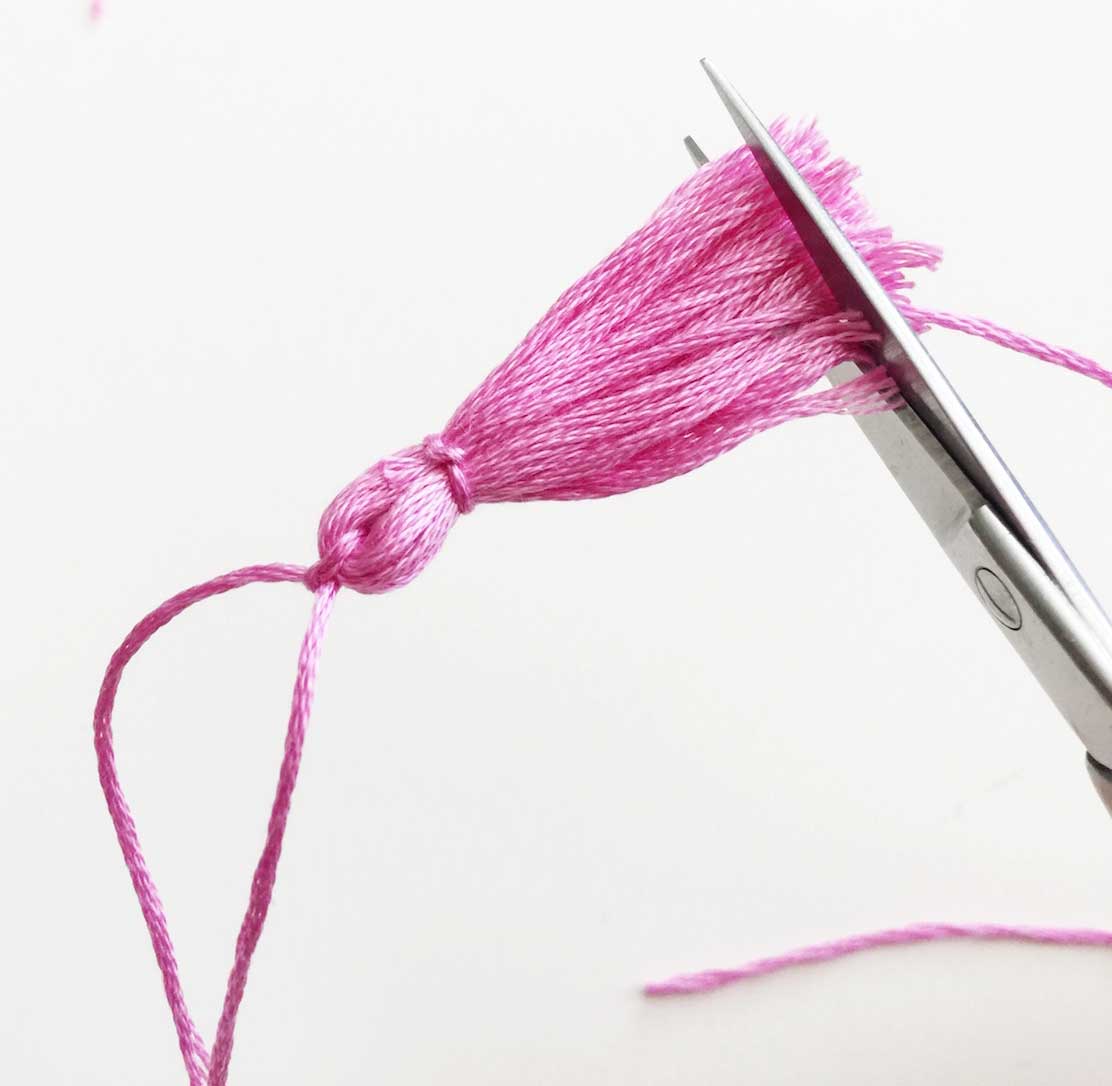
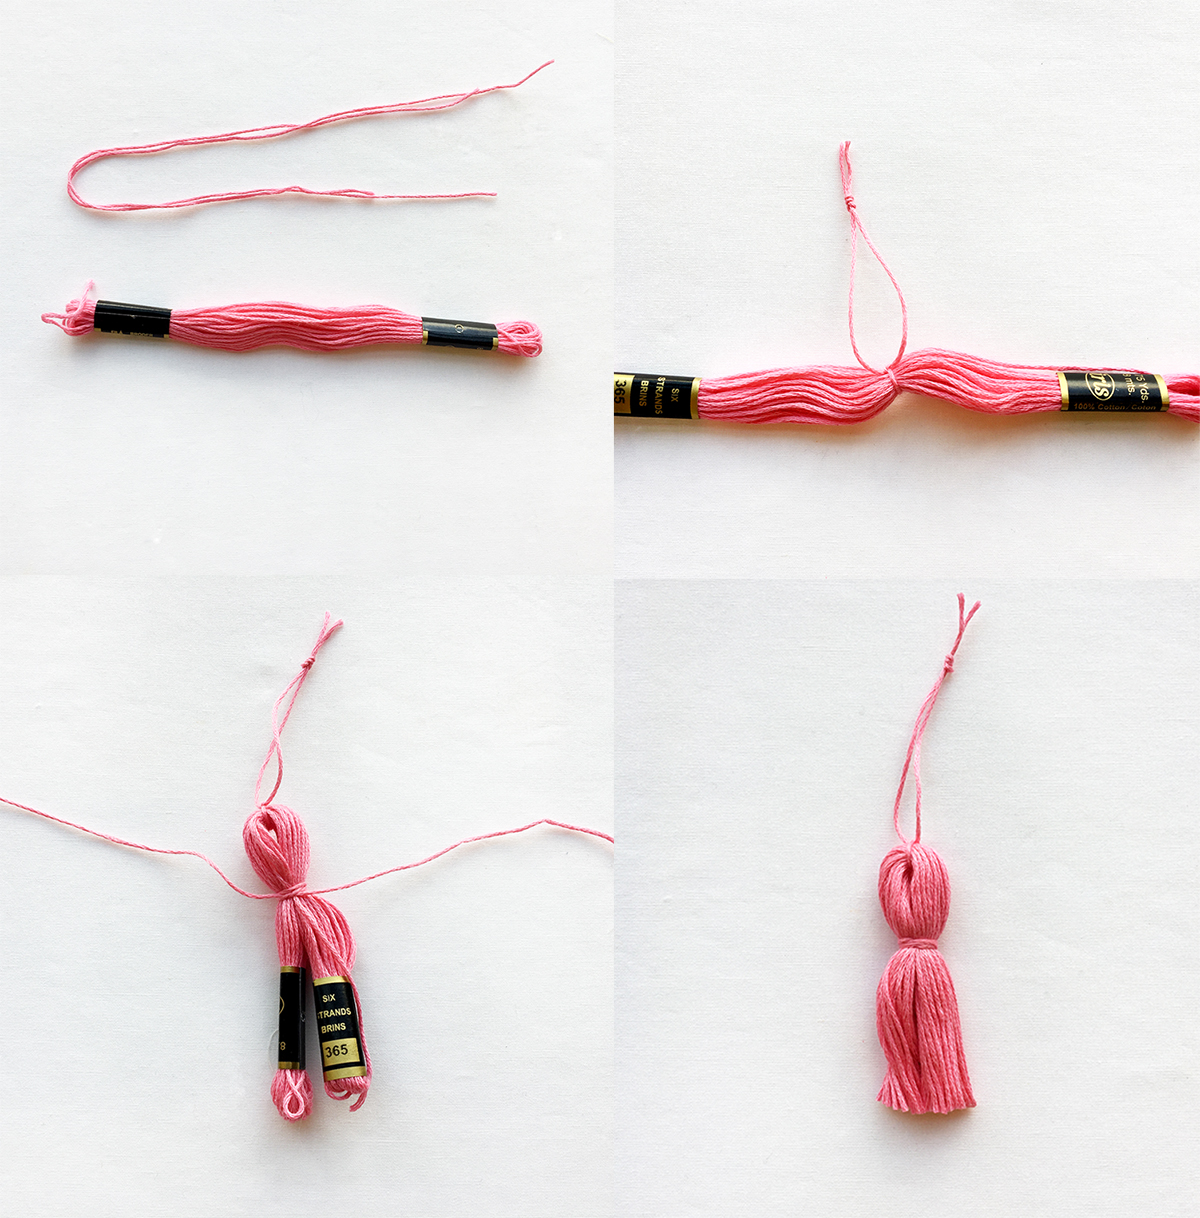
To make tassel making even easier, begin with a skein of embroidery floss, in any color or weight. Cut off a length of the thread, and tightly wrap and tie the center of the skein and tie off to form a hanging loop. Fold the entire skein in half and wrap/tie again a short distance from the top fold. Tuck the loose ends into the wrapped area. Trim the lower looped ends of the tassel strands. Voila…a quick and easy option!

And there’s more…

*Instead of thread or yarn to create your tassels, consider stitching out lengths of serger chain and use that for the strands and wrapping. Any type of thread is fair game, from glitzy metallics to slinky rayon or fuzzy wool strands. After the tassel is done, use a fray stopper or fabric glue on the ends of the strands to keep them from unravelling.

Serger Chain Tassel

Tassel Tips

  • Check out readymade topper caps (available on Amazon. Note we may receive a small commission if you make a purchase). They can be metal, wood or plastic and you simply slip your custom tassel top into the cap and glue it in place. Some caps also come with clips to attach them to your project, or with earring wires for jewelry.
  • Use a large bead for a tassel topper. The hole needs to be large enough for the tassel to be glued firmly into it.
  • Make larger tassels to use for home décor projects, whether you adorn the corners of a pillow or you use a larger tassel for a shade pull. If you use them on pillow corners, stitch the attachment loop into the seam as you join the pillow front and back.

Thank you to Bernina for use of select images.


~Linda Griepentrog is the owner of G Wiz Creative Services and she does writing, editing and designing for companies in the sewing, crafting and quilting industries. In addition, she escorts fabric shopping tours to Hong Kong. She lives at the Oregon Coast with her husband Keith, and three dogs, Yohnuh, Abby, and Lizzie. Contact her at gwizdesigns@aol.com.
 

Tagged With: diy, embellishment, tassels

August 21, 2026

Why Two People Wearing the Same Pattern Get Different Results

Have you ever admired a garment someone made, bought the exact same pattern, and wondered why yours looked completely different? Or perhaps you and a sewing friend made the same pattern in the same size, yet the finished garments hardly looked like they came from the same envelope.

That isn’t necessarily a sign that one person sewed it “better.” A sewing pattern is really only the starting point. Fabric, body shape, fit preferences, construction choices, and even the way a garment is worn all influence the final result. Understanding these variables can help you predict how a pattern will work for you rather than expecting your garment to duplicate the photograph on the pattern cover.

The Body Changes the Garment

Patterns are drafted using a particular set of body measurements and proportions, but few of us match those measurements exactly.

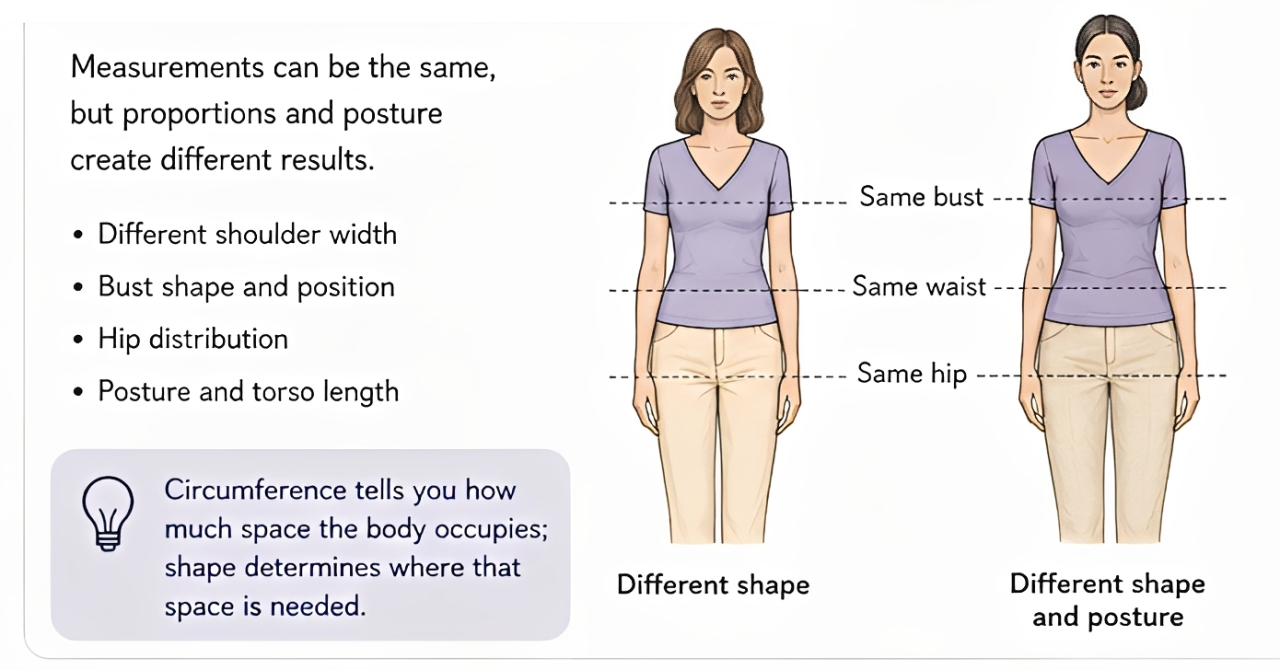
The body changes the garment

Two people may have identical bust, waist, and hip measurements while carrying those measurements very differently. One may have broader shoulders, a fuller bust, and relatively narrow rib cage; another may have a smaller bust but broader back. Hip circumference can be distributed toward the sides, back, or abdomen.

Posture matters, too. Forward shoulders, an erect posture, a rounded upper back, or a tilted pelvis can change how fabric hangs from the body.

That’s why choosing the correct pattern size is only the beginning. Circumference tells you how much space the body occupies; shape determines where that space is needed.

Fabric Can Practically Redesign a Pattern

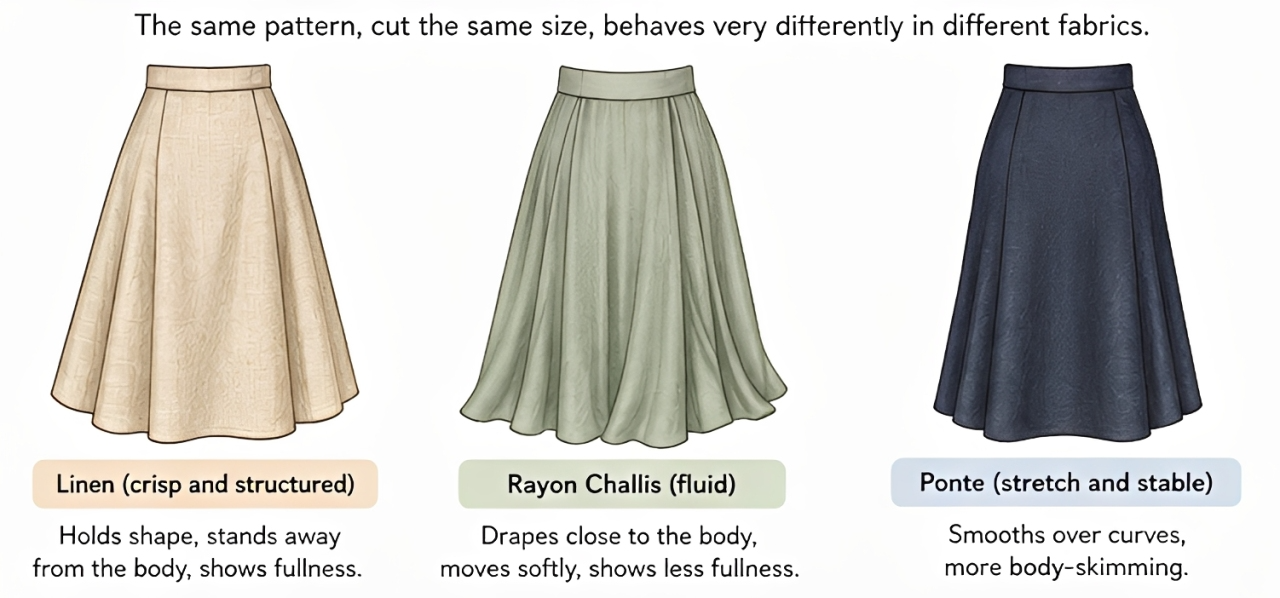
Few things transform a pattern as dramatically as fabric. Imagine making the same wide-leg trouser pattern in crisp linen, fluid rayon challis, and stretch ponte. The pattern pieces haven’t changed, but the resulting garments certainly will.

Fabric can redesign a pattern

In addition, the scale of the print matters. A large print can swallow a small frame, while a tiny print can look busy on a larger frame. The background color of the pattern sets the mood and can make the skin look bright or washed out.

Fabric weight, drape, stretch, recovery, thickness, and surface texture all affect silhouette. A structured fabric may hold a sleeve away from the arm or exaggerate the fullness of a skirt. A fluid fabric may collapse closer to the body and make the same design appear slimmer.

Even fabrics with similar fiber content can behave differently. Two cottons might have completely different weights and drape. This is one reason experienced sewers pay close attention to the fabric recommendations on a pattern. They aren’t simply shopping suggestions—they’re clues to the silhouette the designer intended.

Ease Isn’t Experienced Equally

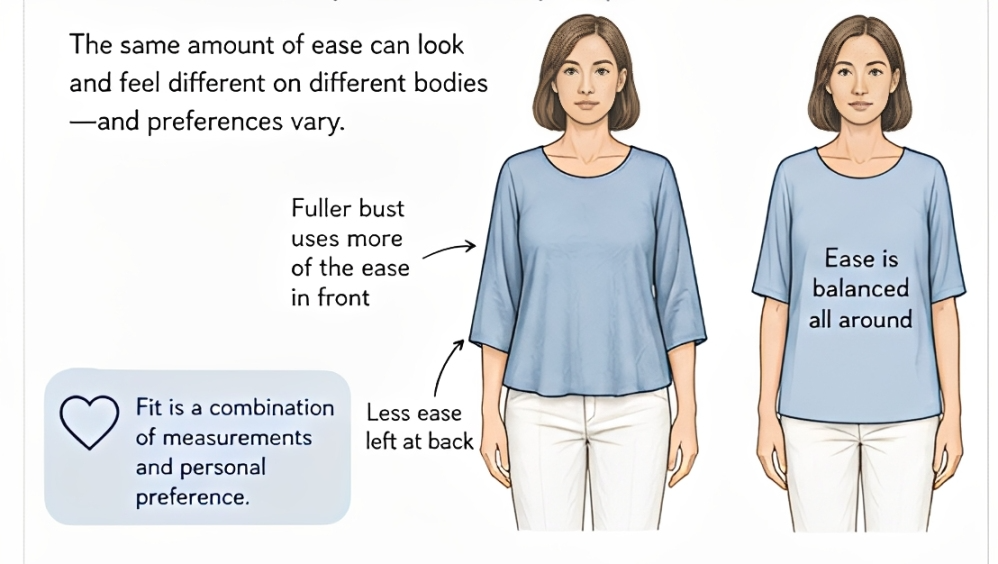
Pattern ease is another reason two garments can look different. Four inches of total positive ease on a bust is a standard baseline in commercial sewing patterns and slopers for a classic, comfortable fit in woven garments with sleeves. This provides about 2 inches of functional breathing/movement room, plus 2 inches of relaxed style ease. However, on one body, that ease may appear relaxed and balanced. On another, the fabric may be pulled forward by a fuller bust, leaving less apparent ease across the front and more fabric pooling at the back.

Ease can look and feel different on different bodies

Personal preference also matters. One sewist may happily wear a jacket with several inches of ease, while another prefers a closer silhouette and automatically takes in the side seams. Neither is wrong. Fit isn’t simply a measurement; it’s also a preference.

Small Adjustments Have Big Consequences

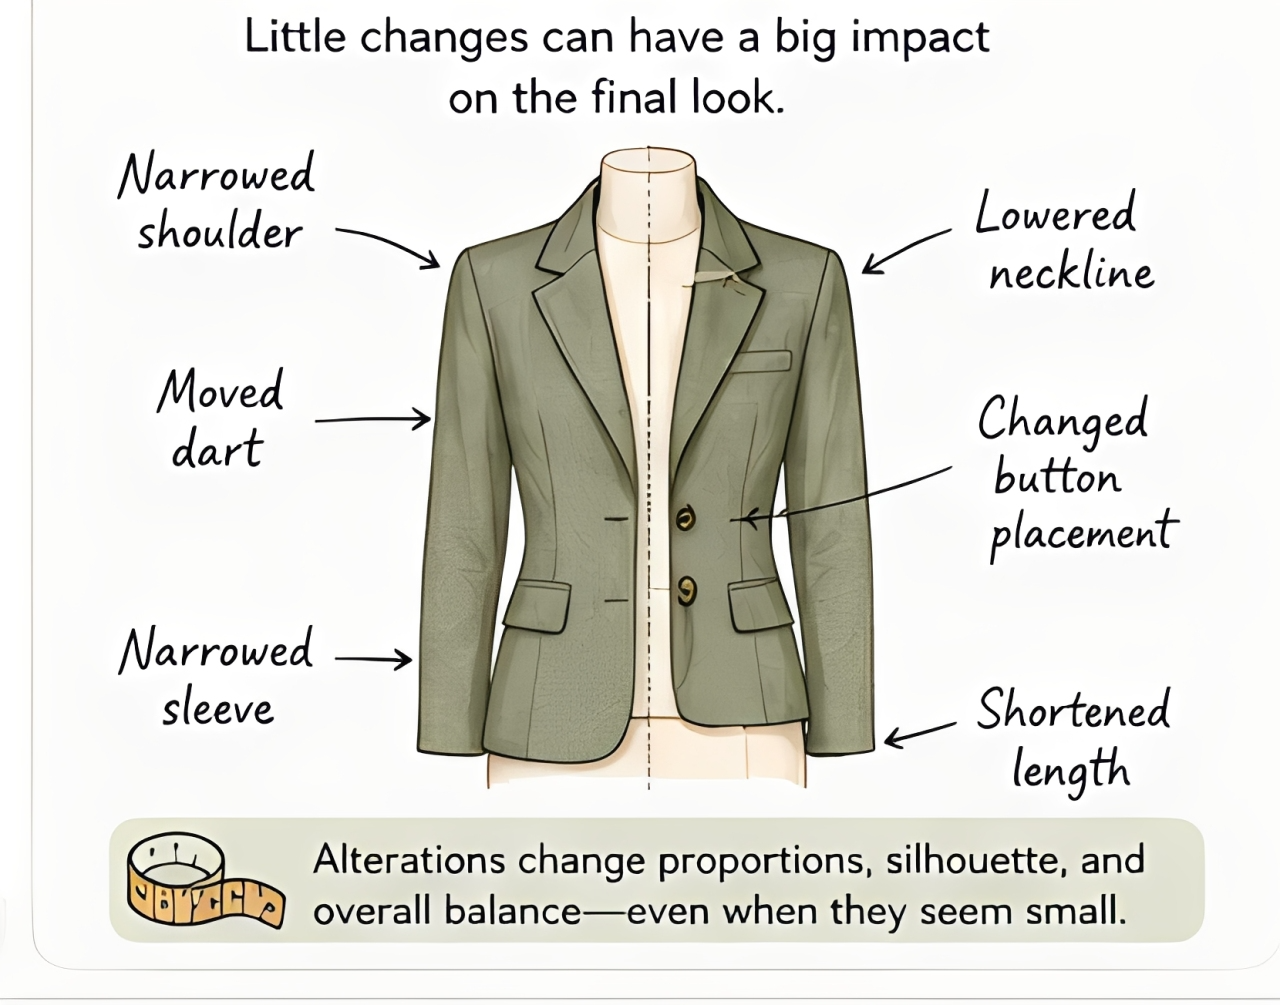
Experienced garment creators rarely make every pattern straight from the envelope. One person may shorten the bodice, lower a dart, narrow the shoulders, or perform a full-bust adjustment. Another might lengthen the torso and raise the waistline. Individually, these alterations can seem minor, but together they change the garment’s proportions.

Even adjustments that aren’t technically “fit alterations” matter. Shortening a skirt three inches changes its visual relationship to the body. Narrowing a sleeve can make an entire jacket look sleeker. Changing button placement can alter where the eye travels.

Pattern changes can have a big impact on the final look

The more you sew, the more a commercial pattern becomes a framework rather than a set of unquestionable instructions.

Construction and Pressing Leave Their Fingerprints

Two sewists can cut identical pieces from identical fabric and still produce noticeably different garments.

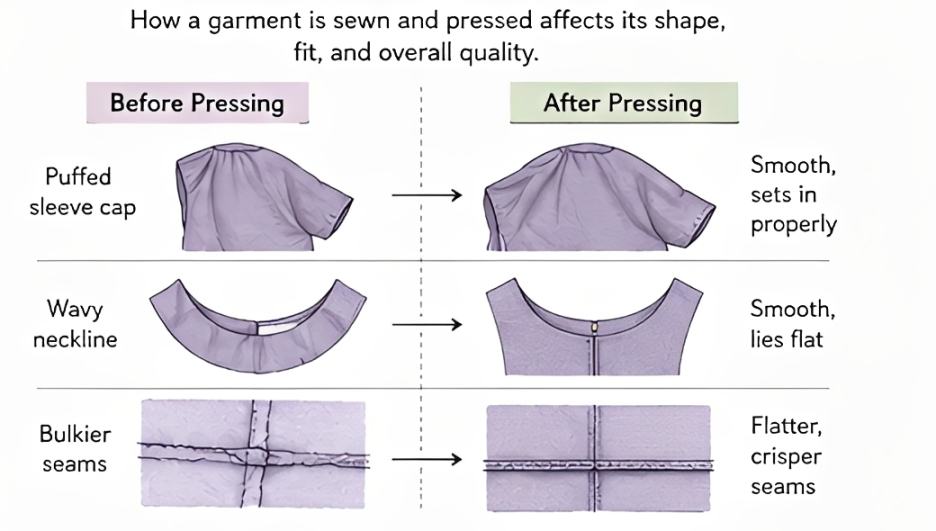
Construction and pressing affect the final product

Seam accuracy matters. A seemingly insignificant 1/8-inch difference repeated across several seams can change finished circumference. Stretching a neckline during construction can alter how it sits. Slightly easing one sleeve differently from another affects its shape.

Then there’s pressing—one of garment sewing’s quiet superpowers. Proper pressing shapes darts, sets seams, molds collars, flattens hems, and gives a garment definition. The difference between “homemade” and beautifully handmade often has less to do with an expensive sewing machine than with what happened at the ironing board.

Styling Changes What We See

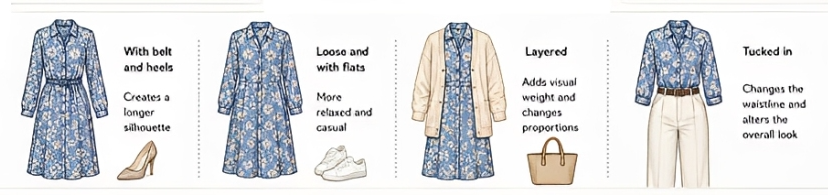
Finally, remember that you’re rarely comparing garments in isolation. A blouse tucked into high-waisted trousers looks different from the same blouse worn loose over jeans. A dress photographed with heels creates different proportions than one worn with flats. Undergarments can change bust position and garment fit. Even sleeve position, posture, and accessories affect our perception.

Styling changes the outfit

So the next time another sewist’s version of a pattern looks different from yours, don’t immediately reach for the seam ripper. Instead, study the differences. Look at body proportions, fabric behavior, ease, alterations, construction, and styling. Ask why the garments look different. That’s where some of the most useful sewing lessons are hiding.

Because ultimately, the goal isn’t to make your garment look exactly like someone else’s. It’s to understand the pattern well enough to make it look as though it was always intended for you. Your garment should be a reflection of you and your personal style.


~The ASG Sewing Room

August 14, 2026

Sleeve Setting

Whether you’re a beginner or an experienced sewer, sleeves can be a little intimidating—whose idea was it to try and fit a rounded curve into an armhole anyway?

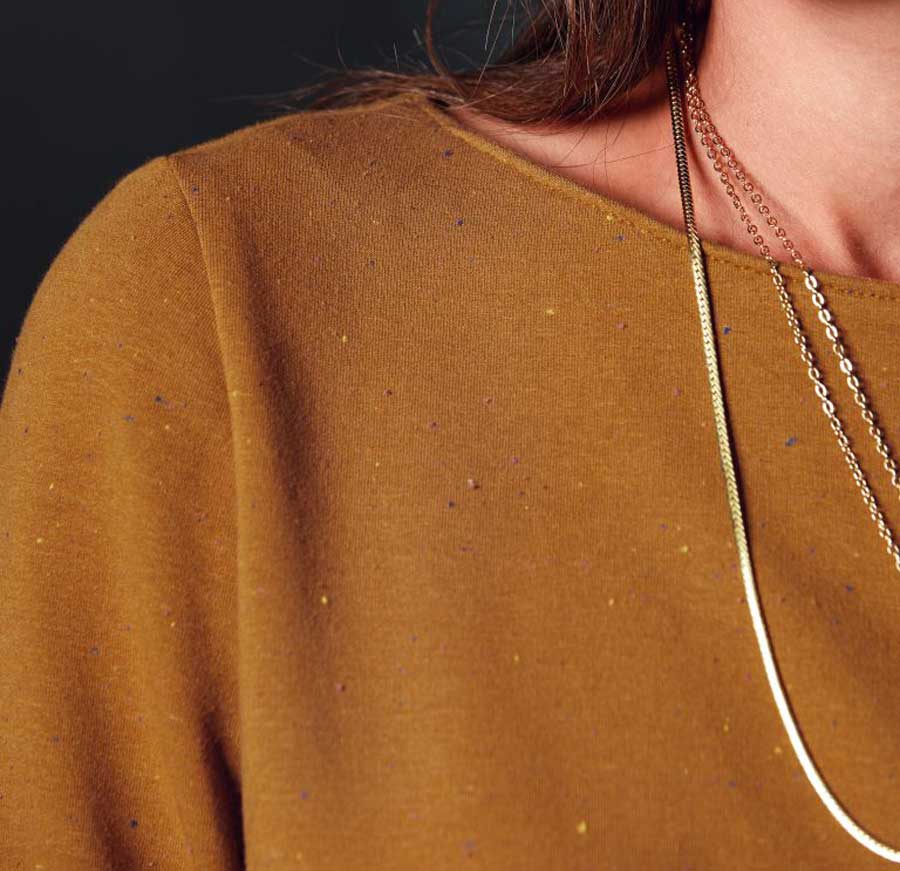
Sleeve image

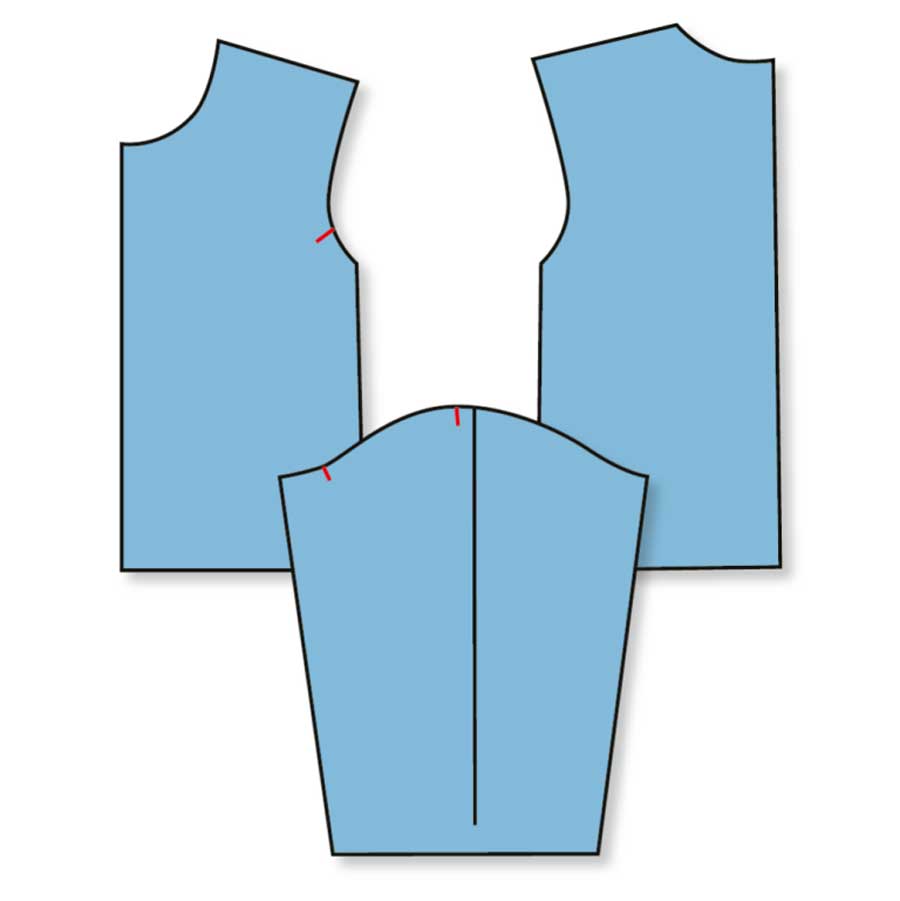
No matter what type of garment you’re creating—from coat to T-shirt—you’ll likely be facing one of two types of sleeves: either one with a rounded cap or one with a flat cap. (Raglan is another type of sleeve, but requires a different insertion method.)

Rounded caps are found in more tailored and fitted garments and are commonly called set-in sleeves, while flat caps (aka shirt sleeves) are found in more sporty garments, menswear and kids’ clothes, and getting them into your garment requires different strategies.

Flat cap sleeve

Set-in Sleeves

The shape of a rounded sleeve cap allows for ease to fit over the shoulder curve and upper arm area. If you measure the seamline of the garment and you measure the seamline of the upper sleeve, you’ll find that the sleeve is longer. That means you’ll need to ease the fullness into the smaller garment opening.

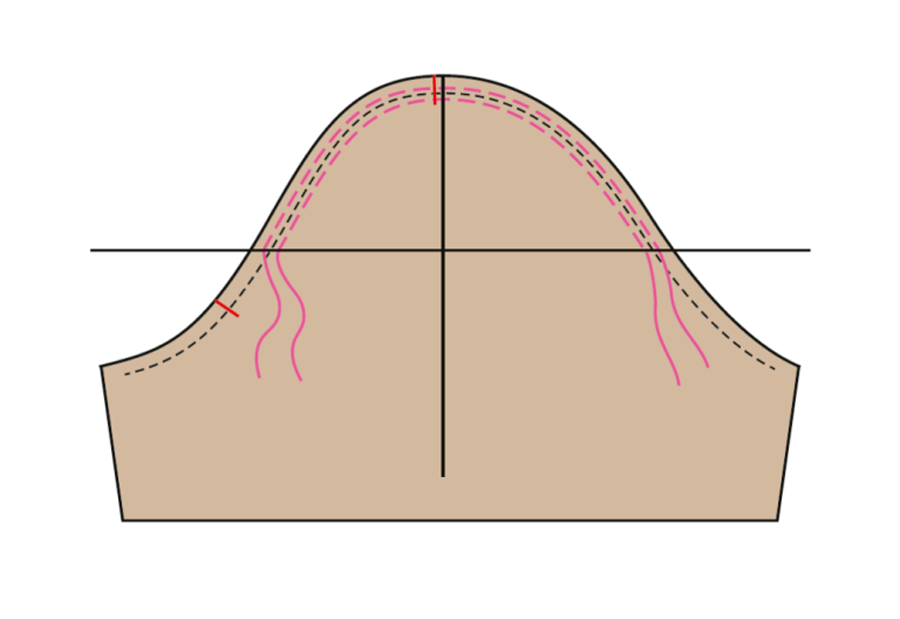
A rounded sleeve cap has important pattern markings—at the shoulder and part way along the sleeve cap both front and back, including placement notches. These are key for distributing the ease.

Rounded cap sleeve with markings

The area below the armhole notches on the sleeve should fit the armhole itself with no ease, as the ease area is concentrated at the top portion of the sleeve, above the notches.

To evenly distribute the sleeve cap ease, stitch a line of basting length stitches 1/8” inside and outside the seamline from notch to notch—do not backstitch, but instead leave the thread tails long enough to pull.

Ease lines

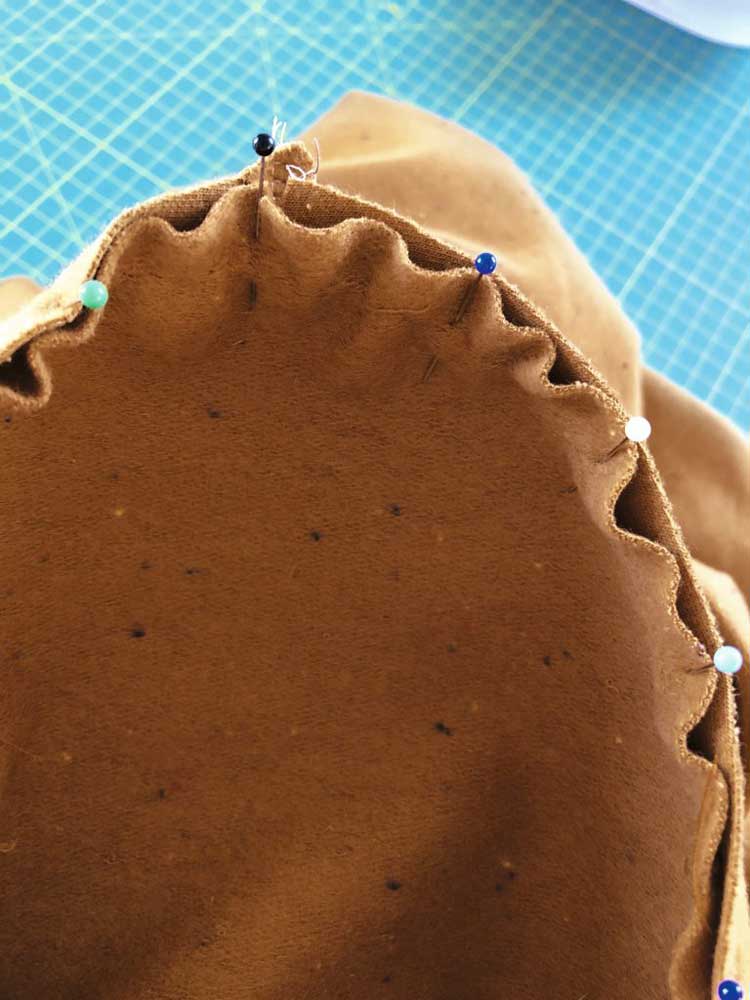
The first step in insertion is to sew the underarm sleeve seam and the corresponding garment shoulder and underarm seam, and press both open. With right sides together, place the sleeve inside the armhole opening and pin at the notches, seamline, shoulder point and corresponding markings on the cap. Gently pull on the bobbin threads of the ease line to fit the sleeve to the armhole size, working from the notch area to the shoulder.

If your machine has a free-arm, this is the place to use it, as the sleeve opening can fit over it for easier access.

Beginning at the underarm seam, stitch the sleeve in place adjusting the ease as needed to fit and being careful to avoid any puckers. Sew with the sleeve side up to control the ease.

Reinforce the lower armhole with a second line of stitching ¼” inside the seamline. Trim the seam allowances below the notches, but leave the seam allowances intact in the cap area to fill out the sleeve head. Push the upper sleeve seam allowances toward the sleeve, but don’t press this area as it will flatten, eliminating the ease you just carefully created. Remove any visible basting.

If you’re working on a tailored garment with a two-piece sleeve, follow the pattern guidesheet to sew the undersleeve to the top sleeve before inserting it into the garment.

Flat Sleeve Insertion

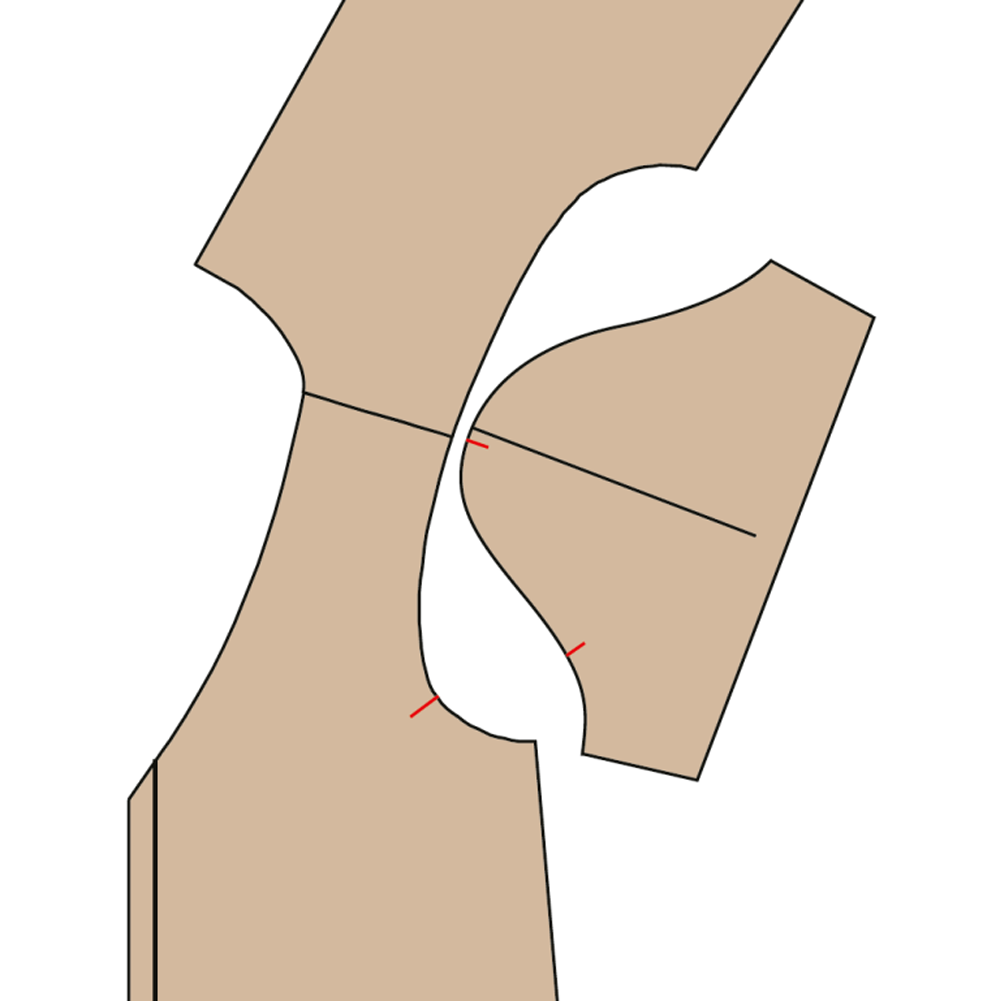
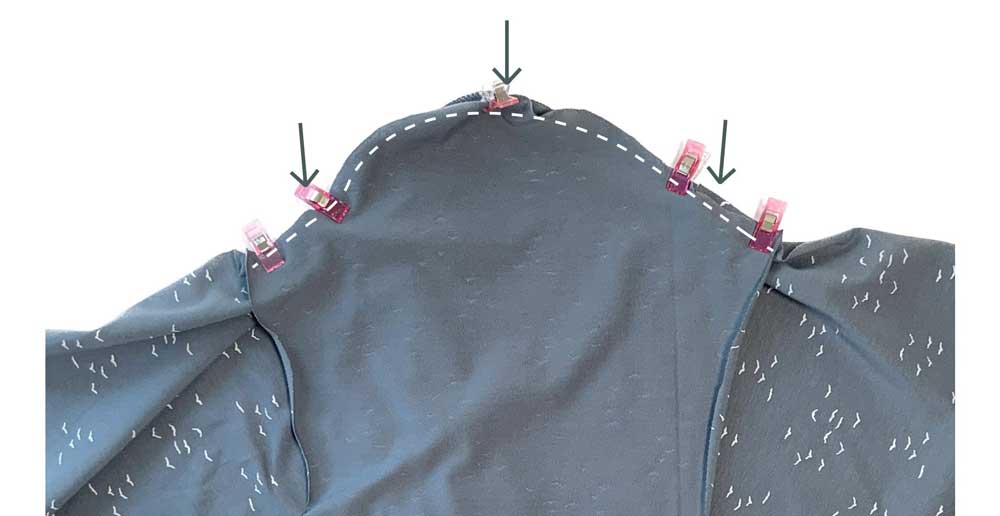
Shirt sleeves have the same markings as their set-in cousins—notches front and back, a shoulder marking and often some intermediate marks as well. This type of sleeve is put in prior to sewing the garment side seams and sleeve underarm seam. No ease line is necessary for this type of sleeve—simply match the notches and other marks, right sides together, and stitch with the sleeve side up.

Flat cap sleeve, ready to sew

Shirt sleeves can easily be inserted with a serger or conventional machine. If you choose the latter, sew a second line of stitching, either zigzag or straight just inside the seamline and trim off the extra seam allowance.

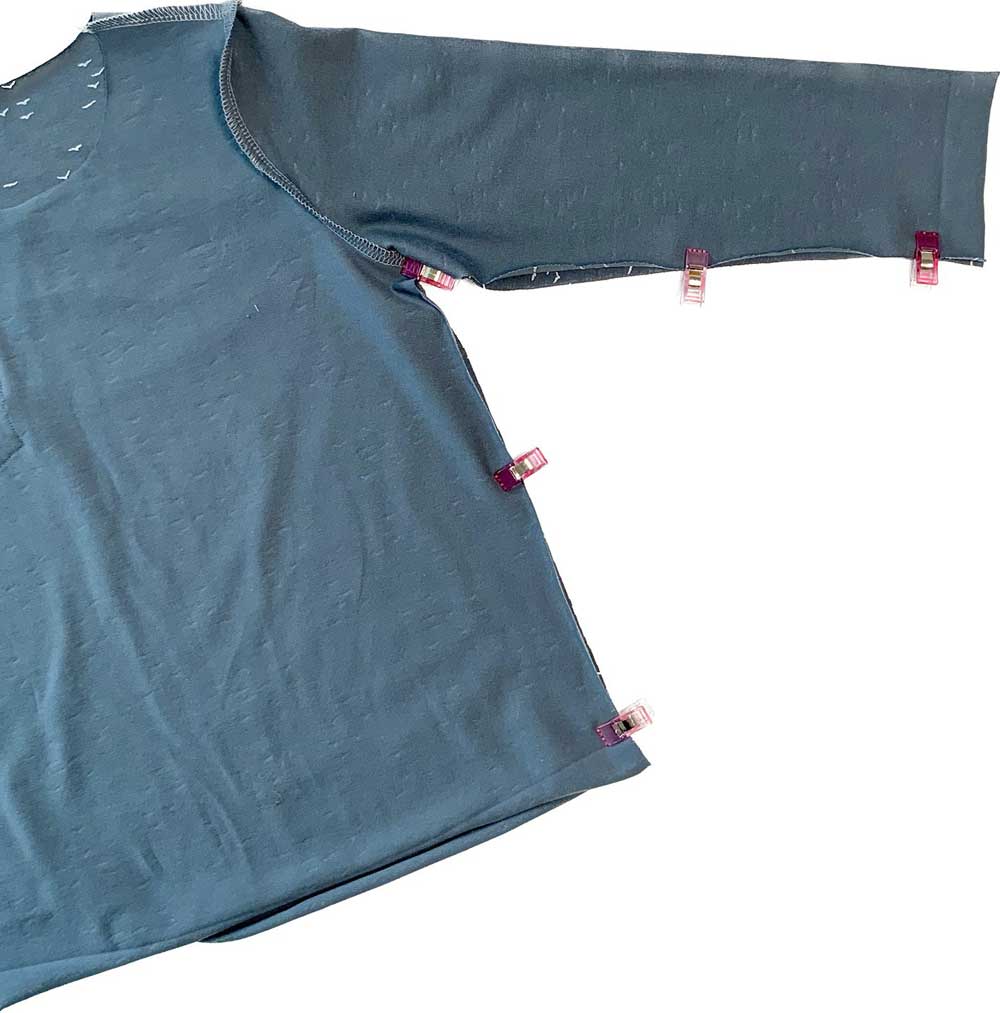
With right sides together, match the garment underarm seams, hemline and sleeve hem, then sew the seam continuously. Finish and trim as for the sleeve cap area.

Flat cap sleeve side seam

All images provided courtesy of Bernina


~Linda Griepentrog is the owner of G Wiz Creative Services and she does writing, editing and designing for companies in the sewing, crafting and quilting industries. In addition, she escorts fabric shopping tours to Hong Kong. She lives at the Oregon Coast with her husband Keith, and three dogs, Yohnuh, Abby, and Lizzie. Contact her at gwizdesigns@aol.com.
Tagged With: garment sewing, sewing tips, sleeves

  • 1
  • 2
  • 3
  • …
  • 74
  • Next Page »

Become a Member

Join the only national organization dedicated to Advancing Sewing as an Art and Life Skill.

Join Now button

Blog Article Categories

  • ASG Conference
  • Chapter Stories
  • Embroidery
  • Fitting
  • Learn to Sew
  • National Sewing Month
  • Products, Books, & Patterns
  • Projects
  • Quilting
  • Sewing
  • Sewing Techniques
  • Sewing Tips
  • Sewing Tours
  • Videos
  • Disclaimer
  • Privacy Policy

American Sewing Guild
National Headquarters
9660 Hillcroft, Suite 230
Houston TX 77096
713-729-3000 | 713-721-9230 Fax
www.ASG.org

ASG wordcloud - education, conference, discounts, videos, special offers, tours and more

Copyright © 1998–2026 · American Sewing Guild · All Rights Reserved