American Sewing Guild (ASG)

Visit our blog Visit the ASG Facebook page Visit ASG on Pinterest Visit ASG's YouTube channel Visit ASG on Instagram
  • Home
  • Join ASG
    • Join Online
    • Chapter Locations
    • Member Benefits
    • Member Brochure
    • Join by Mail
  • Conference & Education
  • Resources
    • Contests & Awards
    • Giving Back
    • Hall of Fame
    • Links
    • Travel and Tours
    • Measurement Chart
  • Shop
    • ASG Store
    • Chapter Products
    • Video Resources
  • Blog
  • About
    • About Us
    • Donate to ASG
    • ASG Sensitivity Statement
    • FAQ’s
    • Start a Chapter
  • Contact
  • Member Login
    • Login First!
    • Members Only
    • Leadership Only
    • Website FAQ’s
    • Logout
  •  

July 7, 2023

Sewing Q&A: Cutting Mats, Chain Sewing, & Elastic Thread

Rotary Cutting Mat

Q: What’s the easiest way to clean my rotary cutting mat?

A: Cutting mats harbor lint as you cut various fabrics and some fabrics are worse than others for their shedding capabilities. If you’re cutting something linty, like fleece or fur, be sure to use a soft brush and clean the mat immediately after use. An art eraser, soft dish scrubber or an adhesive lint remover can also be used to get fibers out of the cutting line grooves. But don’t stop there…

Cleaning a cutting mat

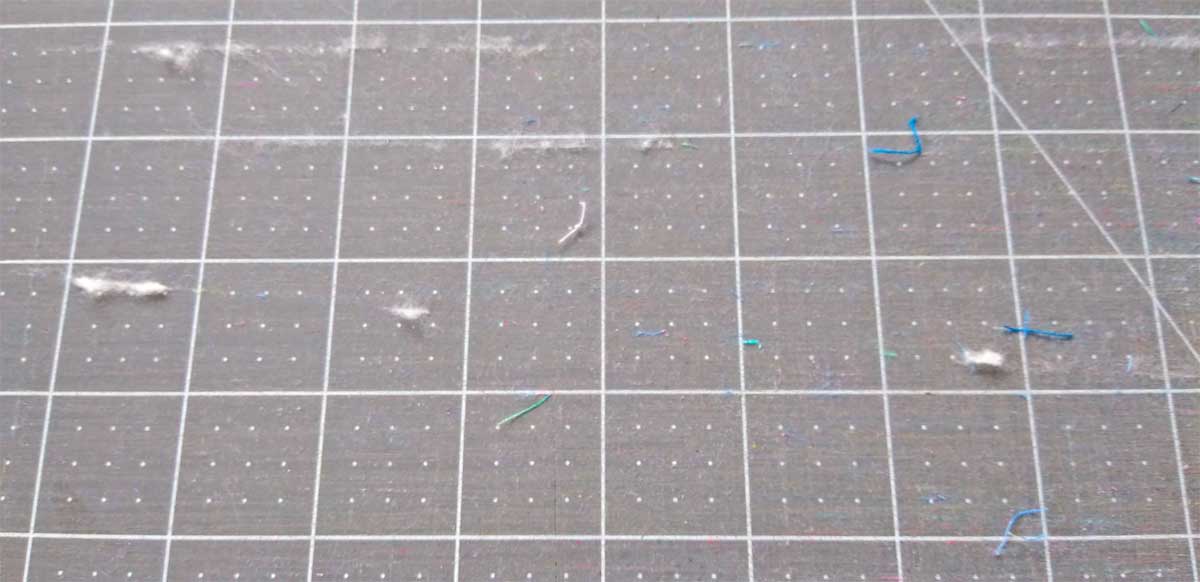
To give your mat a thorough “spa” cleaning, fill your bathtub with enough room temperature water to cover the bottom of the tub, and add ¼ cup of white vinegar. Let the mat soak for 15-20 minutes, then add a bit of dish soap to the mix. Use a small, soft brush to scrub the mat and lather it up. Rinse the mat in cool water and dry with a towel or lay it flat to air dry.

Tempting as it might be, don’t use hot water for this cleanse, and don’t let your mat dry in direct sun, as both will cause the mat to warp. Once a cutting mat is warped, it cannot be made flat again.

Taking good care of your cutting mat will prolong its life and that of your rotary cutter blade as well.

Chain Sewing

Q: I’ve heard the term chain sewing a lot from my quilting friends—what does it mean and can I do it with garment sewing too?

A: Chain sewing means that once you’ve sewn a seam, you simply feed in the next thing to be sewn, without clipping the threads between pieces. For example, if you’re sewing together multiple quilt blocks, sew all the like pieces together continuously. Chain stitching is a real timesaver, and it also saves thread, as you’re not stopping after each piece to clip threads and pulling out new thread ends before you start the next piece.

When you’re done sewing together a quantity of pieces, clip them apart.

Chainstitch examples

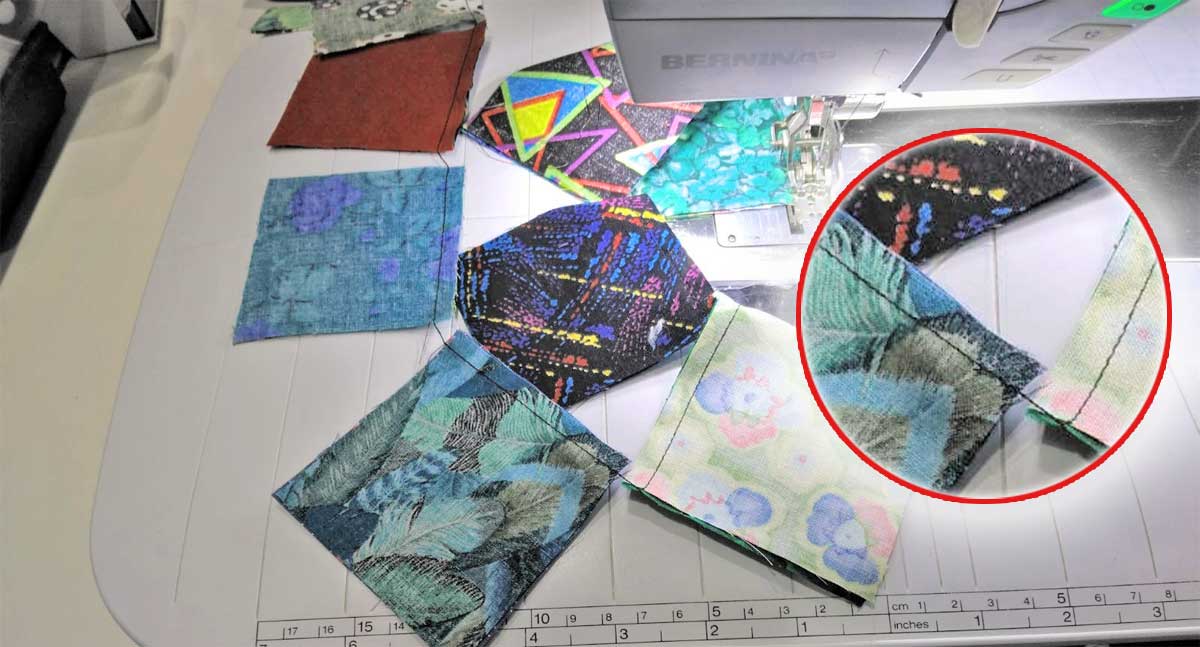
Chain stitching can absolutely be done with garment sewing or other projects as well. In fact, it’s kind of a game to see how far you can go without stopping to clip threads. When sewing a garment, fuse any interfacings to all pieces prior to sewing, then, depending on the style, you may be able to continuously sew the armhole facing shoulder and/or underarm seams, followed by the garment shoulder seams and side and/or center seams, neckline facing seams and skirt side seams, all before stopping. If your garment has sleeves, feed in the underarm seams as well.

Rule of thumb for chain sewing is never cross another seam without pressing it first.

Chain sewing is really quite satisfying to see a mound of pieces quickly piling up behind your presser foot. If you’re making multiples of the same item (cheerleader outfits, band uniforms, etc.), factory style chain sewing is much quicker than sewing each project from start to finish before starting the next.

Elastic Thread

Q: I used elastic thread in my bobbin to shirr a top, but it didn’t pull up as much as I thought it would and my top is too big. Did I do something wrong, and is there any way to fix it?

Smocked top using eleastic thread
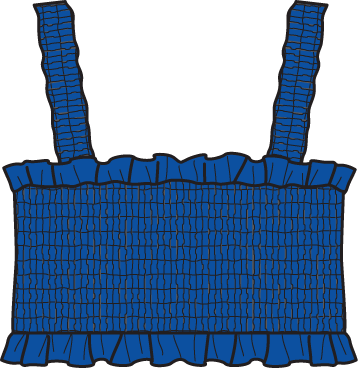
A: Elastic thread differs from brand to brand with its elasticity and recovery, so it’s really important to do test stitching on the actual project fabric before beginning your garment. Top tension may need to be adjusted, and/or the stitch length to get the shirring effect you want.

Since your stitching is already done, there are a couple of possible solutions: First, steam the shirred area from the wrong and/or right side. Most elastic threads will shrink a goodly amount from the steam. Don’t actually press on the elastic or the fabric, just hover the iron and steam. If that doesn’t draw it up sufficiently, find the end of each stitching line and pull up the elastic. When it’s the right size, knot the thread end or stitch over it several times within the seamline. Repeat for each row separately. If you didn’t stop stitching at the end of the rows, but instead turned to stitch the next row, use a large pin to pull up the elastic thread as if it were separate rows for the same effect.


~Linda Griepentrog is the owner of G Wiz Creative Services and she does writing, editing and designing for companies in the sewing, crafting and quilting industries. In addition, she escorts fabric shopping tours to Hong Kong. She lives at the Oregon Coast with her husband Keith, and three dogs, Yohnuh, Abby, and Lizzie. Contact her at .

Did you enjoy this article?
Are you an ASG member?
This field is for validation purposes and should be left unchanged.

Tagged With: sewing tips

June 30, 2023

Custom Decorative Pillows (preview)

When it comes to pillows, if you follow the “rules,” bed pillow sizes are as follows:

  • Standard bed pillow: 20″ x 26″
  • Queen bed pillow: 20″ x 30″
  • King bed pillow: 20″ x 36″
  • Euro square: 26″ x 26″

However, rules are made to be broken!

Bed with decorative pillows

Custom Size Pillows

It can sometimes be a challenge when you need to fill the headboard of a king — or even queen — size bed.

    • One solution is to create a “custom king” measuring 26″ high x 36″ wide
    • You can also expand the concept to include “custom queen” that are 26″ high x 30″ wide


The full article is in the Members area of the website. CLICK HERE to read the full article. Not a member? Join online!


June 23, 2023

Sew Unusual: Make Your Own Shoes or DIY an Umbrella

Chances are good that if you’ve sewn for years, there have been a few unconventional projects emerge from your sewing room—things that onlookers (and even fellow sewers) are amazed that you tackled. Maybe it was a behemoth sized project like a tent or sail, or perhaps an uncommon material for the sewing world like metal or plastic. But, as sewing enthusiasts, we always seem up for a challenge and there’s almost nothing we won’t try.

Sole Mates

A Happy Stitch Espadrille Kits

Making your own shoes may seem a bit farfetched, but hey, why not? Perhaps you’d like to make some custom quilted sneakers, leather high-tops, summery espadrilles or sandals. There are kits and components available for all of those. It takes some ingenuity and hand sewing, but you’ve got a one-of-a-kind pair sure to be admired by all your sewing friends. Soles, both rope for espadrilles, and rubberized for sneakers, are available separately, or they can be a kit component depending on how you want to purchase them.

By Fiona Johnstone, Instagram

Perhaps you can try out some new sewing skills that you don’t use regularly, especially on the sneakers. You’ll get to put in metal eyelets using a punch and/or a stiletto, sew with a curved needle, or create shoelace openings with the eyelet function on your sewing machine. You can even make your own shoelaces, complete with readymade aglets for stylin’.

Espadrilles (left) by Duana Chandler @duanastudio, using a pattern from @sewcreatebyjaime Fabriculous (right) quilted sneakers: Fabriculous Quilted Sneaker kit

DIY Shoemaking Resources

  • A Happy Stitch, espadrille kits
  • Chicago School of Shoemaking & Leather Arts, shoemaking kits and classes
  • Fabriculous, sneaker kits
  • Sneaker Kit, leather sneaker kits, soles
  • Tandy Leather, leather sneaker kits

 Under Cover

Making your own umbrella requires some serious dedication, but it’s easier than you might think. First, you need a frame. Then you need fabric. You can use laminated cotton fabrics for an all-in-one shine, a rain repellent outdoor fabric, or even a quilting cotton adding a second step for waterproofing, if needed. Keep in mind that not all brellies are used for rain protection—some are designed to keep you out of the sun, and they’re also a perfect accent to a summer wedding with parasols coordinating with bridesmaid dresses.

Images courtesy of Nancy Zieman Productions

Precision sewing and cutting is a requisite so the sections fit exactly over the umbrella ribs, otherwise things don’t work well for opening and closing. But the real fun may come as you create a cutting strategy—depending on the fabric print, you can create a literal kaleidoscope of color on the top of the parasol.

DIY Umbrella Resources

  • Nancy Zieman Productions, umbrella frames and Judy Gauthier’s book, “Umbrella”.
  • Sailrite, video tutorial for making a patio umbrella.

Specialty Notes

Whether you’re sewing shoes, an umbrella or anything unconventional, there are some basics to consider:

  • Choose a needle and thread compatible with the fabric. There’s nothing like an oversized needle hole in an umbrella seam allowing water to drip onto you to remind you of this premise.
  • Always test-sew on the fabric you’re using before starting the project. This will allow you to adjust tensions, stitch lengths and stitch choices so they all work together on what might be an unusual fabric. Sew seams and some topstitching, as the number of layers you’re sewing through can be different.
  • Test-press the fabric before you begin sewing. Some fabrics simply cannot be pressed with an iron and require finger-pressing instead so they don’t melt or mar. A flat wooden pressing stick is helpful for flattening bulky seams on non-pressable fabrics.

~Linda Griepentrog is the owner of G Wiz Creative Services and she does writing, editing and designing for companies in the sewing, crafting and quilting industries. In addition, she escorts fabric shopping tours to Hong Kong. She lives at the Oregon Coast with her husband Keith, and three dogs, Yohnuh, Abby, and Lizzie. Contact her at .

Did you enjoy this article?
Are you an ASG member?
This field is for validation purposes and should be left unchanged.

Tagged With: sewing, shoes, umbrella

June 16, 2023

Embroidery on Specialty Fabrics (Preview)

One of the most common questions that comes up in the embroidery process, next to which stabilizer to use, is how to embroider specialty fabrics. While most embroidery designs will sew out easily on a smooth fabric, if you’re sewing on a fabric that has a little texture or special features, there are several things you need to take into consideration. One concern is the texture of the fabric — for slightly textured fabrics such as a pique knit, you may only need to use a topping. But for others, you may need to adjust the design.

Embroidery on Knits

Embroidery on knits


The full article is in the Members area of the website. CLICK HERE to read the full article. Not a member? Join online!


June 9, 2023

Denim Refresh

Denim is quite possibly the most loved fabric, not only in America, but around the world. Its soft blue, flexible nature is a comfort to daily routines for many…think of your beloved jeans, or that just-warm-enough, wear-everywhere jeans jacket.

Denim jacket
Photo courtesy of Treasured Threadz™, amybarickman.com

But there comes a time when that beloved denim shows signs of wear and tear. It can be a sad day, or it can be a day of new opportunities. For creative sewers, it’s mostly the latter.

Most parts of denim garments can be salvaged and repurposed. Whether you use those expertly topstitched fly closures for bags, those embroidered or bejeweled pockets for something new, or small parts like labels and belt loops for new embellishments, worn denim can have a new and longer life.

Repurposed jeans made into bags


Pocket Picks

If you want to keep the bold stitching that attaches the pocket to the jeans, use your sharp scissors and carefully cut the chosen back pocket from the jeans just barely outside the perimeter stitching, cutting as close as possible to the stitching without damaging it or the pocket’s folded edges. From the wrong side, trim the backing fabric behind the pocket, also close to the perimeter stitching so that it’s not part of your new use. Voila—a new pocket for your new project!

An easy way to utilize the trimmed pocket is to put narrow strips of fusible web behind the sides and bottom edges, then fuse in place on the new project. Use matching thread and stitch as close to the pocket’s folded edges as possible, backstitching at the top edges for added security.

For an almost invisible stitching, look for denim thread, a twisted combination of two navy blue colored strands that matches the denim coloration. Or for feature stitching, choose a bold gold jeans or topstitching weight thread and elongate the stitch length to match the original jeans stitches.

Opening Up

One of the easiest ways to disassemble a pair of jeans is to open the inseam, assuming it’s not a flat-felled seam. Opening up this seam will allow for the most usable fabric without piecing as the legs can then open flat. If you open carefully, the original hem can stay in place, perhaps making it usable for your new item.

If you’re making a pieced project, the flat fabric makes it easy to cut your new piecing sizes, and you can incorporate the center flat-felled seam in the new plan since it’s already stitched.

Photo courtesy of Bernina

Depending on the size of the jeans you’re working with, the fly-front zipper may become an integral part of another project, so don’t disassemble it unless you want to repurpose the zipper on its own.

Vintage Vibes

Photo courtesy of Bernina

Perhaps the worn or stained spots in your favorite denim garb aren’t to your liking. That’s easy to fix—just cover them up with other fabric or embellishments. If you’ve got an embroidery machine, stitch up some patches to camouflage the holes. Use scraps to make some fun shapes and hand- or machine stitch them over the affected spots.


Or, follow the lead of designer Amy Barickman and make your own patches from pre-printed fabric designed with a vintage look. Her Treasured Threadz™ line offers two different print collections—one in soft denim blue quilt blocks and one in brighter color postage-stamp groupings. Each of the 14” x 44” panels have several shapes with room between for seam allowances, perfect to dress up multiple garments. In addition, there’s a video tutorial on ways to use these clever pre-prints.

Whether you’re making your own fabric patches, or using the ready-made print shapes, it’s a good idea to add a backing to the fabric for stability. Fusible fleece, lightweight batting, or a firm interfacing all work well. Then you can go to town with hand stitching, machine stitching, quilting, beading, etc. to embellish the additions.

Denim patches

Depending on the garment location you’re highlighting, you may need to hand-stitch the embellished pieces in place—especially on narrow jean legs or wrist areas. If you have access, like on a jacket back, front placket or collar, machine stitching works fine as well.

Photos courtesy of Treasured Threadz™, amybarickman.com

So, don’t give up on those worn denims—embrace the creative opportunity to give them new life!


~Linda Griepentrog is the owner of G Wiz Creative Services and she does writing, editing and designing for companies in the sewing, crafting and quilting industries. In addition, she escorts fabric shopping tours to Hong Kong. She lives at the Oregon Coast with her husband Keith, and three dogs, Yohnuh, Abby, and Lizzie. Contact her at .

Did you enjoy this article?
Are you an ASG member?
This field is for validation purposes and should be left unchanged.

~Linda Griepentrog Linda is the owner of G Wiz Creative Services and she does writing, editing and designing for companies in the sewing, crafting and quilting industries. In addition, she escorts fabric shopping tours to Hong Kong. She lives at the Oregon Coast with her husband Keith, and two dogs, Yohnuh and Abby. Contact her at .

Did you enjoy this article?
Are you an ASG member?
This field is for validation purposes and should be left unchanged.

  • « Previous Page
  • 1
  • …
  • 17
  • 18
  • 19
  • 20
  • 21
  • …
  • 62
  • Next Page »

Become a Member

Join the only national organization dedicated to Advancing Sewing as an Art and Life Skill.

Join Now button

Blog Article Categories

  • ASG Conference
  • Chapter Stories
  • Embroidery
  • Fitting
  • Learn to Sew
  • National Sewing Month
  • Products, Books, & Patterns
  • Projects
  • Quilting
  • Sewing
  • Sewing Techniques
  • Sewing Tips
  • Sewing Tours
  • Videos
  • Disclaimer
  • Privacy Policy

American Sewing Guild
National Headquarters
9660 Hillcroft, Suite 230
Houston TX 77096
713-729-3000 | 713-721-9230 Fax
www.ASG.org

ASG wordcloud - education, conference, discounts, videos, special offers, tours and more

Copyright © 1998–2025 · American Sewing Guild · All Rights Reserved