American Sewing Guild (ASG)

Visit our blog Visit the ASG Facebook page Visit ASG on Pinterest Visit ASG's YouTube channel Visit ASG on Instagram
  • Home
  • Join ASG
    • Join Online
    • Chapter Locations
    • Member Benefits
    • Member Brochure
    • Join by Mail
  • Conference & Education
  • Resources
    • Contests & Awards
    • Giving Back
    • Hall of Fame
    • Links
    • Travel and Tours
    • Measurement Chart
  • Shop
    • ASG Store
    • Chapter Products
    • Video Resources
  • Blog
  • About
    • About Us
    • Donate to ASG
    • ASG Sensitivity Statement
    • FAQ’s
    • Start a Chapter
  • Contact
  • Member Login
    • Login First!
    • Members Only
    • Leadership Only
    • Website FAQ’s
    • Logout
  •  

April 7, 2023

Purely Fluff: DIY Chenille

Chenille run, photo courtesy of Bernina
Chenille rug photo, courtesy of Bernina

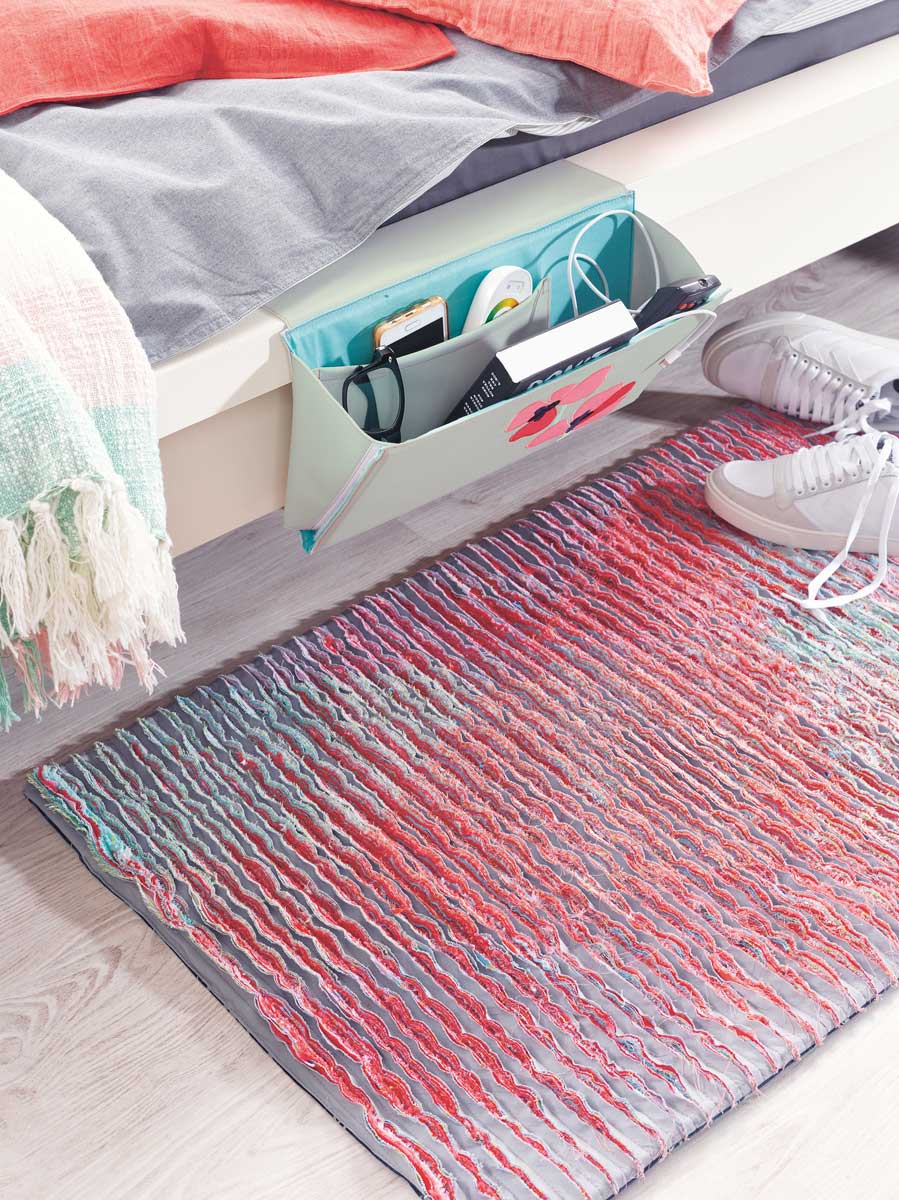
If you love the look of vintage chenille fabric, you can easily duplicate that look for any of your projects. The technique involves layering fabrics, stitching, cutting and fluffing, and the resulting fabric is suitable for garments, quilts, pillows, etc. It’s warm because of the multiple layers, and it’s comfy with a fluffy texture.

Choosing Fabrics

Chenille works best with fabrics that aren’t too tightly woven. Looser weave fabrics, like gauze and homespun, will produce more fringing. Quilting cottons, rayon challis and flannels are also ideal candidates, and each will produce a distinctly different looking fluff. Knit fabrics do not work for this technique. It’s a good idea to pre-shrink your choices first to avoid having the multiple layers shrink at different rates and cause distortion.

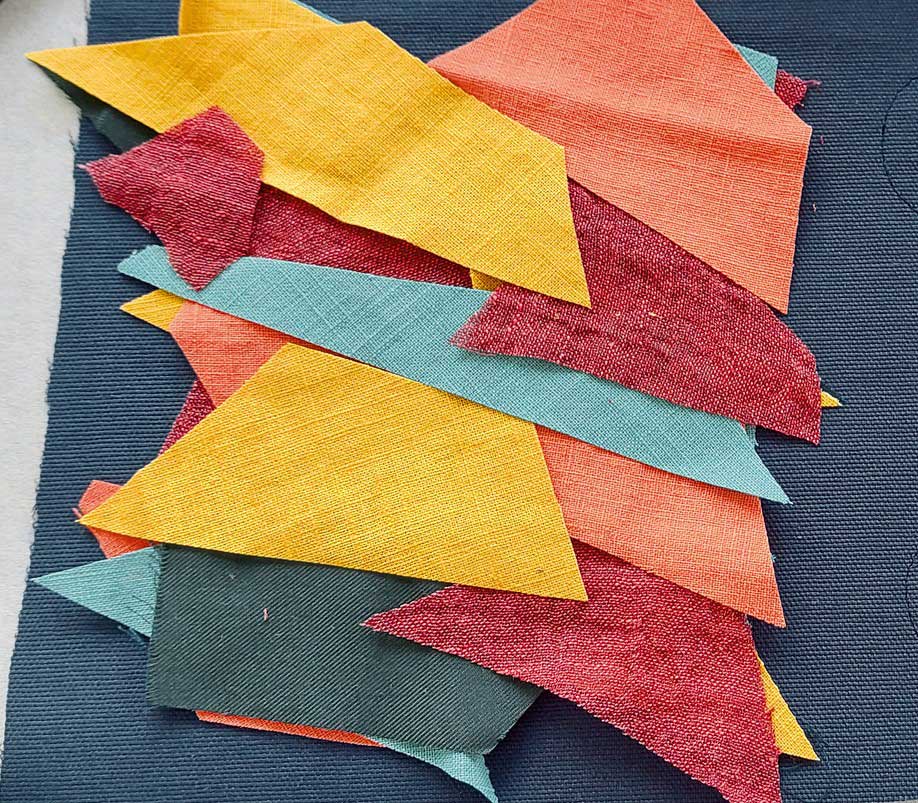
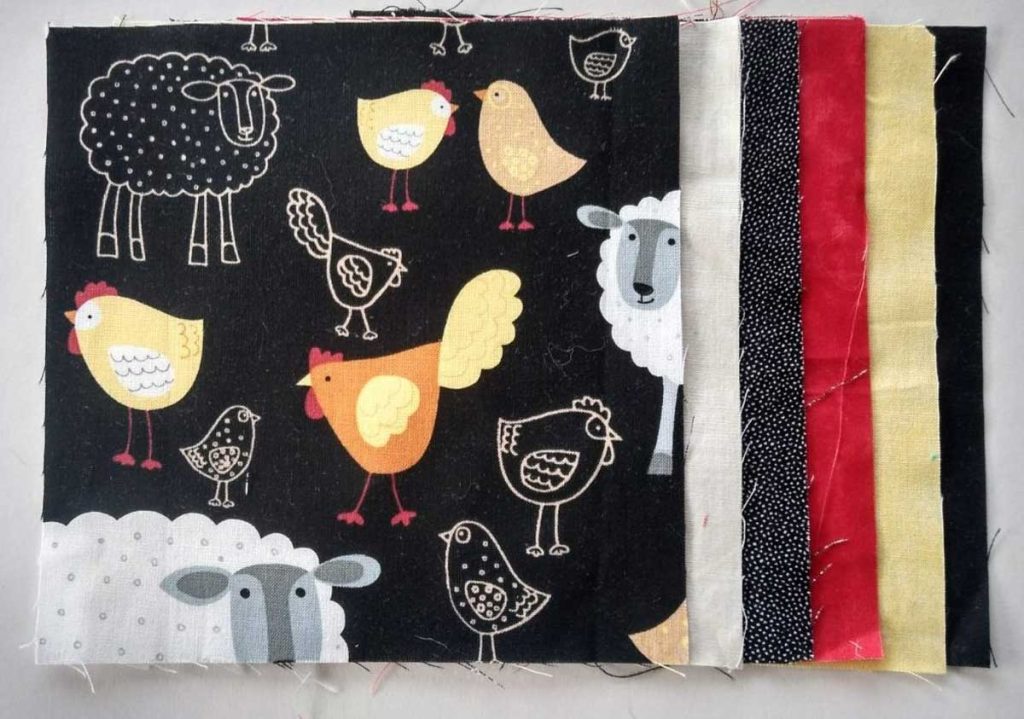
You’ll need several fabric layers—anywhere from 4-8 layers, depending on the fabric weight and the desired finished hand. The fabric layers can all be the same, or they can be different, both in color and fabric type.

Stacking Up

Cut the fabrics at least 2” larger all around than the finished amount needed. If you’re making a garment, rough-cut the pattern shapes this amount larger. Smooth the fabrics flat on a surface and layer them in the desired order with the lowest layer face down and the remaining layers face up. Note that if the top fabric is a print, it likely won’t be discernible once the piece is finished; only the bottom layer will be. If you’re making a quilt, the bottom fabric (face down) will become the quilt backing; on a garment, it will be the “lining.” However, some quilters prefer the fluffy side to be the quilt backing as it’s soft to the skin.

If you want a multi-color layer, arrange scraps across the surface atop another fabric layer—just overlap to avoid a gap in the finished pile.

Pin the layers together randomly to help with shifting.


Ready, Set…Stitch

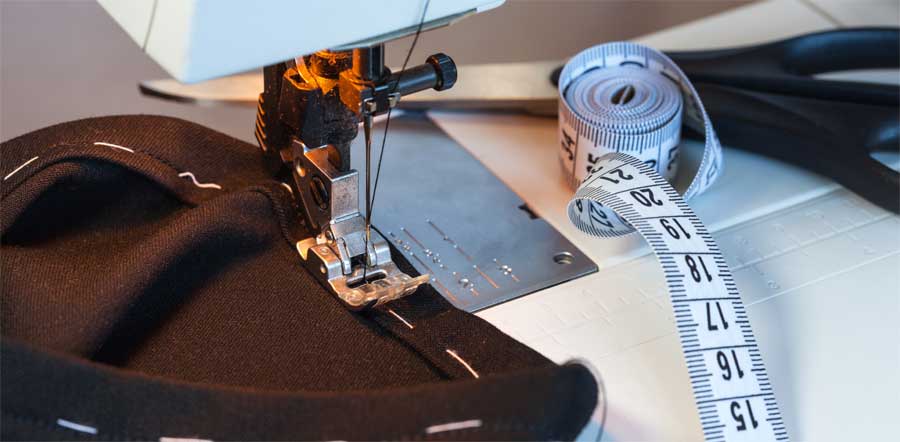
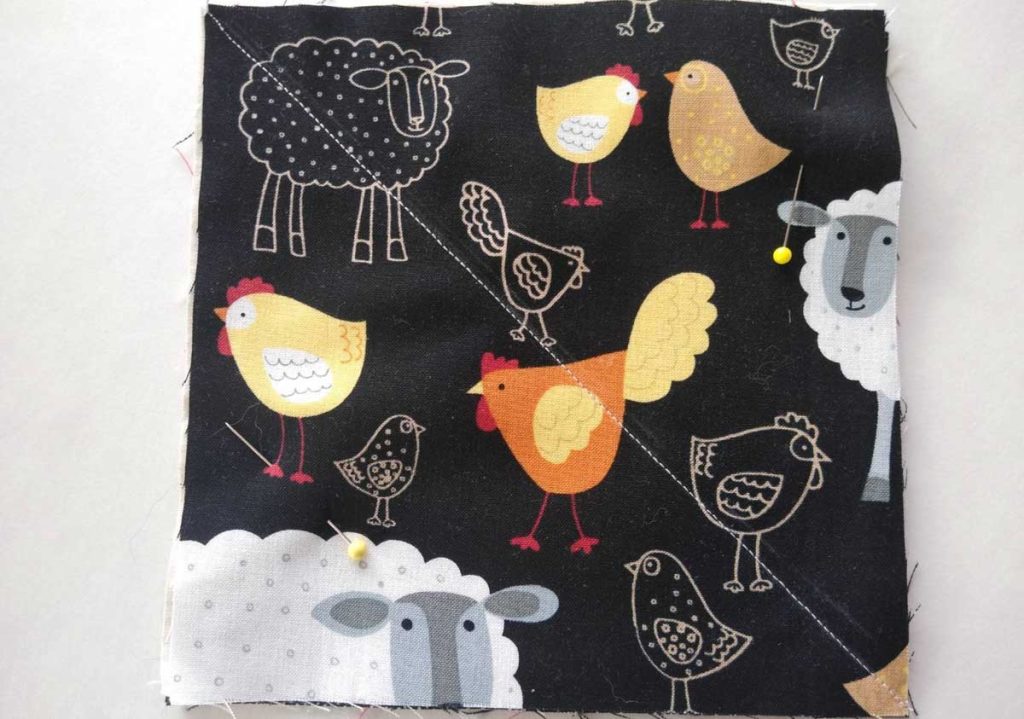
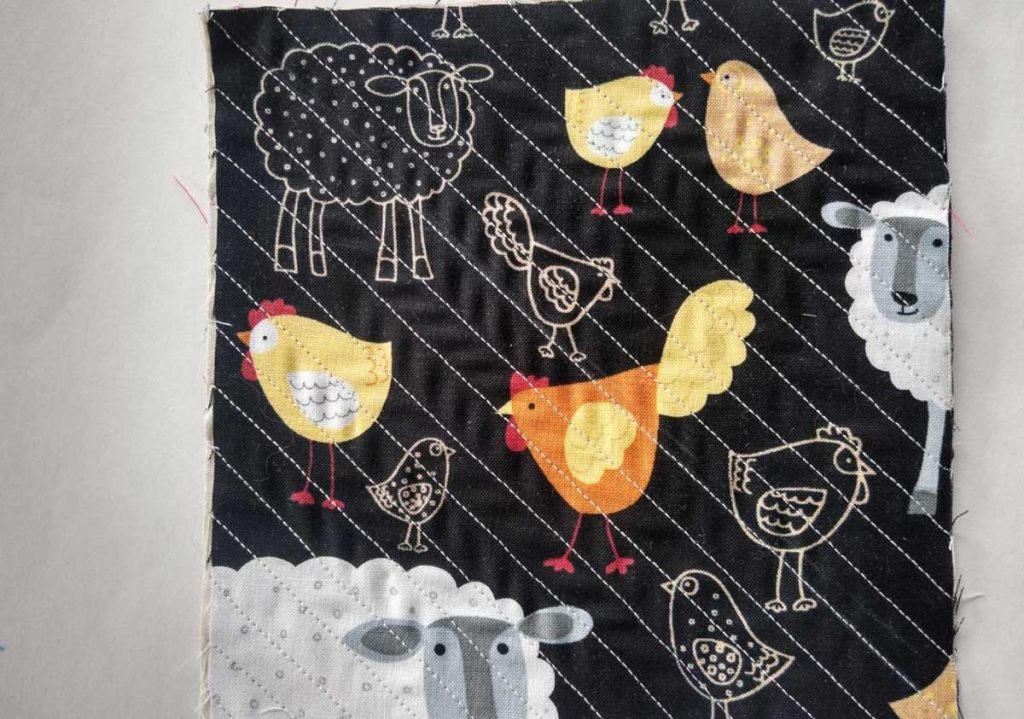
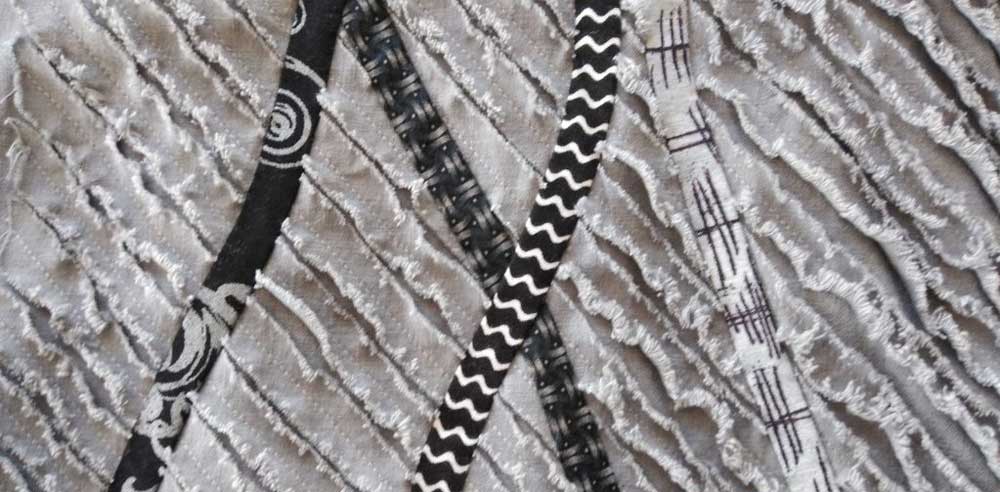
Draw a single line on the top layer of fabric at a 45° angle to one edge. On a garment, the line should be measured from the front and/or back center line, on a quilt or pillow, from the project edge. It’s important that the line is on the bias grain of the fabric.

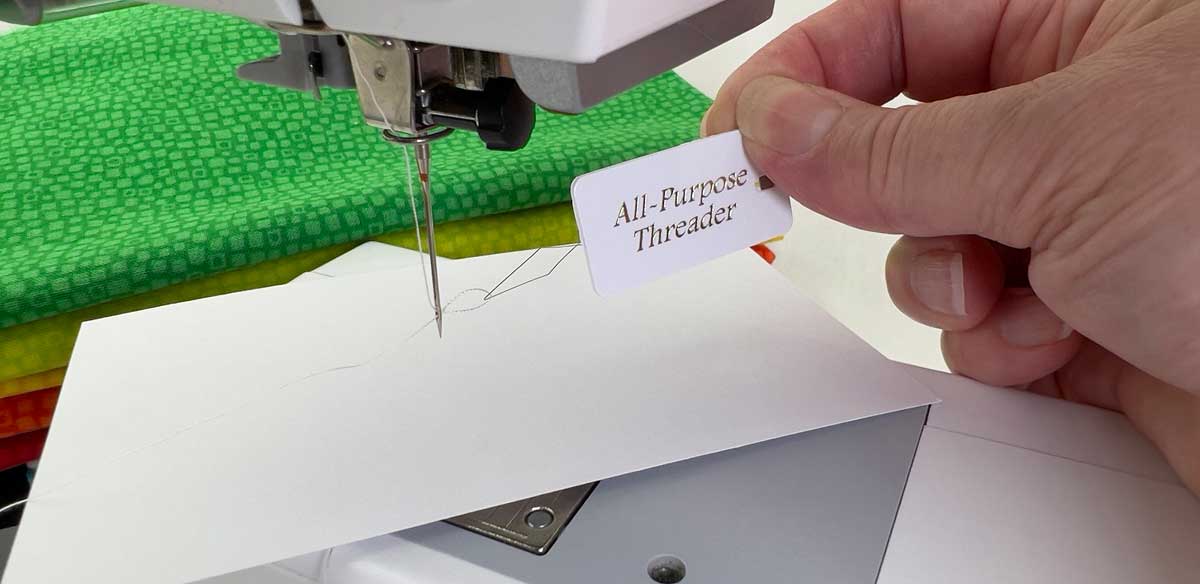
Set the machine for a smaller than normal stitch length—2.0mm—and sew along the drawn line. Using the presser foot as a guide for spacing, sew parallel lines across the entire fabric piece 3/8”-1/2” apart.

Using a walking foot or dual feed will help keep the layers feeding evenly, but don’t worry if they shift a little, as it won’t affect the outcome of the project.

Step 1: Layering fabrics
Step 1: Draw a single line

Cutting Up

If you’re making a quilt, now is the time to square it up and trim off the excess fabric. Do the same for a pillow. If you’re making a garment, lay the pattern over the stitched fabric layers and cut out the shape needed.

Step 3: Draw parallel lines
Step 4: Slash between each line of stitching

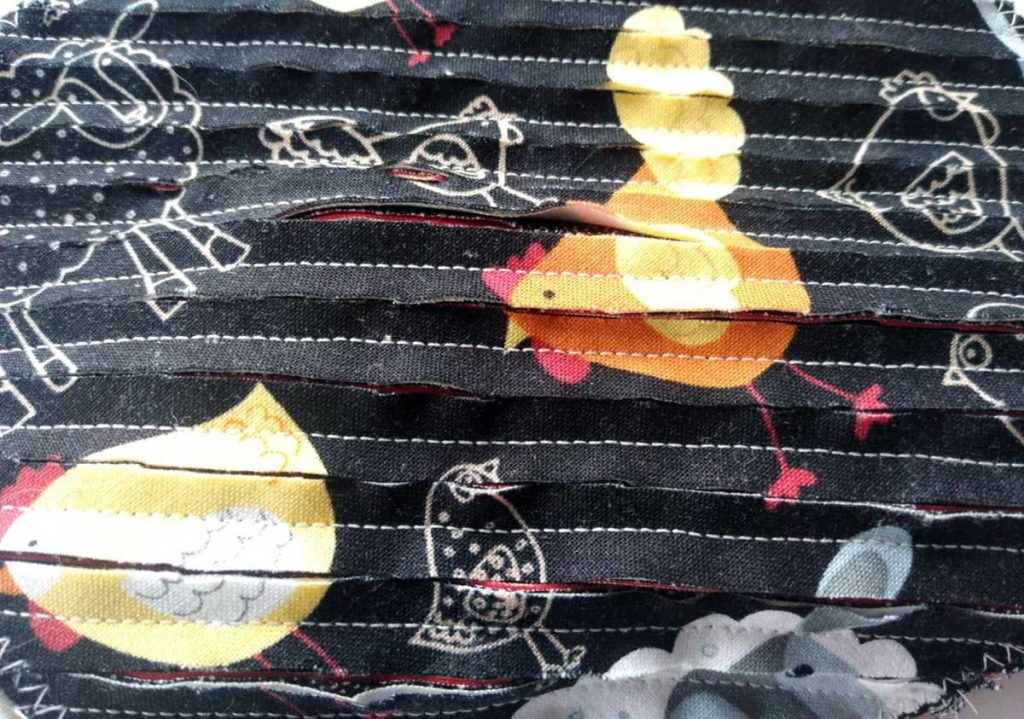
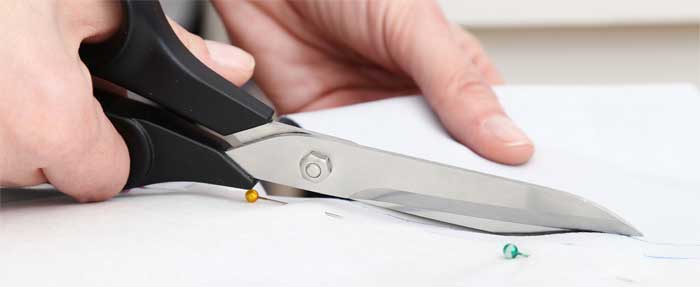
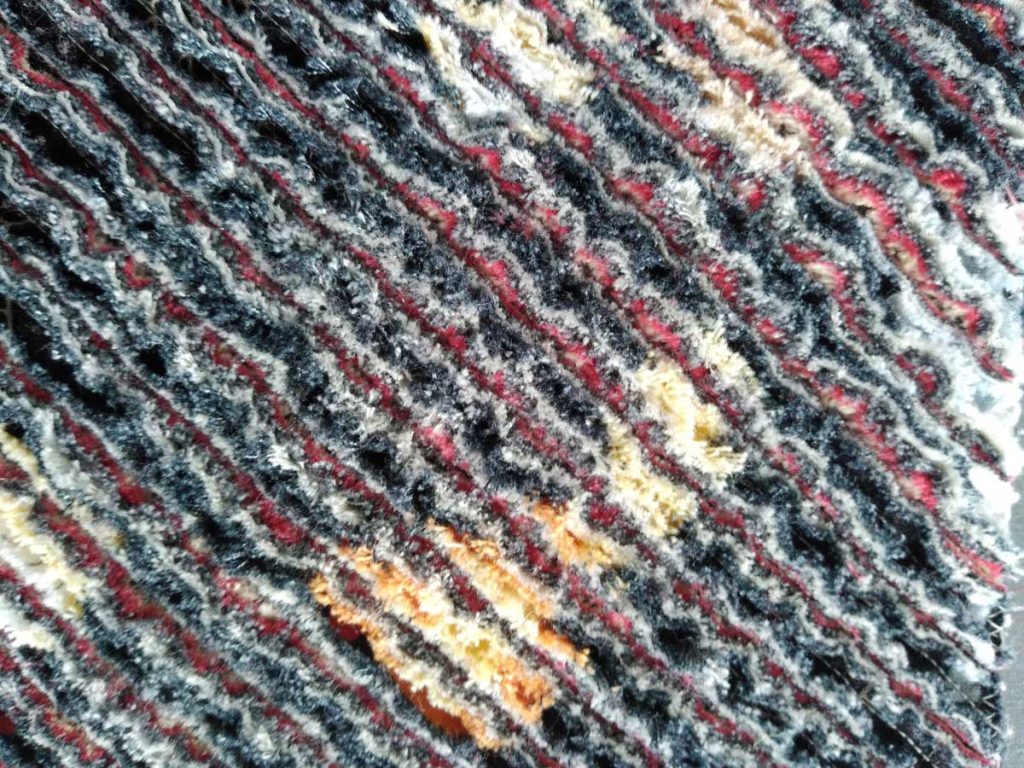
Then come the magic—slashing the channels! Without cutting through the bottom layer, use small sharp pointed scissors or a chenille or slash cutter to cut between each line of stitching.

A Slash Cutter, like this one from Clover, is a great tool to use for this step. The Slash Cutter is available at your local retailer or can be purchased on Amazon. (We may receive a small commission at no additional cost to you if you purchase via our Amazon link).

https://www.youtube.com/watch?v=TIkf5DcA9mU

Once all the channels are slashed, use a large zigzag to stitch around the edges of the piece.

Finishing Up

Once the chenille process is complete, make the project as you normally would. For garments, the backing fabric can act as a lining and seam allowances can be bound or strapped to hide the rough edges. It’s best to avoid the extra bulk of a facing or hem, so bind garment edges instead of conventional construction.

Into the Wash

Throw the finished project into the washer and dryer as you would normally care for the fabric type. Adding a bath towel helps with fringing by providing an abrasive surface during agitation.

Step 5: After laundering and drying


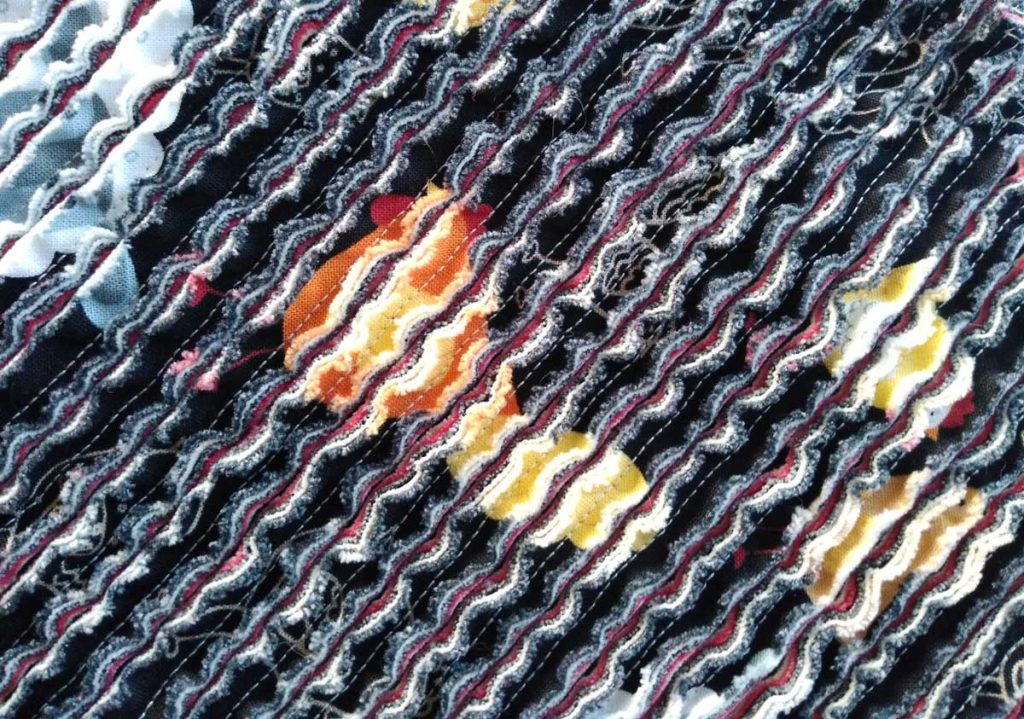
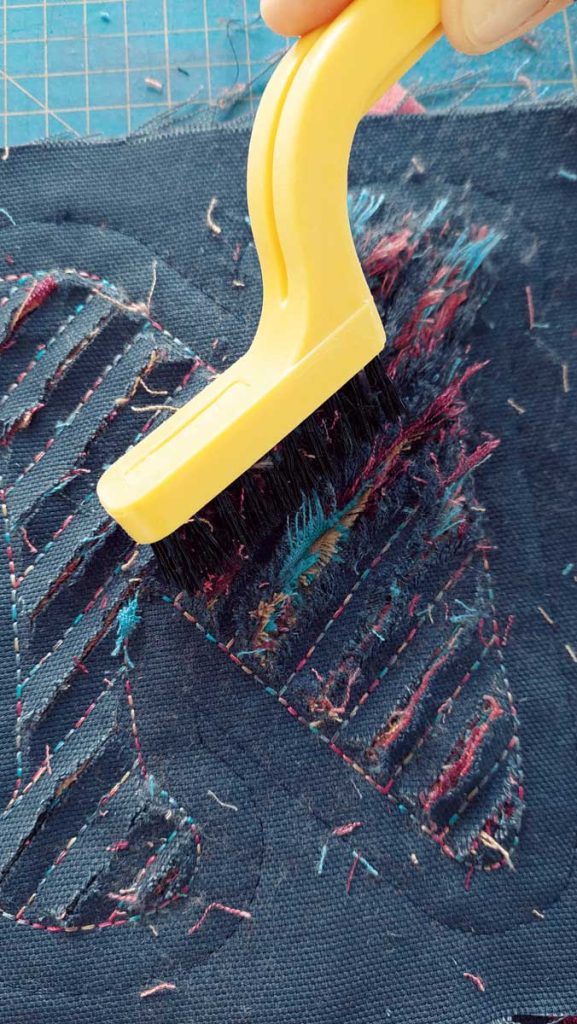
When the piece comes out of the dryer, it should be fluffed and chenille-y looking. If it didn’t fluff as much as you’d like, brush the surface with a stiff nylon brush or a chenille brush to add more richness.

Chenille Brush
Using a chenille brush. Photo courtesy of Bernina

Step 6: After laundering, drying, and brushing

Time for Play!

Make some test samples before starting your project:

  • Experiment by stacking the same fabrics in differing orders and see the difference in the finished looks.
  • Use a different number of layers to vary the fringed looks.
  • Stitch different width channels. You can go all the way up to 1” apart, but the backing fabric shows through at the larger widths…not necessarily bad, just a different look.
  • Work with all the same color solid fabric for a seriously plush look.
  • Change line direction to form a chevron—but keep the lines at a 45° angle to the fabric grain.
6 Layers of Rayon Challis with Chevron Lines
2 Layers of homespun fabric trimmed with bias

~Linda Griepentrog is the owner of G Wiz Creative Services and she does writing, editing and designing for companies in the sewing, crafting and quilting industries. In addition, she escorts fabric shopping tours to Hong Kong. She lives at the Oregon Coast with her husband Keith, and three dogs, Yohnuh, Abby, and Lizzie. Contact her at .

Did you enjoy this article?
Are you an ASG member?
This field is for validation purposes and should be left unchanged.

March 24, 2023

Magnetic Appeal: Purse Magnets

Magnetic clasp on a handbagIf you’ve noticed the details on your favorite handbag or tote, it’s very likely that the flap closure or pocket is secured with a magnetic fastener. These handy pull-aparts are easy to operate, reliable and they’re compatible with all bag fabrics.

The magnets come in both round and square shapes, in sizes ranging from ½” to 1” and they are available in a variety of colors and thicknesses, depending on the brand.

Purse closure snaps come in four parts—the upper and lower snap sections (male and female) that are visible in the completed installation, and two metal washers that go under those sections to support and anchor the pieces. The washers have slots in them to indicate the proper positioning under the pronged outer sections.

Location, Location

  • When applying magnetic fasteners to a bag, be sure to apply the male portion of the snap to the flap lining portion before the bag flap pieces are joined so that the innards are hidden.
  • Apply the female portion to the bag front right side before the lining is applied.

Behind the Scenes

It’s imperative to interface the area where the snaps will go. If your pattern doesn’t call for this, simply fuse a 2” square of interfacing to the wrong side of the snap placement area on both sides of the closure areas. A layer of fusible fleece can also be used if fabrics are lightweight.

Use the slotted washer as a guide to mark the slot locations on the interfaced areas (1). There may be a center closure, or multiple closures, depending on the bag style.

(1) Mark slits on the back of your fabric

Use a seam ripper or sharp scissor points to make very small slashes at the markings through all layers. The slashes should be smaller than the markings so that they fit snugly over the snap prongs. If your fabric is ravelly, coat the slits with seam sealant and allow to dry before continuing.

From the fabric right side, insert the prongs of the appropriate snap fastener half through the slits to the wrong side (2).

(2) Poke the prongs through from the right side.

To reinforce the closure, make corresponding slits in a piece of fleece, vinyl or stiff interfacing and place the piece over the prongs (3).

(3) Add a layer of fleece

Push the washer securely onto the prongs, then bend the prongs inward or outward (4, 5). Note that bending them outward creates a slightly flatter closure since they’re not on top of each other. To get a flatter surface, use pliers or the flat end of a screwdriver to bend the prongs.

(4) Bend prongs inward

(5) Bend prongs outward

If desired, stitch a square or circle around the closure through all the bag layers (6).

(6) Stitch a square or circle around the snap, if desired

To prevent imprinting of the pronged area onto the bag right side after pressing, fuse a small rectangle of fleece over the back of the snap area to cushion it from the outer fabric (7).

Add another layer of fleece for cushioning

Forces to be Reckoned With

Depending on the strength of your magnetic fastener, one half may have a tendency to adhere to the throat plate of your machine while you’re trying to stitch. Simply pick it up off the machine bed and hold that section while continuing to stitch.

These hidden magnetic snap closures can be accented with buttons over them for a decorative look on the outside.

Sew-on Closures

In addition to the pronged closures mentioned above, there are also sew-on magnetic closures. These are applied to the right side of the bag front and to the flap lining. Reinforcing behind these closures as noted above is recommended to help ease the stress and wear and tear from repeated opening and closing.

Magnetic Snap from Amazon.


Looking for something a little more decorative? Some decorative sew-on magnetic closures have leather accents with pre-punched holes for stitching.


Leather Snap
Leather Snap from Amazon.


~Linda Griepentrog is the owner of G Wiz Creative Services and she does writing, editing and designing for companies in the sewing, crafting and quilting industries. In addition, she escorts fabric shopping tours to Hong Kong. She lives at the Oregon Coast with her husband Keith, and three dogs, Yohnuh, Abby, and Lizzie. Contact her at .

Did you enjoy this article?
Are you an ASG member?
This field is for validation purposes and should be left unchanged.

March 17, 2023

Boning and Waist Stays (preview)

Boning and waist stays work because the female body widens both above and below the waistline. Most gowns have a tightly fitted bodice — with or without sleeves, on or off the shoulder — and a full, heavy skirt. We’ve all seen an unfortunate bride wearing a sagging gown. The bodice may be sagging on its own, but the problem can be further compounded by the heavy skirt pulling the whole gown downwards. Boning and a waist stay, which work together, are your best allies in counteracting the force of gravity at work in such a situation.

Wedding gown with boning

Although the muslin is primarily a tool for fitting the gown, it also plays a role in the gown’s engineering. Properly engineered boning and a well-placed waist stay work together to give a gown the structural support it needs.

The full article is in the Members area of the website. CLICK HERE to read the full article. Not a member? Join online!


March 10, 2023

Sewing Q&A: Eyesight, Visibility, and Scissor Care

Q: As I get older, my eyesight is declining and I’m having more and more trouble threading my machine’s needle. Any ideas?

A: Most newer machines have built-in needle threaders, but if your machine doesn’t, there are other options. Try using a fine needle threader, like those used by hand sewers. Note the direction your machine threads, as it may be necessary to remove the presser foot for better access to the needle’s eye.

Klaer International Threader

Anytime you thread a needle, have a contrasting color behind the needle eye can be helpful. For a dark thread, use a white or light-colored paper; for a light thread, use a dark background.

Schmetz Quick Threading Needle
Schmetz Quick Threading Needle. Photo courtesy of Euronotions.

Another option is trying a Quick Threading Needle by Schmetz. This specialty needle has a slotted eye, so that you can draw the thread over the slotted area on the needle’s right side and it will slide right into the eye. The needle is compatible with many fabrics and comes in two sizes, 80/12 and 90/14, depending on your fabric weight. There are two cautions when using this special needle—the slot can snag delicate fabrics, and it shouldn’t be used for quilting as the slot edges can pull batting fibers to the quilt surface. As with all sewing, the needle size should be appropriate to the thread size—too fine of a thread can slip out of the slot, and too heavy of a thread may fray or break.


Q: I take very early morning walks with my dog, but would like to improve my visibility while walking along well-traveled roads. What can I do?

Available on Amazon.

A: To become better noticed in trafficked areas, retroreflective trims are perhaps the best option. These trims glow when exposed to light, like car headlights and streetlights by actually reflecting the source light. The sew-on trims are available as bands, ribbons and a variety of shapes that you can appliqué onto your outerwear. Some trims are available with adhesive backing for easier attachment to an already finished garment.

If you’re making the outerwear, put the trim on during construction, but if your jacket is already made, you can still add it either by hand or machine. Critical areas include the chest and shoulder areas, front and back, as these offer the biggest expanse for reflection. Trim down the side of pant legs is another easy to create option.

Don’t forget your pup when adding this safety feature—add reflection to collars, leashes and jackets/sweaters.


Q: I just treated myself to some new sewing scissors. They were kind of expensive, so I want to be sure I take care of them so they last a long time. How’s the best way to do that?

A: If your scissors came with a case, keep them stowed when not in use. If you don’t have a case, you can easily make one that covers just the blades or the entire scissor.

Keep the scissors in a clean, dry place. If you live in a humid climate, store with a small pack of silica gel to help prevent rust.

Use your good scissors to cut fabric only—not paper or other crafty materials. If you have other family members who might be tempted to misuse them, add a label to the scissor handle indicating their single use, or hide them when you’re not using them.

Never cut over pins—that mistake is a quick way to ruin their cutting finesse. Pins should always be placed inside (or outside) the cutting line.

Try not to ever drop your scissors. Not only can the cutting blades be damaged, but they can also be forced out of alignment. For extra safety, put them on a lanyard or neck ribbon.

Maintain your scissors regularly. Wipe the blades to remove lint, and if the manufacturer recommends it, add a small drop of light oil (like you use on your sewing machine) to the pivot point. Work it into the joint by opening and closing the blades several times and then wiping off any excess.

Not all types of scissors can be sharpened, so use them only for their intended use to extend their lifespan. If they no longer cut fabric well, and they’re not able to be sharpened, relegate them to craft use.


~Linda Griepentrog is the owner of G Wiz Creative Services and she does writing, editing and designing for companies in the sewing, crafting and quilting industries. In addition, she escorts fabric shopping tours to Hong Kong. She lives at the Oregon Coast with her husband Keith, and three dogs, Yohnuh, Abby, and Lizzie. Contact her at .

Did you enjoy this article?
Are you an ASG member?
This field is for validation purposes and should be left unchanged.

Tagged With: needle threader, scissor, Sewing Q & A

March 3, 2023

Special Help for Hems (preview)

Both fitting and sewing hems properly and professionally are the best ways to make clothes feel and look good. This applies whether you have made them from scratch or if you have purchased ready-to-wear. There is more to hemming than meets the eye though and as sewing enthusiasts, we have the advantage and skills to fine-tune our garments and look a cut above someone who doesn’t sew and isn’t able to make those adjustments.

Industry Standards

There are industry standards for determining hem length and I learned these standards while doing a two-year apprenticeship with a tailor from England. This article will detail those standards and explain the reasoning behind them so that you can better decide if you’d like to use them or not. After all, the first rule in fitting is always to defer to personal preference!

CLICK HERE to read the full article. Not a member? Join online!


  • « Previous Page
  • 1
  • …
  • 20
  • 21
  • 22
  • 23
  • 24
  • …
  • 63
  • Next Page »

Become a Member

Join the only national organization dedicated to Advancing Sewing as an Art and Life Skill.

Join Now button

Blog Article Categories

  • ASG Conference
  • Chapter Stories
  • Embroidery
  • Fitting
  • Learn to Sew
  • National Sewing Month
  • Products, Books, & Patterns
  • Projects
  • Quilting
  • Sewing
  • Sewing Techniques
  • Sewing Tips
  • Sewing Tours
  • Videos
  • Disclaimer
  • Privacy Policy

American Sewing Guild
National Headquarters
9660 Hillcroft, Suite 230
Houston TX 77096
713-729-3000 | 713-721-9230 Fax
www.ASG.org

ASG wordcloud - education, conference, discounts, videos, special offers, tours and more

Copyright © 1998–2025 · American Sewing Guild · All Rights Reserved