American Sewing Guild (ASG)

Visit our blog Visit the ASG Facebook page Visit ASG on Pinterest Visit ASG's YouTube channel Visit ASG on Instagram
  • Home
  • Join ASG
    • Join Online
    • Chapter Locations
    • Member Benefits
    • Member Brochure
    • Join by Mail
  • Conference & Education
  • Resources
    • Contests & Awards
    • Giving Back
    • Hall of Fame
    • Links
    • Travel and Tours
    • Measurement Chart
  • Shop
    • ASG Store
    • Chapter Products
    • Video Resources
  • Blog
  • About
    • About Us
    • Donate to ASG
    • ASG Sensitivity Statement
    • FAQ’s
    • Start a Chapter
  • Contact
  • Member Login
    • Login First!
    • Members Only
    • Leadership Only
    • Website FAQ’s
    • Logout
  •  

June 10, 2022

Sewing Machines: The Need for Speed

Whether you sew slowly and diligently or you speed on with reckless abandon, your sewing machine can help with speed control. Most every machine has a speed control of some sort, but sometimes it’s overlooked.

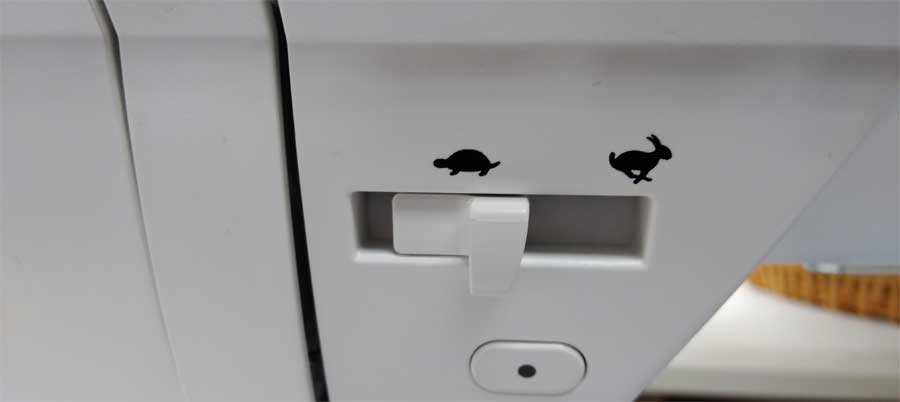
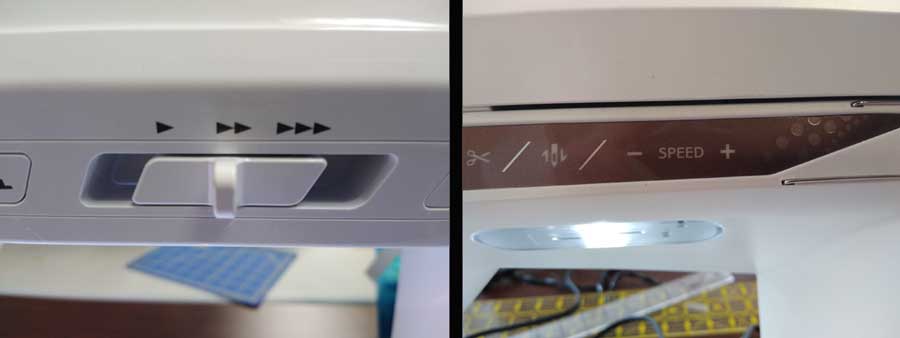
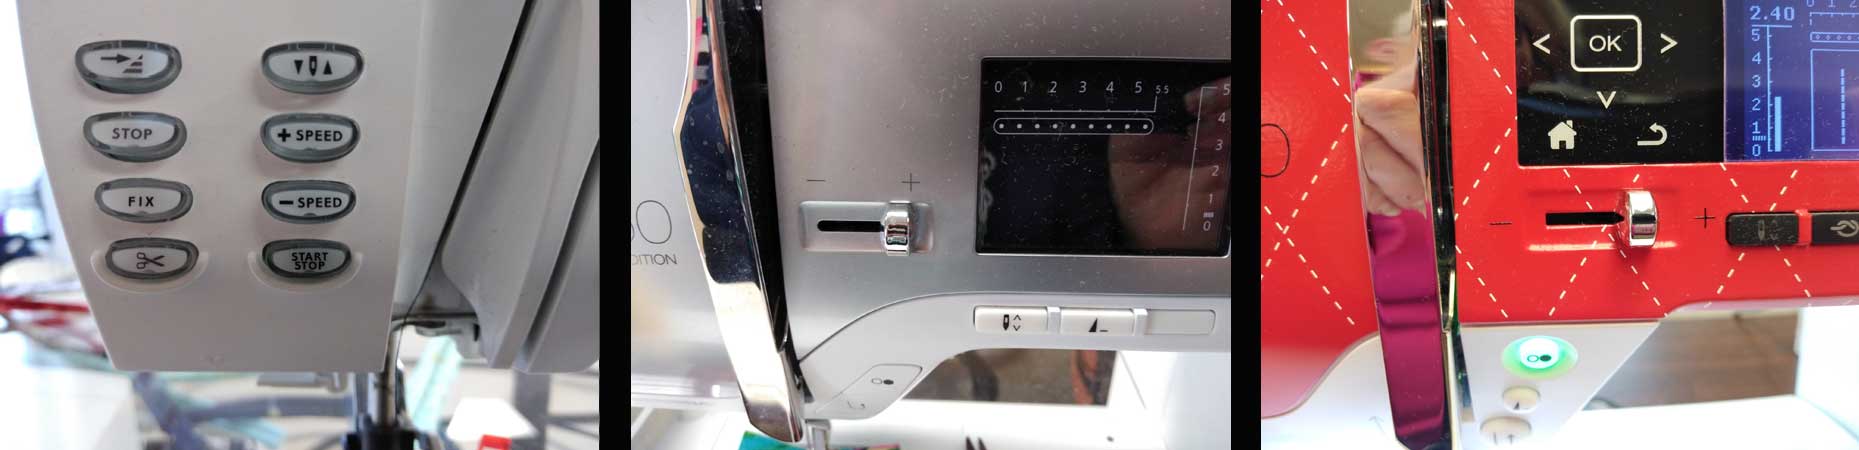
These handy regulators look different depending on the machine brand, but the function is the same—to act as a governor for your sewing speed. Some are sliding levers with dots to indicate speed (one dot, two dots, three dots), some offer plus and minus indicators, still others offer arrowheads (one, two, three), and then there’s the clever tortoise and hare indicators. Other brands of machines offer plus and minus sign push buttons, rather than sliders, for speed indication.

“Why do I need this function when I can simply adjust the sewing speed by varying the foot pedal pressure?”

One great place to use the speed regulator is if you’re teaching someone to sew. Sometimes there’s a tendency to want to “speed” and we all know what happens then if you’re new to sewing—an opportunity for a lesson in ripping out stitches. Using the speed regulator ensures a slow, steady pace and fewer mistakes.

Going around tight curves is a place where you might want to go more slowly than when stitching long, straight seams. Along the same lines, appliqué requires a slower pace for accuracy and good edge coverage. Sewing very heavy thick fabric is often more successful with a slower speed.

Sewing decorative stitches is another place you may want to utilize the stitch speed regulator, so that you’re sewing at a consistent speed for the best appearance. On some machines if you vary the speed as you’re sewing, the stitch appearance may be slightly different.

The speed regulator works with the embroidery function on some machines, but not others. It’s a handy way to slow down the stitching when using metallic or other novelty threads that tend to require more diligence. The slower speed is also great for the intricacies of lace making and structural embroidery.

And then there’s free-motion stitching…stippling and embroidery work. Free-motion stitching often tends to “get away from you” and you can work yourself into a seemingly insurmountable corner if you’re going too fast. That said, some free-motion stitchers prefer to go at the maximum speed, so it simply depends on your comfort (and skill) level.

The stitch speed regulator is just another way, in conjunction with the foot control, you can control your stitching speed if you’re sew inclined. Some machines also allow you to control speed by adjusting the rpm/stitches per minute setting.

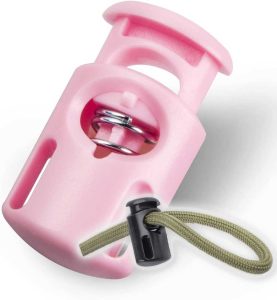
Finally, did you know that many machines also have a control to set the bobbin winding speed? If you go full-throttle when winding a bobbin, some threads can stretch and adversely affect your seam sewing tension. One place to slow the winding speed is when you’re filling a bobbin with novelty thread for bobbinwork—slow and steady wins the race in this instance. Winding metallic threads onto the bobbin also requires a slower pace to avoid breakage. So, check your instruction manual to see if your brand has a way to adjust the bobbin-winding speed.


I debated about sharing this anecdote but decided to go for it, as I’m sure some of you can relate…

I recently had my sewing machine serviced and when I got it back, it seemed to sew slower than I’d remembered. I dismissed the thought, but as I kept sewing for a few days, I’d resolved that I might need to call the dealer where I had it serviced. Time got away from me, and I took the machine to a sewing retreat. When I was lamenting that the machine seemed to be sewing slower than I’d remembered, one astute table mate (thank you, Andi) said calmly, “Have you tried moving the slider bar?” “What slider bar?” said I.

Apparently, the service person had put the speed slider level in the middle of the available speed range, which is why the machine was sewing slower. Who knew? A very embarrassing truth be told, I’ve sewn for many decades and never used the speed adjustment on any machine I’ve had. I’m a pedal-to-the-metal type of girl and if I need to sew slower, I just lighten the pressure on the foot pedal. Lesson learned: Read the instruction manual!

As an aside, I polled several sewing friends and most have never used this machine feature either.   ~Linda


~Linda Griepentrog
Linda is the owner of G Wiz Creative Services and she does writing, editing and designing for companies in the sewing, crafting and quilting industries. In addition, she escorts fabric shopping tours to Hong Kong. She lives at the Oregon Coast with her husband Keith, and two dogs, Yohnuh and Abby. Contact her at .

Did you enjoy this article?
Are you an ASG member?
This field is for validation purposes and should be left unchanged.

Tagged With: sewing machines, sewing speed, speed regulator

June 3, 2022

Sew Cool, Sew Linen

With temperatures already heating up, your summer wardrobe fabric choices can make the difference between being sticky or stylish. Enter linen, a breathable summer fabric that can easily transform from elegant to casual and sporty. Always on-trend, linen continues to be an attractive and comfortable choice and brings with it an air of relaxed sophistication.

Linen materials are available in different weights and weaves and range from whisper-thin shirtings to sturdy suit fabrics. Materials range from a crisp look with a soft hand, convenient blends, semi-sheer weaves, fine yarns with minimalized irregularities, high-twist and creped yarns, subtle novelty weaves, brushed finishes, and knits.

Bolts of linen fabric

Discovered among the remains of the Swiss Lake Dwellers who lived about 10,000 years ago, linen was possibly the first fiber used to make fabrics. Made from the wiry stems of the flax plant, the flax fibers have a thick-and-thin irregular surface and are considered one of the strongest natural fibers in the world (two to three times as strong as cotton). Its smooth, hard surface sheds dirt, resists staining and pulling, and remains lint-free. It feels cool to the touch and since the fibers are hollow, it can absorb up to 20% of its weight in moisture. Linen has a natural luster to it which makes for a beautiful fabric. It boasts longevity, luster, and lovely drape. And since linen fibers are thicker than cotton fibers, a lower thread count is necessary to guarantee a high-quality, enduring linen fabric.

Planning Your Garment

Selecting the fabric

LinenEven though some brand labels automatically denote quality, it’s best to learn how to distinguish good quality linen on your own. Linen does not have high elasticity and will hold its folded shape and any natural creases. It will have a soft, worn-in look. It may help to have a scrap of a known, good-quality linen to use as a comparison when shopping.

As a general rule, better quality linen will tend to be more expensive and will be easy to identify, thanks to its beautiful, natural creases throughout the fabric. Since the yarns, weave, and color are more uniform, the materials are smoother and more evenly woven. Dyes are more uniform, less likely to rub off, and have greater resistance to fading. When yarns are unraveled, the fibers are long and fine. Top-quality linen is simple to wash and dry and can usually withstand a machine wash and tumble dry.

Inferior linen is frequently sized heavily with starch to make it appear crisp. To test for sizing, rub the fabric together vigorously between your hands. If there is a powdery residue, this indicates that the fabric was treated with heavy starch and it will become limp after cleaning. If a linen looks too perfectly ironed, it’s most likely a linen blend or linen imitator.

Design Ideas

To showcase the fabric, choose simple designs with classic lines such as cardigan jackets, tailored separat4es, shifts and skimmers, blouses, and Japanese-inspired designs. Traditionally, heavier linens are used for jackets, skirts, and trousers while lighter-weight materials are used for blouses, shirts, and full skirts. However, since linen is extremely versatile, many designs such as flared and full skirts will be equally attractive in lightweight handkerchief or traditional bottom-weights.

Handkerchief linen is ideal for the popular look of a traditional white shirt and drawstring pants. Alternatively, pair a handkerchief linen shirt with traditional trousers in a heavier bottom-weight linen.

Linen shirts

When selecting your pattern, you can highlight the crispness of a fabric by choosing styles with pleats, tucks, gathers, and gores while reducing problems with ease by choosing designs with features such as shirt sleeves, kimono, raglan, dolman, and cap sleeves. Other features such as topstitched hems and seams, flat-felled seams, and lined yokes will not only accentuate tailored fashions, but also control linen’s tendency to fray. If you prefer laundering to drycleaning, choose styles that will be easy to iron.

Interfacings, Underlinings, and Linings

When selecting interfacings, consider the fabric weight, amount of crispness desired, your preference for sew-ins or fusibles, and the planned garment care. In addition to traditional interfacings, organza, tulle, or a self-fabric interfacing using the same linen are also good choices.

To reduce wrinkling or to add shape, underline the entire garment with a woven, sew-in interfacing. For a softer, more supple look, cut the interfacing on the bias. For increased crispness, underline with a lightweight fusing interfacing.

For most garments, traditional lining fabrics or blouse-weight polyesters are good choices. If you are creating a more luxurious garment that will be dry-cleaned, consider a good quality China silk, a lightweight silk shantung, or a crepe de chine lining.

Get ready though…

Linen shrinks. As a general rule, inexpensive linen shrinks more than a higher-quality material, even bearing in mind that most linens will shrink more when laundered than when dry-cleaned. In addition, if linen is machine dried, it will often shrink more than if it’s air dried.

If you plan to launder the garment, be sure to  wash the fabric before cutting. If you’ll be dry-cleaning the finished garment, have your drycleaner pre-shrink it. Alternatively, you can steam it generously at home using a good iron or quality steamer. Compare your measurements with those on the pattern and then adjust the pattern as needed before cutting.

Making the Garment

Layout, Cutting, and Marking

Before cutting, check the layout carefully. Many linens have prominent grainlines and even a tiny error could be quite noticeable. If the fabric ravels badly, cut one-inch seam allowances and use marking pens, chalk, or thread to make any markings rather than clipping with your scissors.

Sewing Tips

A universal point (H) needle works well on most fabrics, but a sharp point (H-M or H-J) is better, particularly when the fabric has larger slubs.

A “slub” is a section in the fiber or yarn that is thicker than the rest. Originally, slubs were mistakes and were usually either unwoven or the piece of yarn was thrown away altogether. However, someone took notice of the unique look that slubs created and decided to replicate them by intentionally weaving slight knots and knobbles (slubs) into the fabric. The resulting fabric had small rises that creates different textures, which in turn gives it an organic, tactile look and feel.

Choose a small size needle (60/8 or 70/10) for lightweight fabrics, and a medium-size needle (80/12) for heavier materials. Set the stitch length for 10-12 stitches per inch (2mm-2.5mm). Use a straight stitch presser foot to hold the fabric firmly so that the needle can penetrate the fabric easily.

Seams and Hems

Linen pantsConsider the garment structure and care requirements when selecting seams and hems. Plain seams and hems finished with a serger or zigzag stitch are suitable for most garments. When using a zigzag stitch, stitch with a stabilizer under the fabric to prevent tunneling.

For washable garments, seams such as welt, topstitched, and flat-felled are decorative as well as sturdy. Narrow seams such as French and welt seams are good choices for handkerchief linens in light colors.

Topstitched hems are sturdy as well as attractive on both casual and tailored designs. For shirts and blouses, narrow shirttail hems are a good choice.

When working with handkerchief linen in light colors, double hems are particularly attractive and can be finished by hand or machine, depending on the style of the garment.

On suit skirts or tailored jackets, interface the hems with bias-cut wigan interfacing so that the hemline will have a softer fold and an attractive oval. If wigan isn’t available, you can substitute other lightweight, crisp materials such as handkerchief linen, polyester organza, or nylon ninon.

Buttonholes

All types of buttonholes and button loops are suitable for linen designs. To prevent fraying when using any type of buttonhole, reinforce the buttonhole area with a small rectangle of lightweight fusible interfacing.

Sleeves

Since linen is difficult to ease, the sleeves are more difficult to set when the sleeve cap has more than 1″ of ease. To reduce the ease about 3/8″, make a 1/8″ tuck across the top of the cap. Redraw the cutting lines as shown in the drawing without reducing the sleeve width (image from page 72 of Claire Shaeffer’s book, Fabric Sewing Guide, c. 1994 out of print).

Pressing

Iron with steamLinens require a hot iron to remove wrinkles and, once set, wrinkles and unwanted creases are difficult to remove altogether. Fabrics, particularly darker colors, are also easily slicked when pressed from the face side. To prevent “shine,” use a press cloth or press from the wrong side.

To set foldlines, creases on pants, or pleats, brush the fabric with a 50/50 solution of white vinegar and water, then press. However, always test on a fabric scrap for colorfastness before using the vinegar solution.


~Adapted from an article by Claire Shaeffer

Did you enjoy this article?
Are you an ASG member?
This field is for validation purposes and should be left unchanged.

Tagged With: linen, textiles

May 27, 2022

Cork Crazy: Sewing with Cork

You’re likely familiar with cork as a stopper for wine, but cork is equally at home in your sewing room (with or without the wine)!

With an interest in sustainability, sewists have embraced cork fabrics (also called cork leather) with open arms. A cork tree can live for 200 years and when the bark is harvested, it grows new bark. Pair the thin bark with a woven or knitted backing and cork works like most other fabrics, with the exception of being washable or dry cleanable—it’s spot-cleanable only.

Cork fabric rolls
Photo courtesy of C&T Publishing

You can purchase cork by the inch, by the yard or in pre-cut sizes, depending where you’re buying it. Some projects require very little as it’s often used just as an accent, like pockets or straps on a bag. It’s ideal for home décor projects and small accessories, like book covers, change purses, wallets, etc.

Cork fabric is available in myriad colors and printed patterns—some have embedded metallic flecks, others have a die-cut surface with contrast backing fabric, and others are hand-painted. Cork is available in different weights, depending on the brand, so be sure to note the thickness before purchasing and compatibility with your project.

Cutting

Daphne Bag from Sallie Tomato

Cork fabric can be cut with scissors, a rotary cutter, a craft knife or a die-cutting machine. Since pin marks may be permanent, it’s best to use pattern weights to hold the pattern pieces in place while cutting. Cork can’t be folded, so trace entire pattern pieces for single-layer cutting.

Follow the pattern grainline if your cork has a distinct pattern to it and note that shading can occur on some corks if you vary the piece directions within a single project.

Sewing

Just as pin marks may be permanent, needle holes can be as well, so think before you sew. If you didn’t, spritz the area lightly with water after removing the errant stitches, then hover a dry iron over the area to make steam. The moisture can help reduce the size of the needle holes.

Lucky Penny Wallet from Sallie Tomato

Choose a slightly longer than normal stitch length (3mm) and either an 80/12 Microtex or Universal needle. Regular weight sewing thread works fine for seaming, and topstitching or machine embroidery thread for embellishing.

Press cork only on the wrong side using a dry iron and a low-temperature setting.

Some helpful notions for cork sewing are a non-stick presser foot (when sewing from the right side), a walking foot for even feeding, a chalk marker and basting tape or fabric glue. Low-temp fusible or sew-in interfacing can be used in areas requiring additional stabilization, like bag straps, behind grommets, etc. Spring clips are a must for holding layers together when seaming, especially for thick areas like straps, drawstrings, etc.

Seaming

Cork can be sewn with a traditional seam, using spring clips to hold the layers in place while stitching. In addition, you can create a lapped seam by trimming the seam allowance off the overlap layer, using basting tape to lap it over the lower seamline, and sewing in place with one or two lines of stitches.

Cork seam examples

A third seam, called a butted seam, can also be used and it creates a totally flat seam. To create a butted seam, trim off the seam allowances on both edges to be joined, then place a narrow strip of fusible interfacing under the abutted edges. Use a wide zigzag, three-step zigzag or a decorative stitch to catch both cork edges—the stitching must span the seamline to catch both sides.

Topstitching cork is imperative to hold both traditional and lapped seams in place. For traditional seams, finger-press the seam allowances in either one direction or open before topstitching.

Edge-finishing

Since cork fabric doesn’t ravel, a clean-cut edge is an easy finish. Where possible, trim the edge with a rotary cutter for a smooth line.

Depending on the project, decorative scissors (such as pinking, wave or scallop) or rotary cutter blades can be used for creative edge finishing.

Create with Cork Fabric
Image courtesy of C&T Publishing

Looking for more information on sewing with cork and some fun projects, like the Shopping Tote pictured here? Look for Create with Cork Fabric, by Jessica Sallie Kapitanski (aka Sallie Tomato).


~Linda Griepentrog
Linda is the owner of G Wiz Creative Services and she does writing, editing and designing for companies in the sewing, crafting and quilting industries. In addition, she escorts fabric shopping tours to Hong Kong. She lives at the Oregon Coast with her husband Keith, and two dogs, Yohnuh and Abby. Contact her at .

Did you enjoy this article?
Are you an ASG member?
This field is for validation purposes and should be left unchanged.

Tagged With: cork, sewing cork

May 20, 2022

Cleaning Vintage Textiles (brief)

Antique stores, thrift stores, garage sales, and grandma’s attic often have a treasure trove of old textiles that may include linens, tapestries, handmade quilts, or needlework projects. You may also come across christening gowns, wedding gowns, and other cherished garments from days gone by. These items are wonderful to look at and fun to consider how they were used in their day, but they might also set your creative mind to thinking of ways to re-use them. The treasured textiles, whether used intact or made into pillows, garments, or other accessories, are full of character and beauty.

Regardless of how you plan to use it, they most certainly will need cleaning. However, the downside to these fabrics is that they may not stand up to traditional cleaning methods. In this article, we hope to help you to determine the best way to clean those old textiles to give them new life.

Old suitcases with fabric

Read more (requires member login)

The complete version of this article is available on the ASG Members Only blog.
CLICK HERE to read the full article. Not a member? Join online!

May 13, 2022

All About Drawstrings

We see them everywhere—from hoodies to waistlines, necklines to sleeves. What are they? The humble drawstrings. A simple, but oh-so-functional, fashion touch that we sometimes take for granted, but there’s a lot to be said about drawstrings.

Drawstring neckline
Photo courtesy of Bernina

These handy pull-strings can be made from fabric, cord, flat trim, braid, ribbon, twill tape, thin rope, bias tape, or even shoe laces. Did you know that shoe laces come up to 72” long? Drawstrings can stand alone to hold things up, or can be paired with a hidden elastic for a more secure hold.

Photo courtesy of Bernina

Drawstrings can pull in a single direction, or you can add a second one to pull in the opposite direction—think drawstring bag, our go-to for universal small storage.

While we may be most familiar with horizontal drawstrings, like on comfy pj’s and yoga pants, these pull-ups can also go vertically to shirr the front of a skirt, a sleeve or a bodice to new heights.

Grand Openings

Ronan bag from Sallie Tomato
Sallie Tomato “Ronan” bag

Depending on the construction, drawstrings may emerge from hiding through metal or plastic grommets, buttonholes, a sewn eyelet or a seam opening. Both ends can come through one opening, or there may be two openings, one for each end of the string.

It’s a good idea to reinforce behind any drawstring opening before construction, as the pull of a drawstring adds extra wear. Fusible interfacing is ideal for this purpose—just cut a square that’s at least ½” larger than the opening. Pattern markings indicate where a drawstring opening should be placed. If it’s an in-seam opening, fuse to the seam allowances to add stability.

In the End

Aglets available on Amazon

When the ends of a drawstring emerge, they can be finished in several ways, depending on the fabric. Knotting the ends together is one option, knotting the ends separately is yet another. Beads can be added to the ends, or they can be finished with an aglet—a metal finding that encases the raw string end. Another option is to simply let the ends fray, if it’s a woven fabric or trim. If fraying isn’t your cup of tea, secure the ends with a no-fray product or wrap with yarn or heavy thread for a decorative touch.

Long drawstring ends can also be tied creatively—like in bows or Chinese knots—for added interest.

Just Encase

Drawstring are most often hidden inside a casing, though some are woven through openings on the outside for a decorative effect. Casings can be made by folding over a hem edge and stitching a channel that’s wide enough to let the drawstring pull through freely. That casing can also be a separate piece of folded fabric attached to a waistline or hemline, or a strip of fabric can be sewn to the garment wrong side over the channel opening(s) to form the drawstring tunnel.

Photo courtesy of Bernina

Many sewists love the comfort of a drawstring and its adjustability, but sometimes, depending on the fabric, the tied string can loosen and feel a bit less secure. No one wants their pants inching down from the original waistline. So, elastic can easily be paired with the decorative drawstring for more fit. To do this, cut the drawstring in half and sew each end to the end of a piece of elastic before inserted into the casing. Pattern pieces are usually provided for the length, but if not, just be sure that the sewn ends of the drawstring remain hidden in the casing when wearing the item. Or, make multiple casings with a drawstring between two or more rows of encased elastic.

Plastic cord locks from Amazon
Plastic cord locks available in sewing stores, online, and on Amazon

Drawstrings sometimes slide out of casings, either during wear or during laundering. To prevent that and keep the drawstring where it belongs, stitch vertically through the casing at the center back or side seams once you have the drawstring evenly distributed.

Another way to keep a drawstring in place is to add a cord lock to each end at the desired position. These are frequently used on outerwear with waistline casings. Cord locks are available in many shapes and colors.

Inside Addition

Getting the drawstring into its casing can sometimes be a challenge. A large safety pin can work to ease it through the channel, but a specialty drawstring tool is even better. The latter is a very long, flexible plastic “needle” of sorts that can easily pull the drawstring into position once it’s threaded through the tool’s “eye.”


Drawstring tool available from sewing stores, online, and through Amazon.

~Linda Griepentrog
Linda is the owner of G Wiz Creative Services and she does writing, editing and designing for companies in the sewing, crafting and quilting industries. In addition, she escorts fabric shopping tours to Hong Kong. She lives at the Oregon Coast with her husband Keith, and two dogs, Yohnuh and Abby. Contact her at .


  • « Previous Page
  • 1
  • …
  • 27
  • 28
  • 29
  • 30
  • 31
  • …
  • 63
  • Next Page »

Become a Member

Join the only national organization dedicated to Advancing Sewing as an Art and Life Skill.

Join Now button

Blog Article Categories

  • ASG Conference
  • Chapter Stories
  • Embroidery
  • Fitting
  • Learn to Sew
  • National Sewing Month
  • Products, Books, & Patterns
  • Projects
  • Quilting
  • Sewing
  • Sewing Techniques
  • Sewing Tips
  • Sewing Tours
  • Videos
  • Disclaimer
  • Privacy Policy

American Sewing Guild
National Headquarters
9660 Hillcroft, Suite 230
Houston TX 77096
713-729-3000 | 713-721-9230 Fax
www.ASG.org

ASG wordcloud - education, conference, discounts, videos, special offers, tours and more

Copyright © 1998–2025 · American Sewing Guild · All Rights Reserved