American Sewing Guild (ASG)

Visit our blog Visit the ASG Facebook page Visit ASG on Pinterest Visit ASG's YouTube channel Visit ASG on Instagram
  • Home
  • Join ASG
    • Join Online
    • Chapter Locations
    • Member Benefits
    • Member Brochure
    • Join by Mail
  • Conference & Education
  • Resources
    • Contests & Awards
    • Giving Back
    • Hall of Fame
    • Links
    • Travel and Tours
    • Measurement Chart
  • Shop
    • ASG Store
    • Chapter Products
    • Video Resources
  • Blog
  • About
    • About Us
    • Donate to ASG
    • ASG Sensitivity Statement
    • FAQ’s
    • Start a Chapter
  • Contact
  • Member Login
    • Login First!
    • Members Only
    • Leadership Only
    • Website FAQ’s
    • Logout
  •  

December 20, 2019

Stash Busting: Take UFO’s Off the Radar

We all have a stash of projects in drawers, on shelves and in containers that have been started but never quite crossed the finish line. ASG member, Hope Wright, had a stash of UFO’s and a plan and now she’s sharing her tips and hints on how an online challenge in 2011 inspired her to finish an unprecedented 926 projects. (Yes, 926!)

Here’s Hope’s story…

Sewing fills my days. Not to mention the living room, bedroom and closetsSort, Sort, Sort

I first started in 2011 during a challenge from an on-line group.  Attempting to use only “from my stash,” I first gathered all the projects I had already started in to one place.  I then sorted them by estimating how long it would take to finish each project. The first group were projects that would take just an hour to finish. Next came projects that could be done in an evening after work. Finally, projects I could do on a Saturday.

By using this system, I have completed 926 projects to date. I do add projects to my stash, but I try very hard to finish everything I think I can complete in an evening or on a Saturday morning.  Longer projects still await!

Organize

Organize your kits, stash and tools in some way that makes sense to you, or at least gather them together so you can find them.  For me, I have most of my tools  and gadgets in a bookcase in my sewing room.

Try organizing your projects by type of material, where to work, time it will take to complete, color, expense, etc.  Group projects that are repetitive. For example, cut out several projects in one session and make your own kits.

Get rid of anything you have no desire or need to finish. Take that group and consider if someone else may want it for their UFO stash.  I’ve given several boxes of supplies to a school art program.  Remember, it’s also okay to just put it in the trash!

Make Three Lists

  1. Projects to get to this coming year.
  2. Projects, ideas, and stash in storage. This includes actual kits you have and ideas to do “someday” – or as one person said, her Craft Retirement Account.
  3. Projects completed. It is great to see what you’ve accomplished!

Categorize Active Projects

An important function for me is that I always actively work on 3 projects at any one time, with 3 to 9 more in line so I never have “down” time. Everything else remains stored away; anything more than 12 is simply too overwhelming.  My active projects are categorized by where I can do them:

  • Something to do at home, but can’t be done in front of the TV (such as using the cutting table or sewing machine). These are often things I do on the weekend rather than after work. Many projects then move to the next category.
  • Something I can work on while listening to TV, such as pressing, hand sewing, or embroidery. Some projects then move to the next category.
  • Something I can do in a waiting room, meeting, or traveling. These projects are easy to stop at any point, small to pack or carry, do not require extra light, magnification, or a table to spread out.  I always have a project in a tote bag with all supplies to be able to work on it.  I nearly always keep one in the car.

Projects with Deadlines

I work on anything with a deadline first, even if I have a lot of time.  It is much better to finish something six months early than a day late. Between all my clubs and church, I do a dozen or more programs and deadline projects during a year. I put them first on my “to do” list on January 1 and indicate the deadline.

Finally, I also look at promises already made before I agree to do something more.  I try to finish Christmas gifts before Thanksgiving week so I can enjoy holiday parties. Since most groups have their programs planned a year at a time, I know I will start working in December on programs for the coming year. I will seldom start anything else until they are done. Find what works for you to take those UFO’s off your radar!


~© Hope Wright, ASG Member

Tagged With: sewing, sewing tip, Sewing UFO's

December 11, 2019

Easy Embellishments Collar

Adding a bit of detail to a collar can add flair and interest on a plain shirt, jacket or dress. This short video will show you how to use bias tape to embellish your next collar.

https://www.asg.org/wp-content/uploads/2019/12/Easy_Embellishments_Collar_HQ.mp4


~© ASG: Thank you to Sheryl Belson, ASG Plano Chapter

December 6, 2019

Creative Fixes

OOOPS!

Much as we love sewing, things don’t always go as planned. Sometimes an accident happens in the process from cutting to finishing, or even at the first wearing. Rather than using any of ‘those’ words, it’s a lot more fun to try to figure out a creative solution to the problem that looks like it was intentional. Let’s look at three of those possible occurrences:

Not enough fabric

We’ve all done it, thinking we can outsmart the pattern company requirements. Maybe we’re trying to use up fabric in our stashes, but somehow there’s not quite enough. Two creative solutions are pattern mixing and color blocking. Instead of cutting all the garment pieces from the same fabric, mix them up for fun.

Make it seem like there was a plan for your artsy touch. Look for prints in similar colors and/or motifs. Fabric manufacturers often make coordinated groupings that are made to go together. Choose fabrics with similar motifs—for example, garden or flower prints. Select prints of similar scale and contrasts. Solids are always a good go-to tie-together—pick a color found in the print(s) or go with one directly across the color wheel for a bolder look. Just remember when cutting, you’ll need a left and right half to the garment and it’s easy to forget to flip the pattern piece over.

Errant scissor cuts

Let’s just say you accidentally cut a hole in your garment while trimming a seam allowance. Who hasn’t done that at some point in their sewing life? The creative solution: Add something to cover it—like a tab. But before you do, stabilize the erroneously cut edges by ironing a piece of fusible interfacing on the wrong side of the snip to hold the edges together and keep them from fraying. No one will be the wiser to your solution.

Stain game

It never fails, the first time your grandchild wears a garment you’ve painstakingly made, they spill something on the front of it and voilà—permanent stains, despite your best efforts. A fun solution: Use embroidered patches to cover the stains and add some fun. Embroider them yourself or purchase them from the notions wall at your favorite fabric store. Use invisible thread and sew around the edges and listen as people say, “Isn’t that a cute shirt? I love the patches.” We’ll never tell.

So, when something doesn’t quite go as planned, take a deep breath, don’t panic and find a sewing friend to help you come up with a creative resolution. Sometimes the solution is more fun than the original plan.


~Linda Griepentrog
Linda is the owner of G Wiz Creative Services and she does writing, editing and designing for companies in the sewing, crafting and quilting industries. In addition, she escorts fabric shopping tours to Hong Kong. She lives at the Oregon Coast with her husband Keith, and two dogs, Yohnuh and Abby. Contact her at .

Tagged With: color blocking, patches, sewing, solutions

November 29, 2019

Pedal to the Metal, Sewing is Like Driving

This story is by Hope Wright from ASG Springfield Lincolnland Chapter

I taught a Summer Sewing Camp this year and when I went to the school for start of sign up, one teacher’s aide expressed some regrets that she never learned to sew. I told her that if she could drive, she could learn. That was based on my opposite experience — since I could sew, it was pretty easy to learn to drive. Just had to remember to step on the brake, not just lift the foot from the pedal! Since then, I’ve been thinking of comparisons.

  • For Adults: If you can drive a car you can learn to sew.
  • For Kids: If you learn to sew, it will be much easier to learn to drive when you are older.

Using a sewing machine is like driving a car:

  • Both have a start switch, although a key isn’t needed with a sewing machine.
  • Although you can leave them running when you aren’t in the driver’s seat, it isn’t a good idea. (especially be sure to unplug irons!)
  • You have to figure out the purpose of all the buttons and levers on the sewing machine, like all the buttons and levers on a car – and every model can be different so you have to figure it out for a different sewing machine as well as a different car.
  • You have to steer the fabric just like turning the steering wheel. Continual adjustments are needed, and eventually many of them will become automatic.
  • The more you press down on the foot pedal the faster it will go, up to where the pedal is to the metal/floor.
  • You have to figure out where to look to be able to go where you want to go. Keep your eyes on the feet/fabric, not the needle, just like you keep your eyes on the road, not the hood.
  • You can’t be distracted — you could sew through your finger or have an accident.
  • There are times that it is boring, but you have to stay alert or you could sew through your finger or have an accident.
  • You have to plan ahead to know where to turn your fabric or change lanes.
  • Sometimes you have to make corrections, either unpick some stitching or make a detour.
  • Preparation is needed for both. For sewing, you have to to select and cut out the project. For driving, you have to plan your route and make sure you have your driver’s license, etc. before you leave home.
  • Both need to go to a mechanic for oil changes and repairs at regular intervals or when something quits working.
  • You can spend lots more for extra “stuff” and for flash, but there are economical changes you can make.
  • Both have practical uses that will save money, like repairing and upcycling clothes or traveling without taking a bus or cab.
  • Both have fun uses – exercise your creativity and artistic skills, or take a drive to enjoy the scenery.
  • The more you sew or drive, the easier it gets — practice is important!

What is different about it?

  • If you take your foot off the foot pedal of a sewing machine, it will stop. To stop a car, you have to step on the brake.
  • You don’t have to watch out for others who might sew in to you or that you might sew in to.
  • There aren’t very many “rules” in using a sewing machine; certainly nothing that will get you arrested!
  • You can sew at a much younger age than you can drive. And you will probably be able to sew long after you have given up driving.
  • Driving creates memories, but sewing gives you something tangible to show, wear, use, or give.

© Hope Wright, ASG Springfield Lincolnland Chapter


November 8, 2019

Button and Buttonhole Positioning

Button & Buttonhole Placement on the ASG blog
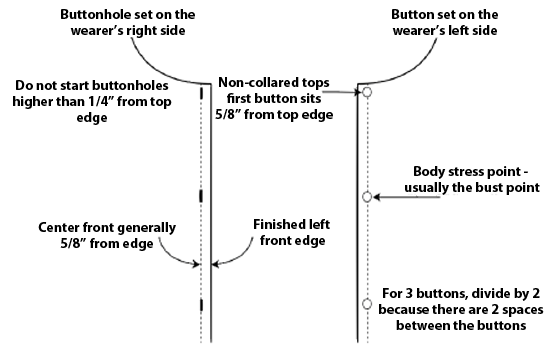
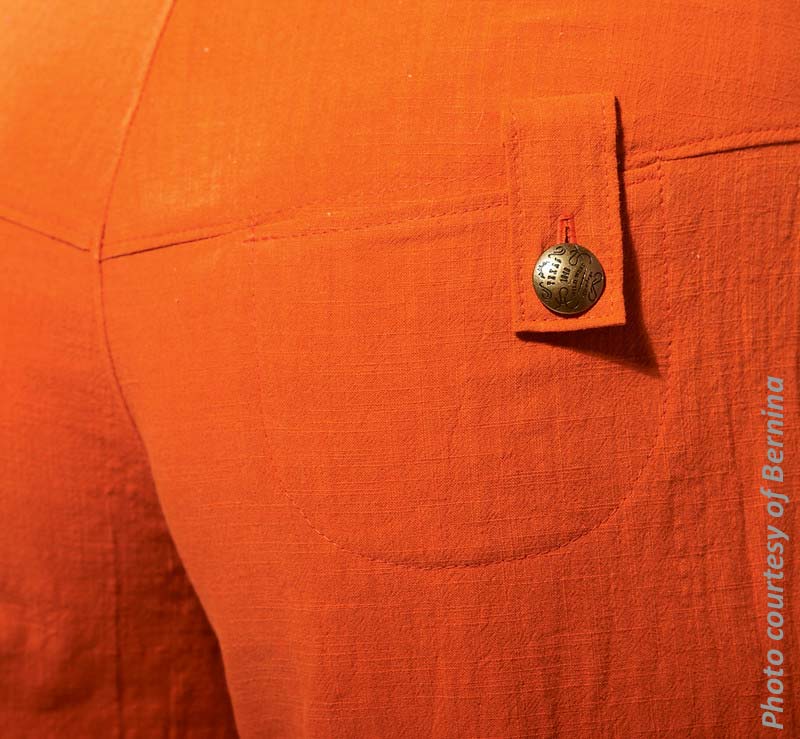
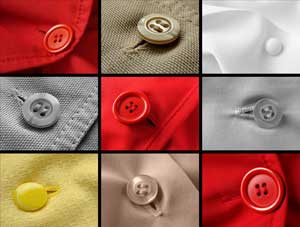
Button and buttonhole placements can sometimes be confusing. If the button and buttonhole are placed incorrectly, the garment may be too tight, too loose, or create gaping. The number of buttons on the garment is suggested on your pattern envelope, but it’s up to your personal preference or need. A good guide to start placing your buttons vertically is to keep in mind your body’s pressure points. Pressure points are where your body may put strain on the garment and may be your bust, belly, or even the hip if you are making a button front dress or skirt.

Button Placement

Once you have identified your pressure point(s), mark these on your muslin or sloper (block) pattern for future reference.

  • Decide how many buttons to use.
  • Lay your pattern or muslin flat, mark the center front and your pressure points.
  • Place your highest and lowest buttons on the muslin.
  • Measure the distance between your top and bottom buttons.
  • Divide this distance between the number of buttons you will use. If you use 5 buttons, divide by 4. You will always divide by one less button, because that is the number of actual spaces between your buttons.
  • Determine if the button placement falls on your pressure point(s). If not, you may want to adjust the position slightly to hit that sweet spot.

Buttonhole Position

Now that you have the button position, you need to determine if you want vertical or horizontal buttonholes. Horizontal buttonholes will need a facing deep enough to fit the entire length of the buttonhole. I have seen some patterns where the facing is too narrow for horizontal buttonholes. Vertical buttonholes allow for button play. This means if the button is not set exactly in the measured spot, there is room for the button to move up and down within the hole.

The distance between center front and the finished edge of your garment is generally 5/8”. This is okay if your button is 7/8” or smaller. If the button is larger, you will need to extend the distance from CF to the finished edge of your garment.

Buttonhole Size

To figure out what size buttonhole to use, some machines have a button hole foot that the button sits on the back carriage and the machine will make a buttonhole to that size. Or you have a machine that is computerized and you can adjust for your button size. The general rule of thumb is, the buttonhole needs to be 1/8” bigger than the button, for ease of going through the hole.

  • 1/2” button uses a 5/8” buttonhole
  • 5/8” button uses a 3/4” buttonhole
  • 3/4” button uses a 7/8” buttonhole

Good Buttonhole Practices

When making a vertical buttonhole, the button and buttonhole will be placed exactly at center front. In the case of horizontal buttonholes, the button is set at center front, but the hole is started 1/8” away from center, toward the finished edge. If your garment needs a button at the top edge, I start at 5/8” down for the button placement, but you can decide how far down, depending on the width of your button. But never start a buttonhole higher than ¼” below the neck edge.

  • Always make a test buttonhole with the same thickness as your garment, Top fabric, bottom fabric and interfacing. Make sure your button will pass through the hole easily.
  • Buttons are set on the left front and buttonholes on the right front for women’s garments

Something that I do for jackets, especially for horizontal buttonholes, is to set all the buttonholes along the edge of your fabric BEFORE cutting out the front body. This allows for checking the placement without chancing ruining the garment and works best for bound button holes because the inside opening is usually hand finished.


~© Annalisa T, Alameda County Chapter

Tagged With: buttonholes, buttons, sewing

  • « Previous Page
  • 1
  • …
  • 48
  • 49
  • 50
  • 51
  • 52
  • …
  • 63
  • Next Page »

Become a Member

Join the only national organization dedicated to Advancing Sewing as an Art and Life Skill.

Join Now button

Blog Article Categories

  • ASG Conference
  • Chapter Stories
  • Embroidery
  • Fitting
  • Learn to Sew
  • National Sewing Month
  • Products, Books, & Patterns
  • Projects
  • Quilting
  • Sewing
  • Sewing Techniques
  • Sewing Tips
  • Sewing Tours
  • Videos
  • Disclaimer
  • Privacy Policy

American Sewing Guild
National Headquarters
9660 Hillcroft, Suite 230
Houston TX 77096
713-729-3000 | 713-721-9230 Fax
www.ASG.org

ASG wordcloud - education, conference, discounts, videos, special offers, tours and more

Copyright © 1998–2025 · American Sewing Guild · All Rights Reserved