American Sewing Guild (ASG)

Visit our blog Visit the ASG Facebook page Visit ASG on Pinterest Visit ASG's YouTube channel Visit ASG on Instagram
  • Home
  • Join ASG
    • Join Online
    • Chapter Locations
    • Member Benefits
    • Member Brochure
    • Join by Mail
  • Conference & Education
  • Resources
    • Contests & Awards
    • Giving Back
    • Hall of Fame
    • Links
    • Travel and Tours
    • Measurement Chart
  • Shop
    • ASG Store
    • Chapter Products
    • Video Resources
  • Blog
  • About
    • About Us
    • Donate to ASG
    • ASG Sensitivity Statement
    • FAQ’s
    • Start a Chapter
  • Contact
  • Member Login
    • Login First!
    • Members Only
    • Leadership Only
    • Website FAQ’s
    • Logout
  •  

April 15, 2022

Pick-up Sticks: Creating Artistic Fabric

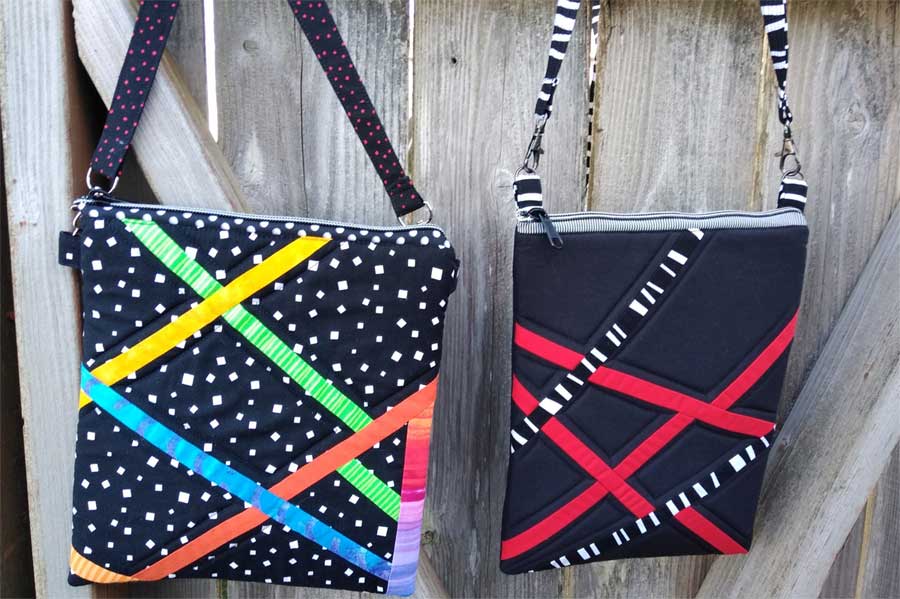
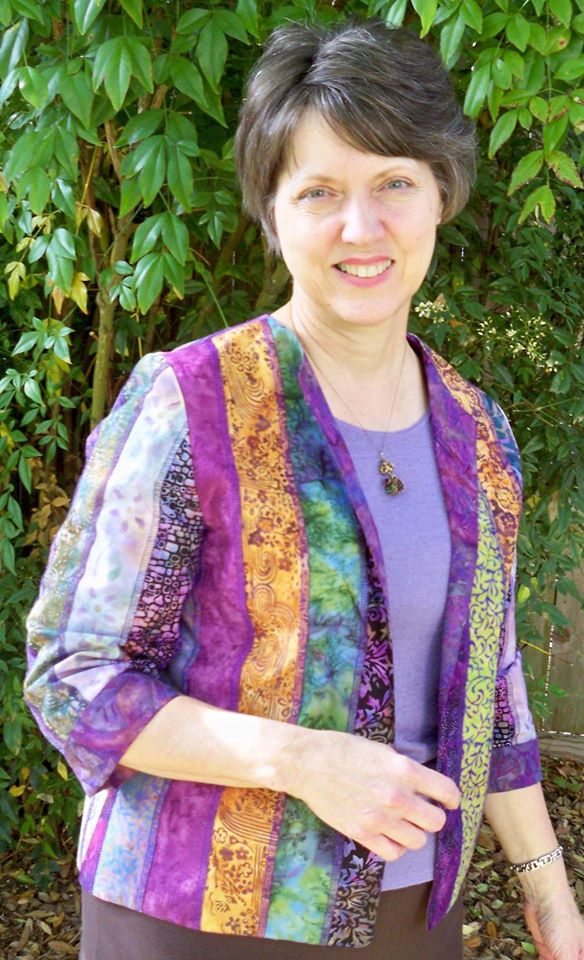
Perhaps you remember that challenging childhood game of pick-up sticks where you had to carefully remove a stick without disturbing the others around it? Well, that nostalgic game has inspired a fun sewing technique showcasing brightly colored channels inset at various angles onto a base fabric.

Whether you use this technique to create artistic fabric for a small project, a section of a garment (like a pocket, collar, cuff, etc.), or for a quilt, it’s sure to provide some fun sewing time. For purposes of these instructions, we’ll refer to the larger piece as base fabric.

Two bags made with artistic fabric
Pink Sand Beach Design’s Barbados Bag (modified)

Tools

Rotary cutter, ruler, and mat

Preparation

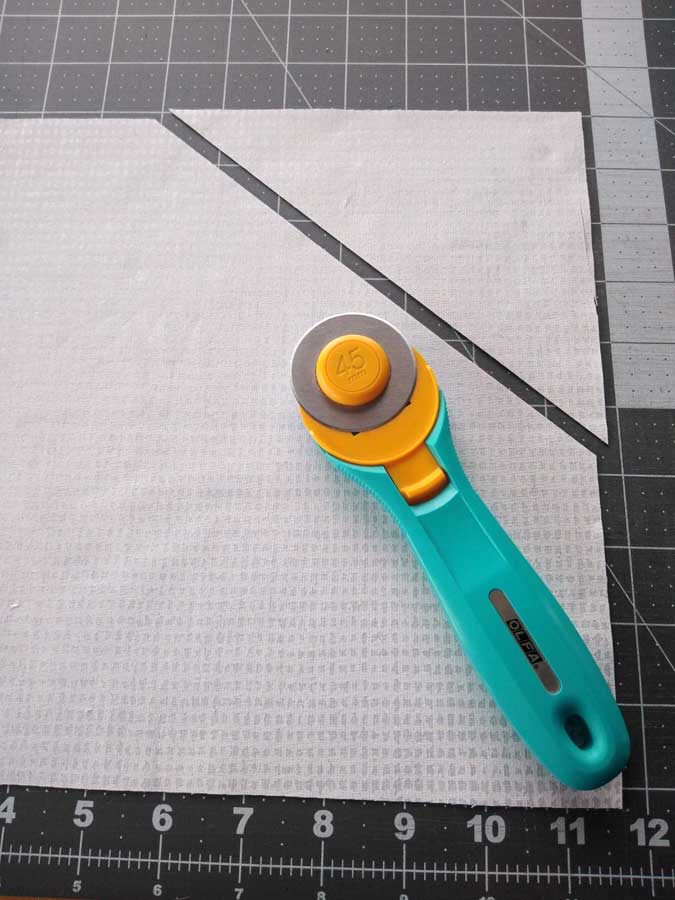
  • Cut the base fabric 1 ½” – 2” larger than the finished size needed. For example, if you’re making a pieced collar, create a rectangle that much larger than your pattern piece.
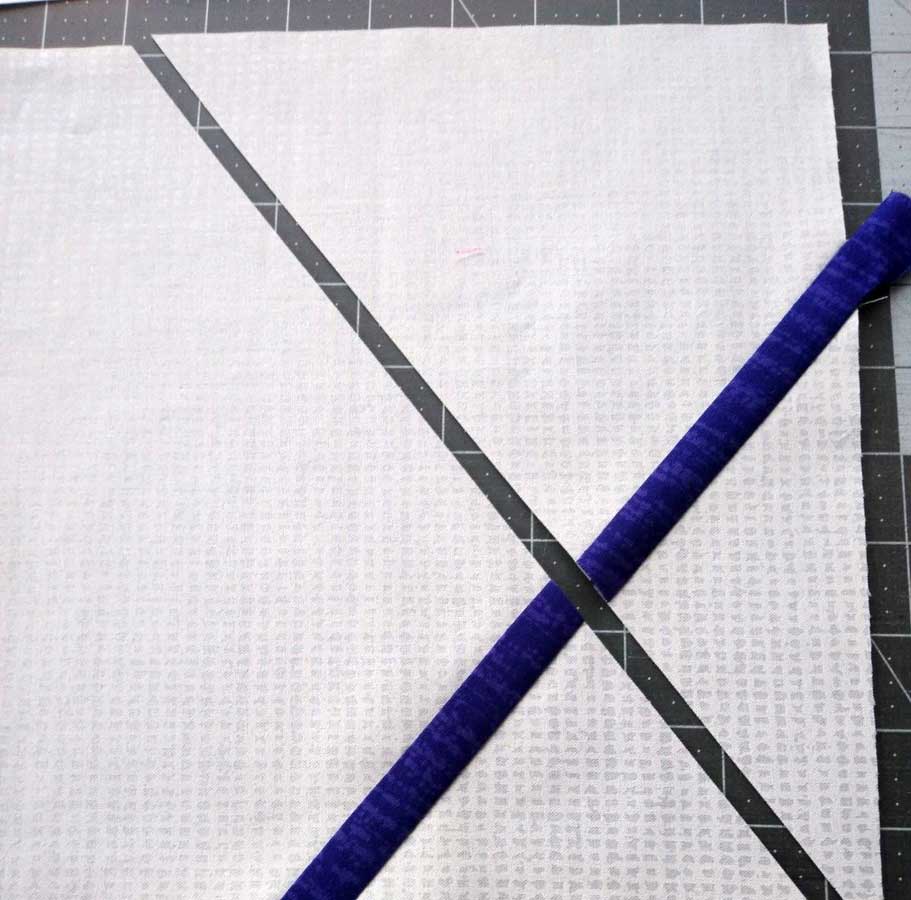
  • Cut the assorted color inset strips 1” wide.

Cutting Up

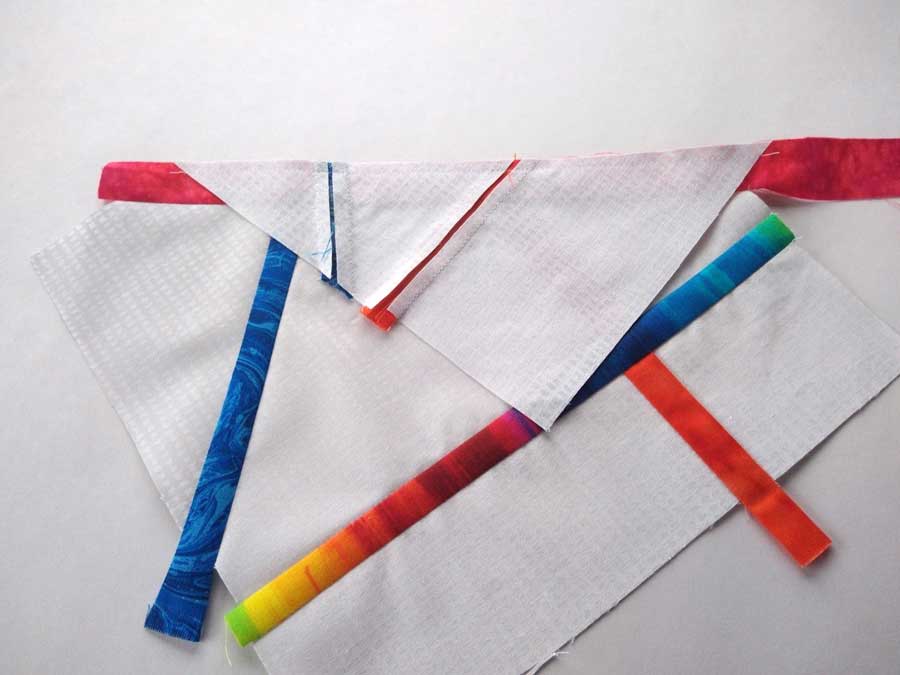
Lay the base fabric right side up and make your first cut at any angle you like, cutting it into two sections.

With right sides together and raw edges matching, sew one side of an inset strip to one side of the previously made cut. Press the seam allowances toward the inset.

Matching the second side to the adjacent base section raw edges, sew the remaining inset edge to the opposite side of the cut. Press the seam allowances toward the inset. Trim the excess inset length.

Lay the pieced fabric right side up on your cutting mat. Decide on the angle of your next cut and slice it apart again. The second inset can be at any angle and can bisect the first inset or not, depending on the desired effect.

Repeat steps 1-3 to complete the second inset.

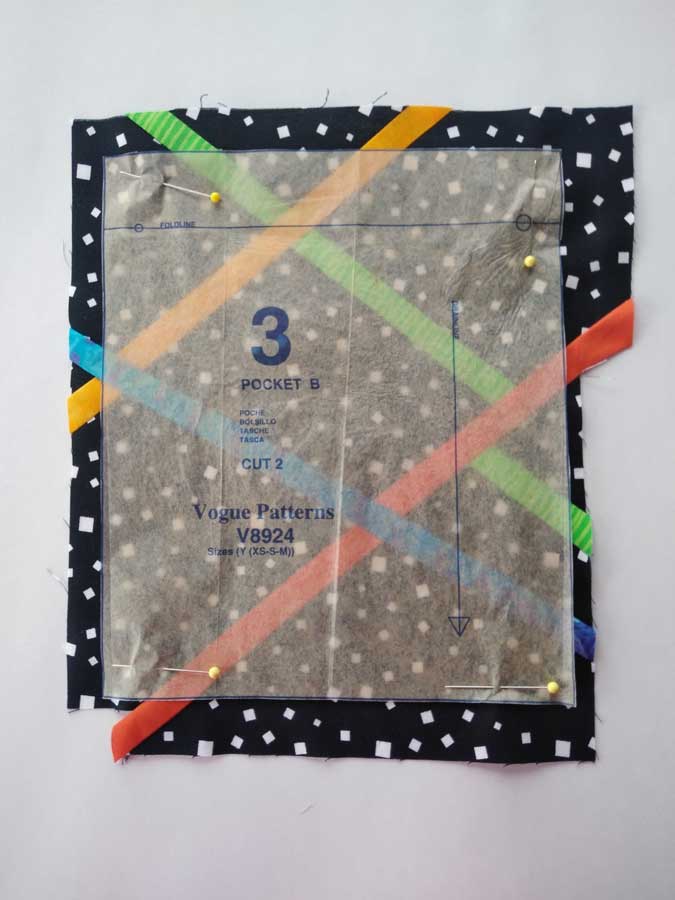
Continue in the same manner, slicing, insetting, and pressing until you have the desired look. Three to five insets per piece is an attractive addition. Note that the edges of the base fabric will not be even once strips have been inserted.

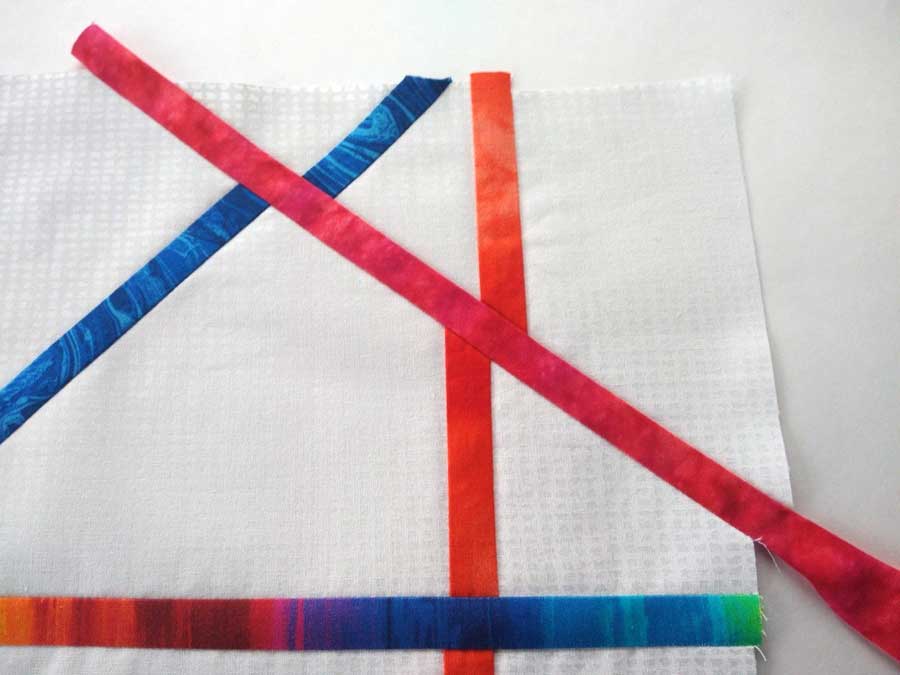
Tip: When you slice through an inset and reassemble the pieces, the adjacent inset sections may or may not align, depending on how you position the second section. If you choose to offset them, do so enough that the alignment looks purposeful and not as though it’s just slippage that caused it.

Once the base is complete, press it flat, and trim to the size needed, including seam allowances for further construction. If you’re making a small project or using the pieced section in a garment, cut out the pattern piece(s) from the completed section of fabric.

Beyond the Basics

  • This technique can be used on almost any woven or non-woven fabric—think lightweight leather, denim, linen, silk, etc. It can work on knits as well if you stabilize the base fabric with fusible interfacing first to avoid stretching.
  • For easier handling, especially on loosely woven fabrics, use spray starch or another pressing aid on the base fabric before starting the piecing to help stabilize bias-cut seams.
  • The base fabric can be solid or print and so can the insets, so mix and match for fun.

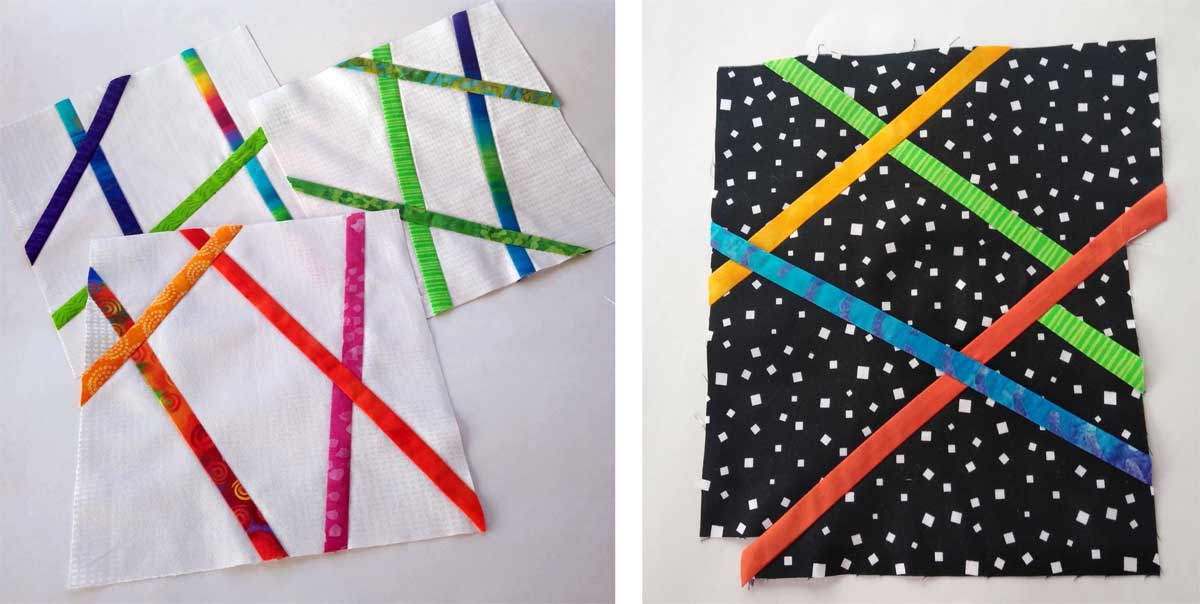
  • The inset pieces can be multiple colors or a single color, depending on the desired look.
  • Use the new shapes created by the insets as a guide to quilt the fabric to fleece, foam or batting, depending on the project you’re making. For garments, pre-shrunk flannel backing adds a light touch without adding warmth.
  • A single square is ideal as an inset in a jacket back, or turn under the edges and make it an appliqué. Add some piping around the edge to frame the featured section.

~Linda Griepentrog
Linda is the owner of G Wiz Creative Services and she does writing, editing and designing for companies in the sewing, crafting and quilting industries. In addition, she escorts fabric shopping tours to Hong Kong. She lives at the Oregon Coast with her husband Keith, and two dogs, Yohnuh and Abby. Contact her at .

Did you enjoy this article?
Are you an ASG member?
This field is for validation purposes and should be left unchanged.

Tagged With: artistic fabric, artwork, bags, fabric, garments, quilts

December 4, 2020

Border Prints 101

When shopping for fabric, we’re accustomed to seeing rows of bolts with an allover print. But look a little deeper and you’ll find some with unique features—border prints! Border prints are fun to work with and allow you to showcase this print feature in creative ways.

What is a border print?

Instead of a fabric having the same patterning across the full width of the fabric, border prints have a different pattern along one or both edges. The bands of distinct prints can be narrow or wide, and can extend their emphatic look across the fabric’s full width in some instances creating a beautiful graphic element.

  • A double border print may have the same or differing designs along each fabric edge. A common pairing is to have one narrow border and one wider one.
  • A border print is parallel to the fabric’s selvage, ready for showcasing in a garment, accessory or quilt and can be found on a woven fabric or along the cut edge of a knit.
  • Another type of fabric considered a border print has a lengthwise edge detail like scallops or fringe along one or both sides.

Working with a Border Print

The primary difference in working with a border print is that the project needs to be on the crosswise grain of the fabric, rather than the traditional lengthwise spec. The design area is best showcased along a straight edge, like a skirt or sleeve hemline, pant leg, jacket hem, etc., though it doesn’t need to be at the bottom of a garment. The border can also be used along a pocket edge, in a bodice area or even at the waistline.

If you prefer to use the border vertically instead of horizontally, think about a jacket front, wrap skirt or side-seam accent. If you choose this orientation, be sure the border design isn’t directional—for example, you probably don’t want flower stems horizontal on a jacket front, or people lying down along a wrap skirt edge. The print should really be non-directional for vertical use.

Border prints can also be used to accent small areas, like collars and cuffs, totes, etc., and are also ideal for home décor projects, like on a curtain hem, pillow or quilt border.

Like any distinct print, matching is always a good idea, so consider where you may need to match a distinct pattern before you begin cutting. A hemline border should match at the side seams to avoid breaking the visual patterning.

Pattern Adaption

Some patterns are designed specifically to be used with border prints, but most are not. Look for designs with straight edges, like a gathered or pleated skirt, if you want to feature the print along the hemline.

  • If the area you want to use the print in is curved, you’ll need to straighten it or risk losing part of the border to the curve.
  • Redraw your pattern’s grainline to reflect the new orientation on the fabric. Use a ruler to change up the standard grainline 90°. Double check the fabric width to accommodate the new orientation.
  • Since some border prints are close to the selvage, it may be necessary to modify a hem depth if you want to use the print along the bottom of a skirt. A narrower hem, or a faced hem, could both be options depending on the design placement.

Yardage Adaptation

The amount of yardage needed for a border print will likely differ from what was originally called for if the garment was originally cut on the lengthwise grain. After redrawing the grainline on the pattern pieces, do a test layout to refigure the fabric before purchasing. Keep in mind that it’s best to cut all the garment pieces on the same grain to avoid any variance in directional prints or shading.

The width of the fabric may limit the use of the border on certain garments, or require you to piece a garment if you’re intent on using a particular fabric.

Note that you can also trim off the border and reattach it if needed, to get the look you want in your project.

Now that you know more about them, when you see a border print fabric, think about how you can showcase it in your next project!


~Linda Griepentrog
Linda is the owner of G Wiz Creative Services and she does writing, editing and designing for companies in the sewing, crafting and quilting industries. In addition, she escorts fabric shopping tours to Hong Kong. She lives at the Oregon Coast with her husband Keith, and two dogs, Yohnuh and Abby. Contact her at .

Did you enjoy this article?
Are you an ASG member?
This field is for validation purposes and should be left unchanged.

Tagged With: border prints, fabric, garments, textiles

March 12, 2020

Meet Patty Dunn with All Dunn Designs

This month we are pleased to turn the spotlight on a very special independent designer, Patty Dunn of All Dunn Designs and part of the Corpus Christi Chapter.

Patty Dunn, All Dunn DesignsMany of you may already know the All Dunn Design line from ads in sewing magazines, from her nine years of sewing shows on PBS, or from her many classes she has taught at our ASG conferences. But did you know that it was just such a class that gave birth to the Corpus Christi Chapter 24 years ago? Patty taught a fitting and tailoring class at the local junior college and the students wanted to stay in contact and continue to see each other after the class. Patty explained, “So I agreed they could come to my house once a month. The group started with 9, and there were 20 in just a couple months. So we rented a space at the art center. It grew real fast. I had heard about ASG, presented it to the group, and we signed up. I think we had been going for about a year when we decided to join.”

It started with a Christmas gift

And how did Patty develop her interest in sewing? She credits it to the Christmas she turned 9 when her parents bought her a child’s, metal, hand cranked sewing machine. That started her sewing clothes for her bride doll that she still has today. By the time she was in 8th grade, she was making her own clothes with a little help from her Home Ec. Class.

Patty was also inspired by a friend of her mother’s who had a sewing room. She says, “When I saw everything she was creating and the machines all set up with fabric everywhere, I was amazed!  I was probably around 7 years old, but it really impressed me.”

In the 1980’s, Patty became a certified mechanic for Bernina, Viking, and Janome sewing machines and was trained in sales for those machines. She continued her sewing education by taking classes at various conferences.

From dolls and bags to something more

Hangin Around Lu LuWhen asked how she got started in her own business, Patty explained, “I began by selling dolls and bags at craft shows. Then people began to want me to sew for them. Many of my clients wanted me to copy something they loved or something they saw in a magazine. Many had unique fitting issues, so I began making a basic shell that fit them, and then I designed from that. In the late 1990’s, I began making patterns for clients to sew, and from there I began my own pattern line.”

Her patterns are simple, easy to make designs that differ from the big four. She explains, “I use a more realistic base pattern that starts narrower at the shoulders and gives more room in the hips. My patterns are not for the models on the New York runway, but then, who really looks like that?  Our bodies have changed to much fuller proportions.”

Patty offers a 15% discount to all ASG members. See the Special Offers page in the ASG members area for more information.

Patty credits her inspiration for her designs from clothing in stores, catalogs with creative clothing, and internet browsing. She says, “You never know where you might find inspiration. There is a shop in the Houston airport I always love to go in when I’m there. It might be the embroidery or the color combinations, sleeves, or collar. Just one thing can be incorporated into something I might try. Designing is my favorite aspect of sewing, but teaching is also a favorite. I’m thrilled when I can help someone be successful in what they create. And I love to problem solve, just NOT with math.”

Like most of us who sew, Patty laments the changes in local fabric stores with so many of them going out of business. “The fabric stores change with the trends, now believing that people aren’t sewing clothing anymore. I hate the concept that people don’t sew because it is cheaper to buy clothes already made. Although this is now true, it is discouraging. Thread can cost as much or more than we used to pay for a yard of fabric.”

An eye to the future

Patty DunnLooking to the future she says, “At some point, and I already see it changing, people will respect you if you are able to sew. We have become a society of ‘get everything quick and easy.’  Knowing a skill like sewing will be valuable because EVERYONE wears clothing and no matter where they get it from, someone ran a sewing machine through the fabric. I believe someday there will be more recognition for the value in knowing how to put a garment together from beginning to end and people will pay well for that service. More independent designers have become respected for their expertise.”  She went on to praise the blogs and sharing that are so popular on the internet and noted the fabulous new machines and sewing tools that have made it more convenient to sew.

We are pleased to have Patty as a part and know she has much more to contribute to her craft, for after all, she is not “done” yet. (Sorry, I couldn’t resist!)


To see Patty’s designs and to get fitting and sewing information, she provides two links:

  • Patterns:  www.alldunndesigns.com/
  • Fitting and sewing:  www.patternmd.com

Patty offers a 15% discount to all ASG members. See the Special Offers page in the ASG members area for more information.


~ Rosemary Fajgier

The American Sewing Guild is truly fortunate to be able to count many gifted sewing designers and instructors among our friends, members, and supporters.  Throughout this coming year we will be featuring some of them in our Notions Blog.  We hope you will enjoy reading about them and take the opportunity to get to know them better and explore their many talents by visiting their websites, taking their classes, and discovering the wide variety of designs they bring to the home sewing market.

Did you enjoy this article?
Are you an ASG member?
This field is for validation purposes and should be left unchanged.

Tagged With: dolls, garments, patterns, sewing educator

September 20, 2019

2019 Fashion Show

Enjoy the video from the One if by Land, Two if by Sea Fashion Show from the 2019 ASG Conference in Boston. The show was emceed by Nick Coman from Dragonfly Dyeworks.

Tagged With: ASG Conference, Fashion, fashion show, garments

January 25, 2019

The Dior Exhibition

DiorOn a beautiful, sunny day in January, the Colorado Springs ASG garment group toured the Dior exhibition held at the Denver Art Museum. I had heard glowing reviews from other friends who had attended, but I was not prepared for the scope of the offering. A selection of more than 200 couture dresses was on display, along with many drawings, mood boards and accessories. The exhibition was even more fantastic because of the way the garments were presented, having been designed by the internationally renowned architect Shohei Shigematsu.

The first room of the exhibition had the viewers walking through a dimly-lit passage filled with toiles made up in a flat black fabric (even the mannequins were black). Something about stripping the designs of all color allowed the viewer to see the beautiful structure of the garments.

We were able to see design boards and garments by Christian Dior, who was head of the house for a short time before his death. The exhibition then showed garments and their inspiration from all the lead designers who have followed, including Yves St. Laurent. Each of these designers has contributed his or her own design esthetic to the Dior line.

Denver Museum Dior Exhibit
« ‹ 2 of 5 › »

Another striking room was filled with traditional toiles in white. The room was probably 25 feet tall and the toiles were hung on the wall at least four garments high. We were told that Dior drew his sketches without a lot of thought as to how they were going to be constructed. He expected his workers to be able to translate his designs to finished garments, the toile being the first step.

One room of about 20 ball gowns featured a video display above with images of celebrities in some of the same gowns. While we definitely couldn’t touch the garments, we were able to get quite close to some of them.

Part of Dior’s genius was to design and create accessories, even perfume, so that a woman could be clothed head to toe in Dior. One display had colorful columns that held hats, headpieces, jewelry, shoes, bags and what looked like doll clothes. It was a bold presentation that captured the breadth of the line.

In many cases, the designers of the House of Dior were influenced by what was happening in the greater art world. This influence showed up in fabric creation and garment silhouettes. In many rooms the Denver Art Museum showcased actual art that served as inspiration.

The final room of the exhibition was an extensive display of Dior around the world. The room was enormous with the garments standing on tiered discs. With almost 50 garments, the visual punch was intense.

We all agreed that once through this exhibition was not enough to take it all in. Perhaps we’ll be able to go again before it leaves Denver and makes its way to Dallas – the only two cities in the US to house the exhibition.

Dior Exhibit at the Denver Museum
« ‹ 1 of 7 › »

~Thank you to Cecelia Harris from the Colorado Springs chapter for this post.

Tagged With: design, Dior, fabric, Fashion, garments

Become a Member

Join the only national organization dedicated to Advancing Sewing as an Art and Life Skill.

Join Now button

Blog Article Categories

  • ASG Conference
  • Chapter Stories
  • Embroidery
  • Fitting
  • Learn to Sew
  • National Sewing Month
  • Products, Books, & Patterns
  • Projects
  • Quilting
  • Sewing
  • Sewing Techniques
  • Sewing Tips
  • Sewing Tours
  • Videos
  • Disclaimer
  • Privacy Policy

American Sewing Guild
National Headquarters
9660 Hillcroft, Suite 230
Houston TX 77096
713-729-3000 | 713-721-9230 Fax
www.ASG.org

ASG wordcloud - education, conference, discounts, videos, special offers, tours and more

Copyright © 1998–2025 · American Sewing Guild · All Rights Reserved