


In this short sewing basics video, we show you how to use a bamboo point turner. If you think this tool is only used for one thing, think again! See what else it can do and why you need it in your sewing space.
~Sheryl Belson
In this short sewing basics video, we show you how to use a bamboo point turner. If you think this tool is only used for one thing, think again! See what else it can do and why you need it in your sewing space.
~Sheryl Belson
What is the one item that you absolutely must have for every sewing project you will ever do? It’s fabric, of course! Since the fabric you choose will have a significant impact on how your finished project turns out, it can help to have an understanding of how fabric is woven so that you can meet the expectations of your finished project. While weaving is a skill all on its own, understanding weaving principles can open our eyes to a greater depth of our understanding of fabric. Let’s start by watching this 7-minute video as we see cotton and hemp woven into fabric.
Now that we have a visual of the process, let’s look at fabric terms:
Selvage: The video provides a great visual representation of selvage and why it exists. The process of shuttling the weft threads back and forth is what creates the finished edge. Now, as you think about how that thread if shuttled from one direction then the other, wrapping the edge as you turn to the other direction, selvage makes a lot more sense. No wonder it doesn’t ravel! And since it is created by wrapping those vertical warp threads, it now makes sense why the selvage is so vital to determining the grainline, as well as the most stable part of the fabric. The selvage can be included when cutting a waistband to help reduce the stretch factor that is sometimes experienced while wearing a garment. Using the finished edge of the selvage in a waistband can add strength and may eliminate the need to turn another layer of fabric inside, thus reducing a layer of bulk.
Warp: As shown in the video, warp threads are the first to be set up and run the length of the fabric. Warp threads provide the structure for the weft threads to weave through and give the fabric stability. Warp thread and grainline go together — the grainline equals the direction of the warp thread. Doesn’t it make more sense now that the grainline is the most stable direction of the fabric?
Weft: Remember the threads being shuttled from the left to the right in the video? Those vertical threads are the weft, which also defines the cross grain of the fabric. The cross grain is the second most stable direction of your fabric but since they are not held tightly in place like the warp thread, they have a bit more “give” to them. However, since they are in a straight line, they have more stability than the bias, which we will talk about next.
Bias: Think of bias as a tic-tac-toe grid and draw a line from one corner to the opposite diagonal corner. That 45-degree angle is the bias. This has the most give and the least stability of any direction in your fabric. With an understanding now of how threads are woven, you can probably visualize the tiny gap between the threads. When you pull those threads at a diagonal, there is no straight thread to pull against, thus you are pulling across that tiny open gap between the threads. Sometimes we use the property of bias to the advantage of a project. For example, a garment made with bias-cut pieces will have a greater amount of drape and will skim the body much more than the same garment made of the same fabric that was cut on the grain.
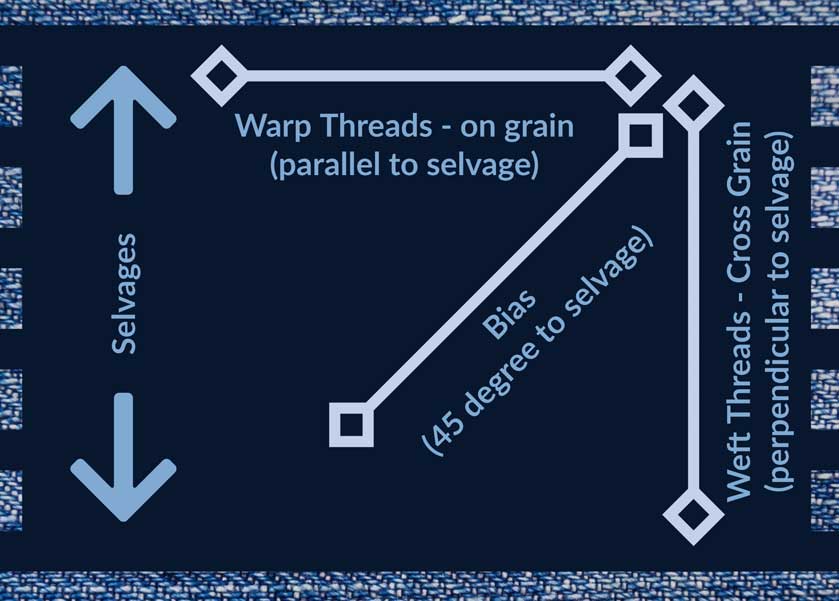
Grain: By now, just by talking about warp and weft, we have already addressed grainline. But to see a little bit more focus on the grainline, watch this 6-minute video we published in January of 2020. It addresses some of the things already discussed here with a little more information about how to identify and use the grainline when cutting out your projects.
Hand: The final term in this discussion is hand. The “hand” of a fabric refers to the “feel” of the fabric against your skin. There are many adjectives that can be used to describe the hand, or feel, of a fabric. Words like cool, slick, smooth, loose, stiff, heavy and stretchy can all be used to tell someone about the hand of a fabric.
We hope that diving into the art of weaving has given you a new perspective on fabric and has helped to explain the importance of understand the relationship between the fabric you’ve chosen for your project and your desired outcome.
~Sheryl Belson
In this article, we review a catch-all “Other” category of basic sewing tools that includes thread snips, seam rippers, point turners and stilettos:
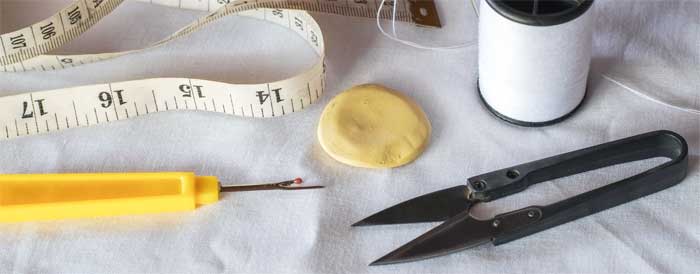
Thread snips, also called thread nippers, thread clippers, and thread cutters—are small, often spring-loaded, scissors used for trimming threads and are easy to keep close to your sewing machine for quick access to trim at the end of each seam. Some varieties are more heavy duty and can even be used for notching fabric.
Thread snips come in various designs, sharpness, and price points.
Seam rippers are a small tool used for removing stitches. There are two primary styles:
No matter which style you choose, it is always important to use care not to slice your fabric as you pick out your stitches.
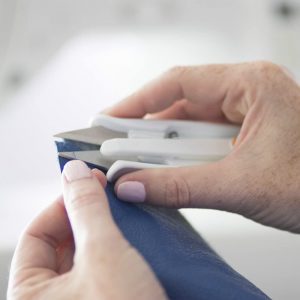
Point turners are usually made from either plastic or bamboo. They are a great tool for creating sharp corners and can also be used to crease or mark fabric temporarily. Be careful not to poke the pointed end through your fabric as you turn out your corners. Simply insert the pointed end inside the corner and pull the fabric over the end. If you have trimmed your seams well, you should have a beautiful sharp point.
Here’s a 1-minute video tutorial that will give you some quick tips on how to use your point turner. You may be surprised about some extra functions you can get out of this handy little tool!
Stilettos, sometimes called awls, are a great help at the sewing machine to help move fabric under the presser foot as well as several other functions. They come in a variety of styles and materials such as metal, bone, and wood. Regardless of style, they will have at least one, and sometimes two, pointed ends and a handle to hold onto. The sharp point can ride along close to your presser foot and act like a safe extra finger to help you hold fabric in place while sewing. They can be useful when picking out stitches or turning under small edges of fabric. They can also hep you to safely secure your fabric while pressing without getting too close to a dangerously hot iron.
Many stiletto options are available in sewing shops but for the non-traditionalist, you can improvise with things like a bamboo skewer (think shish-kabobs), a porcupine quill or even an ice pick.
We hope you found something new or were reminded of something old as you read through this list of sewing tools. And if you decide to try a new tool or replace an old one, don’t forget to take advantage of your member discount as you do.
See our full series of Sewing Basics/Learn to Sew articles.
~Sheryl Belson
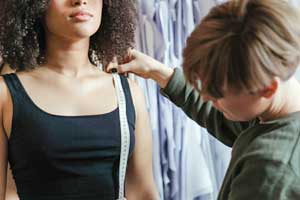 We’ve all done it. You cut that precious fabric, and you cut it wrong. Once you’ve made that cut, you can’t undo it. And now you don’t have enough to recover from your mistake. ARGH! Whether taking body measurements, marking seam allowances, or cutting quilt squares, when we sew, we need to measure accurately every time if we want our project to come out correctly.
Accurate measurements help to ensure a proper fit in garments, desired proportions in home dec, beautifully square and align quilt pieces and more. We definitely need to pay close attention to what we are doing, but making a small investment in a few helpful measuring tools can help. These are your must-haves:
Also called a measuring tape, it’s a flexible strip of cloth, plastic or other pliable material with measurement markings. They usually measure about 60” long and 5/8” wide. It is generally reversible with inches on one side and centimeters on the other to help take a more accurate measurements, and can easily be rolled up when not in use.
Pro Tip: Since a tape measure is usually 5/8” wide, you can use it to check the accuracy or placement of your 5/8 seam allowances.
 Tape measures can be used for just about everything when it comes to sewing. Use it to:
Many resources suggest that the flexible material that tape measures are made of will not stretch. However, that is not always the case. It’s a good idea to check the accuracy of your tape measure every few months just to be sure an inch is still an inch. Many are made of fabric and then coated, which helps to make them last longer and discourages stretching. You can look for a non-stretch fiberglass model instead of fabric to solve the stretching issue. Choosing one with metal tips can also prevent fraying.
 Clear rulers are extremely helpful when measuring and drawing seamlines and cutting lines. They are made of sturdy transparent plastic or acrylic and have easy-to-read measurement markings. They also come in a variety of sizes and shapes, such as square, rectangle and even a French curve.
Sometimes, they are also marked with helpful 30, 45 and 60 degree angled lines which makes them great for marking straight edges and parallel lines, buttonholes, tucks and pleats. It can also be used to check the grainline of the fabric. The best thing about this type of ruler is that since you can see through them, it makes it so much easier to align the marking and cutting lines perfectly with the designs on the fabric.
Many sewists like having both a large ruler (15 x 60 cm or 6” x 24”) for long straight lines, and a small one (3 x 30 cm or 1” x 12.5”) for the details. Another favorite is a 5/8” curve ruler that can be used to mark seam allowances or add that extra ¼” to a pattern piece to give a little extra ease in the final garment.
Pro Tip: Clear rulers can be slippery on fabric. Try adding a strip of Dritz Omnigris Invisi-Grip or a few TrueCut TrueGrips non-slip adhesive rings to give it some gripping power. Alternatively, choose a no-slip ruler like the Quilter’s Select Rulers.
Th ere is one additional measurement tool in this category to share. While not necessarily a ruler by the truest definition, templates like the welt pocket template and the fly zipper template found on Stitch Buzz are extremely useful. Watch the interview with Claire Cochran, owner/inventor to learn about the Stitchbuzz rulers and templates. ASG members can also get a 20% ASG discount by using the discount code in the ASG Member’s Only Special Offers section!
 Seam gauges are rulers, usually 6” long with a sliding pointer that can be used sort of like a caliper. They are often marked in both inches and centimeters and are great tools for marking buttonholes, pleats, hems, etc. because they aren’t flexible and, thus, allow for more accurate measurements.
Though the most common length for a Seam gauge is 6”, you can also find them in longer lengths. Dritz makes one that is 7” long with a point turner on one end, making it a multi-purpose tool. Clover makes one called a 5-in-1 that can be found not only in the 6” length, but also in an 11” length.
These tools will get you off to a great start. As your sewing skills become more advanced, you may want to invest and experiment with other more specialized measuring tools to help you do the job more efficiently. There are many measuring tools with different shapes, measurements, sizes and neat gadgets to choose from.
 If you do choose to add some new tools to your sewing box, don’t forget to check the Member’s Only Special Offers. Many of these tools are available to members at a discount. The table in this blog article summarizes just of few of the discounts available .
~Sheryl Belson
