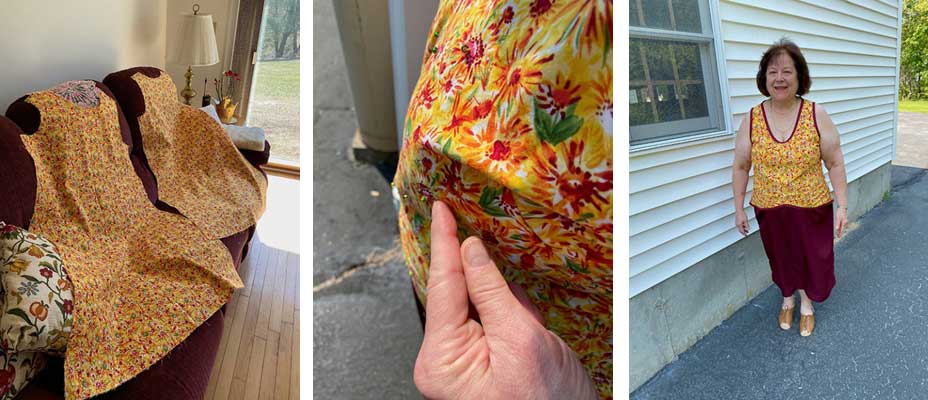
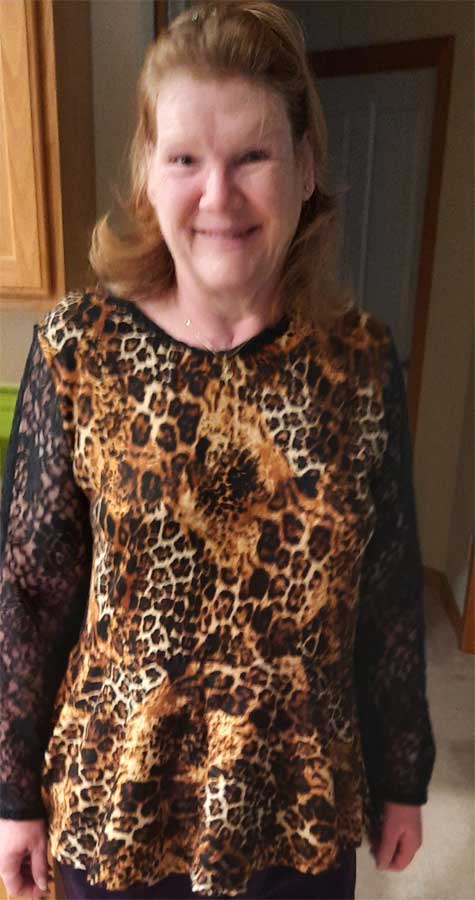
American Sewing Guild (ASG)

Visit our blog Visit the ASG Facebook page Visit ASG on Pinterest Visit ASG's YouTube channel Visit ASG on Instagram
  • Home
  • Join ASG
    • Join Online
    • Chapter Locations
    • Member Benefits
    • Member Brochure
    • Join by Mail
  • Conference & Education
  • Resources
    • Contests & Awards
    • Giving Back
    • Hall of Fame
    • Links
    • Travel and Tours
    • Measurement Chart
  • Shop
    • ASG Store
    • Chapter Products
    • Video Resources
  • Blog
  • About
    • About Us
    • Donate to ASG
    • ASG Sensitivity Statement
    • FAQ’s
    • Start a Chapter
  • Contact
  • Member Login
    • Login First!
    • Members Only
    • Leadership Only
    • Website FAQ’s
    • Logout
  •  

September 15, 2021

What I’m Sewing: Pretty Peplum Top

Pamela's Patterns #114Q. Item Created 
A. Knit Top

Q. Independent Pattern Designer
A.
Pamela’s Patterns, Pamela Ligett

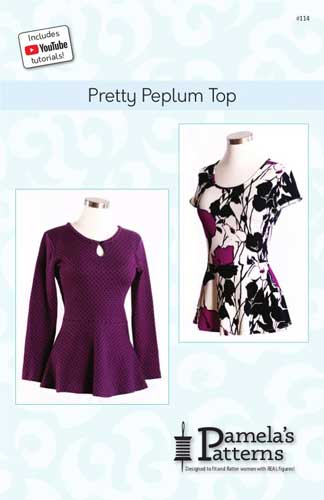
Q. Name and Number of Pattern
A.
Pretty Peplum Top

Q. Fabric Used:
A. Light stretch knit

Q. Special Embellishments/Notions Used
A. Stretch lace for sleeves

Q. Skill level required?
A.
Moderate

Q. Are the instructions easy to follow?
A.
Yes, including the fitting of proportions

Q. Are you pleased with the finished result?  Did it meet your expectations?
A.
Very please and have received many compliments!

peplum topQ. Did it look like the picture?
A.
Better with lace sleeves

Q. Did you make any modifications in the pattern?
A.
Used stretch lace for the sleeves instead of the knit fabric

Q. Are there any changes you would have made?
A. None

Q. Did the pattern teach you any unique or special techniques?
A.
Some good info and techniques about fitting

Q. Would you make this again?
A.
Definitely

Q. Would you recommend this pattern to others?
A.
Yes

Pattern Link: https://pamelaspatterns.com/products/114-pretty-peplum-top?_pos=1&_psq=PEPLUM&_ss=e&_v=1.0


~Cheryl Huckerby

Did you enjoy this article?
Are you an ASG member?
This field is for validation purposes and should be left unchanged.

September 10, 2021

Sewing Machine: Using The Built-In Specialty Stitches

Have you looked at advertisements for new sewing machines lately? One boasts of 729 built-in stitches! The designs consist of holidays, seasonal references, geometrics, flowers, plants, bugs, scrolls, animals, lettering, and just about any topic you might be looking for. They are quite impressive, but where can they be used?

Sewing machine screen showing decorative stitchesIn this article, Beverly Betz and Rosemary Fajgier set out to not only find uses for these great designs, but also to explore their machines and find some of their little known features. Although these stitches can be found on traditional sewing machines, when using them, there are a few embroidery tips that should be followed.

Starting Out

First, begin with the proper foot installed on your machine. Some machines will indicate the foot by number or letter. Generally, this will be a foot that has a wider needle opening to allow the needle to move from side to side without hitting the foot and breaking. The second characteristic of the foot is on the underside. If you turn the foot over, you will see that the foot has a channel running from the needle opening to the back of the foot. This channel is especially important for those stitches that are dense and use more thread when created. The channel allows the extra space needed for the stitch to clear the foot without getting hung up under it.

Stabilize It

The extra stitches often overwhelm the fabric and cause it to pucker if not supported properly. To avoid this, use a stabilizer under the fabric. What kind of stabilizer? That depends on several factors:

  • Weight of the fabric—the lighter the fabric, the lighter the stabilizer
  • Use of the item—if it will be worn and laundered, use a cutaway, otherwise a tear-away may be used.

Which Thread?

Threads can make a big difference in the final appearance of the stitches. Embroidery threads have a glossy sheen to them and especially when contrasting colors are used, draw the eye to the stitching and make the design detail pop.

Tip: Before you begin stitching, always make sure you have enough thread on the bobbin to complete the line of stitching. Trying to realign your stitching once you change a bobbin is most frustrating!

Where to Use Them?

So where can these decorative stitches be used?

  • One of the more traditional ways is to use them for top-stitching — try placing them on hems or collars to give a bit of detail on the edges of garments or on home dec items like curtains.
  • Harry Potter pillowIf your machine has lettering capabilities, little kids love having their name stitched on the lining of their garment or as an accent around a pocket or other design detail It’s a great way to make that garment even more special because it will be personalized.
  • Lettering can also be used to upscale other items. For example, rather than using a plain black fabric for this Harry Potter pillow (right), randomly stitched character names on the fabric made it a one-of-a-kind pillow.
  • When putting in a zipper, top-stitching down the sides of the zipper gives a great accent and a pop of color.
  • Purse handles get attention when accented with specialty stitches.

Quilters have long used these kinds of stitches to accent crazy quilts and even bindings. In this tote bag, a number of different patterns were stitched down the centers of strips to give the tote an added detail. The stitches can be applied on the strips as a sewing detail or to quilt the layers together.

Just because we traditionally think of specialty stitches as long lines of stitching doesn’t mean that is the only way to use them. When this plain blue fabric got a new personality with embroidered snowflakes in a random pattern on the fabric. Note that some machines can be set to stitch single designs while others must be stopped manually after each motif. And instead of quilting in just straight lines, why not use the specialty stitches when you want to add a little creativity to plain fabric. Either way, it’s a great technique to use to create an all-over pattern or just a few random accents.

What’s on the Screen

StitchesThe way the stitch appears on the machine screen and the way it looks when stitched out is sometimes very different. Therefore, it’s a good idea to test out the stitches to see if you like them before placing them on your finished project. Even doing test stitches can spur some creativity, as shown here by placing a number of designs together to create an overall pattern. Starting in the center with tiny blue eyelets, a wavy pattern was added and stitched down either side of the eyelets. Then a utility stitch in yellow resulted in a heavier braid effect. Rows of stitches continued to be added until a desired width was achieved. This design is now slated to become the front of a peasant-style blouse, but it could just as easily become a decorative pocket, or used on the front on a purse. You can even take a plain piece of fabric and fill it with your pattern to create an entirely new look to the fabric.

To get a good design, it is important to align each new row of stitching in relation to the last. The width of the presser foot makes a great spacer, as does marking a line with chalk that you can follow when stitching. And if you have a laser pointer on your machine, here is a great use of that feature. But if you don’t want to keep sewing in straight lines, how about stitching in curvy lines from various directions to create a totally unique pattern. Placing decorative stitches on fabric in random patterns gives the impression of an all-over print.

Some machines provide the same stitch in both a small and large size. If the large design requires the feed dogs to move the fabric horizontally to achieve that wider width, accurate alignment with preceding rows can be very difficult. It is better to start with the narrower designs when first stacking straight rows. The wider width ones are best used when straight lines are not necessary.

Some machines allow the user to flip or mirror image designs. Mirror imaging allows you to create more symmetrical designs and achieve a framing effect.

Change Up Your Design

Now that you have the basics, how else might you change up your design?

  • Variegated thread is an easy way to add different colors without having to change spools. Testing is critical when using variegated threads. Some of the dense, satin stitch designs just don’t translate well into these threads. They produce awkward bands of color, depending on the length of each color in the thread. Generally they create the best effects with light, airy stitches.
  • Check to see if your machine allows the use of a double needle for specialty stitches. The double needle allows the use of two colors and gives a shadow effect while stitching. Not all stitches can be done with a double needle, so check your particular machine manual.
  • Try using a double eyed needle — one needle allows thread from two different spools to be stitched at the same time within the same stitch. When the same color thread is used, it gives the effect of a heavier thread without the hassles of requiring a larger eyed needle. When different colors are used, you can choose the exact blend of colors and are not restricted to those on variegated spools. Because the two colors are always present, there is no banding like the variegated thread. The randomized twisting of the two threads also presents an ever changing effect in the stitching.

While creating a manual stitching pattern manually is time consuming, it’s not especially hard. And watching a pattern emerge is exciting and rewarding. While playing with her decorative stitches, Rosemary discovered that these same stitches could also be used in her embroidery mode on her machine. Using the embroidery mode took all the tedium out of trying to align the stitches and allowed more focus on the creativity of the patterns. But that’s another story. Look for Part 2, Using Decorative Stitches in the Hoop coming soon. Until then, give the manual method a try a see what you can create.


~Beverly Betz and Rosemary Fajgier

Did you enjoy this article?
Are you an ASG member?
This field is for validation purposes and should be left unchanged.

Tagged With: decorative stitches, machine stitches

September 3, 2021

FAQ’s: Cleaning an Iron | Home Décor Fabric | Rotary Cutters

What’s the best way to clean my iron?

If you’re using fusible sewing products like webs, interfacings and stabilizers, there’s always that errant portion that finds its way to the soleplate of the iron. If you don’t take care of it right away, the fusible goo can transfer to the next thing you’re pressing and then it comes a bigger challenge to get the black stuff off the fabric.

Cleaning an iron

If your iron has a non-stick soleplate, fusible adhesive can often be simply wiped off using a soft rag or paper towel. But, if your iron doesn’t have that feature, enlist the assistance of an iron cleaner available in the notions department of your fabric store. Usually in a tube, these cleaners just smear onto the soleplate surface of a warm iron, interact with the adhesive, and are gently wiped off with a cloth. They may smoke a bit in the process, but no worries—that’s just the product doing its work. Be sure to read and follow the product instructions.

Prefer a DIY option? Mix two parts baking soda and one part water to form a paste and gently rub it onto the soleplate. Or, soak a cloth in white vinegar and heat in the microwave for 30 seconds, then wipe the soleplate.

  • It’s important never to use an abrasive pad or cleaner on your iron soleplate as those can scratch the metal surface.
  • No matter what cleaning option you choose, keep the product out of the steam holes on the soleplate. If you do get some in them, use a pipe cleaner or cotton swab to remove the excess.
  • For fusing, it’s best to use a press cloth to protect your iron from errant adhesive—saving you the effort of cleaning it.

Can I use home décor fabric for a garment?

Home Dec fabrics sample
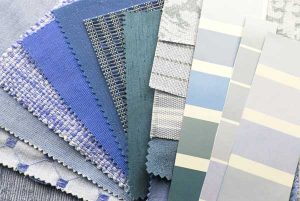
Short answer—it depends! Many home décor fabrics can be used for garments, but some are better left on the bed or the chair. So, ask some questions about it before jumping into the switch.

  • Check the weight of the fabric—will it drape or hang appropriately for a garment? Some curtain and drapery fabrics are ideal, while upholstery fabrics tend to be too stiff and often have a heavier backing.
  • Are there finishes that affect the fabric’s hand? Sun- and stain-resistant finishes often make fabrics stiffer than might be appropriate for a garment, and chemicals can potentially cause an allergic reaction if in close contact with skin, so be sure to read the label carefully.
  • Check the care instructions, as many home décor fabrics are dry-clean only due to their added finishes.

If the fabric feels right to you for garment use, there are some advantages to home décor fabrics. Most are wider than traditional garment fabrics so you may not need as much. Many offer bold patterns to make eye-catching garment patterning, but be sure to account for pattern matching before you buy, as extra may be required to match large prints. If you’re working with a bold print, keep garment design lines simple to avoid breaking up the visual patterning.

Do I need a rotary cutter if I’m not a quilter?

Rotary cutters slice a very straight, clean edge which is ideal for many fabrics, both quilting cottons and garment fabrics. It also creates a smooth edge on fabrics like UltraSuede, cork, etc. that may have lapped seams. Rotary cutters come in several sizes, so the blade diameter can be tailored to the use. A protective cutting mat is required to protect the table surface.

Rotary cutter in use

Pro
One advantage of using a rotary cutter for garment sewing is that the fabric can stay flat on the cutting surface as you cut. That’s very helpful for slippery materials or fabrics that distort readily, like loose knits. Used with a medium to large blade and a ruler, rotary cutting for straight lines is faster than scissor cutting—think full skirt, long eveningwear seams, etc. Smaller diameter blades work well for cutting curved areas like armholes and necklines.

Con
One downside of rotary cutting garments is that you have to have the protective cutting mat under the area being cut, and this may necessitate constantly moving the mat (depending on the size) or the fabric.

So, is a rotary cutter necessary if you’re only sewing garments? No, but it’s definitely a nice option to have around, especially if you’re sewing on pesky fabrics that make scissor cutting more challenging.


~Linda Griepentrog
Linda is the owner of G Wiz Creative Services and she does writing, editing and designing for companies in the sewing, crafting and quilting industries. In addition, she escorts fabric shopping tours to Hong Kong. She lives at the Oregon Coast with her husband Keith, and two dogs, Yohnuh and Abby. Contact her at .

Did you enjoy this article?
Are you an ASG member?
This field is for validation purposes and should be left unchanged.

Tagged With: home decor fabric, iron, rotary cuter

August 31, 2021

Chapter News: Central MA – Upcycling Project

Upcycling text
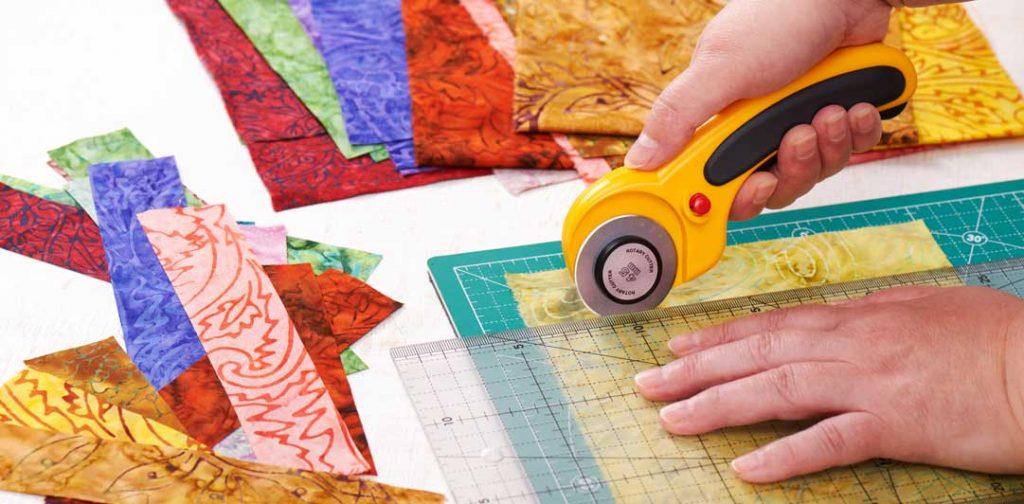
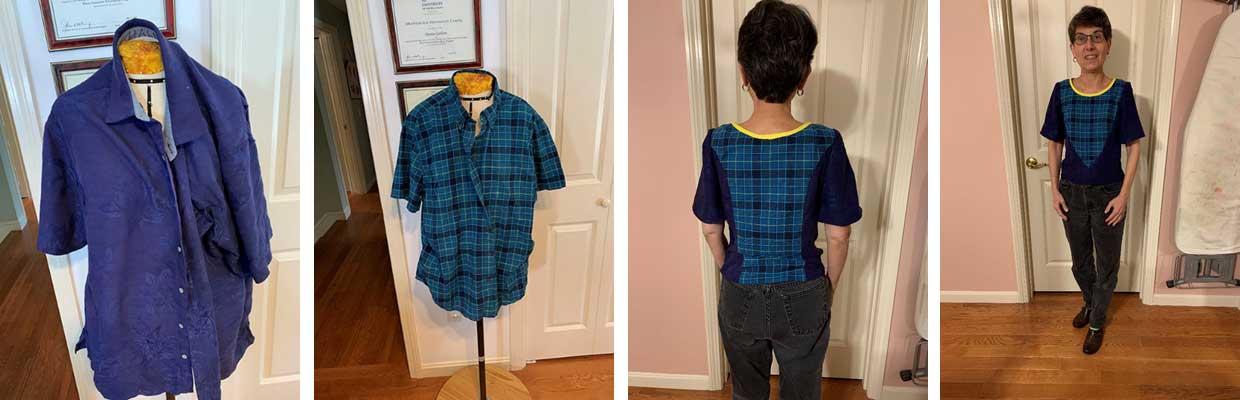
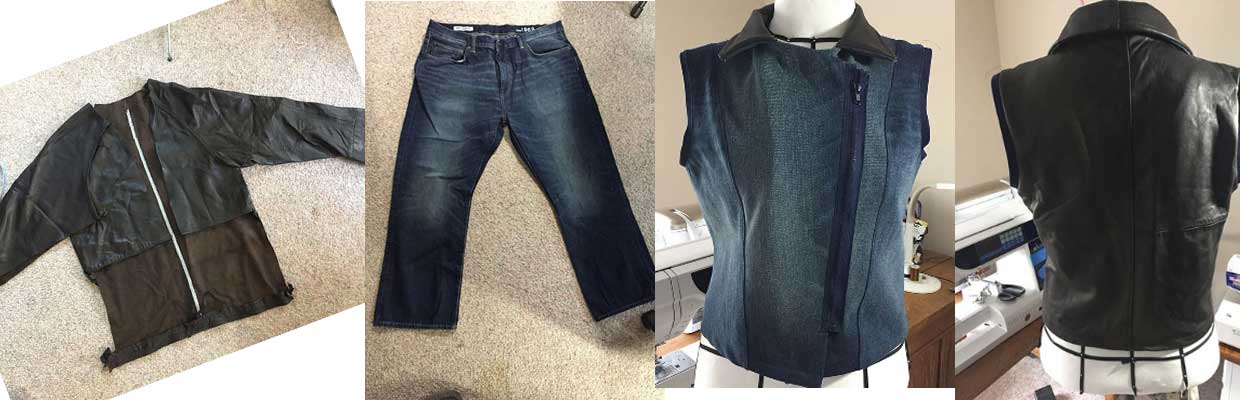
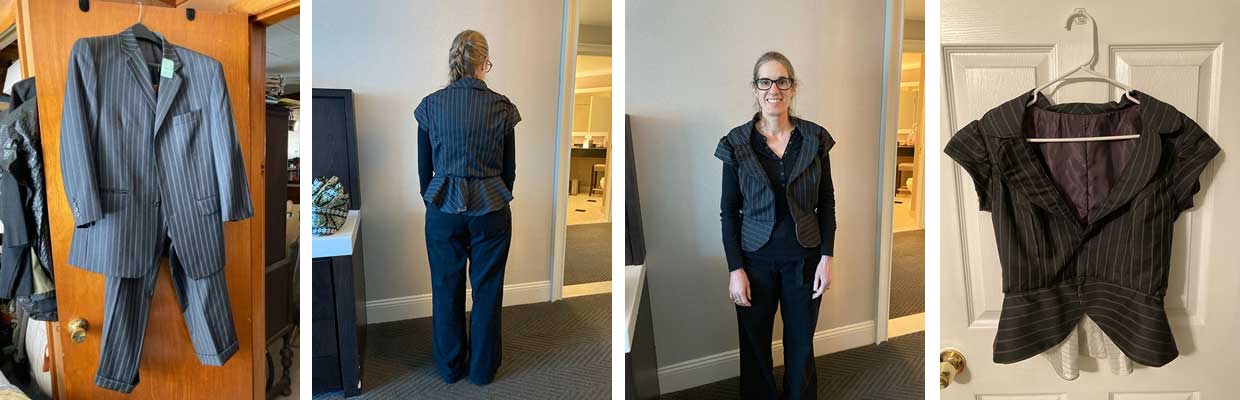
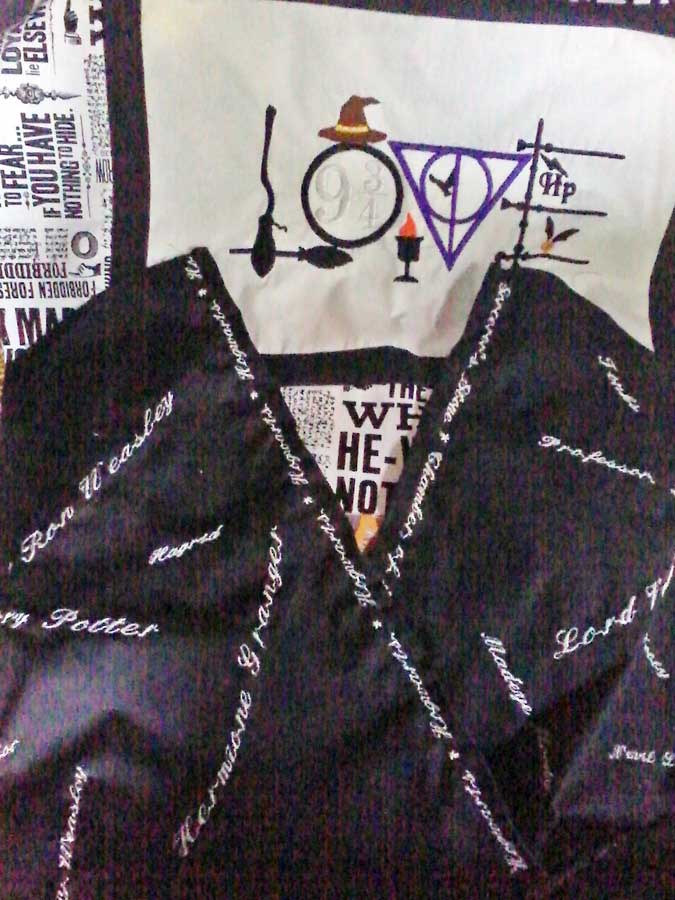
An upcycling article in Threads Magazine was the inspiration behind a member contest in the Central MA ASG chapter. Four chapter members participated in the contest and they were judged by two members the North New Jersey chapter, and one from the San Jose chapter. The criteria was to make a garment from one or two pieces of an existing garment. They could also use one yard of either purchased fabric or fabric from their own fabric stash. Read on to hear the members explain their projects:

First Place Winner – Denise Carlson

I was entering this contest with a lot of apprehension because I rarely alter clothes as I don’t like to do so.  I used two of my late father’s shirts.  I am proud of myself for completely reconstructing his shirts to make it my own.  The shirt “called” for different seam finishes. The shoulder seams were flat-felled and one side seam (which one of his shirts had), serged seams and the armhole has seam binding.  I made a blind hem, and I inserted an invisible zipper in the side seam.    I can honestly say that from start to finish, I truly did not stress about this.  I took my time and very carefully documented all the pieces.   I measured many times and placed the patterns on the fabric and then waited a day or two before deciding if I wanted to use it in that manner.

I drafted my front and side front from my sloper which I already had from my Master Seamstress classes and used my flat pattern book to design the front. I already had my princess seam pattern for the back. I combined the two to make my shirt.

Denise Carlson Contest Entry


Second Place Winner – Barbara Hendricks

Given the guidelines for the contest (2 garments only, 1 yard of stash fabric allowed), Barbara decided to use a pair of men’s jeans from her denim upcycle collection, a partial leather jacket which she had already used for the soles on baby shoes, and about a half yard of fabric from her stash for the lapels. She also had a navy blue separating zipper in her stash to use as well. Barbara made a vest from Simplicity Pattern #1499, which she had used previously which meant she didn’t have to purchase anything.

She began the project with the back of the leather jacket which was largely intact, so she cut the back of the vest out of that, lining up the pattern CB fold line with the center seam of the jacket; therefore, I eliminated the need to sew the center back seam by using the original one in the jacket. I followed the pattern instructions to a great extent, using known techniques for denim and leather, especially needle types and sizes.

The upper collar is cut from the leather and the under collar is denim.  The separating zipper is asymmetrical and the lapel linings (exposed), made from a heavy weight woven print, fall nicely, complementing the leather and the denim.

This was a fun and creative project – I was very happy to participate.

Barbara Hendricks Contest Entry

Stacey Smith – Runner Up

I bought this suit at Salvation Army – it was originally bought at a well-known store in Worcester MA, “Shacks”, that went out of business recently. I used McCall’s pattern M5936, and every stitch of fabric from the suit for the jacket. I really enjoyed doing this upcycle project – it got me out of my comfort zone.

Stacey Smith Contest Entry

 Melanie Dumas – Runner Up

My entry to the Upcycling Contest began as a cotton yellow floral sleeveless jumper which I had made years ago. I deconstructed it for use of the top of my contest dress. The maroon skirt of the dress is a peach skin fabric. The neckline and armholes were bound in coordinating bias tape.

I placed green peridot shaded beading on the hot pink floral centers of the dress’s top. This beading does sparkle in the appropriate lighting. The front of the top of my dress curves and flares to the sides while the back comes to a centered point.

I am going to make a summer wrap to complement the dress for a summer wedding.

Melanie Dumas Contest Entry


~ Thank you to Denise Carlson, Central MA Chapter President for this submission

August 27, 2021

Best Pressed…Without an Iron

There are times when you need to press something flat or press a fold, but for one reason or another, you don’t want to or can’t use an iron. But never fear, there are other ways.

We all know the importance of pressing to set seams, make crisp edges, etc., but some fabrics don’t like heat from an iron—they can melt, scorch or become totally destroyed from even the coolest of iron heat. Others tend to imprint from the iron’s heat, leaving telltale lines showing the iron’s outline or soleplate’s steam holes. Some dyes, especially in handprinted fabrics, may be heat sensitive and pressing with an iron can cause irreversible color changes.

Think of some of your more unusual fabrics that are fun to work with—like screening, faux suedes, vinyls, laminates, oil cloths, waxed canvases, and many sheers or metallics—all of these are candidates for no-iron pressing.

But, how do you press without an iron? The answer comes in the form of two handy tools—a seam roller and an iron finger.

Seam pressing with a 4-in-1 tool from Alex Anderson
4-in-1 tool from Alex Anderson

Seam Roller

Seam rollerYou may be familiar with a seam roller from any wallpapering experiences—the roller is used to flatten the seams at the paper edge joinings and to help remove air bubbles for a flat application. But, take that roller to your sewing room to give it new life. Many sewing companies make seam rollers specifically for craft applications—the roller portion can be made from plastic, wood or ceramic.

One thing the seam rollers have in common is that the roller wheel may not be totally flat. There is a rise in the center portion of the roller so that it hits only the narrow area being “pressed” and contact doesn’t extend beyond the center. This eliminates imprinting on delicate fabrics—a term used to describe a visible line on the right side of a seam where the seam allowance edges drop off.

A seam roller can be used to open seams and keep them flat, or it can be used to press both seam allowances to one side. Simple even pressure along the stitching line works for either. The roller can also be used to press a folded edge, like around an appliqué or facing. It’s also great for creating a flat seam when paper piecing. If the fabric can tolerate it, roll the seam or edge from both the right and wrong side for a flatter result.

Clover Roll Press
Clover Press Perfect Roll & Press

For best results, use the seam roller on a hard surface, like a table or rotary cutting mat, not on a soft surface like your ironing board.

In addition to no-iron pressing, the seam roller can be used in conjunction with the iron for added pressure. A great place to combine them is when tailoring wool—shoot the area with steam from the iron and press it further with the roller to embed the moisture.

Tip: If you’re heading to a sewing retreat, take your seam roller to avoid standing in line waiting for an iron. Simply press at your work station with the roller.

Iron Finger

Also used to flatten seams, an iron finger is much like its name suggests—a round (or squared) piece of wood or silicone with a flat end. The flat end can be used just like the seam roller to open or flatten seams and edges, while the rounded (or squared) portion can serve as a mini pressing surface to open otherwise hard to reach seams, with or without an iron—think shoulder straps or purse handles. The tool simply fits inside the sewn piece so that the seam allowances are exposed at the top of it for easy pressing.

Clover Iron Finger
Clover Iron Finger

An iron finger can be a stand-alone tool, or it can be combined with other tool functions, like a stiletto or seam ripper.

Pressing with a Clover Iron Finger
Using an iron with a Clover Iron Finger

Finger Pressing

Never fear, you can press seams just with your finger or fingernail on many fabrics, especially quilting cottons. Another time saver so you don’t have to leave the machine or use any heat or steam.

Simply open the seam (or fold it to one side) and run your finger or fingernail along the seam line, applying some pressure as you go.

Finger pressing is ideal for things like suedes, vinyl, sequined fabrics and other delicates when an iron just isn’t a good option.


~Linda Griepentrog

Linda is the owner of G Wiz Creative Services and she does writing, editing and designing for companies in the sewing, crafting and quilting industries. In addition, she escorts fabric shopping tours to Hong Kong. She lives at the Oregon Coast with her husband Keith, and two dogs, Yohnuh and Abby. Contact her at .

Did you enjoy this article?
Are you an ASG member?
This field is for validation purposes and should be left unchanged.

  • « Previous Page
  • 1
  • …
  • 39
  • 40
  • 41
  • 42
  • 43
  • …
  • 82
  • Next Page »

Become a Member

Join the only national organization dedicated to Advancing Sewing as an Art and Life Skill.

Join Now button

Blog Article Categories

  • ASG Conference
  • Chapter Stories
  • Embroidery
  • Fitting
  • Learn to Sew
  • National Sewing Month
  • Products, Books, & Patterns
  • Projects
  • Quilting
  • Sewing
  • Sewing Techniques
  • Sewing Tips
  • Sewing Tours
  • Videos
  • Disclaimer
  • Privacy Policy

American Sewing Guild
National Headquarters
9660 Hillcroft, Suite 230
Houston TX 77096
713-729-3000 | 713-721-9230 Fax
www.ASG.org

ASG wordcloud - education, conference, discounts, videos, special offers, tours and more

Copyright © 1998–2025 · American Sewing Guild · All Rights Reserved