American Sewing Guild (ASG)

Visit our blog Visit the ASG Facebook page Visit ASG on Pinterest Visit ASG's YouTube channel Visit ASG on Instagram
  • Home
  • Join ASG
    • Join Online
    • Chapter Locations
    • Member Benefits
    • Member Brochure
    • Join by Mail
  • Education & Classes
  • Resources
    • Contests & Awards
    • Giving Back
    • Hall of Fame
    • Links
    • Travel and Tours
    • Measurement Chart
  • Shop
    • ASG Store
    • Chapter Products
    • Video Resources
  • Blog
  • About
    • About Us
    • Donate to ASG
    • ASG Sensitivity Statement
    • FAQ’s
    • Start a Chapter
  • Contact
  • Member Login
    • Login First!
    • Members Only
    • Leadership Only
    • Website FAQ’s
    • Logout
  •  

February 28, 2020

Ending it All (serger stitching, that is)

We all love sergers for stitching and finishing our seams all in one operation. Those loopers and needles just seem to zing along the edges, but what happens at the ends is something to note. You can’t backstitch with a serger like a conventional machine. Do you just cut off the threads and hope for the best, or do you plan a neat finish for the threads that would make your home ec teacher proud?

There are several options for finishing the ends of serger seams, depending on the location and actual type of seam you’re using.

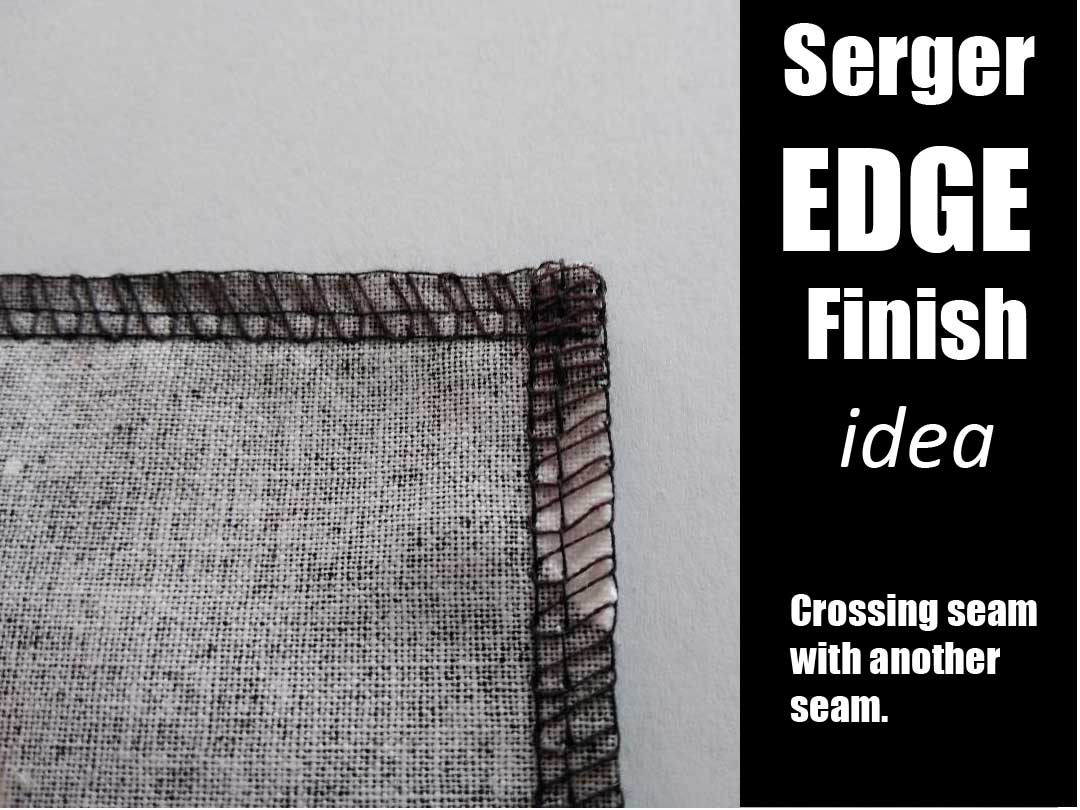
The easiest way to anchor serger threads is to cross them with another line of stitching. For example, if you’ve serged seams in a skirt, you’ll be crossing them with a waistband or facing and a hem finish. The perpendicular stitching is enough to hold the serger threads in place and keep them from raveling.

Another way to finish serger seams is to apply seam sealant to the threads, let it dry, then trim the threads close to the fabric. This is a great option for rolled hems or places where you don’t want other visible fastening of the threads. The down side of this method is that seam sealant can make the threads a bit stiff (depending on the product brand), it can be a bit messy to apply so best to do so with a pin to avoid getting it on the adjacent fabric, and you have to wait for it to dry before moving on in the construction process. (You can speed up the drying process by sandwiching the area between paper towels and pressing.)

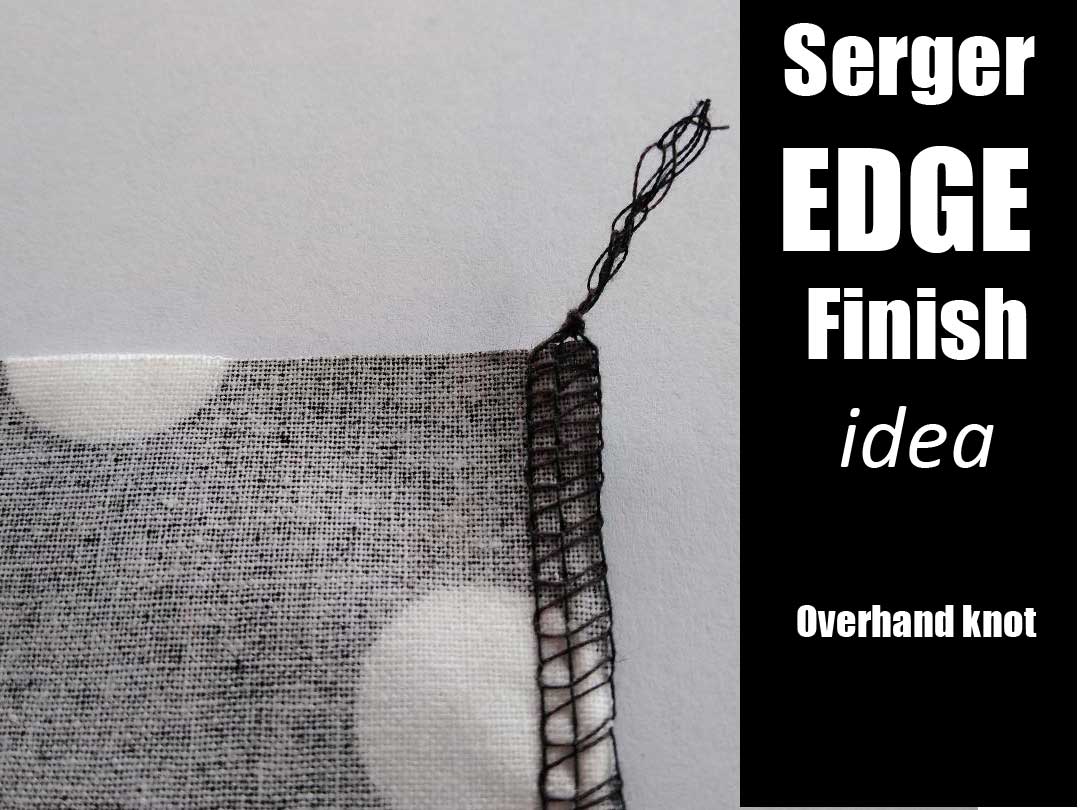
How about knotting the threads? Good idea, and it can be done two ways. First, simply tie the serger chain in a loose overhand knot, use a pin to push it down to the fabric edge and tighten the knot to secure. Cut off the thread ends close to the knot. Depending on the thread and location, this can make a highly visible fastening. Another knotting option is to separate the threads from the serger chain so that you have them paired—one looper and one needle together, and tie a small knot with the two close to the fabric, then clip the ends. This makes a more discreet knot than the overhand version, and is great for decorative threads or outside stitching.

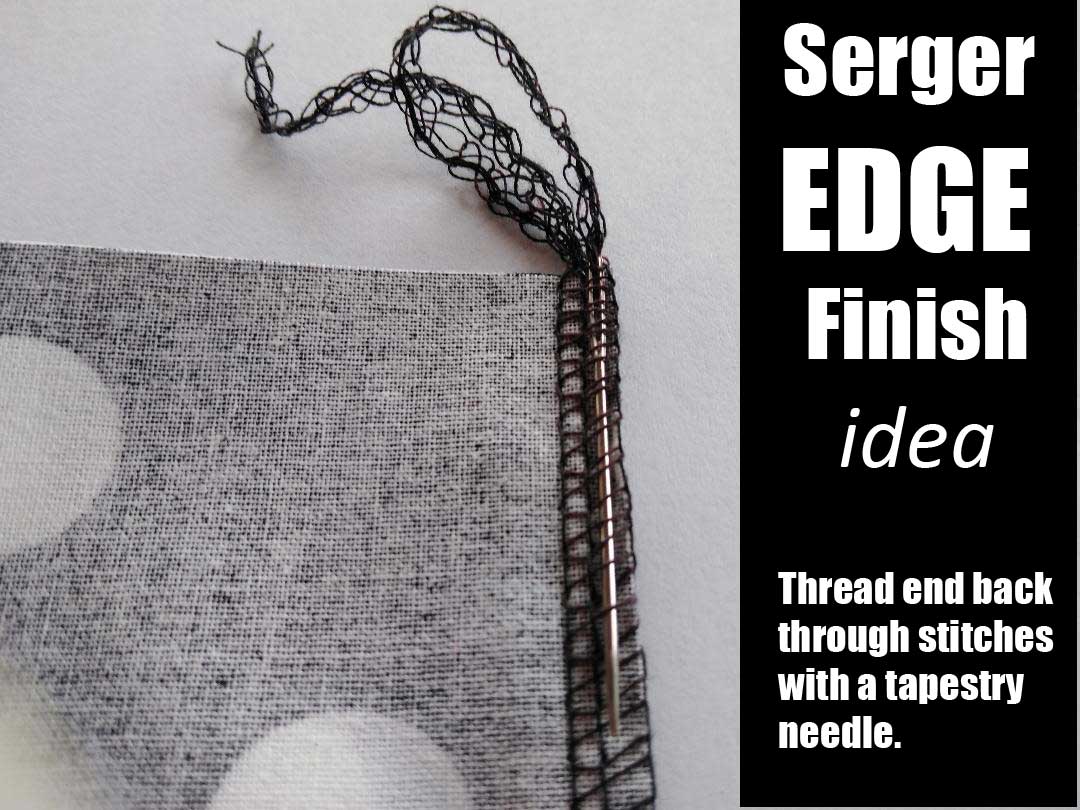
Yet another option is to thread the serger chain ends back through the serger stitch itself. You can use a tapestry needle or loop puller to slide the chain ends back about an inch through the looper stitches before trimming the ends. A needle threader can be helpful for getting the chain into the needle eye and corralling multiple threads together. {photo}

As you begin to sew a line of serger stitches, it’s easy to secure the tail at the same time, by simply lifting the presser foot and bringing it around to the top surface of the fabric. Lay it on the fabric where the looper stitches will encase it as you serge the seam. It’s important that the chain lies between the needle and the blade to avoid cutting it.

Wrapping it up

Choosing the right method for ending it all depends primarily on the location of the area you’re securing. For outside and decorative stitching, choose a method that’s as unobtrusive as possible. Inside, select a method that gives a secure finish without too much bulk for your project.


~Linda Griepentrog
Linda is the owner of G Wiz Creative Services and she does writing, editing and designing for companies in the sewing, crafting and quilting industries. In addition, she escorts fabric shopping tours to Hong Kong. She lives at the Oregon Coast with her husband Keith, and two dogs, Yohnuh and Abby. Contact her at .

Tagged With: serger, sewing, sewing tips

February 7, 2020

Machine Needles: What’s the Point?

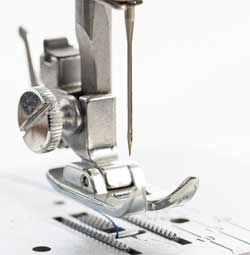
The needle you use in your sewing machine can make the difference between perfection and a disaster. Use the wrong needle, a damaged needle or a worn needle and you could end up with broken threads, holes, uneven stitches, puckers and possibly even permanently damaged fabric. To keep your seams straight and your collars curvy, there are several points to successful stitching.

Check first

Check for any special requirements for your specific machine. For the most part, standard sewing machine needles can be used in any sewing machine. However, differences may be found in some machines like sergers, embroidery machines and some brands which could require a special needle.

Size matters

Needle size is the numeric representation of the diameter of the blade. Note that when you see needle sizes, they are labeled with two numbers, separated by a slash (65/9, 80/12, etc.). This refers to EURO metric sizing (in millimeters) and the comparable US sizing. The following chart from Colonial Needle describes the fabric weights and the size of needle that are appropriate for each project.

Information reprinted with permission from the Colonial Needle Company
ASG Members receive a 20% discount. See the Special Offers page in Members Only.

Download the Colonial Needle machine needle resource guide.

Let’s Get to the Point

  • There are 3 basic General Purpose needle types. Universal needles are usually used in knits and wovens. Ball points are great for knits. Finally, Sharps/Microtex are used in finely woven fabrics.
  • Specialty needles are available for use in denim, leather, embroidery, metallic (for use with metallic threads), quilting, twin, triple, stretch and more. Check out this Guideline for an extensive list of needle types, sizes and their uses.

Needle Tips

  • For best results, needles should be replaced every 6-8 hours of sewing time.
  • If you hit a pin, even if the needle seems okay, it’s safer to replace it.
  • Needle breakage could mean that the needle size is too small for the type or thickness of fabric you are using. In this case, try changing to a larger needle size.
  • When you are sewing, allow the feed dogs to draw your fabric along. Use a light touch with your hands to guide the fabric rather than pushing or pulling, which could cause your needle to bend and break.

Stock up

It can be frustrating to not be able to start — or finish — a project because you don’t have the correct needle or don’t have a replacement,  so make sure to keep a good supply of your favorite needles on hand. ASG members can take advantage of a 20% discount on needles, notions, thimbles, thread, jewelry and more at Colonial Needle by visiting the Special Offers section of ASG.org


~Janice Blasko, webgoddess for ASG

Tagged With: sewing machine needles, sewing tips

January 24, 2020

Tailoring Tricks, Part 2

Fusibles

Stack of interfacings

Fusible interfacings are de rigueur for today’s tailoring aficionados. They are easy to apply and a great option for building structure and shape into a tailored garment without laborious hand stitching.

Types of Fusibles

  • Wovens have lengthwise and crosswise threads that make them stable in both directions. If they’re cut on the bias, they offer some stretch and draping, like on a jacket roll line or lapel. Hair canvas, a type of woven interfacing, is often used in tailored garments to build shape.
  • Knits offer built-in stretch for shaping and draping, and can also be used to back an entire garment section to add body to fabrics like loosely woven bouclés or lightweight wool flannels.
  • Non-wovens are crisp and paper-like, and generally aren’t used in tailoring projects since they offer no draping or molding attributes. They’re better saved for craft projects.

Note that each type of interfacing is available in several weights, from light to heavy, and should be chosen to match the weight of the garment fabric.

More than one type of interfacing is often used in a single tailored garment. For example, a lightweight knit might be used to back a jacket front and back, while fusible hair canvas is applied over it in the upper shoulder and lapel areas. A heavier weight bias-cut woven may be used in a collar stand area, over hair canvas applied directly to the entire collar. The choices depend on the end result you’re looking for—soft and drapable to firm and supported. Always test before you fuse!

Preshrinking

Preshrink all interfacings, as later shrinkage can ruin your garment. Simply fold the interfacing and submerge it in warm water for 30 minutes, then hang or lie flat to dry. Do not press fusible interfacing.

Cutting

Your pattern guide should tell you where to use interfacing and may have separate pattern pieces for cutting it. Common places to add stability are the garment back to support the shoulder, armscye and neck areas; on facings (behind buttonholes) and lapels, in sleeve hems, sleeve caps, and on collars, cuffs and pockets. Depending on the interfacing weight, you may want to trim it out of the seam allowances and/or darts to help reduce bulk.

Fusing

One side of fusible interfacing has adhesive dots on it, and the opposite side does not. It’s important that you place the interfacing with the adhesive side against the fabric wrong side. Once fused, the interfacing and fabric behave as one entity as far as drape, handling and sewability are concerned.

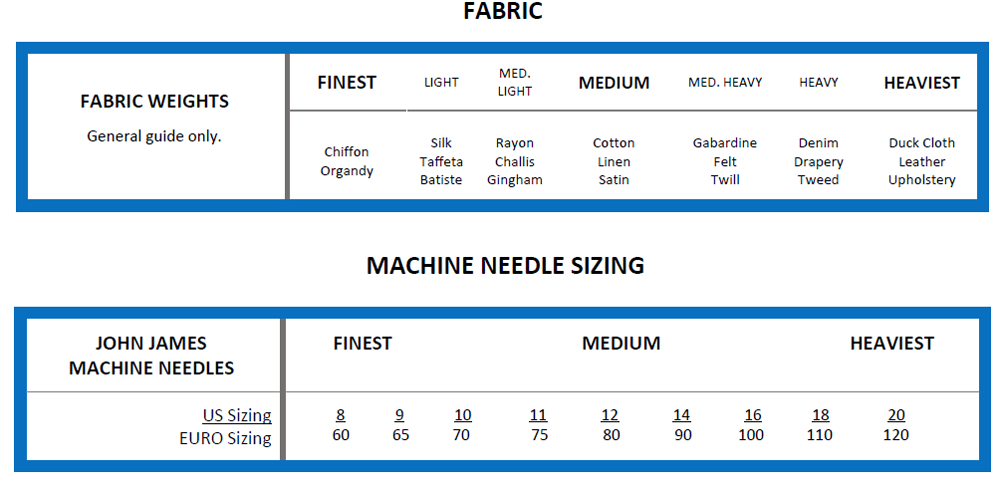
Different types/brands of interfacings require different fusing techniques, so be sure to read the label. Some require steam, others dry heat, while still others specify a damp press cloth. Note the fusing time and iron temperature for proper adherence.

To begin fusing, choose a flat pressing surface and smooth the interfacing onto the companion fabric piece wrong side. Be sure to press, not iron the pieces in place: Pressing is a lifting motion, while ironing is sliding the iron along the surface. To fuse properly, hold the iron in one place for the specified amount of time, then lift it and move to the next area, overlapping the first section slightly. Repeat to cover the entire garment area for complete fusing.

Always allow the fused garment sections to cool before moving them from the pressing surface. If you move them while warm, it can affect adhesion and cause distortion.

For smaller garment pieces, like collars and cuffs, it’s easier to fuse an entire fabric section and then cut out the pieces than it is to try and match up small cut pieces of interfacing with pre-cut garment sections.

Once all the interfacing pieces are fused to their matching garment sections, transfer the pattern markings to the interfacing layer and move forward with construction.


~Linda Griepentrog
Linda is the owner of G Wiz Creative Services and she does writing, editing and designing for companies in the sewing, crafting and quilting industries. In addition, she escorts fabric shopping tours to Hong Kong. She lives at the Oregon Coast with her husband Keith, and two dogs, Yohnuh and Abby. Contact her at .

Tagged With: fusibles, sewing, tailoring

January 17, 2020

Sewing Basics: Fabric Grainline

Fabric grain refers to the direction in which the threads run. It’s important for the lengthwise and crosswise threads to meet at right angles, or the project will twist or hang crooked. Do you understand fabric grain, why it is important and how to work with it? This video will tell you everything you need to know to begin building your understanding.

Tagged With: fabric, grainline, sewing

January 8, 2020

How to Sew Bias Strips Together

Our short video on using the Bias Tape Tool will show you how to make your own bias tape, but do you know how to join your fabric to create the bias strips? This video will show you how.

https://www.asg.org/wp-content/uploads/2020/01/How_Do_I_Sew_Bias_Strips_HQ.mp4

~© ASG; Sheryl Belson, Plano Chapter

Tagged With: bias strips, sewing, sewing tip

  • « Previous Page
  • 1
  • …
  • 8
  • 9
  • 10
  • 11
  • 12
  • …
  • 15
  • Next Page »

Become a Member

Join the only national organization dedicated to Advancing Sewing as an Art and Life Skill.

Join Now button

Blog Article Categories

  • ASG Conference
  • Chapter Stories
  • Embroidery
  • Fitting
  • Learn to Sew
  • National Sewing Month
  • Products, Books, & Patterns
  • Projects
  • Quilting
  • Sewing
  • Sewing Techniques
  • Sewing Tips
  • Sewing Tours
  • Videos
  • Disclaimer
  • Privacy Policy

American Sewing Guild
National Headquarters
9660 Hillcroft, Suite 230
Houston TX 77096
713-729-3000 | 713-721-9230 Fax
www.ASG.org

ASG wordcloud - education, conference, discounts, videos, special offers, tours and more

Copyright © 1998–2025 · American Sewing Guild · All Rights Reserved