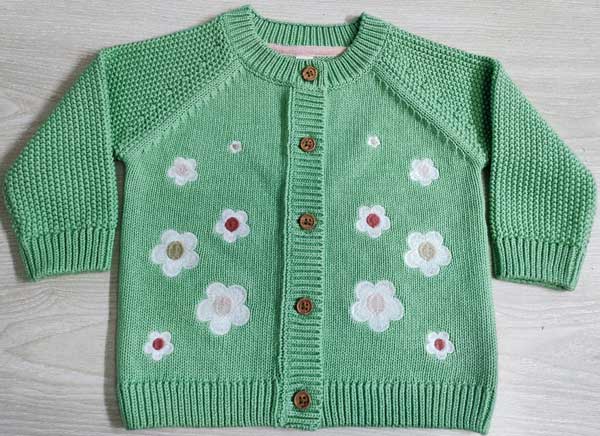
American Sewing Guild (ASG)

Visit our blog Visit the ASG Facebook page Visit ASG on Pinterest Visit ASG's YouTube channel Visit ASG on Instagram
  • Home
  • Join ASG
    • Join Online
    • Chapter Locations
    • Member Benefits
    • Member Brochure
    • Join by Mail
  • Education & Classes
  • Resources
    • Contests & Awards
    • Giving Back
    • Hall of Fame
    • Travel and Tours
    • Measurement Chart
  • Shop
    • ASG Store
    • Chapter Products
    • Video Resources
  • Blog
  • About
    • About Us
    • Donate to ASG
    • ASG Sensitivity Statement
    • FAQ’s
    • Start a Chapter
  • Contact
  • Member Login
    • Login First!
    • Members Only
    • Leadership Only
    • Website FAQ’s
    • Logout
  •  

May 26, 2023

Fusible Thread Lines

Most sewers have fusible web in their arsenal of sewing tools, but in areas where you need only a teeny line of adhesive, check out fusible thread. Yes, thread that fuses. The fibers are activated by the heat of the iron, as they have a low melting point.

Fusible thread enables you to place a very thin line of adhesive exactly where you need to, without the mess of glue or trying to trim web narrowly. And, you can sew and serge with it to help get it where you need it. Do note, most fusible threads create only a temporary hold, until you sew permanently.

Name Game

Fusible threads are made by several different companies, and they look slightly different depending on the brand. Some are white, others clearer; some are tightly twisted, others not. Check your favorite sewing or quilting shop for these options: YLI Fusible Thread, Wonderfil Iron ‘n Fuse™, Gütermann Fusible Thread, Superior Charlotte’s Fusible Web and Floriani Press N Bond.

Fuse Use

Fusible thread can be used in the bobbin of a conventional sewing machine or in the lower looper of the serger, depending on the application, but always paired with regular thread. If you use it on a conventional machine, wind the bobbin slower than you would regular thread. Some brands of fusible thread can also be used through the eye of a large needle, but be sure to test-stitch to note any tension adjustments needed.

Fusible thread is always placed on the side of the fabric where fusing is needed for the final application, so note which side is up when stitching.

Fusible Applications

Non-sewing applications include placing a strand of fusible thread inside pleat folds to help create sharp edges. Or, add a thread inside a pant crease to maintain a perfect crease. A fusible thread strand is ideal for quickly “basting” a patch pocket in place for stitching.

If you’re applying narrow trims, fusible thread placed under the trim is just enough to hold it in place for stitching.

Matching plaids or stripes
Figure 1

Matching plaids or stripes is easy peasy with fusible thread. Press under one seam allowance, position the fusible along the folded edge, overlap matching the design, and press. Then open out the seam allowances for regular thread stitching along the seamline. (Figure 1)

For garment sewing, fusible thread can be used in several ways. Use it for understitching—on the facing seam wrong side. After sewing, turn the facing to the inside and press the edge to melt the thread. Topstitch if desired.

When creating a narrow hem, such as at an armhole or on a ruffle, use the fusible thread in the serger lower looper. Position the fusible on the fabric wrong side, press the narrow hem in place, and stitch permanently using regular thread. This works for wider hems as well, as they stay in place for hand or machine finishing.

Figure 2

Do you have issues with zipper insertion, especially those centered applications? With fusible thread in the bobbin, sew a zigzag along the zipper tape edges so that the fusible is on the zipper right side. Center the zipper over the basted placket area and fuse in place. Add the permanent stitching with regular thread and voila—the zipper is perfectly centered without shifting. (Figure 2)

If you’re creating an appliqué, trace the shape onto the appliqué fabric right side. With fusible thread in the bobbin, sew around the appliqué shape. Trim very close to the stitching line, then fuse the appliqué in place on the base fabric. To finish it, use a decorative stitch or zigzag around the appliqué edge.

One advantage of using fusible thread for appliqué, as opposed to fusible web, is that only the outer edge is fused, not the entire shape. So, there’s less stiffness, and to reduce bulk, the area under the appliqué shape can easily be trimmed away if needed, or you can easily cut a slit in it to add stuffing for a dimensional look.

Figure 3

Quilters often use fusible thread for an easy binding application. Binding can be attached from back to front, or front to back. Stitch the binding to the quilt using regular thread. Then, use a zigzag with fusible thread in the bobbin to stitch the binding seam allowances together; the fusible should be on the unfinished side of the binding. Press the binding over the edge and fuse. To finish, topstitch or hand-stitch in place…no pins or clips needed to hold it securely in place while stitching. (Figure 3)

So, be sure that fusible thread stays close in your sewing room, as you’ll find all kinds of tasks to use it for!


~Linda Griepentrog is the owner of G Wiz Creative Services and she does writing, editing and designing for companies in the sewing, crafting and quilting industries. In addition, she escorts fabric shopping tours to Hong Kong. She lives at the Oregon Coast with her husband Keith, and three dogs, Yohnuh, Abby, and Lizzie. Contact her at gwizdesigns@aol.com.

This field is for validation purposes and should be left unchanged.
Did you enjoy this article?
Are you an ASG member?

May 18, 2023

Drape and Shape a One-Hour Vest (Preview)

East vestVests are a popular garment for good reasons — they go many places and serve many purposes, from dressing-up an outfit for the holidays, to giving a skirt or pants a fresh look, to adding a colorful layer to a plain top, and to keeping you warm. With these simple drape-and-shape techniques, you can quickly make vests that flatter your figure and go anywhere, depending on the fabrics and embellishments.

Drape-and-shape construction has been the favored method for making clothes since people started wrapping themselves with animal hides and cloth. From caveman to couturiere, those who create garments know the best is achieved by draping-and-shaping the fabric on the wearer’s body (or on a form of his or her body). The vest uses a few of the simple drape-and-shape methods which means that anyone, regardless of their size or shape, can create gently fitted, graceful clothes. Fit the garments for how you want the final shape.

The vest in this project is long and flowing (Figure 1) and is designed for a medium-large figure (39-42″ bust and 41-44″ hip); however, it is easy to change in length or fullness to fit your particular figure.


The full article is in the Members area of the website. CLICK HERE to read the full article. Not a member? Join online!


Tagged With: drape and shape, vest

May 12, 2023

Bobbin Storage

OK, raise your hand if your bobbin storage area looks like the photo below. Just what I thought…few hands in the air, and certainly not mine! Keeping these pesky little rounds handy and neat is an ongoing chore, but thankfully, there are some notions that can come to our rescue.

Bobbin Storage, available on Amazon
Bobbin Storage, available on Amazon.

How you store your bobbins is a matter of personal choice—Do you like them safely attached to their matching thread spools, or tucked away separately with other like rounds? Either way, it’s possible to keep them neat and tidy.

Before you invest in a bobbin storage item of any kind, note the size of your bobbin, as some containers are specific to a size or bobbin type.

Separate Quarters

Little boxes with foam or molded inserts help to organize bobbins easily. See-through versions allow you to check out the contents without opening, and lids keep bobbins dust-free. Whether you have individual slots or long channels depends on the storage device.

HONEYSEW Bobbin Case for Bernina

Not into rectangles? Perhaps you’d like a donut instead. These pliable plastic containers allow for aligning bobbins around an open center space. Since they come in multiple colors, you can choose one for each machine you own.

Eurotions BobbinSavers

Bobbin racks have wooden pegs that you can fill with your colorful rounds. Hang them on the wall or use a tabletop model, depending on your space. Or, put in a drawer to keep bobbins dust-free.

Bobbin Rack


Some bobbin racks have flexible plastic snap-on holders that can be stacked.

Clover Stack ‘n Store Tower


Plastic storage tubes are yet another idea to keep bobbins organized and dust free. They’re also handy for toting to class when you just need a few for you planned projects.

If your machine has metal bobbins, there’s the option of a magnetic bobbin holder to keep them in place.

Euronotions Grabobbin

Togetherness

If you prefer to keep your thread spools and matching bobbins together, there are a host of options for this neatness. Some devices snap onto the top of the thread spools, while others push into the top hole in the spool.

60 Pieces Bobbin Holder Thread Spool Holder Stack Bobbins on Spool Tops

DIY Options

If you’re sew inclined, there are many ideas for creating your own bobbin storage device.

Empty pill bottles are ideal for dust-free bobbin storage and the clear ones let you see what’s inside. Just be sure to check the size of your bobbins to be sure they fit inside.

Pick up a multi-day medicine dispenser with mini-compartments perfectly sized to fit your bobbins.

Foam toe separators are a quirky option for bobbin storage, but handy if you just need to take a few with you to a class. The foam also keeps the thread ends in place.

bobbin storage toe separator

For storing bobbins with thread spools, simply wrap a rubber band around the spool and around the matching bobbin.

A paper clip can be inserted into the top of a thread spool and through a matching bobbin for inexpensive togetherness. A pipe cleaner can be used in the same manner.

Visit your office supply store for a large metal ring that opens—simply thread the bobbins onto the ring for organized storage.

Wrapping Up

Bobbin Holders for Thread Spool Sewing Bobbin Small Clips Sewing Tool Accessory Clear Thread Clips Holder Tool

No matter how you store your bobbins, there’s always the issue of thread ends. But taming them is easy if you just get one of small wrap clamps available. Clip it over the bobbin thread for neat-as-a-pin storage.

Or, for a DIY option, get some small clear tubing from the hardware store and slice down one side. Cut it into length that fits your bobbin thread height, then snap in place around the loose thread end. {photo}

No matter how you store them, there’s always a cat or dog willing to unroll your bobbins at the most inopportune time, it seems.


~Linda Griepentrog is the owner of G Wiz Creative Services and she does writing, editing and designing for companies in the sewing, crafting and quilting industries. In addition, she escorts fabric shopping tours to Hong Kong. She lives at the Oregon Coast with her husband Keith, and three dogs, Yohnuh, Abby, and Lizzie. Contact her at gwizdesigns@aol.com.

This field is for validation purposes and should be left unchanged.
Did you enjoy this article?
Are you an ASG member?

Tagged With: bobbin storage, bobbins, sewing room

May 5, 2023

The Humble Seam Ripper

Much as we hate to admit it, we all make mistakes, and sometimes those are stitching-related. But, luckily there’s a tool for that—the humble seam ripper.

Seam rippers come in many styles and shapes, but they all function in a similar way to remove errant stitches so we can fix whatever caused the error in the first place.

Seam ripper

Anatomy of a Ripper

All seam rippers have blades of some sort for cutting, and they all have handles. Most rippers also come with a safety cap to protect not only the blade, but humans, when the tool is not in use.

Handles come in all shapes, sizes, and materials, so it’s a matter of finding one that fits your hand comfortably. Look for plastic, wood, or metal handles. Some rippers are flat on one side to prevent the tool from rolling on the table, others offer loops for hanging on a ribbon or cord. It’s a good idea to test out the “feel” of a ripper before purchasing it—is it comfortable in your hand?

Safety caps help protect the delicate ripper blade from nicks, moisture, and inadvertent drops to the floor. Some caps are attached to the tool for easy storing while others are separate.

If you’re ripping something out at night, and/or it’s a dark thread on a dark fabric, a built-in light is helpful for greater visibility. Look for this battery-powered accoutrement to help save your eyesight. Another helpful addition is a magnifier, especially if you have vision issues. A light and a magnifier together help get the blade to the right place in the stitching line.

Lighted, magnifiying seam ripper
Dritz Magnified LED Seam Ripper available on Amazon.

Sometimes rippers are combined with other tools, like tiny scissor blades, a stiletto or a needle threader on the opposite end of the ripping blade, so you get two tools in one device.

Hand-turned seam ripper and stilettos
Hand-turned wooden handle seam ripper/stiletto combination created by the author’s husband

But, probably the most important feature of a seam ripper is the blade that’s doing all the work. Look for rippers with a flat metal blade that look like a surgical scalpel—either curved or straight and with either permanent or replaceable blades. Another blade option is a U-shaped blade with a small plastic ball on one section of the point (to protect the fabric). The longer point extends beyond the shorter one to help guide the fabric as you rip. A third blade type is retractable, pulling itself into the handle with a slide lock. This adds a safety feature, especially if you have children near your sewing tools.

Slice Safety Seam Ripper with manual retraction, available on Amazon.

Using a ripper

There are multiple ways to use a seam ripper, but of course the ultimate goal is to remove the wayward stitching without harming the fabric. It’s easy to accidentally tear the fabric with the sharp point of a ripper, forcing another creative option for repair.

One common way to use a ripper is to slide the blade under a stitch at regular intervals, popping the thread. Cut every 3-4 stitches, pull out threads, and repeat along the length needed. Once you have removed all the threads, press the area to help remove the needle holes.

Accidentally made a hole in your fabric with a seam ripper? Restitch the seam just inside the previous stitching line to avoid any visible holes.

You can also use the seam ripper point to pick out the seam stitch by stitch.

Perhaps the fastest way to rip, but the riskiest, is to hold open the seam and slice down the stitches with the ripper blade. It’s hard for one person to do this, so use a “third hand” tool or get a sewing buddy to help you hold the seam open.

If you need to remove serger stitches, simply slide the ripper blade under the looper stitches and move it along the edge.

Singer Seam Ripper available on Amazon.


~Linda Griepentrog is the owner of G Wiz Creative Services and she does writing, editing and designing for companies in the sewing, crafting and quilting industries. In addition, she escorts fabric shopping tours to Hong Kong. She lives at the Oregon Coast with her husband Keith, and three dogs, Yohnuh, Abby, and Lizzie. Contact her at gwizdesigns@aol.com.

This field is for validation purposes and should be left unchanged.
Did you enjoy this article?
Are you an ASG member?

April 21, 2023

Sewing Tools: What’s This?

We all know that sewing enthusiasts need certain tools to function—a sewing machine, scissors, thread, pins, etc.—but there are some other tools of the trade that might just be nice to have. Are they a necessity? No. Are they a convenience? Absolutely. Let’s take a look at some of those handy-to-have specialty items.

This page contains Amazon affiliate links. If you shop from these links, we may earn a small commission on your purchase (at no additional cost to you).

Needleboard

Needle Board for Velvet
Needle Board for Velvet, available on Amazon

If you work with velvet, velveteen, corduroy or plushes, you know how difficult it is to press without crushing the pile or imprinting the holes of the steam iron onto the fabric. The surface of a needleboard, as its name suggests, is covered with short metal pins that fit between the pile strands of a plush fabric for pressing. It keeps the fabric backing elevated without crushing the surface pile. To use, simply place the fabric face down onto the protrusions, then lightly press.

With a somewhat hefty price tag, a needleboard is a luxury, but if you work with these pile fabrics frequently, it’s something you may truly deem a necessity as the pressing results speak volumes.


Seam Roller

Seam roller
Seam Roller, available on Amazon

We’ve all been taught to press seams as we sew, so whether you’re pressing open a quilt block seam or setting a facing seam, this handy seam roller lets you do that at your sewing machine without a trip to the ironing board. Just hold the seam in the direction you need it, then roll over it using a moderate amount of pressure, depending on the fabric. It’s handy to reach small areas where it’s difficult to get an iron, and it keeps your fingers out of the way. In addition, the seam roller can be used to make creases at fold lines and edges. If you’re a scrapbooker or card maker, it works well on paper too.


Sticky Tape

Sticky Tape
Sticky Tape available on Amazon

There are times when having a measuring tape with a sticky backing comes in handy and there are multiple types available. Look for ½”, 1” and 1 ½” widths, and differing calibrations. Sticky masking tape comes with incremental markings of 1/16” up to 1/8”, and some brands come with metric markings as well. The tape can adhere not only to your cutting table or sewing machine base plate, but to your garment or other sewing project to help mark seam allowances, pleat spacing, buttonhole lengths, quilting or topstitching lines, etc. It won’t damage the surface on most fabrics and leaves no residue.


Buttonhole Knife

Buttonhole Knife
3 Piece Buttonhole Cutter Set, available on Amazon

There’s nothing scarier than having your garment all finished and it’s time to cut open the buttonholes. One slip and you’re facing some creative solutions to repair and disguise potential errors. A buttonhole knife helps with that trepidation. Coming with a tiny cutting mat or a wooden cutting block to protect your table surface, the cutter has a sharp knife edge to slice open buttonholes without severing the stitches. It can be used straight on or at an angle, depending on the size of the buttonhole. For keyhole buttonholes, some cutters also come with a separate punch to open the circular end. Just press down on the tool for a smooth cut. If the buttonhole is longer than the blade width, move it along the length after the initial cut.

Bernina Buttonhole Knife in use
Image courtesy of Bernina


Stiletto

Stilletto
Stiletto available on Amazon

If you have ever wished for a third hand, the stiletto is your answer. This sharp little tool is handy for guiding fabric under the presser foot and aligning edges as you sew. It fits very close to the presser foot—closer than your fingers. If you’re crossing over seams, it can hold them open as you pass, or push them in a single direction if preferred. When sewing bulky fabric like wool suiting and coating, the stiletto can help push them flatter as you approach the presser foot. Tedious needle-turn appliqué is easier with a stiletto, as you can easily fold under the fabric’s raw edge with the point. Sharp-pointed stilettos can also be used to punch holes for eyelets or grommets. Most stilettos are metal, but others are plastic or bamboo and some brands of stilettos have a blunter point than others, but function in a similar way (except for punching holes). Don’t have one? Use the longer point of your seam ripper for the same functions, or hunt up a super-sharp porcupine quill!


~Linda Griepentrog is the owner of G Wiz Creative Services and she does writing, editing and designing for companies in the sewing, crafting and quilting industries. In addition, she escorts fabric shopping tours to Hong Kong. She lives at the Oregon Coast with her husband Keith, and three dogs, Yohnuh, Abby, and Lizzie. Contact her at gwizdesigns@aol.com.

This field is for validation purposes and should be left unchanged.
Did you enjoy this article?
Are you an ASG member?

  • « Previous Page
  • 1
  • …
  • 29
  • 30
  • 31
  • 32
  • 33
  • …
  • 71
  • Next Page »

Become a Member

Join the only national organization dedicated to Advancing Sewing as an Art and Life Skill.

Join Now button

Blog Article Categories

  • ASG Conference
  • Chapter Stories
  • Embroidery
  • Fitting
  • Learn to Sew
  • National Sewing Month
  • Products, Books, & Patterns
  • Projects
  • Quilting
  • Sewing
  • Sewing Techniques
  • Sewing Tips
  • Sewing Tours
  • Videos
  • Disclaimer
  • Privacy Policy

American Sewing Guild
National Headquarters
9660 Hillcroft, Suite 230
Houston TX 77096
713-729-3000 | 713-721-9230 Fax
www.ASG.org

ASG wordcloud - education, conference, discounts, videos, special offers, tours and more

Copyright © 1998–2026 · American Sewing Guild · All Rights Reserved