American Sewing Guild (ASG)

Visit our blog Visit the ASG Facebook page Visit ASG on Pinterest Visit ASG's YouTube channel Visit ASG on Instagram
  • Home
  • Join ASG
    • Join Online
    • Chapter Locations
    • Member Benefits
    • Member Brochure
    • Join by Mail
  • Education & Classes
  • Resources
    • Contests & Awards
    • Giving Back
    • Hall of Fame
    • Links
    • Travel and Tours
    • Measurement Chart
  • Shop
    • ASG Store
    • Chapter Products
    • Video Resources
  • Blog
  • About
    • About Us
    • Donate to ASG
    • ASG Sensitivity Statement
    • FAQ’s
    • Start a Chapter
  • Contact
  • Member Login
    • Login First!
    • Members Only
    • Leadership Only
    • Website FAQ’s
    • Logout
  •  

March 4, 2022

Single Layer Construction

One Layer at a Time

Boiled wool coat
Boiled wool coat. Photo courtesy of Bernina

There are times when more than one layer of fabric really isn’t necessary or desired—think bulky hems, facings, etc. Single-layer construction techniques to the rescue!

Fabric Choices

Many types of fabrics are suitable for single-layer construction, but those that are most commonly used are sheers, laces, handwovens, fleeces, boiled wools or felted fabrics, linens and double-sided fabrics (different colors or weaves on each side). The commonality in these choices is that both sides of the fabric are presentable and can show in the finished garment without anyone saying, “The wrong side of your fabric is showing.”

Obviously, densely woven or knitted fabrics are suitable for single-layer techniques, but some loosely woven or seemingly less likely candidates can also be used.

Pattern Changes

If you plan to finish the single-layer edge of your garment, mark the original seamlines along the requisite areas. The marked line becomes the new edge, using one of the techniques below. Do not trim the seam allowances.

Edge Finishes

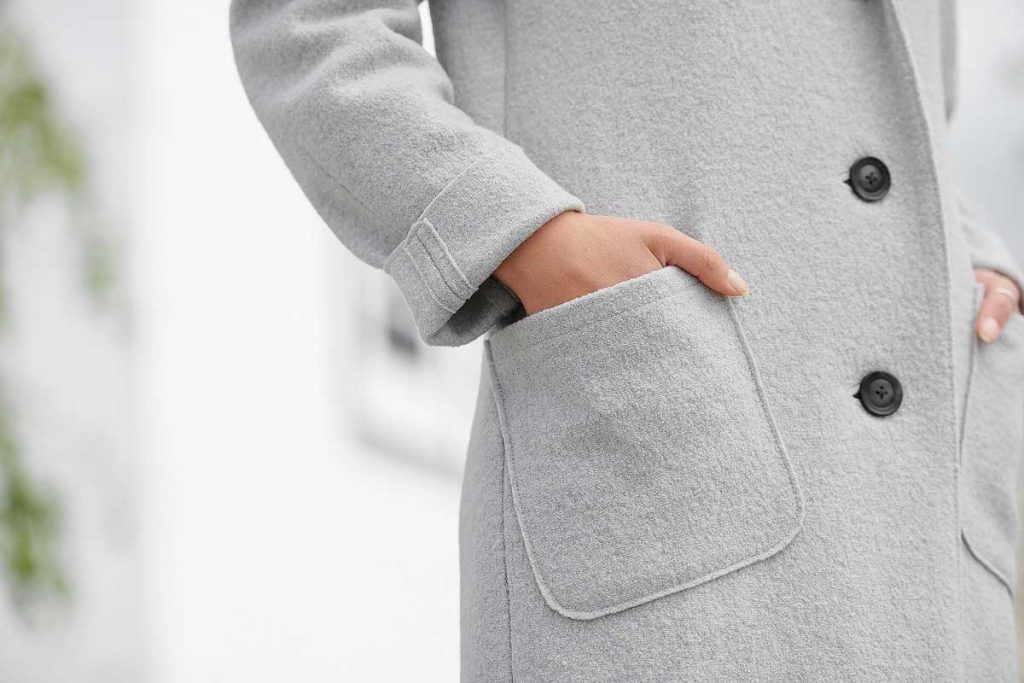
The one place where single-layer construction is the most obvious is along the garment edge—there are no standard hems, facings or turn-backs, that add both weight and bulk to the edge, whether it be a lower hem, sleeve hem, collar, front opening or patch pocket. So, how are those unfinished edges handled? Let’s explore some options.

Cut Edges
On some fabrics, like fleece and boiled or felted wool, a simple cut edge will suffice as an edge finish. These fabrics are usually stable and won’t distort without added finishing.

Unfinished pocket edge
Raw edge top-stitched pocket. Photo courtesy of Bernina.

Topstitching
The cut fabric edge can simply be topstitched with one or more lines of stitching. Heavier threads can provide a nice accent to this easy edge finish.

Fringe
Fringed edge
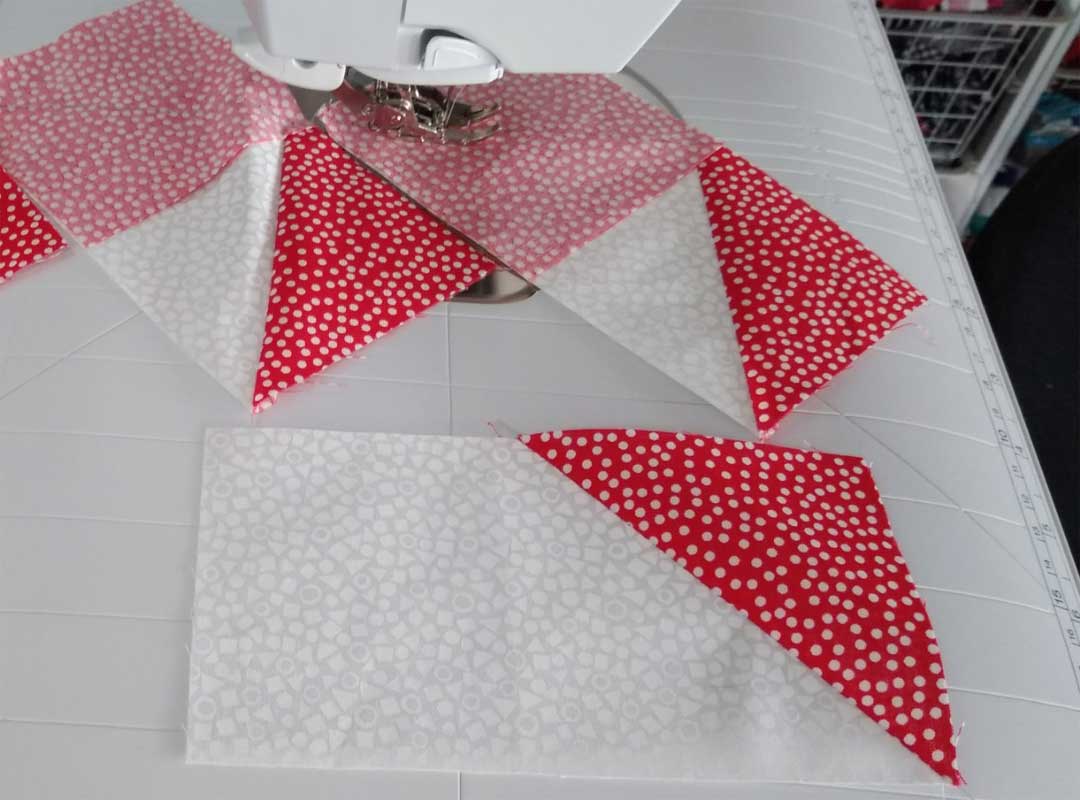
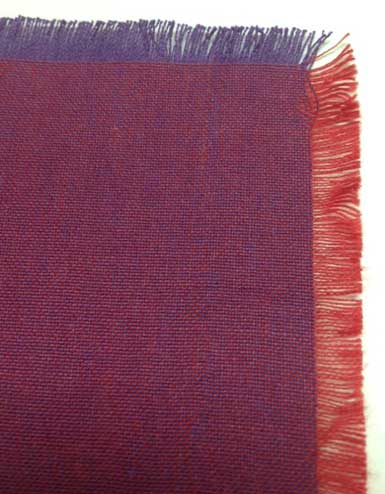
For fabrics that are loosely woven, a great single-layer finish is fringing, assuming the edge is cut on-grain, like a center front opening or collar. Sew one or two lines of stitching along the marked seamline, then carefully remove the threads up to the stitching line to form the fringe. On double-woven fabrics, or if you’re fringing perpendicular edges, you may see two different colors of threads fringe out.
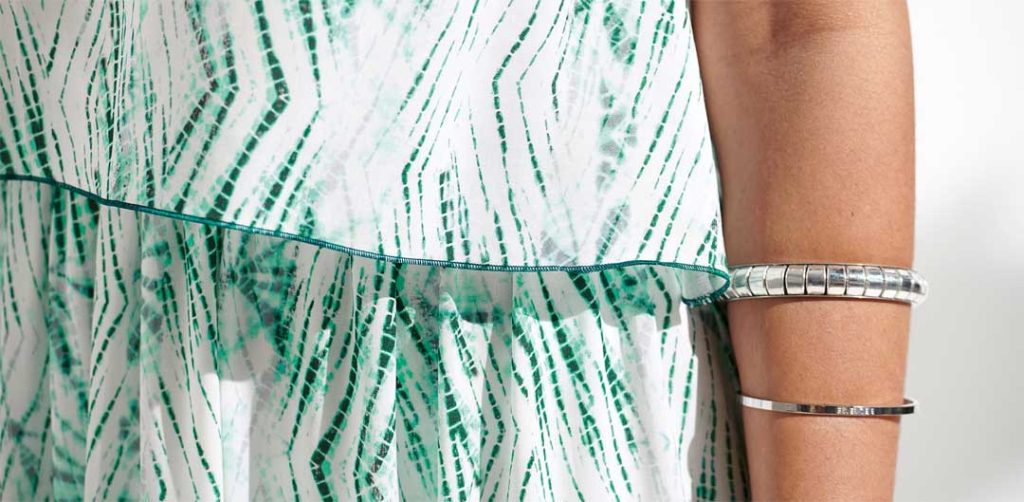
Binding
Almost any kind of fabric can be used to bind a single edge and contrast trim can form an attractive design line. On knit fabrics, bind the single edge with a knit fabric to maintain some flexibility. Use the marked seamline for attaching the binding, then trim away part of the width to create a narrower bound edge.
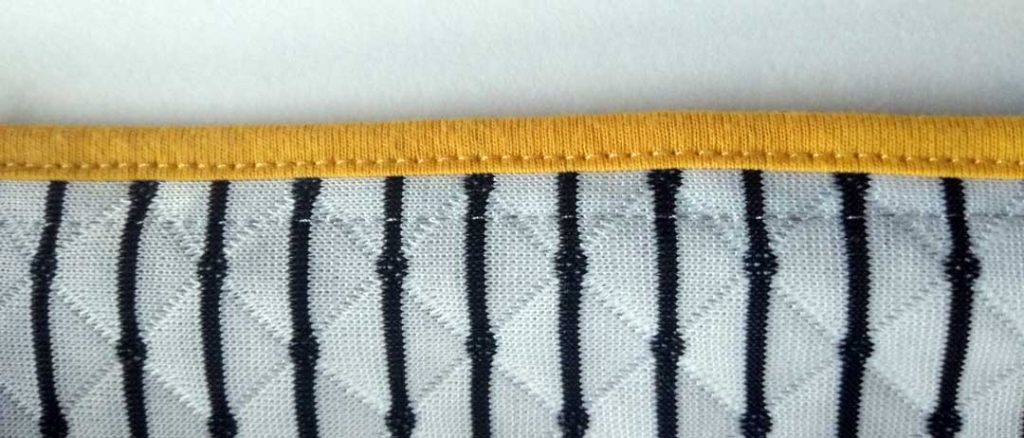
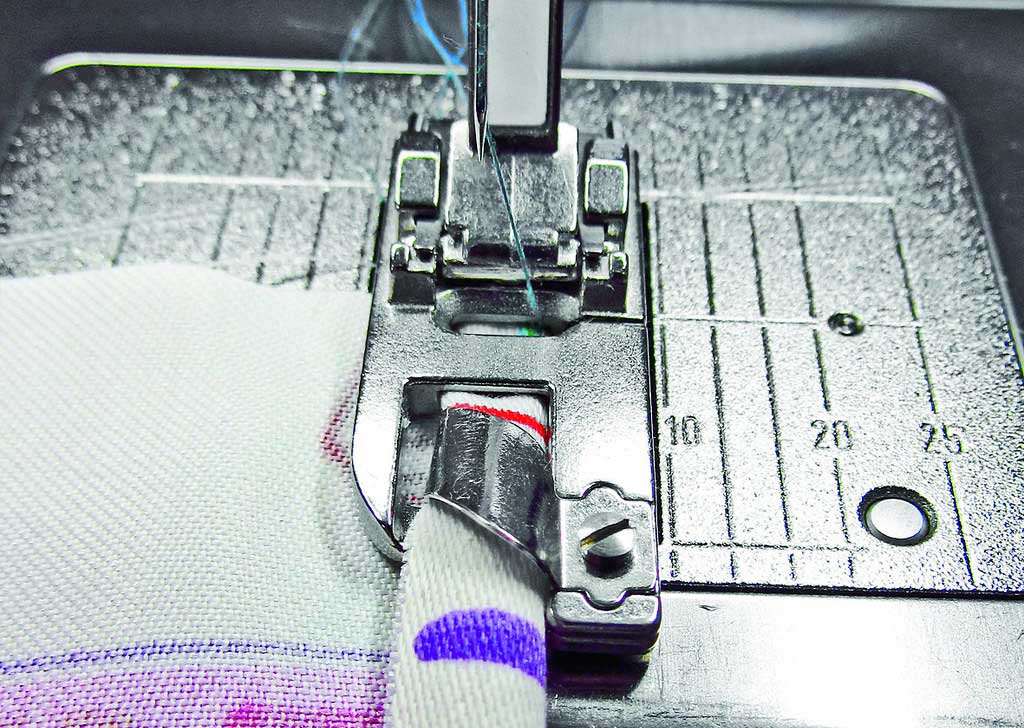
Bound edge on knit
Bound edge

Fold-over Elastic
This elastic has an indentation woven into it designed to make it easy to fold in half for encasing an edge. When using this specialty elastic, trim the seam allowance off the edge that’s to be bound before applying it. A straight stitch or narrow zigzag can be used for the application, as some slight stretch may be needed in some areas, like at a neckline opening. In other areas, like a center front or lapel, no stretch is required. Fold-over elastic comes in both prints and solid colors, depending on the desired look.

Narrow Hem
On lightweight fabrics, like sheers and some linens, a narrow hem is the perfect finish for a single-layer edge. A narrow hem can be just one layer, as in turn up and finish the raw edge with a decorative machine stitch, or it can be turned twice to encase the raw edge, then topstitched in place. Either way, the narrow hem uses the garment seam allowance to finish the edge. On large expanses, a narrow hemming attachment for the sewing machine can make quick work of this finish.

Narrow hemming foot. Photo courtesy of Bernina.

Serging

Serged edge with heavy thread
Serged edge with heavy thread. Photo courtesy of Bernina.

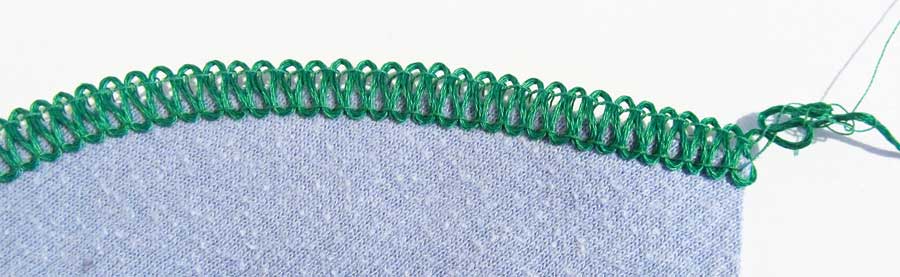
One of the most common finishes for single-layer construction is a serged edge. This finish encases the raw edge and trims off the seam allowances at the same time. The stitching can be narrow or wide, depending on the desired look, and can be sewn with regular thread or one of the specialty threads like rayon for a bit of sheen. For a denser edge finish, use Woolly Nylon or Polyester thread to create a matte finish, almost braid-like look, to the edge. If both sides of the fabric will show, like on a turn-back lapel or hood lining, be sure the thread tension is adjusted so both sides of the stitching look the same.

Narrow hem
Narrow serged hem. Photo courtesy of Bernina

To keep edges from stretching while serge-finishing, fuse a very narrow strip of water-soluble stabilizer to the wrong side of the fabric before sewing. After the serging is complete, dissolve the stabilizer following the manufacturer’s instructions. Note that this technique works only on fabrics that can tolerate water. On other fabrics, sew a line of straight stitching along the seamline to stabilize the area, then serge over it, hiding the stitching.


~Linda Griepentrog

Linda is the owner of G Wiz Creative Services and she does writing, editing and designing for companies in the sewing, crafting and quilting industries. In addition, she escorts fabric shopping tours to Hong Kong. She lives at the Oregon Coast with her husband Keith, and two dogs, Yohnuh and Abby. Contact her at .

Did you enjoy this article?
Are you an ASG member?
This field is for validation purposes and should be left unchanged.

Tagged With: coat, sewing, single layer construction

February 25, 2022

Fabric Sources: Minerals — Spandex, Regenerated Cellulose/Rayon

This article is Part 2 of the Fabric Sources: Minerals series and is the final article in our Fabric Sources series.

Plants (part 1) | Plants (part 2)
Living Things: Silk | Living Things: Wool | Other Living Things
Minerals: Acrylics, Polyester, & Nylon (part 1) | Minerals: Spandex and Rayon (part 2)


Spandex (Lycra)

Spandex, a.k.a. Lycra (DuPont’s brand name for spandex), is a synthetic fiber known for its exceptional elasticity. Like nylon, it was invented at DuPont, but much later than nylon in 1958.

Fun Fact: The generic name SPANDEX is an anagram of the word EXPANDS!

Dupont conducted market research to find out what women wanted from textiles and guess what fabric women wanted to see changed the most …. GIRDLE FABRIC! This is no surprise since most girdles were made of rubber at the time, which sounds oh so comfortable. Dupont decided to come to the rescue with a product that was still effective at capturing women’s “fluff” while being more comfortable than rubber.

By the mid-1970s, even with all of DuPont’s provisions for girdle comfort, girdles began to lose popularity and sales began to drop. DuPont had to pivot and reimagined Lycra as the answer to activewear, tapping into the growing aerobic fitness movement. By the mid-1980s activewear began to expand its presence in the fashion world beyond the gym and out into the streets so much that DuPont struggled to meet the demand. Fast-forwarding to today, you find Lycra, or its off-brand generic spandex, everywhere.

How is it processed?

Spandex fibers can be produced using various methods, though all use the same basic chemistry. The method called solution dry spinning is used to produce over 94.5% of the world’s spandex fibers. In dry spinning, solvents are used to dissolve the polymer. The solvent evaporates after the solution leaves a spinneret (extrusion holes). This is followed by stretching, applying the finish, and winding the fibers on spindles to make it ready to be woven or knitted along with other fibers into fabric. Spandex is always combined with other fibers, retaining their basic qualities while giving them stretch.

Watch this 4½-minute video to learn a little bit more about this fabric and how it is used in the fashion industry.

Pros

A prime benefit of spandex is its significant strength and elasticity, which protects garments from rips and splits. Other benefits include great recovery (its ability to return to the original shape after stretching) and quick drying time.

Cons

Spandex is not breathable, is slippery, sensitive to heat, and with its ability to hug the body, can reveal every bump and curve, including those we prefer to hide. However, each of these “cons” can be seen as a “pro” depending on the application.

Stretch jeans on woman doing yoga

Environmental Impact

Most clothes containing spandex end up as non-recyclable waste once they have been worn out. Fabric blends containing spandex are very difficult to recycle. Like the other petroleum-based fabrics we have discussed, spandex can take up to 200 years to decompose.

Regenerated Cellulose

Regenerated cellulose is a class of materials manufactured by chemically converting natural cellulose (natural material like wood and other agricultural products) to a derivative, typically forming either a fiber (rayon) or a film (cellophane). The most common type of rayon is viscose rayon (also called simple viscose). Rayon and its derivatives are viscose, acetate, triacetate, modal, Tencel, and Lyocell.

Rayon

Cotton Rayon dressRayon is a versatile fiber and is widely claimed to have the same comfort properties as natural fibers. Although the drape and slipperiness of rayon textiles are often more like nylon, it can imitate the feel and texture of silk, wool, cotton, and linen.

How is it processed?

The raw material for viscose is primarily wood pulp. The pulp is treated with caustic soda, pressed between rollers to remove excess liquid, then cured/ripened. Next, it is filtered, degassed, and extruded into fibers through spinnerets, just like the other synthetic fabrics we have discussed in this article. Those fibers are then spun, stretched, and washed to prepare them for the step of weaving or knitting them into fabric.

For a great overview of rayon and how it is made, watch this 8-minute video.

Pros

Rayon fibers are easily dyed in a wide range of colors. Rayon fabrics are soft, smooth, cool, comfortable, and highly absorbent, but they do not always insulate body heat, making them ideal for use in hot and humid climates.

Cons

The elastic recovery, durability, and appearance retention of regular viscose rayons are low, especially when wet. For this reason, dry cleaning is usually preferred. However, HWM rayon (a.k.a. Modal) has been specially treated to have virtually the same properties as regular rayon, plus high wet strength. HWM rayons can be machine washed and tumble dried and perform much like cotton.

Environmental Impact

Rayon is more sustainable than petroleum synthetic fibers like polyester and nylon but is not as sustainable as organic cotton and hemp. For one thing, the chemicals used in the production of rayon are quite toxic. On a positive note, pure rayon decomposes in only a few weeks, faster than cotton which takes about 5 months. Tencel, one of the rayon derivatives, is slower to decompose than rayon, roughly 3 months, but still far faster than either cotton or other synthetic fabrics.

And that’s a wrap!

This has been quite a journey! We explored 23 different fabric types originating from plants, living things, and “minerals.” We looked at the usual suspects, and at several that were very unusual. We saw the benefits and drawbacks of each one as well as the impact each fabric brings to the environment and/or the animal kingdom. And yet we only scratched the surface of all that could be covered in the wide world of fabric.

We hope you have enjoyed this journey and learned a thing or two along the way.​


~Sheryl Belson

Did you enjoy this article?
Are you an ASG member?
This field is for validation purposes and should be left unchanged.

February 18, 2022

Sewing Projects: Making Multiples

Do you showcase your DIY projects at craft sales or bazaars, make things for charity, or make dozens of handmade items for gifts? No matter what time of year, making multiples of the same or similar item can be simple and quick with a few helpful hints.

Tagboard on Amazon (affiliate link; we may earn a small commission on your purchase)

Streamline your pattern. If you’re making lots of hats, for example, create a tagboard pattern you can trace around. Not only does this save wear and tear (and shredding) of tissue paper patterns, but it’s more accurate for cutting. It doesn’t matter if the fabric colors are the same, as long as it’s the same item being cut.

Simplify the design. Depending on the project, you may be able to change up the design a bit to save time. For example, instead of creating tedious narrow hems on something, could you bind the edges with bias tape instead? Instead of finishing seams, like on a gift bag, could you add a simple lining to hide seams and add a bit more body?

Rotary cut multiple layers. Depending on the project and the fabric, you may be able to stack fabrics and cut six or so layers at one time with a good rotary cutter.

Choose a neutral thread. If you’re making lots of items in different colors, avoid constantly changing threads by using a neutral. White, off-white or light gray work for seaming light colors, and navy, black or dark gray blend with dark colors. If your project has topstitching, you may want to use thread to match the fabric, in which case, stack up similar colors and do the matching stitching at one time.

Bundle components. If your project requires elastic, for example, pre-cut the number of lengths needed before you start construction. When it’s time to insert the elastic, it’s ready to go, without have to go back and cut for each project.

Fuse fast. Think fusible interfacing if your project requires more body. You can fuse fabric prior to cutting out pieces to avoid having to tediously match up cut edges.

Chain sew. Continuous sewing is a technique borrowed from factories and involves sewing as many things as possible without cutting the thread. Simply feed in the next item and go, letting completed units trail out the back of the machine. Not only do you save thread, but also a lot of time. Once a task is done, simply clip apart all the pieces and move onto the next step.

Chain sewing—how far can you go without cutting the thread?


Sew without pins. Take a lesson from factory workers and learn to sew without pins. The task of stopping to remove pins as you approach them takes time and slows your speedy construction methods used for sewing multiples.

If you’re bored making the same item, play a game. It makes the time go faster if you challenge yourself to accomplish a certain task within a time frame. For example, if you finish x quantity of y task by 1pm, you can reward yourself with a break and a cup of your favorite beverage. (Warning: Do not drink alcoholic beverages while sewing.)

Plan ahead. Sew together small components—like ties, drawstrings, etc.—prior to constructing the item. For example, if you’re mass-producing aprons, make all the neck ties and waistline ties first before it’s time to attach them. If you’re making dozens of fleece hats, make all the pompoms first and they’re ready when you get to sewing the seam that includes them.

Don’t hesitate to invest. If you’re going to be doing a lot of sewing of similar items, think about what sewing machine attachments might help make your task easier. Depending on the project, you may find it’s a serious timesaver to invest in a bias binding attachment, edgestitch foot or perhaps a narrow hemming foot. If your machine doesn’t come with one, perhaps a ¼”-foot would help keep seamlines on the straight and narrow. Check with your dealer to see if there’s a machine accessory to help with specific tasks you’re facing that could speed up your work.

machine feet

Keep it clean. Sewing multiples can add a lot of lint to your sewing machine bobbin area and feed dogs. Be sure to regularly brush out those areas for trouble-free sewing.

Hand MadeAdd an ID. If you’re a prolific crafter who sells your wares, it’s always good to add a bit of professionalism to your projects with labels or tags. It’s easy to create and print tags from the computer, as there are several templates available online. Add your business name if you have one, or simply your contact information in case someone wants to purchase another similar item. Care instructions may be noted as well, and if the project comes in different sizes, indicate the size on the tag too.


~Linda Griepentrog

Linda is the owner of G Wiz Creative Services and she does writing, editing and designing for companies in the sewing, crafting and quilting industries. In addition, she escorts fabric shopping tours to Hong Kong. She lives at the Oregon Coast with her husband Keith, and two dogs, Yohnuh and Abby. Contact her at .

Did you enjoy this article?
Are you an ASG member?
This field is for validation purposes and should be left unchanged.

Tagged With: sewing business, sewing project, sewing tip, sewing tips

February 11, 2022

Moving the Dart to Create a Princess Line

Bust dark drawings
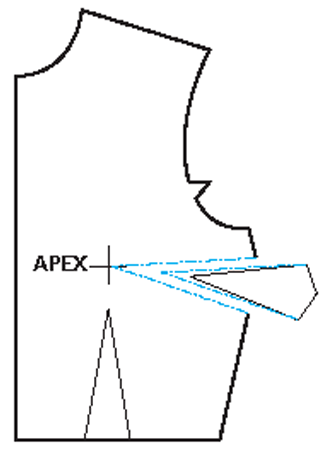
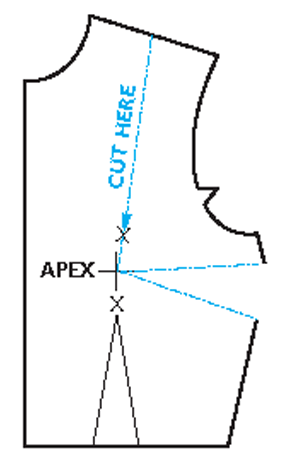
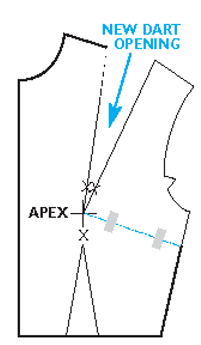
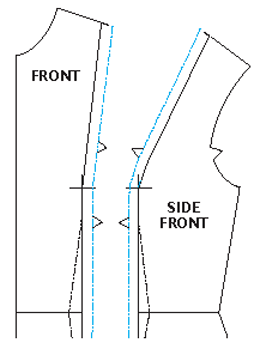
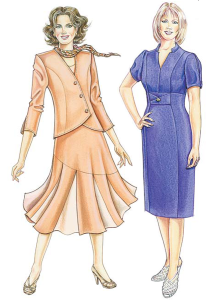
If good fit is important to you, especially when sewing with woven fabrics, you already know the significance of a properly placed and well-fitting bust dart. Darts shape that two-dimensional fabric to fit around your three-dimensional body. Even for the less-endowed figure, when darts are the correct size and pointed to the correct location, they can add shape and flatter your frame.

When they are incorporated into special design lines, darts also have wonderful attributes beyond fitting and shaping. Fashion designers have always known and utilized these skills for creating different styles with special design lines. For your own design explorations, here are some guidelines for moving the standard side seam bust-fitting dart and converting it into the always flattering princess line. This design line can originate from the shoulder line or from the armscye—that choice is yours.

When the princess design line extends from the shoulder line, it creates a vertical line which gives more visual height to the wearer. It is the easiest version to sew. When it comes from the armscye, the tighter the armscye curve, the more challenging those curved seams can be to stitch together particularly for the full-busted figure. However, the closer the starting point is to the shoulder point, the easier it will be to sew.

Basic Dart Fit

Princess lines flatter most figure shapes. However, they can end up being ill-fitting and unsightly if your bust dart is not the correct width for your cup size and is not aimed toward your apex. If the original bodice sloper doesn’t conform properly to your apex contours, then the curvature of the princess line could ride above or below your actual apex level, creating a poor fit. When you begin with a pattern that is fit exclusively to your body contours, where the side bust-fitting dart is the correct shape and is pointed toward your apex, you can rest assured that the resulting princess line fashion detail will also fit as it should and be flattering on your body.

Make sure you have the correct size dart for the fullness of your bust and that the dart is pointing toward your apex. Sure-Fit Designs offers an Adjust-A-Bust template with A through E-cup dart sizes. This template is found within the Sure-Fit Designs Dress Kit. If you’re full busted, this solves the problem for the traditional FBA (full bust adjustment).

Creating the Shoulder Princess Seam

Now, let’s begin to move that dart.

1. Beginning at the top and bottom legs of the side seam dart, draw a designer’s dart, which is one that extends to the apex cross mark. The tip of this dart, which is now at your apex, will become a pivot point.

2. Stabilize the apex with a piece of clear plastic tape. Then, cut on the designer’s dart lines to remove this dart.

3. Approximately mid-shoulder, mark a point where the princess detail will begin. Draw a straight line from this point to your apex marking. Continue this line down through the center of the waist-fitting dart. Mark X’s above and below the apex which will become the princess seam matching notches. Cut on this line down to the apex only.

4. Close the original side-fitting bust dart, allowing the pattern to pivot at the apex hinge. Tape original side seam dart in this closed position.

5. Continue cutting from the apex down through the waist-fitting dart. Separate the Center Front panel from the Side Front panel. Add 5⁄8″ (1.6cm) seam allowances to both cut edges. Extend the X’s to create the matching notches.

6. If you want the princess line to fit with more shaping at the waistline, you can always stitch on the side legs of the waist-fitting dart to tighten the bodice.


This article appeared in a previous issue of Notions
~ Glenda Sparling is president of Sure-Fit Designs, an international company specializing in pattern fitting and designing. Canadian-born, her background includes 10 years as a home economics educator and 30 years in the sewing industry. Based in Eugene, Ore., she has traveled extensively, teaching in the U.S., Canada, Australia, New Zealand, and Great Britain. Glenda has written pattern fitting, designing, and embellishment books, including “Wrapped in Fabrique,” and a series of how-to fitting videos that have been converted recently to DVD format. She is a member of the ASG Willamette Valley, Ore. Chapter. www.surefitdesigns.com

Did you enjoy this article?
Are you an ASG member?
This field is for validation purposes and should be left unchanged.

Tagged With: bust dart alteration, dart, sewing

February 4, 2022

Storing Sewing Patterns

There’s nothing more challenging that having a burgeoning pile of pattern tissue and trying to fold it all neatly back into its original envelope without tearing either the pattern or the envelope. It’s one of those “How did they get it all in there?” questions. (Truth be told, a machine does it at the factory.)

Sewing Tip for folding patterns

The question becomes, what’s the best way to store sewing patterns to keep them neat and make them easy to find for your next project? The more patterns you own, the harder this becomes. But first you need to analyze your space as that can determine your preferred method of organizing.

Also, as you probably have noticed, not all pattern brands have the same size envelopes, creating yet another challenge. Then there are those patterns you downloaded as PDF files, traced from a magazine, or drafted yourself. So, let’s explore some ideas.

Organizing Options

pattern pieces

  • Some sewists like to store patterns by category—pants, dresses, skirts, etc.—making them easy to find for a specific project. Other categories include home décor, accessories and crafts. If you have a lot of craft patterns, you may want to break down the categories further—maybe aprons, hats, totes, baskets, holiday, etc.
  • If you’ve got a pattern stash for multiple family members, you may opt to separate them by name. Or, perhaps by size range—men, women, kids, plus sizes.
  • Other sewers like to keep all patterns of a given brand together, and then perhaps sort them by number within the branded group.
  • So, decision #1 is how do you want to organize your patterns. Decision #2 becomes how best to manage the inventory, and there are many great methods.

Binders

Binder for holding patterns
We utilize affiliate links and may earn a small commission on your purchase.

Having a binder of pattern options is like perusing the pattern catalogs at the fabric store, only these are all yours. Invest in some plastic sleeve protectors and place one pattern’s folded tissue and the envelope into the page protector, then file them in large binders using one of the organizing methods noted above.

Another binder option is to stow only the envelope in the page protector, and store the innards in a separate location labeled by pattern brand/number. Binders are available with 5” rings that will hold hundreds of pattern sleeves.

Drawers/Boxes/File Cabinets/Baskets

Pattern storage chestIf you opt to stow your patterns in a drawer, box, basket, etc., the same clear plastic options can be used, or purchase manila envelopes, place the tissue and instructions inside, then cut the envelope apart and glue the front and back onto the envelope.

Depending on the size of the container, you may also be able to just stand the original pattern envelopes up in rows, assuming the tissue is stuffed inside, or you’ve opted for plastic/manila sleeves.

Technology to the Rescue

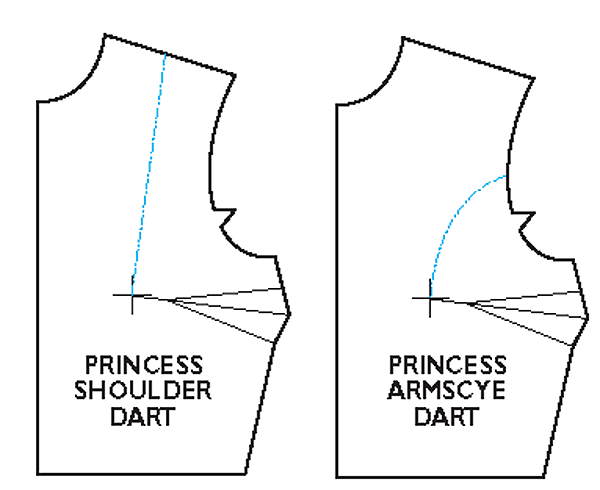
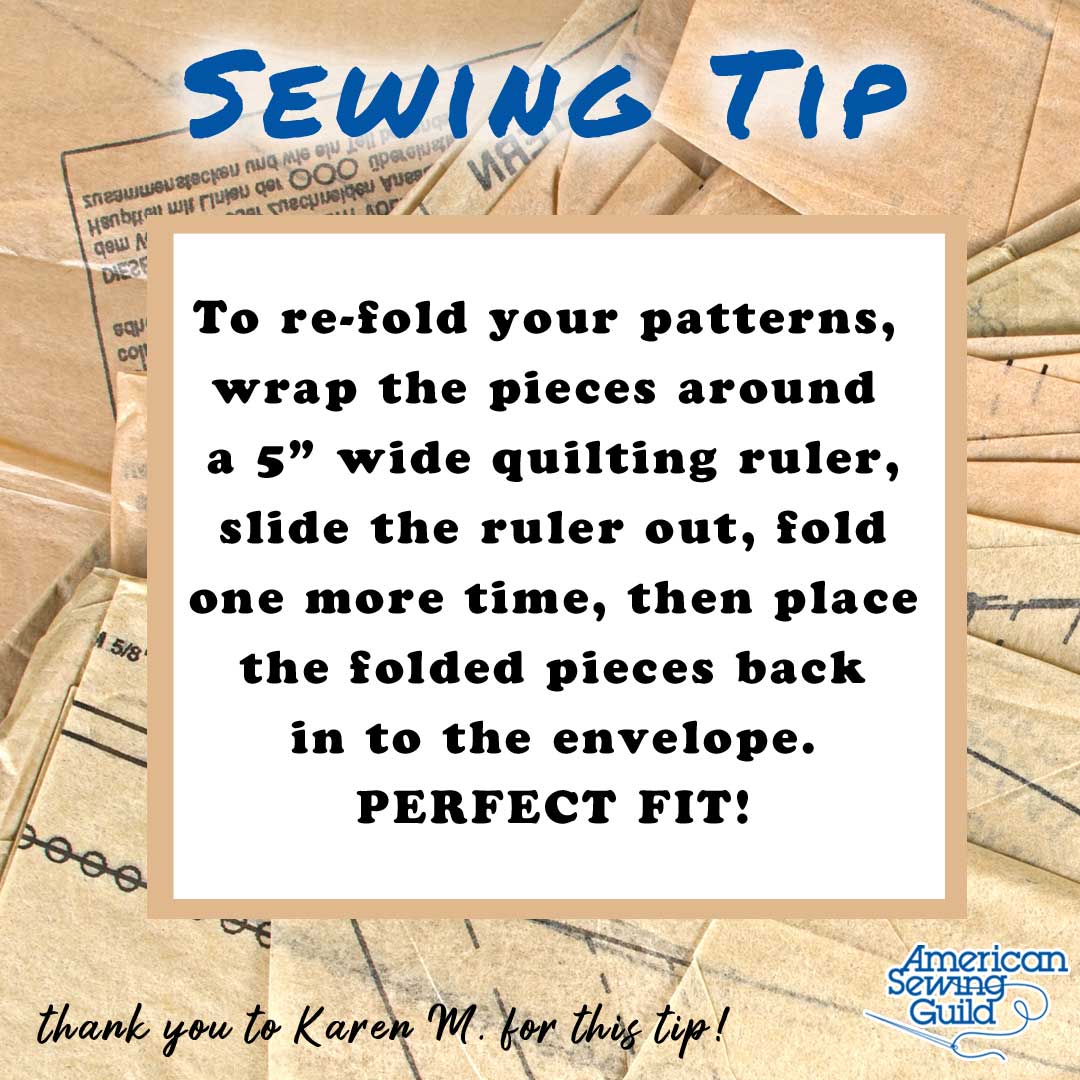
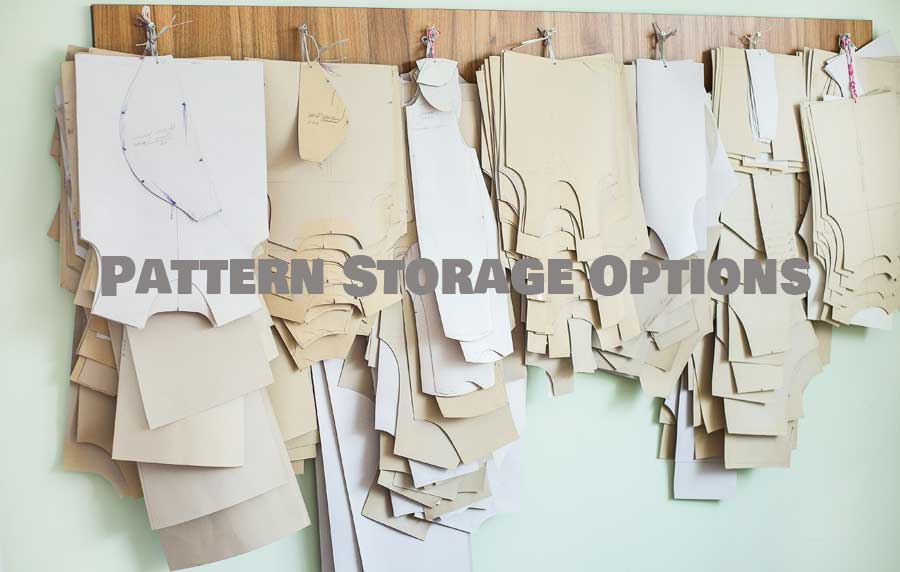
It’s helpful to create a database of patterns, if you’re sew inclined. This allows you to cross-reference by brand, number, garment type and size. If you scan the pattern envelope front and back, you can have a quick guide to the fabric amounts, etc. and if your database is accessible on a mobile device, it can be used while shopping. Most databases allow your pattern inventory to be shared with others—like if some family members you sew for live elsewhere.

And, who hasn’t purchased the same pattern twice, not realizing you already owned it? Having access to your current pattern inventory can eliminate that issue.

Some software programs to explore for pattern organizing include Evernote, Trello, Tap Forms, and Dropbox.

Special Needs

Dressmakers: If you’re a dressmaker, you may have several patterns with custom alterations—someone’s favorite shirt or pants made just for them. If the patterns are made from tagboard, it’s easy to punch a hole in them, hang the pieces, then label them with the client’s name and date. These hang easily on a closet rod, hooks or metal rack.

Costume Maker: If you’re a costume maker or work with a theater group, perhaps you want to organize your patterns by era, so you can access something period appropriate for a performance. Maybe you further delineate by male/female or child/adult.

Bridal: Bridal work requires larger pieces than daywear, so the hanging option may be a good one for veil, train and petticoat patterns common to many styles.

How do the Pros do it?

We asked three industry professionals how they store their patterns:

Deanna Springer
Vice President of Marketing, Host/Producer, Stitch it! Sisters, Nancy Zieman Productions, LLC
To keep my sewing patterns organized, I store them in reusable pattern pouches that are see-through, waterproof and have a zippered closure. I can easily see what’s inside and they’re big enough to hold all the tissue without trying to restuff it into the original envelope.

Rhonda Pierce
Spokesperson, SCHMETZneedles.com/Vice President, Euro-notions

My pattern stash organization is three-fold: Used patterns, never to be made again but can’t bear to toss or donate, are stored in a giant box in the garage. Patterns waiting to be made are neatly organized in a basket in my sewing room awaiting fabric and stitch time. Favorite patterns are dropped into a zip-top bag and hung with completed projects for easy reference and perhaps made again.

Kenneth D. King
designer

I draft my own patterns on fairly robust white kraft paper. Once I get a pattern perfected, I have two legal-sized envelopes—one for the initial working draft, one for the finished pattern. I label it, with the name, date it was finished (month and year), and on the envelope, I make any notes I need to construct it.  If it goes on to be part of my output for customers, I will note the customer, the serial number of the piece on the envelope as well. They store in my filing cabinet—the newer work in the upper drawers, older in the lower. Patterns that I use rarely live in a big banker’s file storage box in my office. So, nothing fancy. I don’t spend more time storing them, as I prefer to spend that time sewing.


~Linda Griepentrog
Linda is the owner of G Wiz Creative Services and she does writing, editing and designing for companies in the sewing, crafting and quilting industries. In addition, she escorts fabric shopping tours to Hong Kong. She lives at the Oregon Coast with her husband Keith, and two dogs, Yohnuh and Abby. Contact her at .

Did you enjoy this article?
Are you an ASG member?
This field is for validation purposes and should be left unchanged.

  • « Previous Page
  • 1
  • …
  • 30
  • 31
  • 32
  • 33
  • 34
  • …
  • 63
  • Next Page »

Become a Member

Join the only national organization dedicated to Advancing Sewing as an Art and Life Skill.

Join Now button

Blog Article Categories

  • ASG Conference
  • Chapter Stories
  • Embroidery
  • Fitting
  • Learn to Sew
  • National Sewing Month
  • Products, Books, & Patterns
  • Projects
  • Quilting
  • Sewing
  • Sewing Techniques
  • Sewing Tips
  • Sewing Tours
  • Videos
  • Disclaimer
  • Privacy Policy

American Sewing Guild
National Headquarters
9660 Hillcroft, Suite 230
Houston TX 77096
713-729-3000 | 713-721-9230 Fax
www.ASG.org

ASG wordcloud - education, conference, discounts, videos, special offers, tours and more

Copyright © 1998–2025 · American Sewing Guild · All Rights Reserved