American Sewing Guild (ASG)

Visit our blog Visit the ASG Facebook page Visit ASG on Pinterest Visit ASG's YouTube channel Visit ASG on Instagram
  • Home
  • Join ASG
    • Join Online
    • Chapter Locations
    • Member Benefits
    • Member Brochure
    • Join by Mail
  • Education & Classes
  • Resources
    • Contests & Awards
    • Giving Back
    • Hall of Fame
    • Travel and Tours
    • Measurement Chart
  • Shop
    • ASG Store
    • Chapter Products
    • Video Resources
  • Blog
  • About
    • About Us
    • Donate to ASG
    • ASG Sensitivity Statement
    • FAQ’s
    • Start a Chapter
  • Contact
  • Member Login
    • Login First!
    • Members Only
    • Leadership Only
    • Website FAQ’s
    • Logout
  •  

April 29, 2022

Zippers as Trim

Sometimes things normally found in our sewing rooms end up with surprise uses. Such is the case for zippers!
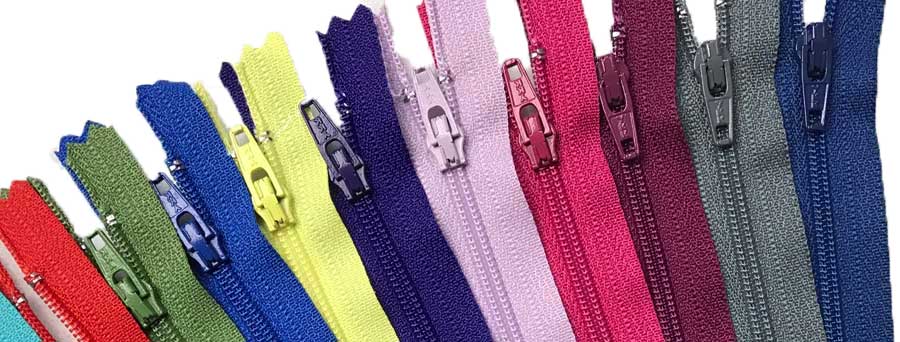
Zippers from Ghees.com
Photo courtesy of Ghees.com

With the myriad types of zippers available, they can definitely do more than close a garment. Think about them turning into jewelry or becoming piping or a surface trim. When grouped, they can also cover an entire garment section, like a cuff or collar.

Zippers are not only available individually, but you can purchase zipper by the roll or by the yard from some resources. When you purchase zipper tape by the yard, you have more flexibility to use it for many things since you’re not limited by standard lengths.

The various types of zipper teeth add to the intrigue. Look for brightly colored plastic teeth on sport-weight zippers, brassy metal teeth on jeans and utility zippers, and even multi-color teeth on some novelties. For a bit of glam, indulge some rhinestone teeth.

Zipper tapes, the woven base for the teeth, come in many types as well, from solid color basics to printed or stripes of all sorts. For a bit of bling, you can also find metallic and satin zipper tapes.

Let the zipper inspire you for alternate uses!

April 29 is National Zipper Day!

Weaving

If you want to cover a large area, like for making a pillow, garment yoke, or perhaps a tote bag front, think about weaving zippers to the size you need.

A simple over-one-under-one patterning done over a pinnable surface can yield some sizeable pieces. A bit of stitching (or fabric glue) at the overlaps can secure the pieces in place and allow for cutting of the size and shape needed for the project.

Before cutting woven zippers, trace the piece shape needed and stitch just inside the cutting line so the woven strips don’t distort or pull apart. Once the piece is secure, use the woven zipper area as you would fabric, with one exception. If the zipper teeth are metal, remove those within the seam allowances to avoid breaking needles.

Looking for inspiration? Check out this cute zipper bag from Yarnspirations and visit the link to see how it’s made.
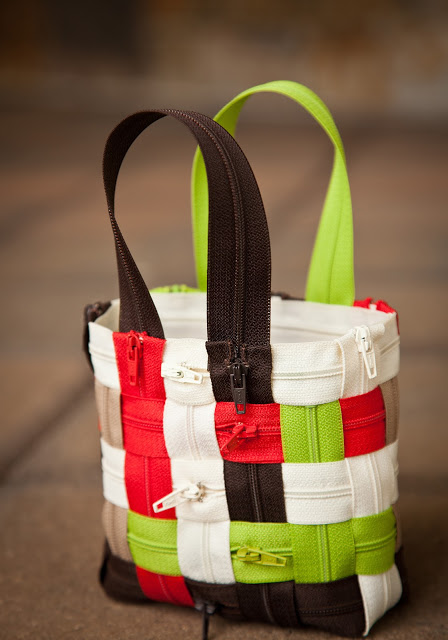
Zipper Bag from Yarnspirations
Photo courtesy of Coats & Clark. See bag instructions at Yarnspirations.

Stacking

Zipper tapes can be overlapped, either closely or more widely spaced, to fill an area, such as a cuff or jacket yoke, or to make a bracelet. The easiest way to do this is to cut a lightweight background fabric in the size and shape needed, then stitch the zippers onto it. For a bracelet, a felt background is ideal since it’s comfortable against the skin, yet sturdy enough to hold the weight of multiple zippers.

Zipper tapes can be parallel to each other, or not, depending on the desired look, and zipper pulls can be incorporated for added accents.

Zipper bracelet by Coats & Clark
Photo courtesy of Coats & Clark

Shaping

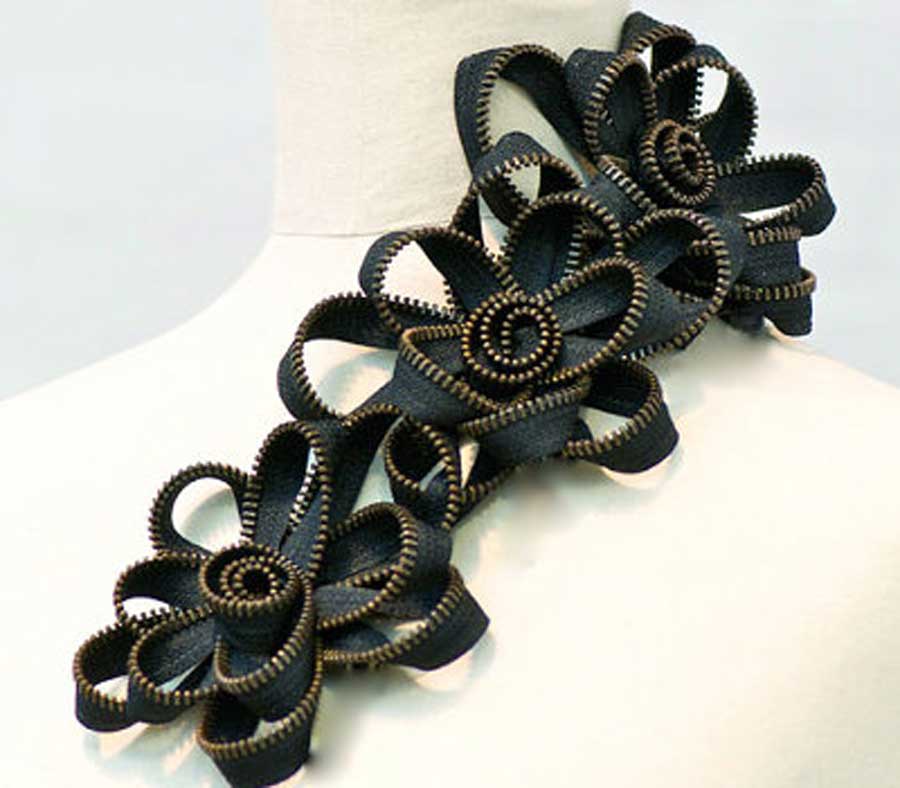
Zipper flower from Coats & Clark
Photo courtesy of Coats & Clark

Zipper tape is readily shapeable with a few hand stitches to hold it in place, so making freestanding flowers is easy. Just shape the petals to the desired size and hand-tack the center. Sew directly to the project, or add a pin back to make a jewelry accent.

To make longer lengths of trim, use hand stitches along the tape edge to shape it, either in regular or random patterning, then stitch through the zipper to hold it in place.

For even more flexibility, trim the zipper tape close to the teeth, so that those become the focal point. To prevent fraying, coat the cut edges with a fray stopping product. To hold the design shape, hand-stitch over the teeth with invisible thread.
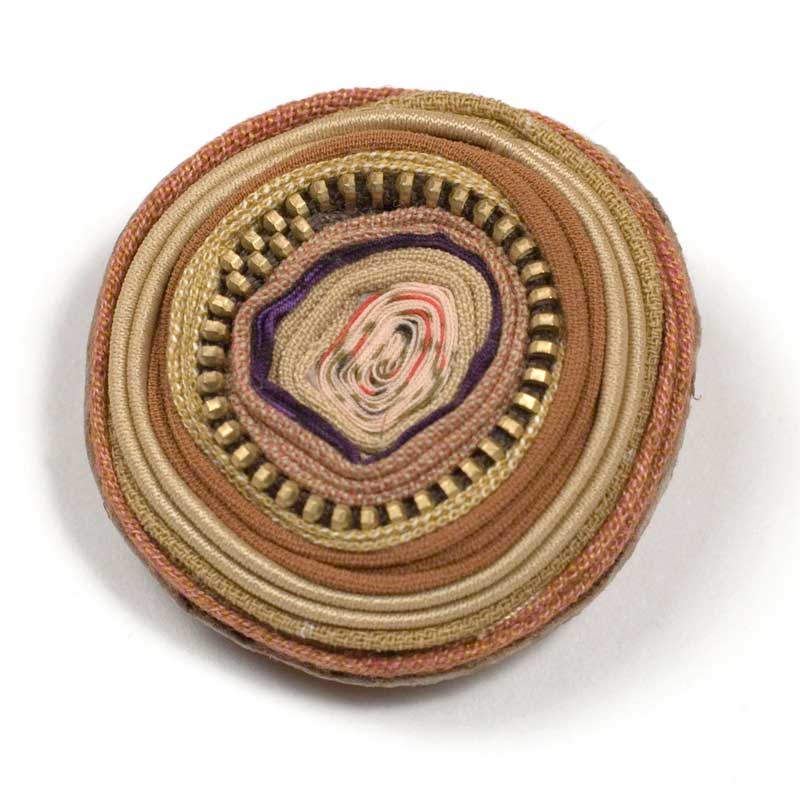
Zipper as a buttonConsider using zippers decoratively to make buttons—the glint of metal teeth works well when coiled with other fabrics. Hand-stitch the wraps together to create the desired size, or stitch them to a background circle of fabric. These types of decorative buttons are best for show, and not for use through a buttonhole, though they can work well through loops…perhaps loops made of zipper.

Piping

Who says piping has to be fabric? It can be even more interesting if it’s made from zippers. Fun teeth create the exposed trim portion for a fun pop of color when inserted into a seam or used along an edge. Insert the zipper tape as you would standard piping so that the teeth are the visible portion, or stitch further away from the teeth to show a hint of the zipper tape as well.
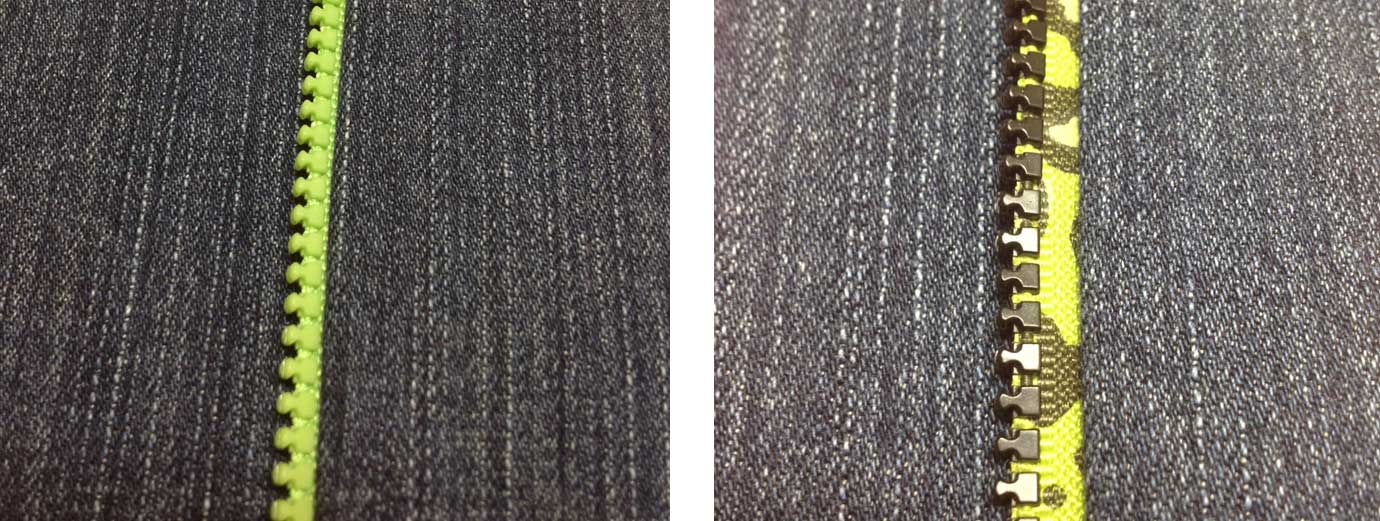
Zippers as piping

Do not extend heavy teeth beyond the seamline, but instead trim them off and use a fray stopping product to secure the ends.

To apply edge piping to a curve, clip into the zipper tape and spread it so it lies flat against the shaped edge.
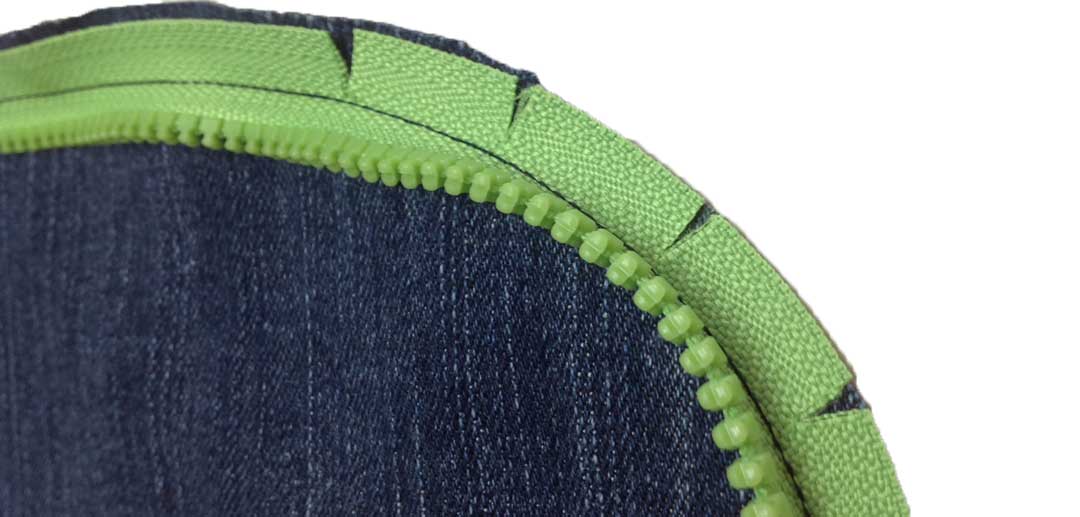
Zipper applied to a curve and clipped

One caution: Metal or large plastic zipper teeth can be an irritant to the skin when used along the edge of a garment, so keep that in mind when choosing where to use them.

So, start looking at zippers in a new light—not just hidden closures. Happy Zipper Day!


~Linda Griepentrog
Linda is the owner of G Wiz Creative Services and she does writing, editing and designing for companies in the sewing, crafting and quilting industries. In addition, she escorts fabric shopping tours to Hong Kong. She lives at the Oregon Coast with her husband Keith, and two dogs, Yohnuh and Abby. Contact her at gwizdesigns@aol.com.
This field is for validation purposes and should be left unchanged.
Did you enjoy this article?
Are you an ASG member?

Tagged With: National Zipper Day, sewing, zippers

March 4, 2022

Single Layer Construction

One Layer at a Time

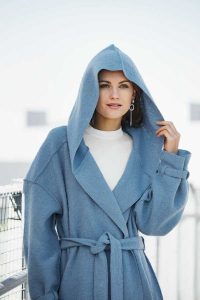
Boiled wool coat
Boiled wool coat. Photo courtesy of Bernina

There are times when more than one layer of fabric really isn’t necessary or desired—think bulky hems, facings, etc. Single-layer construction techniques to the rescue!

Fabric Choices

Many types of fabrics are suitable for single-layer construction, but those that are most commonly used are sheers, laces, handwovens, fleeces, boiled wools or felted fabrics, linens and double-sided fabrics (different colors or weaves on each side). The commonality in these choices is that both sides of the fabric are presentable and can show in the finished garment without anyone saying, “The wrong side of your fabric is showing.”

Obviously, densely woven or knitted fabrics are suitable for single-layer techniques, but some loosely woven or seemingly less likely candidates can also be used.

Pattern Changes

If you plan to finish the single-layer edge of your garment, mark the original seamlines along the requisite areas. The marked line becomes the new edge, using one of the techniques below. Do not trim the seam allowances.

Edge Finishes

The one place where single-layer construction is the most obvious is along the garment edge—there are no standard hems, facings or turn-backs, that add both weight and bulk to the edge, whether it be a lower hem, sleeve hem, collar, front opening or patch pocket. So, how are those unfinished edges handled? Let’s explore some options.

Cut Edges
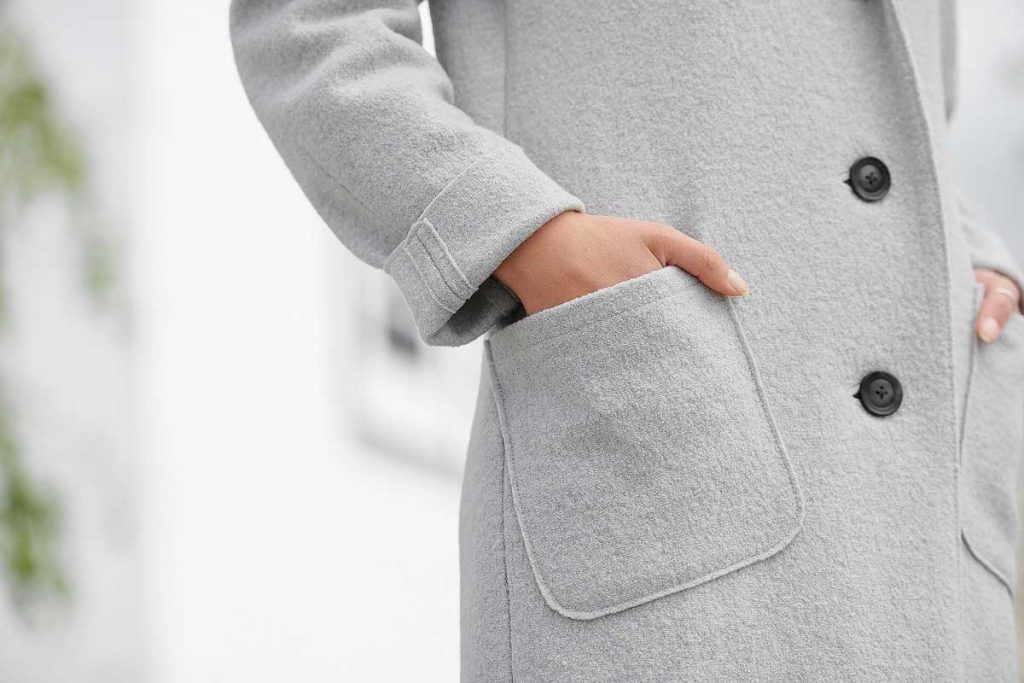
On some fabrics, like fleece and boiled or felted wool, a simple cut edge will suffice as an edge finish. These fabrics are usually stable and won’t distort without added finishing.

Unfinished pocket edge
Raw edge top-stitched pocket. Photo courtesy of Bernina.

Topstitching
The cut fabric edge can simply be topstitched with one or more lines of stitching. Heavier threads can provide a nice accent to this easy edge finish.

Fringe
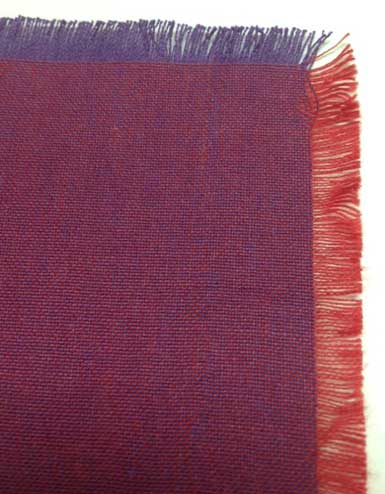
Fringed edgeFor fabrics that are loosely woven, a great single-layer finish is fringing, assuming the edge is cut on-grain, like a center front opening or collar. Sew one or two lines of stitching along the marked seamline, then carefully remove the threads up to the stitching line to form the fringe. On double-woven fabrics, or if you’re fringing perpendicular edges, you may see two different colors of threads fringe out.

Binding
Almost any kind of fabric can be used to bind a single edge and contrast trim can form an attractive design line. On knit fabrics, bind the single edge with a knit fabric to maintain some flexibility. Use the marked seamline for attaching the binding, then trim away part of the width to create a narrower bound edge.

Bound edge on knit
Bound edge

Fold-over Elastic
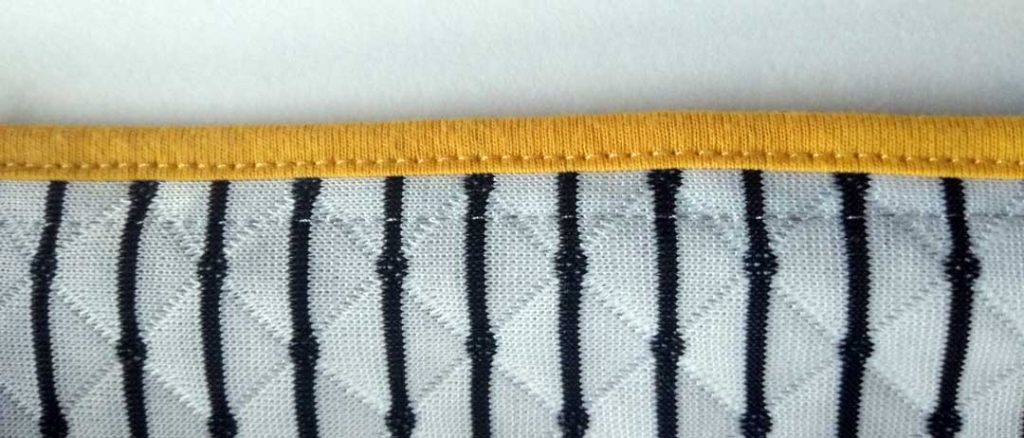
This elastic has an indentation woven into it designed to make it easy to fold in half for encasing an edge. When using this specialty elastic, trim the seam allowance off the edge that’s to be bound before applying it. A straight stitch or narrow zigzag can be used for the application, as some slight stretch may be needed in some areas, like at a neckline opening. In other areas, like a center front or lapel, no stretch is required. Fold-over elastic comes in both prints and solid colors, depending on the desired look.

Narrow Hem
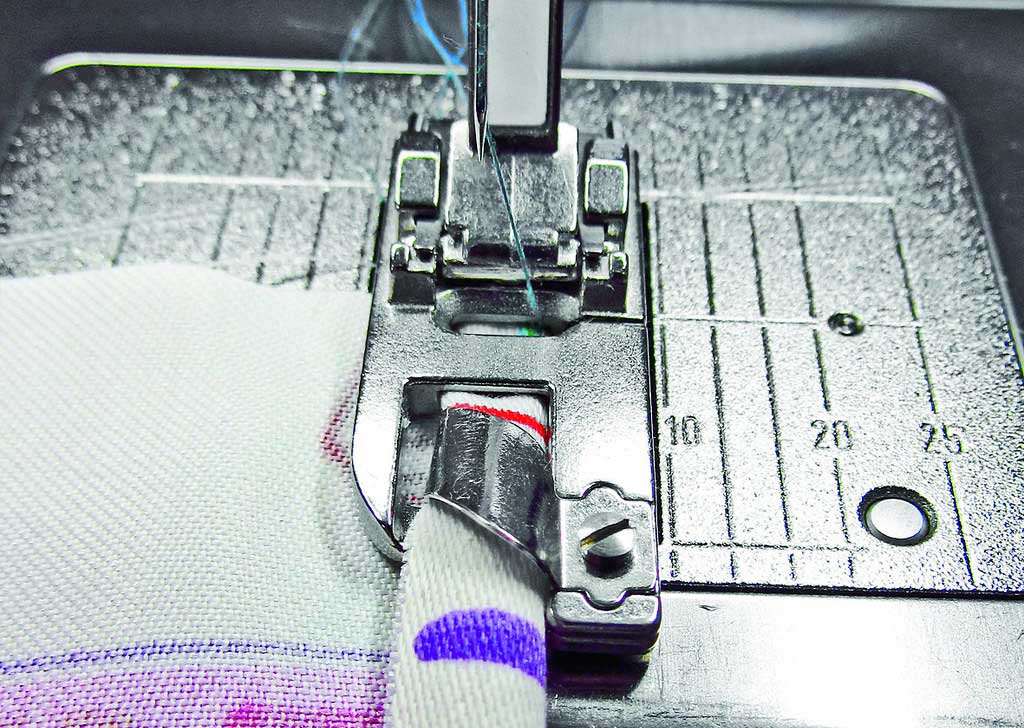
On lightweight fabrics, like sheers and some linens, a narrow hem is the perfect finish for a single-layer edge. A narrow hem can be just one layer, as in turn up and finish the raw edge with a decorative machine stitch, or it can be turned twice to encase the raw edge, then topstitched in place. Either way, the narrow hem uses the garment seam allowance to finish the edge. On large expanses, a narrow hemming attachment for the sewing machine can make quick work of this finish.

Narrow hemming foot. Photo courtesy of Bernina.

Serging

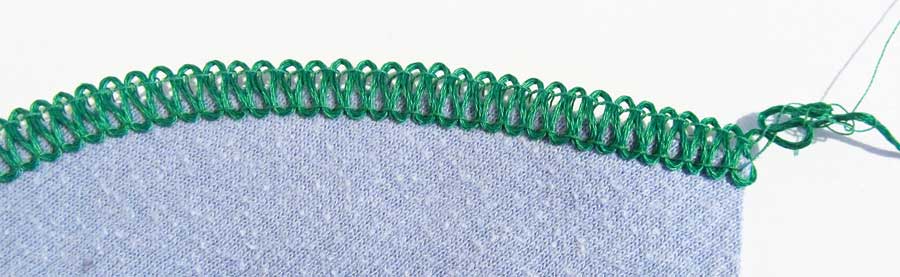
Serged edge with heavy thread
Serged edge with heavy thread. Photo courtesy of Bernina.

One of the most common finishes for single-layer construction is a serged edge. This finish encases the raw edge and trims off the seam allowances at the same time. The stitching can be narrow or wide, depending on the desired look, and can be sewn with regular thread or one of the specialty threads like rayon for a bit of sheen. For a denser edge finish, use Woolly Nylon or Polyester thread to create a matte finish, almost braid-like look, to the edge. If both sides of the fabric will show, like on a turn-back lapel or hood lining, be sure the thread tension is adjusted so both sides of the stitching look the same.

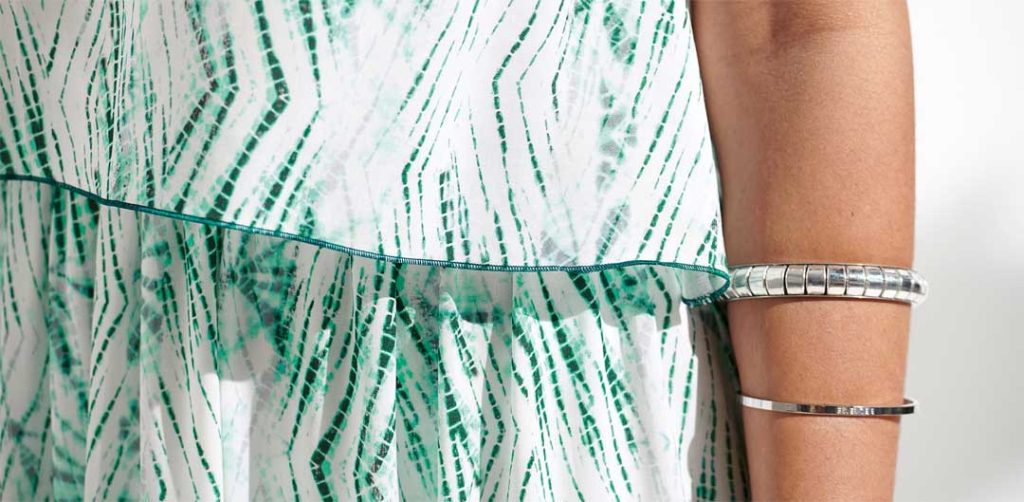
Narrow hem
Narrow serged hem. Photo courtesy of Bernina

To keep edges from stretching while serge-finishing, fuse a very narrow strip of water-soluble stabilizer to the wrong side of the fabric before sewing. After the serging is complete, dissolve the stabilizer following the manufacturer’s instructions. Note that this technique works only on fabrics that can tolerate water. On other fabrics, sew a line of straight stitching along the seamline to stabilize the area, then serge over it, hiding the stitching.


~Linda Griepentrog

Linda is the owner of G Wiz Creative Services and she does writing, editing and designing for companies in the sewing, crafting and quilting industries. In addition, she escorts fabric shopping tours to Hong Kong. She lives at the Oregon Coast with her husband Keith, and two dogs, Yohnuh and Abby. Contact her at gwizdesigns@aol.com.
This field is for validation purposes and should be left unchanged.
Did you enjoy this article?
Are you an ASG member?

Tagged With: coat, sewing, single layer construction

February 11, 2022

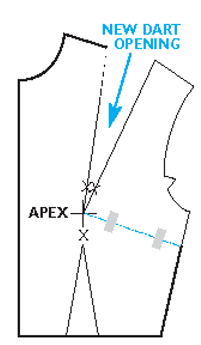
Moving the Dart to Create a Princess Line

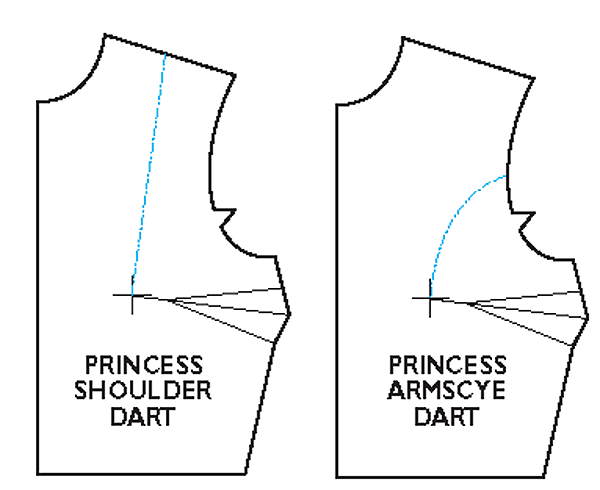
Bust dark drawingsIf good fit is important to you, especially when sewing with woven fabrics, you already know the significance of a properly placed and well-fitting bust dart. Darts shape that two-dimensional fabric to fit around your three-dimensional body. Even for the less-endowed figure, when darts are the correct size and pointed to the correct location, they can add shape and flatter your frame.

When they are incorporated into special design lines, darts also have wonderful attributes beyond fitting and shaping. Fashion designers have always known and utilized these skills for creating different styles with special design lines. For your own design explorations, here are some guidelines for moving the standard side seam bust-fitting dart and converting it into the always flattering princess line. This design line can originate from the shoulder line or from the armscye—that choice is yours.

When the princess design line extends from the shoulder line, it creates a vertical line which gives more visual height to the wearer. It is the easiest version to sew. When it comes from the armscye, the tighter the armscye curve, the more challenging those curved seams can be to stitch together particularly for the full-busted figure. However, the closer the starting point is to the shoulder point, the easier it will be to sew.

Basic Dart Fit

Princess lines flatter most figure shapes. However, they can end up being ill-fitting and unsightly if your bust dart is not the correct width for your cup size and is not aimed toward your apex. If the original bodice sloper doesn’t conform properly to your apex contours, then the curvature of the princess line could ride above or below your actual apex level, creating a poor fit. When you begin with a pattern that is fit exclusively to your body contours, where the side bust-fitting dart is the correct shape and is pointed toward your apex, you can rest assured that the resulting princess line fashion detail will also fit as it should and be flattering on your body.

Make sure you have the correct size dart for the fullness of your bust and that the dart is pointing toward your apex. Sure-Fit Designs offers an Adjust-A-Bust template with A through E-cup dart sizes. This template is found within the Sure-Fit Designs Dress Kit. If you’re full busted, this solves the problem for the traditional FBA (full bust adjustment).

Creating the Shoulder Princess Seam

Now, let’s begin to move that dart.

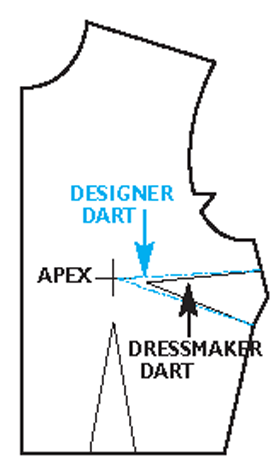
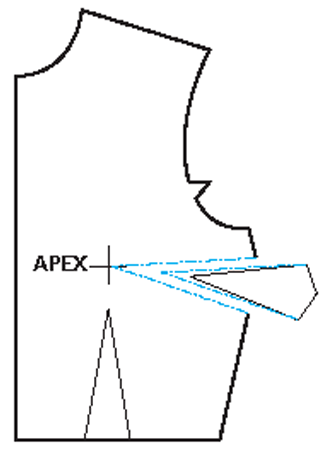
1. Beginning at the top and bottom legs of the side seam dart, draw a designer’s dart, which is one that extends to the apex cross mark. The tip of this dart, which is now at your apex, will become a pivot point.

2. Stabilize the apex with a piece of clear plastic tape. Then, cut on the designer’s dart lines to remove this dart.

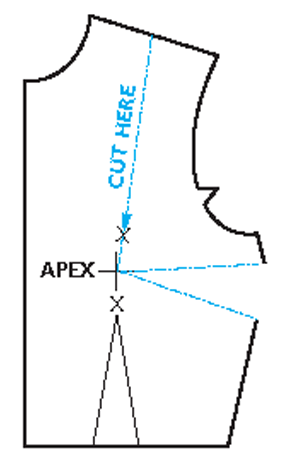
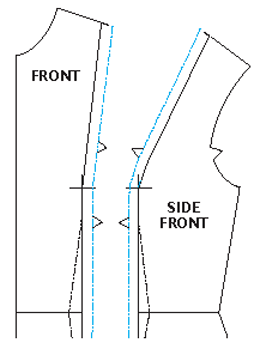
3. Approximately mid-shoulder, mark a point where the princess detail will begin. Draw a straight line from this point to your apex marking. Continue this line down through the center of the waist-fitting dart. Mark X’s above and below the apex which will become the princess seam matching notches. Cut on this line down to the apex only.

4. Close the original side-fitting bust dart, allowing the pattern to pivot at the apex hinge. Tape original side seam dart in this closed position.

5. Continue cutting from the apex down through the waist-fitting dart. Separate the Center Front panel from the Side Front panel. Add 5⁄8″ (1.6cm) seam allowances to both cut edges. Extend the X’s to create the matching notches.

6. If you want the princess line to fit with more shaping at the waistline, you can always stitch on the side legs of the waist-fitting dart to tighten the bodice.


This article appeared in a previous issue of Notions
~ Glenda Sparling is president of Sure-Fit Designs, an international company specializing in pattern fitting and designing. Canadian-born, her background includes 10 years as a home economics educator and 30 years in the sewing industry. Based in Eugene, Ore., she has traveled extensively, teaching in the U.S., Canada, Australia, New Zealand, and Great Britain. Glenda has written pattern fitting, designing, and embellishment books, including “Wrapped in Fabrique,” and a series of how-to fitting videos that have been converted recently to DVD format. She is a member of the ASG Willamette Valley, Ore. Chapter. www.surefitdesigns.com

This field is for validation purposes and should be left unchanged.
Did you enjoy this article?
Are you an ASG member?

Tagged With: bust dart alteration, dart, sewing

January 7, 2022

Horsehair Braid

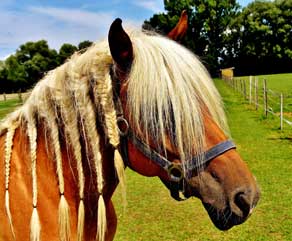
What do horses and braids have to do with sewing?

Now that we’ve got your attention, let’s talk about this uncommon notion called horsehair braid!

Historically, it was made from the stiff hair of a horse’s mane and tail, and then from cotton and linen, but today’s version is made from nylon or polyester fibers.

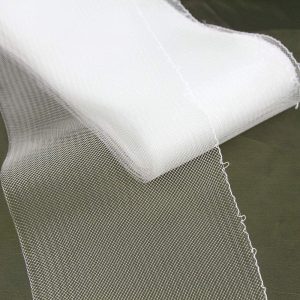
Horsehair braid is a stiff, bias woven mesh used to provide structure and body to special occasion and wedding dresses, as well as costumes. Available in multiple colors in widths ranging from ½” to 6”, it is sold either by the yard or packaged in pre-cut lengths on the notion wall. Colors and wide widths may be found at millinery supply companies or online.

You’ll find horsehair braid on hems to add flounce to a full or circular skirt, in puffed sleeves for a little oomph, and internally to maintain shape and structure in fitted evening gown bodices. In addition, you may see horsehair braid on wedding veils, as large bows either on hats and fascinators, or shaped into wedding pew bows. You may also see it on many kinds of ruffle edges.

Shop on Amazon
ASG may earn a small commission from your purchase, at no additional cost to you.

This crinoline-like trim comes in two weights—soft and heavy—and it is also available with a built-in gathering thread for shaping. The latter is sewn along one edge only and is pulled to ease the tape around curves, like on a circular skirt hem where the hem circumference edge is longer than the horsehair facing being turned inward.

Whether you put the horsehair braid on the inside or outside is a matter of preference and style—the choice is yours, either as a hidden structure or see-it trim. On sheer fabric, like netting, tulle and organza, the horsehair will show through if it’s on the inside, so some designers opt for placing it on the garment right side instead.

Handling

Because it’s a woven bias strip, horsehair braid should not be cut widthwise as it tends to disintegrate and unravel with even minimal handling, so choose the finished width you need.

Horsehair braid will stretch and if it’s distorted during the application, you can have some unsightly ripples and wrinkles, so be careful not to keep it flat, without stretching, during an application. It also narrows if stretched, further complicating the potential distortion.

The cut end of horsehair braid is quite prickly as all the fiber ends are exposed, so before using it, encase the cut exposed end in a scrap of fabric or bias tape to prevent the uncomfortable poking while wearing the garment. For hems, finish just the overlapping end, but for sleeves or other uses where both ends are exposed, encase both ends.

Hemmin’

There are two options for hemming with horsehair braid—use it as a facing or encase it in the garment fabric hem. Either way, the function is the same—to add body and structure to the edge.

To use narrow horsehair braid as a hem facing, place it along the cut hem edge right side and sew ¼” from the edge. Turn the braid and the seam allowance to the inside, then topstitch the braid in place.

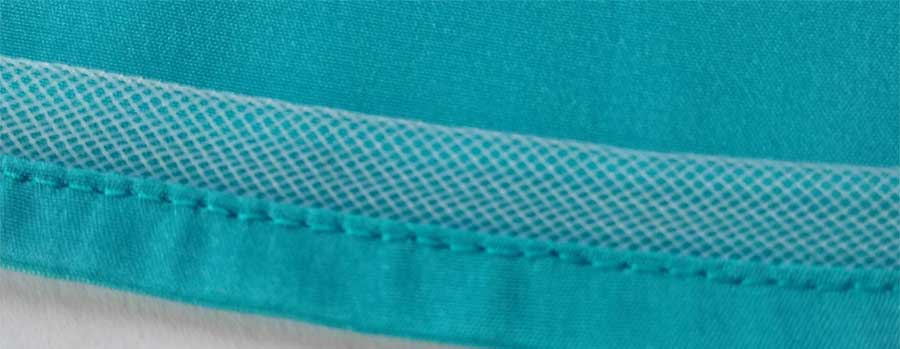
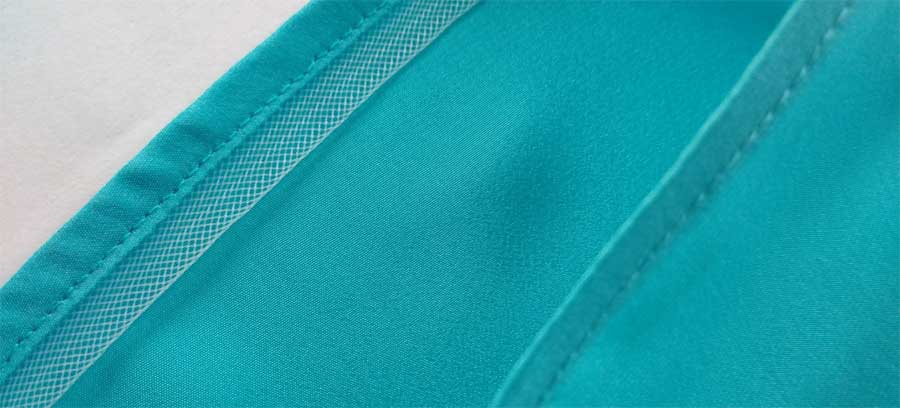
Horsehair braid inside a hem (showing wrong side)

If the garment has a circular hemline, choose a wider braid with a built-in gathering thread at the upper edge. Follow the process above, but when you turn the braid to the inside, gently pull on the gathering thread to shape the braid’s upper edge to fit the skirt. Topstitch the braid lower edge in place, then invisibly hand-stitch the upper edge of the shaped braid in place around the skirt. Depending on the span, it may be sufficient to only tack the braid upper edge at the skirt seams.

To place the trim on the outside of a hem, repeat either of the above techniques, but place the braid on the garment wrong side and then turn it to the right side and secure.

To encase the braid, place it on the wrong side of the skirt hem, aligning the edge with the cut hem edge. Sew ¼” from the edge, then turn up a double hem, encasing the braid inside. Either topstitch or hand-stitch the hem in place.

Horsehair braid inside a hem, showing right and wrong sides.

Sleeves

Horsehair braid is often used on sleeve caps to add extra body and pouf to puffed sleeves. Insert the sleeve following the pattern directions before adding the braid. Cut a length 1 ½ times longer than the area where it will be applied (often notch to notch in the upper sleeve). If your braid does not have a built-in gathering thread, add one along one side. Pull up the gathering thread to the desired fullness and secure. Finish both ends of the braid to avoid discomfort. Place the gathered edge along the upper sleeve seam allowance and stitch in place through the seam allowance layer only.


~Linda Griepentrog
Linda is the owner of G Wiz Creative Services and she does writing, editing and designing for companies in the sewing, crafting and quilting industries. In addition, she escorts fabric shopping tours to Hong Kong. She lives at the Oregon Coast with her husband Keith, and two dogs, Yohnuh and Abby. Contact her at gwizdesigns@aol.com.
This field is for validation purposes and should be left unchanged.
Did you enjoy this article?
Are you an ASG member?

Tagged With: hem, horsehair braid, sewing, shoulder

November 12, 2021

Sew Thrifty

Photo by Michael Morse from Pexels

Every sewer seems to have a bit of a thrifty soul…whether it’s finding a great fabric at a bargain price or reusing something to create something new. An easy way to do both of those virtuous tasks is to shop thrift stores. We’re not suggesting that you do that as your sole source for sewing things, but the occasional bargain safari is good for the soul (and lots of fun, too!).

If you’re of a certain age, you might remember when thrift stores were dank places with bad smells, and no one wanted to be seen there, but that’s all changed. Today’s stores have coffee bars and trendy cafés, they take credit cards and offer frequent buyer clubs.

So, what’s the pursuit? Sewing stuff, of course. Your fab finds can fall into three categories—things you can use as-is now, items to creatively repurpose, and those for “harvesting” parts (i.e. fabric, trim, buttons, clever closures, handles, etc.).

Most thrift stores have a sewing department with patterns, fabric, notions, yarns, etc. cast off by someone no longer in need of the treasures you may be hunting for, but don’t stop there—look in all the departments.

Strategize Your Shopping

There are some great strategies to follow when you shop at thrift stores. Take a look:

  • sale tagCheck for coupons and discount days, like 50% off a certain tag color or a senior discount. Some stores offer sales with a single fee for an entire bagful. Thousands of buttons can fit into a bag for a buck!
  • If you like something, put it in your cart when you find it. Another creative sewer might be right behind you. After consideration, if you decide not to get it, put it back where you found it.
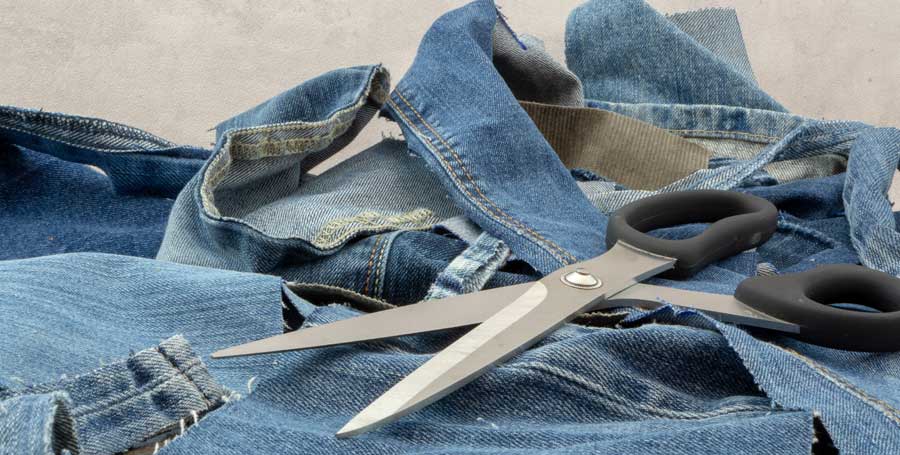
  • Visit all the departments—including linens, home décor, handbags, and accessories. Check men’s and women’s areas for large size items that can yield more fabric. Large men’s baggy jeans can yield a lot of great denim. Look for items with pleated and gathered skirts, full sleeves, etc. to maximize the usable fabric. Worth noting: Old sheets provide great fabric for test-fitting.
  • Be sure to check for any damage or stains, and on window treatments looks for any fading or sun deterioration.
  • Bring a tape measure to assess items. If it’s a garment you plan to wear as-is or repurpose, try it on. Some stores allow for try-ons, others don’t. If not, check the store’s return policy.
  • Wash or dry clean your finds before using to preshrink and help avoid color transfer to other fabrics.
  • Ask if your favorite thrift store has an outlet. The outlet is where unsold items from the regular stores go, and things are often sold by the pound—a highly competitive atmosphere. Note: It takes lots of silk to make a pound!

 Fav Finds

jean scraps

  • Jeans, with their fun (done) details like waistbands, pockets and zippers, are perfect for pieced skirts and casual handbags. Multiple shades of denim can be easily combined in one project.
  • The domestics department is the place to check out curtains, drapes and bed linens. Sheer curtains are great petticoats (or overskirts) for evening-wear.
  • Handbag leather handles, metal findings, latches, zippers, pulls, pockets and linings are perfect for incorporating into newly sewn bags.
  • Men’s silk ties are ideal for piping, covering buttons or piecing for a garment or accessory. Take out the insides and you have bias-cut fabric ready to go. Keep the interfacings for another use.
  • Men’s suit details like welt pockets, lapels, fly zippers and linings are great to incorporate into re-do items.
  • Wool (or mostly wool) sweaters are easily felted and transformed into new things, from mittens to wine cozies, garment sections and home decorating accents.
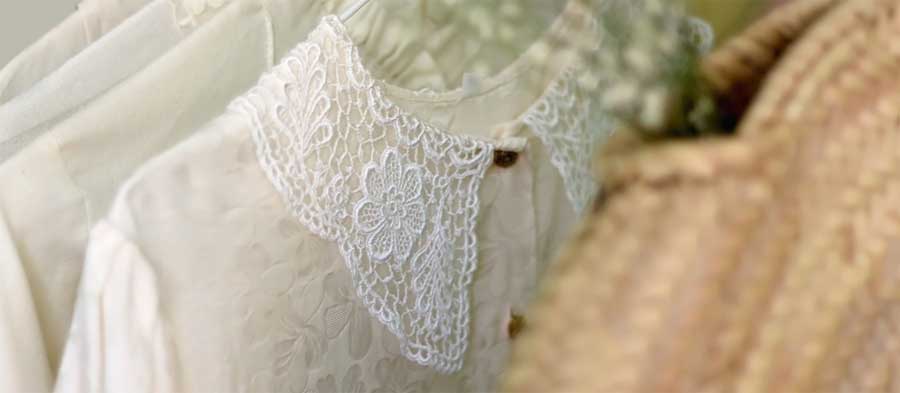
  • Old laces are ideal to repurpose for garment accents, whether yardage or a vintage doily.

In all your thrifting adventures, enjoy the hunt and open your mind to the creative aspects of reusing the treasures you find. Sewists are so lucky to be able to use their skills for creative purposes and see new life in old things!


~Linda Griepentrog
Linda is the owner of G Wiz Creative Services and she does writing, editing and designing for companies in the sewing, crafting and quilting industries. In addition, she escorts fabric shopping tours to Hong Kong. She lives at the Oregon Coast with her husband Keith, and two dogs, Yohnuh and Abby. Contact her at gwizdesigns@aol.com.
This field is for validation purposes and should be left unchanged.
Did you enjoy this article?
Are you an ASG member?

Tagged With: recycle, recycle sewing, repurpost, reuse, sewing, thrift store finds

  • « Previous Page
  • 1
  • 2
  • 3
  • 4
  • 5
  • …
  • 16
  • Next Page »

Become a Member

Join the only national organization dedicated to Advancing Sewing as an Art and Life Skill.

Join Now button

Blog Article Categories

  • ASG Conference
  • Chapter Stories
  • Embroidery
  • Fitting
  • Learn to Sew
  • National Sewing Month
  • Products, Books, & Patterns
  • Projects
  • Quilting
  • Sewing
  • Sewing Techniques
  • Sewing Tips
  • Sewing Tours
  • Videos
  • Disclaimer
  • Privacy Policy

American Sewing Guild
National Headquarters
9660 Hillcroft, Suite 230
Houston TX 77096
713-729-3000 | 713-721-9230 Fax
www.ASG.org

ASG wordcloud - education, conference, discounts, videos, special offers, tours and more

Copyright © 1998–2026 · American Sewing Guild · All Rights Reserved