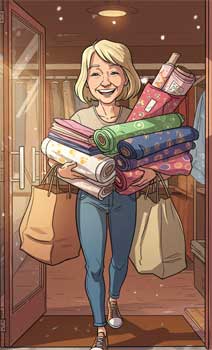
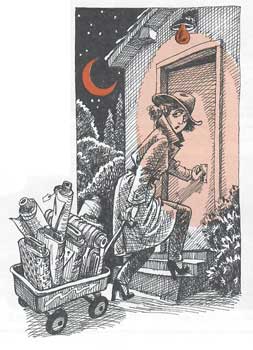
American Sewing Guild (ASG)

Visit our blog Visit the ASG Facebook page Visit ASG on Pinterest Visit ASG's YouTube channel Visit ASG on Instagram
  • Home
  • Join ASG
    • Join Online
    • Chapter Locations
    • Member Benefits
    • Member Brochure
    • Join by Mail
  • Conference & Education
  • Resources
    • Contests & Awards
    • Giving Back
    • Hall of Fame
    • Links
    • Travel and Tours
    • Measurement Chart
  • Shop
    • ASG Store
    • Chapter Products
    • Video Resources
  • Blog
  • About
    • About Us
    • Donate to ASG
    • ASG Sensitivity Statement
    • FAQ’s
    • Start a Chapter
  • Contact
  • Member Login
    • Login First!
    • Members Only
    • Leadership Only
    • Website FAQ’s
    • Logout
  •  

May 10, 2024

Elevate Your Projects with Metallic Threads

Metallic Inspiration piece

In the world of sewing, threads are the unsung heroes that hold together our creations with strength and finesse. But beyond functionality, threads also possess the power to elevate our projects from ordinary to extraordinary. Enter decorative metallic thread, the ingredient for adding flair and personality to your home sewing endeavors.

Metallic thread comes in a myriad of colors and offers endless possibilities for creativity. Whether you’re embellishing a garment, adding accents to home decor items, or simply looking to infuse your projects with a touch of elegance, these could be the ticket to achieving stunning results. Their reflective properties catch the light, creating eye-catching accents that elevate the overall aesthetic of your creations. However, they can be more prone to breakage than standard sewing threads, so opting for a high-quality brand designed specifically for machine embroidery can help ensure smooth stitching.

Another consideration when using decorative thread is the choice of stitch. While basic straight stitches and zigzags are versatile options, experimenting with specialty stitches like satin stitch, chain stitch, or feather stitch can yield stunning results. Most sewing machines today come equipped with a variety of decorative stitch options that you may not have considered using before but can offer unexpected options to allow you to unleash your creativity with ease.

When it comes to selecting colors, don’t be afraid to mix and match to create visual interest. Contrasting threads can make your stitching pop, while complementary colors can create a harmonious effect. Consider using a color wheel as a guide to help you choose combinations that work well together.

Metallic Threads

Although metallic thread appears to be made of metal, it’s actually composed of a synthetic material such as polyester. For best results:

  • Use a needle made to work with metallics (try a 90/14 metallic or topstitch needle).
  • Loosen your top tension a few numbers.
  • Whether vertical or horizontal, position the thread spool so that it stays flat and rolls off flat without pulling against the spool.
  • Use soft materials and stabilizers for fewer stitching interruptions.
  • Slow down the speed of your machine.
  • If doing an embroidery design, choose simple designs without heavy or dense fills and use longer stitch lengths to avoid breakage.
  • If you run into issues, try using a thread lubricant.

What about my bobbin?

Metallic Thread Inspiration piece

Choose a lighter weight thread such as a smooth polyester (not spun polyester) for your bobbin that won’t compete for tension with the metallic thread on top. Lighter bobbin thread yields to the top thread, reducing bulk in your stitching. As a result, your needle won’t encounter as much resistance and you’ll find that your stitches are much smoother.

Is it rough in your neighborhood?

Metallic threads are delicate and can easily catch on burrs or imperfections. Check all of the thread guides on your machine for rough areas where the thread may get caught.

Consider your serger

Have you thought about using metallic thread in your serger? Although it can be used in the needle, it will form an attractive decorative edge if you use it in either the upper looper with a rolled hem setting, or both upper and lower loopers with a balanced tension setting. Just remember to change the stitch length to get the desired filled look on the edge.


Did you enjoy this article?
Are you an ASG member?
This field is for validation purposes and should be left unchanged.

May 3, 2024

Sew…what? Unexpected Sewing Tools

As sewing enthusiasts, we’re always looking for the best tool for the job, but do we always need to look only at the fabric or quilt shop for the right tool? Heaven’s no…any store is fair game! Check out some of these handy tools that didn’t have sewing as their original purpose.

Hemostats

Medical professionals will recognize these tools from the operating room where they’re used to access small areas during surgery and clamp blood vessels together, but in the sewing room, it’s a different story. These small scissor-like tools are ideal for turning things and for stuffing tiny areas. Dollmakers swear by them for getting fiberfill into mini-fingers and toes. They’re also useful for turning bag straps and helping to create sharp points on collars. For spaghetti straps and other small tubes, long hemostats are a godsend.

This tool comes in a variety of shapes and sizes—some have curved blades, others have long and skinny straight blades, and some have rounded, blunt-nose tips.

Magnetic bowl/tray

Head to the auto supply store, big box stores like Home Depot or Lowe’s, discount tool stores like Harbor Freight, or on Amazon for this handy device. It’s designed to hold screws, bolts and other small metallic parts removed during automotive servicing. But in the sewing room, it makes an ideal holder for pins and/or needles. Depending on your machine brand, some sewing machine feet can also be corralled with one of these bowls.

The magnetized bowls come in multiple shapes and sizes, some purely metallic, others with colorful plastic borders. Some are collapsible for easier toting and storing.

One caution: Be sure whatever you want to store is made from a metal that is magnetically attracted, like steel or nickel…otherwise things can fall out of the bowl.

Magnetic Knife Holder

Magnetic bar

Another magnetic fav from the kitchen section! Designed to hold the knife blades along a rail, these handy devices are ideal for storing scissors and other magnetically attractive sewing tools. Just hang it on the wall in your sewing room and you’ll always know where to find your items.

Dental Floss

dental flossWe all know that flossing is good for your dental health, but the floss itself can be helpful in your sewing room as well.

Floss is ideal for making gathers in all kinds of fabric. Simply sew over a strand of it with a wide and open zigzag stitch, the pull the floss to gather the fabric to the size needed (hold one end to avoid pulling it out of the thread channel).

Waxed dental floss is also helpful for sewing on buttons, as it makes a more secure attachment, especially for metal buttons that can sometimes wreak havoc with thread.

Wooden Spoon

Even if you have a large arsenal of professional pressing tools, there comes a time when something you’re trying to press may be too small to use with any of them. Enter the trusty narrow round wooden spoon handle. Whether it’s a spaghetti strap for a sundress or a shoulder strap for a tote, both need to be pressed and have the seams positioned. Once your sewn piece is turned, simply slide it over the wooden spoon handle and press as needed. Note: Be sure your spoon handle is raw wood and not coated, painted or finished with something that will come off on your fabric when subjected to the heat of the iron.

A wooden spoon handle can also be used to help turn a narrow tube as well or as a “finger-presser” for fabrics that can’t take the heat of an iron, like vinyl or laminated cottons. The bowl of the spoon can be used to press seams open at your machine without making repeated trips to the iron—just press and drag it along the opened seam.

Straws

Straws

Cut off a short bit of a straw and tape it to the front bed of your sewing machine (just in front of the foot) as a guide for feeding yarn or trim you want to couch. It helps the thread feed evenly in the needed location.

This same function can be accomplished by taping a straw segment above the presser foot and feeding the yarn or other couching material down through it and then under the foot.

Flex Straws

Flexible strawsFlex straws that bend allow for even more precise placement in awkward areas.

A straw segment can also be used in place of a bodkin to help thread elastic or a drawstring through a stitched channel. Just insert the carrier, tape the end in place and push the length through the opening. And a straw is perfect to thread through bobbins to keep them corralled.

So, next time you’re shopping, ask yourself “Is there a sewing use for that?”


~Linda Griepentrog is the owner of G Wiz Creative Services and she does writing, editing and designing for companies in the sewing, crafting and quilting industries. In addition, she escorts fabric shopping tours to Hong Kong. She lives at the Oregon Coast with her husband Keith, and three dogs, Yohnuh, Abby, and Lizzie. Contact her at .

Did you enjoy this article?
Are you an ASG member?
This field is for validation purposes and should be left unchanged.

April 26, 2024

Sewing Tips from Japanese Tailoring

Japanese Tailoring: What is it?

Japanese tailoring represents a distinctive approach to construction methods within Japan’s ready-to-wear clothing sector. This method seamlessly blends the intricate craftsmanship of traditional tailoring with the efficiency and accessibility of modern techniques, resulting in impeccably crafted garments.

Seamstress sewing

These are a few of the characteristics found in Japanese tailoring techniques:

  • Fusible interfacing is used as a substitute for hair canvas.
  • Instead of hand-stitched tape along the roll line, fusible stabilizing tape is used.
  • Garment shaping is achieved through pressing rather than pad stitching.
  • The seam allowances at the edges of the collar, neck, and facings are adjusted on the pattern to save time, improve accuracy, and ensure concealed seams on the front-facing side of the garment.
  • Bulk is eliminated in the notch area where the collar joins the garment.
  • Collar and lapel corners are symmetrically turned under.
  • Seams reverse direction at breakpoints, resulting in flat, sharp edges on collars and facings.
  • Welt pocket ends are mitered to remove bulk and conceal seams.
  • Sleeve vents provide an opportunity for the sleeve to be lengthened or shortened if needed.
  • Additional ease is incorporated into the lining.
  • Hand stitching is minimized.

Sewing Tips from Judy

  • Understand the pattern before you sew, so that easing and stretching can be done appropriately.
  • Check seam allowances — 5/8″ isn’t always the best standard. A nar­rower seam is better if grading is needed; a wider seam gives room for fitting.
  • When tracing patterns, dry iron the pattern paper. Paper can shrink with a steam iron!
  • Extend the grain lines the full length of the pattern.
  • Make a fitting shell, especially if making the pattern for the first time. It tests the fit and the style.
  • Check the seams and make sure they match. Always check on the stitching lines, not the cutting lines.
  • Add notches on long seams instead of using lots of pins.
  • Check princess lines-make notch­es on the front working from the bottom up and the top down above and below where the dart fullness is, then compare the notch dis­tances and make sure they match.
  • On armscyes, it is helpful to know how much sleeve ease exists before it is set in. More than 1 1/2″ is too much. If there is too much ease, fold out the excess in the sleeve cap.
  • On a two-piece sleeve, be sure there is ease to accommodate the elbow.

Unshin

Interested in learning more about Japanese-style sewing? Watch this video to learn about unshin, a Japanese hand-sewing technique:


~ Judy Barlup, formerly of Unique Techniques, is a master of Japanese Tailoring and was a frequent teacher at ASG events. Although Judy is no longer teaching, her tips and techniques are timeless.

April 19, 2024

Quilting Q&A: Borders, Miters, and Fussy Cuts

Today we offer a triple treat of quilting trivia. From understanding mitered corners, to explaining fussy cuts, and finally, navigating the width of a quilt border. Grab your rotary cutter and let’s patch together some knowledge that’s as snug as a perfectly quilted blanket!

Quilting tools

How wide should a quilt border be?

A quilt border can be any width you want, depending on the finished look you like. There can a single border around the outer quilt top edge or there can be multiple borders of varying widths, again depending on the look you like or the pattern you’re following. Several factors should be considered when choosing border widths.

Austin House Quilt by Carolyn Friedlander

The first question to ask yourself might be how much bigger you want the quilt to be, as this can help determine how many and what width of borders you need to add to the pieced center.

The size of the fabric print can influence the border width. Larger prints beckon wider borders to showcase the design. If you use a narrow border with an oversized print, you can’t discern the beauty of the print motifs. The border fabric itself can help determine the width, as often stripes or floral stripes are used for borders and they’re a specific width to showcase an entire pattern.

If you plan to do custom quilting on the border, you may want a wider area to showcase the stitching.

When using multiple borders, a common rule of thumb for determining widths is that a border should be about 1 ½ times larger than the previous border. For example, if an inner border finishes at 1”, the second border should be approximately 1 ½”. In most instances, the narrowest border is on the inside, working outward to the widest.

For those who prefer numbers, outer borders can range from 3” wide on wall quilts up to 7” or more for king-size quilts.

Sometimes you may not want to put borders on all four sides of a quilt. Some modern quilters often use borders on only two sides, either adjacent or opposite, or they vary the border size from side to side and/or top to bottom, or even use different fabrics for different border locations.


Should I miter the border corners or lap them?

Again, this is a matter of preference. Lapped borders are easier to sew than mitered borders and they’re perfect for allover prints. But, if your border fabric is a stripe or floral stripe pattern, mitered borders are more attractive as the design comes together at a 45° angle, rather than lapping.

Image showing lapped and mitered corners on quilts

Borders can also be pieced, either purposefully or from scraps, and scrap borders can also be lapped or mitered, depending on the desired look.

Pieced border on a quilt
Pieced border

My quilt pattern says to fussy-cut the blocks. What does that mean?

Fussy-cutting is a technique in which a fabric motif is strategically placed within a quilt block. Most commonly, a design element is centered in a block for emphasis.

Fussy cut square

Garment sewers often fussy-cut fabric so that motifs are placed in a specific place on the garment—a collar, pocket, front band, etc.

Fussy-cutting requires a template or pattern piece you can see through for the easiest cutting. Just place it over the desired design and cut around it. DON’T FORGET that you need seam allowances, so make your template or pattern to include those.

Many prints are directional, so keep that in mind when cutting pieces, so that the design is oriented the proper way in the finished project. For example, all the elephants should be standing on their feet, not some on their heads.

Fussy-cutting normally takes more fabric than not fussy-cutting, as you may not be able to use the entire length or width, and you don’t want to end up with partial motifs during your cutting process. The extra amount needed depends on the repeat and size of the design motif you’re showcasing, so there’s no hard and fast rule about how much extra to buy. Bring your pattern to the store and see how many you can cut out of a given amount of yardage.

Some fabrics may offer multiple opportunities for fussy-cutting within the same piece. For example, a zoo animal may be the center for some blocks, a different animal for others and perhaps a rainbow motif from the same fabric for others. This allows for less waste than choosing a single motif focus.


~Linda Griepentrog is the owner of G Wiz Creative Services and she does writing, editing and designing for companies in the sewing, crafting and quilting industries. In addition, she escorts fabric shopping tours to Hong Kong. She lives at the Oregon Coast with her husband Keith, and three dogs, Yohnuh, Abby, and Lizzie. Contact her at .

Did you enjoy this article?
Are you an ASG member?
This field is for validation purposes and should be left unchanged.

April 12, 2024

Add a Little Bling: Iron-on Designs

Whether you’re planning to bling out a ready-made T-shirt or denim jacket, or you’re planning to embellish a garment you’re constructing, iron-ons can help you become an artist.

Iron-on for denim

Iron-on designs are available with small, single motifs, or more elaborate large designs, depending on your preference. Pre-made designs are temporarily affixed to a paper or plastic sheet, which acts like a pressing cloth during adhesion and is then removed once the design is fixed in place.

Look for a variety of types of embellishments, from crystals and pearls to rhinestones, nail heads, studs and sequins.

In addition, individual adhesive-backed design components can be purchased if you want to create your own motif. Items like rhinestones, crystals, etc. are usually sold in bags by size expressed in millimeters.

A hard and protected work surface, like a glass or ceramic cutting board is ideal for applying iron-ons, whether a full design or individual bits.

One-by-one

If you’re applying individual components, a hot tool applicator is ideal as the wand shaped tool holds the item in place while it melts the adhesive on the back of the jewel. Most hot tools come with multiple tips so you can choose which one fits your embellishments the best.

Hotfix applicator
Hotfix Rhinestone Applicator 7-in-1 Tool Kit from Amazon.

Unless you’re randomly scattering jewels, it’s a good idea to draw your design on the fabric (with a removal marker) before you start placing the components.

When using a hot tool, be sure your fabric can withstand the heat needed for the application process without melting or distorting. Test-affix an extra jewel or two onto a scrap, or a hidden area of the garment (like a hem) to get a feel for the process.

Depending on the brand of hot tool you’re using, most tips allow you to actually pick up the individual embellishment with the tool and set it onto the fabric base, then release. Some tools (and jewels) require holding the tool in place for a designated number of seconds to be sure the backing adhesive melts into place. Follow the instructions in detail, as holding a hot tool in place too long can result in the backing adhesive seeping out from under the gemstone or melting the fabric below.

Apply all the embellishments needed to complete the planned design. If you have different sizes of jewels, switch out the hot tool tips to accommodate the sizes.

Design Wise

Using pre-made iron-on designs is easier for most people, rather than applying jewels individually, especially if you’re covering a large area.

Bee Kind Iron-on
Bee Kind Sparkly Crystals Iron-on from Amazon>.

Instructions for applying motifs will vary by brand, so be sure to read the directions for your particular motifs. But, the general process is to position the motif on the right side of your garment/fabric, with the protective sheet uppermost. Press in place with a dry iron, then turn the design over (wrong side up) and press again to be sure the adhesive has melted into the fabric base. The motif instructions will tell you how long to press. Remove the protective sheet, following the product instructions—some brands remove the sheet while the design is still warm, others recommend waiting until the design is cool.

If there are any individual components that didn’t adhere for some reason, re-fuse them separately following the same process. Occasionally, when you’re trying to apply a motif to a large area with seams within (think denim jacket with flat-felled seams), the added thickness of the seams can wreak havoc with the adhesion. To resolve this, just carefully re-fuse the components in the thicker area, or add some fabric glue to help hold the gems in place.

When and where?

Iron ons

You can apply iron-ons to either a finished garment or to one in progress. If you’re working with the latter, you can draw your pattern shape onto the fabric and working within the lines prior to cutting, or cut out the garment first, then apply the embellishment. Just remember to keep the gems inside the seam lines as you don’t want to hit them during construction.


~Linda Griepentrog is the owner of G Wiz Creative Services and she does writing, editing and designing for companies in the sewing, crafting and quilting industries. In addition, she escorts fabric shopping tours to Hong Kong. She lives at the Oregon Coast with her husband Keith, and three dogs, Yohnuh, Abby, and Lizzie. Contact her at .

Did you enjoy this article?
Are you an ASG member?
This field is for validation purposes and should be left unchanged.

  • « Previous Page
  • 1
  • …
  • 9
  • 10
  • 11
  • 12
  • 13
  • …
  • 82
  • Next Page »

Become a Member

Join the only national organization dedicated to Advancing Sewing as an Art and Life Skill.

Join Now button

Blog Article Categories

  • ASG Conference
  • Chapter Stories
  • Embroidery
  • Fitting
  • Learn to Sew
  • National Sewing Month
  • Products, Books, & Patterns
  • Projects
  • Quilting
  • Sewing
  • Sewing Techniques
  • Sewing Tips
  • Sewing Tours
  • Videos
  • Disclaimer
  • Privacy Policy

American Sewing Guild
National Headquarters
9660 Hillcroft, Suite 230
Houston TX 77096
713-729-3000 | 713-721-9230 Fax
www.ASG.org

ASG wordcloud - education, conference, discounts, videos, special offers, tours and more

Copyright © 1998–2025 · American Sewing Guild · All Rights Reserved