American Sewing Guild (ASG)

Visit our blog Visit the ASG Facebook page Visit ASG on Pinterest Visit ASG's YouTube channel Visit ASG on Instagram
  • Home
  • Join ASG
    • Join Online
    • Chapter Locations
    • Member Benefits
    • Member Brochure
    • Join by Mail
  • Conference & Education
  • Resources
    • Contests & Awards
    • Giving Back
    • Hall of Fame
    • Links
    • Travel and Tours
    • Measurement Chart
  • Shop
    • ASG Store
    • Chapter Products
    • Video Resources
  • Blog
  • About
    • About Us
    • Donate to ASG
    • ASG Sensitivity Statement
    • FAQ’s
    • Start a Chapter
  • Contact
  • Member Login
    • Login First!
    • Members Only
    • Leadership Only
    • Website FAQ’s
    • Logout
  •  

March 11, 2022

Thinking Outside the Sewing Store — Ideas for Tools & Notions

Some tools/notions used in sewing are not necessarily purchased as “sewing” items. ASG member, Judith Weyl shared some of her favorite innovative notion ideas with us:

Home Improvement Stores

Handrail 
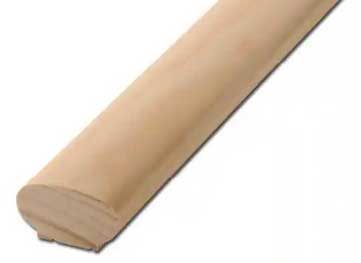
A 3′ Section of Wood Handrail makes a wonderful tool for pressing seams open without leaving an imprint on the garment. It’s round on one side and flat on the other, which keeps it from rolling off the ironing board. The 3′ length is great for pressing seams in a pant leg but you could have it cut any length.

Galvanized or Zinc-Plated Washers (about 2” diameter) make great pattern weights. They have a hole in the center and can be stored on a small dowel or hook. Judith rarely use pins to hold pattern to the fabric any longer. An added bonus to using the washers is that they are so thin, you can place an acrylic ruler on top of them along the edge of the pattern and there’s enough clearance to use a rotary cutter to glide along the ruler’s edge.  Don’t stop there though! When Judith made drapes for her dining room, she sewed a small pocket from the lining fabric for each washer and pinned them as weights at the hem of the drapes.

Painter's tape
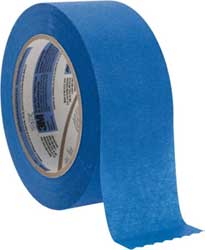
Blue Painter’s Tape makes a handy guide for seam allowances. Using a razor, carefully make two deep cuts into the roll about 2” apart and remove the entire cut area which should be about 1/8” to ¼” thick. Place this on the bed of your machine the required distance from the needle. Even if you use specialty feet or attachments, adding the tape gives you a further marking and lets the fabric  ride along it well before reaching the needle. And because it doesn’t leave a residue, you can reposition the tape as needed. When it loses its stickiness, just remove the bottom layer of tape to rejuvenate your strip.

Office Supply Store

sorter
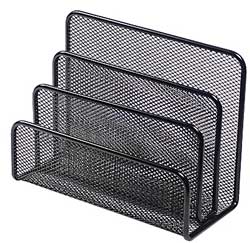
Vertical Mail or File Sorters are great for storing acrylic rulers. Judith says this multi-slotted desktop sorter doesn’t have enough slots for all the rulers, but they are still held conveniently in one place.

Supermarket or Drug Store

Toothpicks can be used as shank spacers when sewing on buttons. When sewing a button on by machine, slip a toothpick under the foot directly over the buttonholes before stitching, making sure to hand-turn the wheel to be sure the zigzag stitch is clearing the toothpick.

Wooden Skewers or Chopsticks are excellent for guiding your fabric to the needle and holding that final edge when piecing. You can’t get your fingers that close! A bonus is that you can share the extras at your next ASG meeting.

Tweezers are a great tool to help when unpicking a seam. Use them to grasp the cut end of threads and you will easily be able to yank a long thread out of the fabric.  It also helps when clipping or trimming embroidery threads as you can hold the thread with the tweezers and get very close to the fabric.

Other Ideas

We loved Judith’s ideas so much, we decided to poke around the house and see if we could channel similar creative-outside-the-box thinking department as she did. Here’s what we came up with:

  • Hair curlersPipe Cleaners would make a great brush to remove dust and debris from under your presser foot and in the bobbin case. You may want to double it up or even make a loop with it.
  • A Portable Book Light velcroed or taped (use Painter’s Tape to avoid tape residue) to your machine can add some additional light and you can swing the little arm to where you need it.
  • Velcro Hair Rollers (oh, remember the days?!) would make a great tool for picking up loose threads.
  • Magnet tape to pick up stray pins.

Thanks so much to Judith for these fabulous sewing room ideas! She advises that when you see tools and notions advertised, look around your home or in non-sewing stores for similar items that are non-traditional but will still serve the purpose.


~ Judith Weyl, Greater Lehigh Valley ASG Chapter

Did you enjoy this article?
Are you an ASG member?
This field is for validation purposes and should be left unchanged.

Tagged With: Notions, sewing tools

March 4, 2022

Single Layer Construction

One Layer at a Time

Boiled wool coat
Boiled wool coat. Photo courtesy of Bernina

There are times when more than one layer of fabric really isn’t necessary or desired—think bulky hems, facings, etc. Single-layer construction techniques to the rescue!

Fabric Choices

Many types of fabrics are suitable for single-layer construction, but those that are most commonly used are sheers, laces, handwovens, fleeces, boiled wools or felted fabrics, linens and double-sided fabrics (different colors or weaves on each side). The commonality in these choices is that both sides of the fabric are presentable and can show in the finished garment without anyone saying, “The wrong side of your fabric is showing.”

Obviously, densely woven or knitted fabrics are suitable for single-layer techniques, but some loosely woven or seemingly less likely candidates can also be used.

Pattern Changes

If you plan to finish the single-layer edge of your garment, mark the original seamlines along the requisite areas. The marked line becomes the new edge, using one of the techniques below. Do not trim the seam allowances.

Edge Finishes

The one place where single-layer construction is the most obvious is along the garment edge—there are no standard hems, facings or turn-backs, that add both weight and bulk to the edge, whether it be a lower hem, sleeve hem, collar, front opening or patch pocket. So, how are those unfinished edges handled? Let’s explore some options.

Cut Edges
On some fabrics, like fleece and boiled or felted wool, a simple cut edge will suffice as an edge finish. These fabrics are usually stable and won’t distort without added finishing.

Unfinished pocket edge
Raw edge top-stitched pocket. Photo courtesy of Bernina.

Topstitching
The cut fabric edge can simply be topstitched with one or more lines of stitching. Heavier threads can provide a nice accent to this easy edge finish.

Fringe
Fringed edgeFor fabrics that are loosely woven, a great single-layer finish is fringing, assuming the edge is cut on-grain, like a center front opening or collar. Sew one or two lines of stitching along the marked seamline, then carefully remove the threads up to the stitching line to form the fringe. On double-woven fabrics, or if you’re fringing perpendicular edges, you may see two different colors of threads fringe out.

Binding
Almost any kind of fabric can be used to bind a single edge and contrast trim can form an attractive design line. On knit fabrics, bind the single edge with a knit fabric to maintain some flexibility. Use the marked seamline for attaching the binding, then trim away part of the width to create a narrower bound edge.

Bound edge on knit
Bound edge

Fold-over Elastic
This elastic has an indentation woven into it designed to make it easy to fold in half for encasing an edge. When using this specialty elastic, trim the seam allowance off the edge that’s to be bound before applying it. A straight stitch or narrow zigzag can be used for the application, as some slight stretch may be needed in some areas, like at a neckline opening. In other areas, like a center front or lapel, no stretch is required. Fold-over elastic comes in both prints and solid colors, depending on the desired look.

Narrow Hem
On lightweight fabrics, like sheers and some linens, a narrow hem is the perfect finish for a single-layer edge. A narrow hem can be just one layer, as in turn up and finish the raw edge with a decorative machine stitch, or it can be turned twice to encase the raw edge, then topstitched in place. Either way, the narrow hem uses the garment seam allowance to finish the edge. On large expanses, a narrow hemming attachment for the sewing machine can make quick work of this finish.

Narrow hemming foot. Photo courtesy of Bernina.

Serging

Serged edge with heavy thread
Serged edge with heavy thread. Photo courtesy of Bernina.

One of the most common finishes for single-layer construction is a serged edge. This finish encases the raw edge and trims off the seam allowances at the same time. The stitching can be narrow or wide, depending on the desired look, and can be sewn with regular thread or one of the specialty threads like rayon for a bit of sheen. For a denser edge finish, use Woolly Nylon or Polyester thread to create a matte finish, almost braid-like look, to the edge. If both sides of the fabric will show, like on a turn-back lapel or hood lining, be sure the thread tension is adjusted so both sides of the stitching look the same.

Narrow hem
Narrow serged hem. Photo courtesy of Bernina

To keep edges from stretching while serge-finishing, fuse a very narrow strip of water-soluble stabilizer to the wrong side of the fabric before sewing. After the serging is complete, dissolve the stabilizer following the manufacturer’s instructions. Note that this technique works only on fabrics that can tolerate water. On other fabrics, sew a line of straight stitching along the seamline to stabilize the area, then serge over it, hiding the stitching.


~Linda Griepentrog

Linda is the owner of G Wiz Creative Services and she does writing, editing and designing for companies in the sewing, crafting and quilting industries. In addition, she escorts fabric shopping tours to Hong Kong. She lives at the Oregon Coast with her husband Keith, and two dogs, Yohnuh and Abby. Contact her at .

Did you enjoy this article?
Are you an ASG member?
This field is for validation purposes and should be left unchanged.

Tagged With: coat, sewing, single layer construction

February 25, 2022

Fabric Sources: Minerals — Spandex, Regenerated Cellulose/Rayon

This article is Part 2 of the Fabric Sources: Minerals series and is the final article in our Fabric Sources series.

Plants (part 1) | Plants (part 2)
Living Things: Silk | Living Things: Wool | Other Living Things
Minerals: Acrylics, Polyester, & Nylon (part 1) | Minerals: Spandex and Rayon (part 2)


Spandex (Lycra)

Spandex, a.k.a. Lycra (DuPont’s brand name for spandex), is a synthetic fiber known for its exceptional elasticity. Like nylon, it was invented at DuPont, but much later than nylon in 1958.

Fun Fact: The generic name SPANDEX is an anagram of the word EXPANDS!

Dupont conducted market research to find out what women wanted from textiles and guess what fabric women wanted to see changed the most …. GIRDLE FABRIC! This is no surprise since most girdles were made of rubber at the time, which sounds oh so comfortable. Dupont decided to come to the rescue with a product that was still effective at capturing women’s “fluff” while being more comfortable than rubber.

By the mid-1970s, even with all of DuPont’s provisions for girdle comfort, girdles began to lose popularity and sales began to drop. DuPont had to pivot and reimagined Lycra as the answer to activewear, tapping into the growing aerobic fitness movement. By the mid-1980s activewear began to expand its presence in the fashion world beyond the gym and out into the streets so much that DuPont struggled to meet the demand. Fast-forwarding to today, you find Lycra, or its off-brand generic spandex, everywhere.

How is it processed?

Spandex fibers can be produced using various methods, though all use the same basic chemistry. The method called solution dry spinning is used to produce over 94.5% of the world’s spandex fibers. In dry spinning, solvents are used to dissolve the polymer. The solvent evaporates after the solution leaves a spinneret (extrusion holes). This is followed by stretching, applying the finish, and winding the fibers on spindles to make it ready to be woven or knitted along with other fibers into fabric. Spandex is always combined with other fibers, retaining their basic qualities while giving them stretch.

Watch this 4½-minute video to learn a little bit more about this fabric and how it is used in the fashion industry.

Pros

A prime benefit of spandex is its significant strength and elasticity, which protects garments from rips and splits. Other benefits include great recovery (its ability to return to the original shape after stretching) and quick drying time.

Cons

Spandex is not breathable, is slippery, sensitive to heat, and with its ability to hug the body, can reveal every bump and curve, including those we prefer to hide. However, each of these “cons” can be seen as a “pro” depending on the application.

Stretch jeans on woman doing yoga

Environmental Impact

Most clothes containing spandex end up as non-recyclable waste once they have been worn out. Fabric blends containing spandex are very difficult to recycle. Like the other petroleum-based fabrics we have discussed, spandex can take up to 200 years to decompose.

Regenerated Cellulose

Regenerated cellulose is a class of materials manufactured by chemically converting natural cellulose (natural material like wood and other agricultural products) to a derivative, typically forming either a fiber (rayon) or a film (cellophane). The most common type of rayon is viscose rayon (also called simple viscose). Rayon and its derivatives are viscose, acetate, triacetate, modal, Tencel, and Lyocell.

Rayon

Cotton Rayon dressRayon is a versatile fiber and is widely claimed to have the same comfort properties as natural fibers. Although the drape and slipperiness of rayon textiles are often more like nylon, it can imitate the feel and texture of silk, wool, cotton, and linen.

How is it processed?

The raw material for viscose is primarily wood pulp. The pulp is treated with caustic soda, pressed between rollers to remove excess liquid, then cured/ripened. Next, it is filtered, degassed, and extruded into fibers through spinnerets, just like the other synthetic fabrics we have discussed in this article. Those fibers are then spun, stretched, and washed to prepare them for the step of weaving or knitting them into fabric.

For a great overview of rayon and how it is made, watch this 8-minute video.

Pros

Rayon fibers are easily dyed in a wide range of colors. Rayon fabrics are soft, smooth, cool, comfortable, and highly absorbent, but they do not always insulate body heat, making them ideal for use in hot and humid climates.

Cons

The elastic recovery, durability, and appearance retention of regular viscose rayons are low, especially when wet. For this reason, dry cleaning is usually preferred. However, HWM rayon (a.k.a. Modal) has been specially treated to have virtually the same properties as regular rayon, plus high wet strength. HWM rayons can be machine washed and tumble dried and perform much like cotton.

Environmental Impact

Rayon is more sustainable than petroleum synthetic fibers like polyester and nylon but is not as sustainable as organic cotton and hemp. For one thing, the chemicals used in the production of rayon are quite toxic. On a positive note, pure rayon decomposes in only a few weeks, faster than cotton which takes about 5 months. Tencel, one of the rayon derivatives, is slower to decompose than rayon, roughly 3 months, but still far faster than either cotton or other synthetic fabrics.

And that’s a wrap!

This has been quite a journey! We explored 23 different fabric types originating from plants, living things, and “minerals.” We looked at the usual suspects, and at several that were very unusual. We saw the benefits and drawbacks of each one as well as the impact each fabric brings to the environment and/or the animal kingdom. And yet we only scratched the surface of all that could be covered in the wide world of fabric.

We hope you have enjoyed this journey and learned a thing or two along the way.​


~Sheryl Belson

Did you enjoy this article?
Are you an ASG member?
This field is for validation purposes and should be left unchanged.

February 24, 2022

Learn to Sew: Knit Binding Tutorial

This 1-minute video from the American Sewing Guild will show you how to apply knit binding. Sew easy!

Tagged With: knit binding

February 18, 2022

Sewing Projects: Making Multiples

Do you showcase your DIY projects at craft sales or bazaars, make things for charity, or make dozens of handmade items for gifts? No matter what time of year, making multiples of the same or similar item can be simple and quick with a few helpful hints.

Tagboard on Amazon (affiliate link; we may earn a small commission on your purchase)

Streamline your pattern. If you’re making lots of hats, for example, create a tagboard pattern you can trace around. Not only does this save wear and tear (and shredding) of tissue paper patterns, but it’s more accurate for cutting. It doesn’t matter if the fabric colors are the same, as long as it’s the same item being cut.

Simplify the design. Depending on the project, you may be able to change up the design a bit to save time. For example, instead of creating tedious narrow hems on something, could you bind the edges with bias tape instead? Instead of finishing seams, like on a gift bag, could you add a simple lining to hide seams and add a bit more body?

Rotary cut multiple layers. Depending on the project and the fabric, you may be able to stack fabrics and cut six or so layers at one time with a good rotary cutter.

Choose a neutral thread. If you’re making lots of items in different colors, avoid constantly changing threads by using a neutral. White, off-white or light gray work for seaming light colors, and navy, black or dark gray blend with dark colors. If your project has topstitching, you may want to use thread to match the fabric, in which case, stack up similar colors and do the matching stitching at one time.

Bundle components. If your project requires elastic, for example, pre-cut the number of lengths needed before you start construction. When it’s time to insert the elastic, it’s ready to go, without have to go back and cut for each project.

Fuse fast. Think fusible interfacing if your project requires more body. You can fuse fabric prior to cutting out pieces to avoid having to tediously match up cut edges.

Chain sew. Continuous sewing is a technique borrowed from factories and involves sewing as many things as possible without cutting the thread. Simply feed in the next item and go, letting completed units trail out the back of the machine. Not only do you save thread, but also a lot of time. Once a task is done, simply clip apart all the pieces and move onto the next step.

Chain sewing—how far can you go without cutting the thread?


Sew without pins. Take a lesson from factory workers and learn to sew without pins. The task of stopping to remove pins as you approach them takes time and slows your speedy construction methods used for sewing multiples.

If you’re bored making the same item, play a game. It makes the time go faster if you challenge yourself to accomplish a certain task within a time frame. For example, if you finish x quantity of y task by 1pm, you can reward yourself with a break and a cup of your favorite beverage. (Warning: Do not drink alcoholic beverages while sewing.)

Plan ahead. Sew together small components—like ties, drawstrings, etc.—prior to constructing the item. For example, if you’re mass-producing aprons, make all the neck ties and waistline ties first before it’s time to attach them. If you’re making dozens of fleece hats, make all the pompoms first and they’re ready when you get to sewing the seam that includes them.

Don’t hesitate to invest. If you’re going to be doing a lot of sewing of similar items, think about what sewing machine attachments might help make your task easier. Depending on the project, you may find it’s a serious timesaver to invest in a bias binding attachment, edgestitch foot or perhaps a narrow hemming foot. If your machine doesn’t come with one, perhaps a ¼”-foot would help keep seamlines on the straight and narrow. Check with your dealer to see if there’s a machine accessory to help with specific tasks you’re facing that could speed up your work.

machine feet

Keep it clean. Sewing multiples can add a lot of lint to your sewing machine bobbin area and feed dogs. Be sure to regularly brush out those areas for trouble-free sewing.

Hand MadeAdd an ID. If you’re a prolific crafter who sells your wares, it’s always good to add a bit of professionalism to your projects with labels or tags. It’s easy to create and print tags from the computer, as there are several templates available online. Add your business name if you have one, or simply your contact information in case someone wants to purchase another similar item. Care instructions may be noted as well, and if the project comes in different sizes, indicate the size on the tag too.


~Linda Griepentrog

Linda is the owner of G Wiz Creative Services and she does writing, editing and designing for companies in the sewing, crafting and quilting industries. In addition, she escorts fabric shopping tours to Hong Kong. She lives at the Oregon Coast with her husband Keith, and two dogs, Yohnuh and Abby. Contact her at .

Did you enjoy this article?
Are you an ASG member?
This field is for validation purposes and should be left unchanged.

Tagged With: sewing business, sewing project, sewing tip, sewing tips

  • « Previous Page
  • 1
  • …
  • 32
  • 33
  • 34
  • 35
  • 36
  • …
  • 82
  • Next Page »

Become a Member

Join the only national organization dedicated to Advancing Sewing as an Art and Life Skill.

Join Now button

Blog Article Categories

  • ASG Conference
  • Chapter Stories
  • Embroidery
  • Fitting
  • Learn to Sew
  • National Sewing Month
  • Products, Books, & Patterns
  • Projects
  • Quilting
  • Sewing
  • Sewing Techniques
  • Sewing Tips
  • Sewing Tours
  • Videos
  • Disclaimer
  • Privacy Policy

American Sewing Guild
National Headquarters
9660 Hillcroft, Suite 230
Houston TX 77096
713-729-3000 | 713-721-9230 Fax
www.ASG.org

ASG wordcloud - education, conference, discounts, videos, special offers, tours and more

Copyright © 1998–2025 · American Sewing Guild · All Rights Reserved