American Sewing Guild (ASG)

Visit our blog Visit the ASG Facebook page Visit ASG on Pinterest Visit ASG's YouTube channel Visit ASG on Instagram
  • Home
  • Join ASG
    • Join Online
    • Chapter Locations
    • Member Benefits
    • Member Brochure
    • Join by Mail
  • Conference & Education
  • Resources
    • Contests & Awards
    • Giving Back
    • Hall of Fame
    • Links
    • Travel and Tours
    • Measurement Chart
  • Shop
    • ASG Store
    • Chapter Products
    • Video Resources
  • Blog
  • About
    • About Us
    • Donate to ASG
    • ASG Sensitivity Statement
    • FAQ’s
    • Start a Chapter
  • Contact
  • Member Login
    • Login First!
    • Members Only
    • Leadership Only
    • Website FAQ’s
    • Logout
  •  

December 10, 2021

Specialty Scissors

Chances are good that you’ve got more than one pair of shears and/or scissors in your sewing room. The old standby is a good pair of dressmaker shears, but there are a few other lesser-known varieties that you may want to add to your tool arsenal. These novelties often have a single function, but sometimes they’re the best tool for the job.
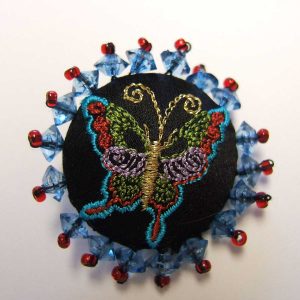
Havels Duckbill Applique Scissors.Cut Ups

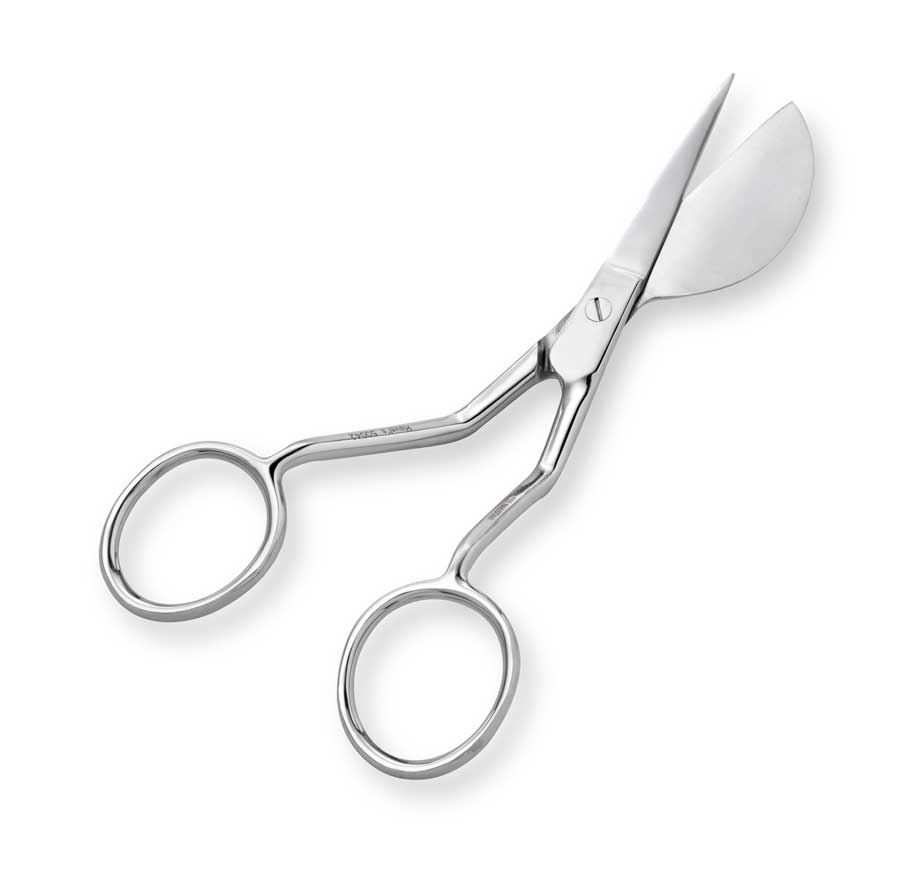
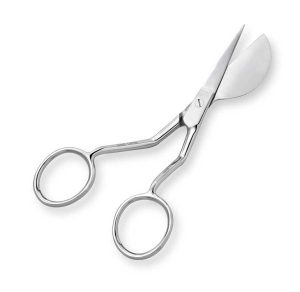
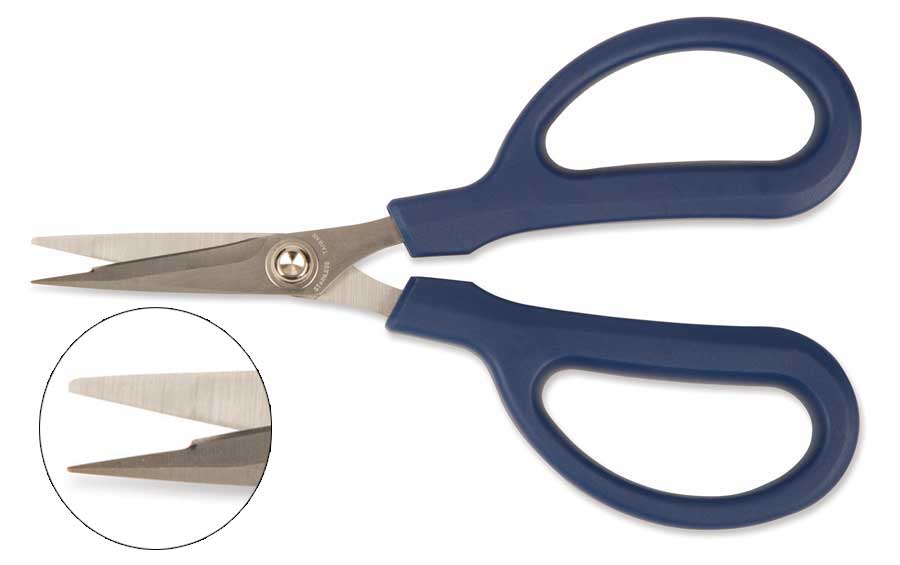
Appliqué (duckbill) scissors are perhaps the funniest looking of our scissor choices. They have one large D-shaped blade and one regular blade and are designed to trim close to an appliqué without cutting the fabric base. These scissors are available with either sharp points or rounded points, depending of your cutting confidence.

Pictured: Havels Duckbill Appliqué Scissors


Tooltron-Buttonhole-Scissors
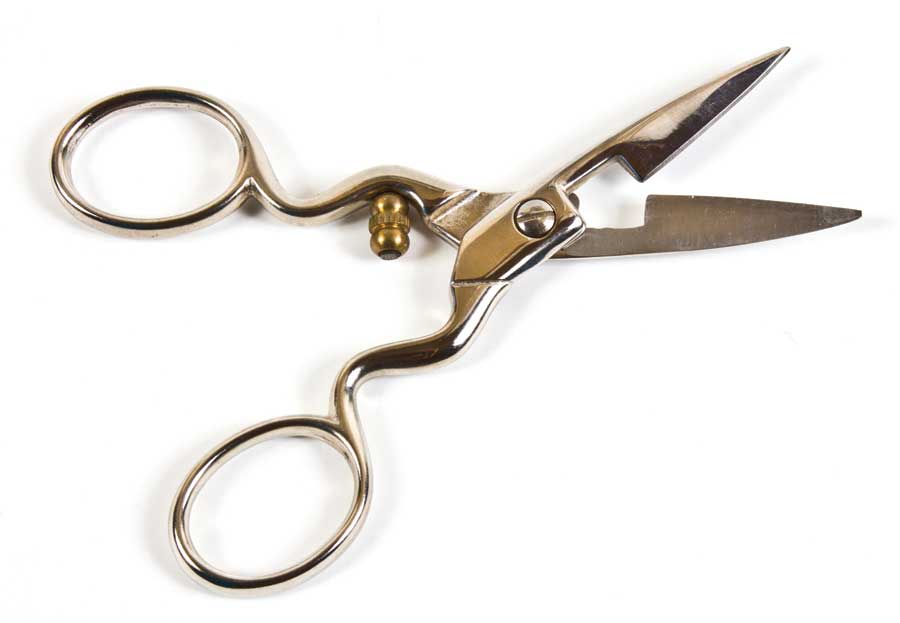
Buttonhole scissors have a screw adjustment that can set the cutting size so that multiple buttonholes are all cut the same length. These replace seam rippers for opening buttonholes and offer a bit more safety than trying to use larger scissors for the opening task.

Pictured: Tooltron Buttonhole Scissors


Mundial Embroidery Scissors
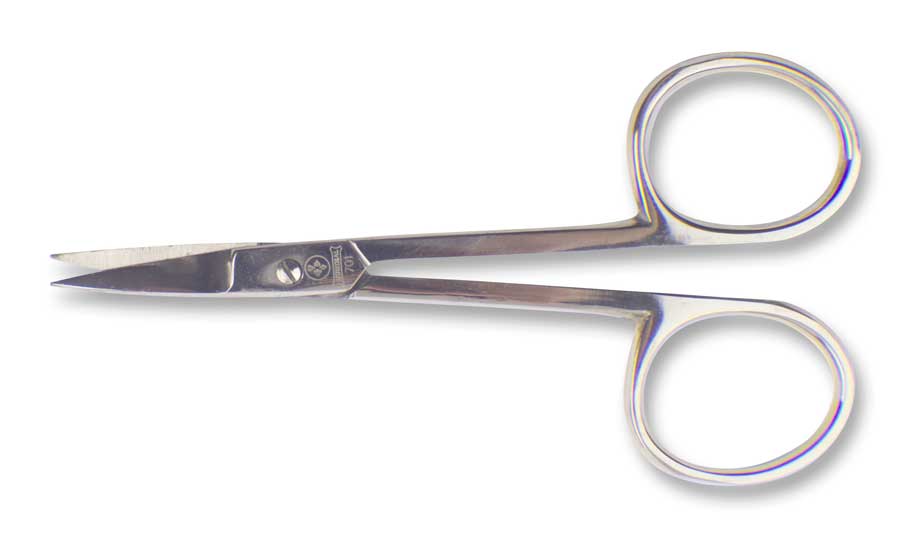
Embroidery scissors are small (3”-5” blades) with very sharp points for cutting threads very closely. Available with straight or curved blades, some embroidery scissors have an antique look with filigree designs or animal shapes, like the heirloom stork scissors.

Pictured: Mundial Embroidery Scissors


Havel's Ultimate Curved Machine Embroidery ScissorsMachine embroidery scissors have curved blades/handles so that you can trim threads closely while the work is still in the embroidery hoop at the machine. Depending on the brand, the handles can be at a right angle to the blades. They’re not limited to machine embroidery and can be used anytime you need to trim something close to a surface, like quilting or free-motion stitchery.

Pictured: Havel’s Ultimate Curved Machine Embroidery Scissors


Fiskars Non-stick Detail Scissors
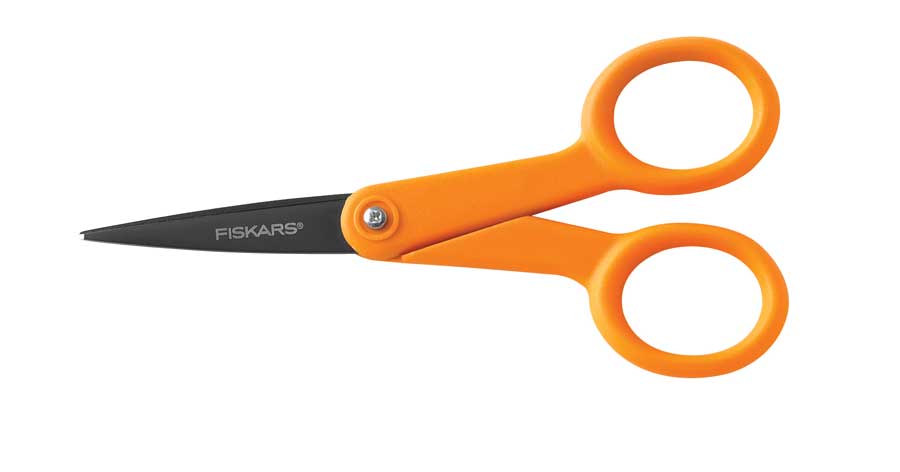
Non-stick scissors have coated blades specifically designed for working with fabrics that tend to stick, like vinyl, laminated cottons, oilcloth and some faux leathers.

Pictured: Fiskars Non-stick Detail Scissors


Tooltron Open Ring Scissors
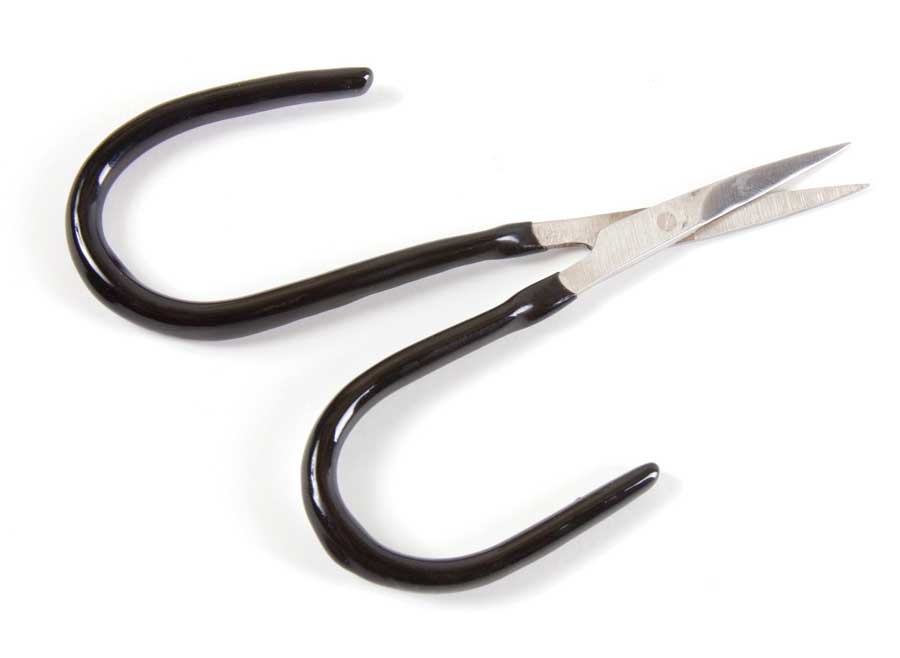
Open-ring scissors have open curved handles (instead of rings), so that they can be used by either right- or left-handed sewers, or anyone with finger or hand issues, as there’s extra space for access.

Pictured: Tooltron Open Ring Scissors


Famore Rag Clips
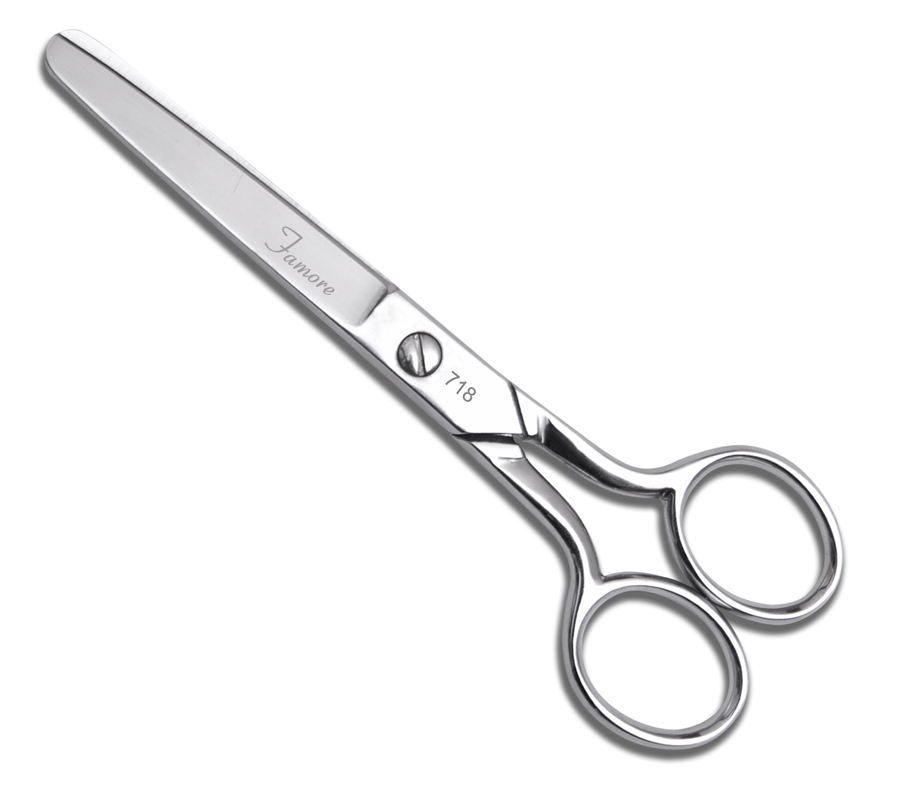
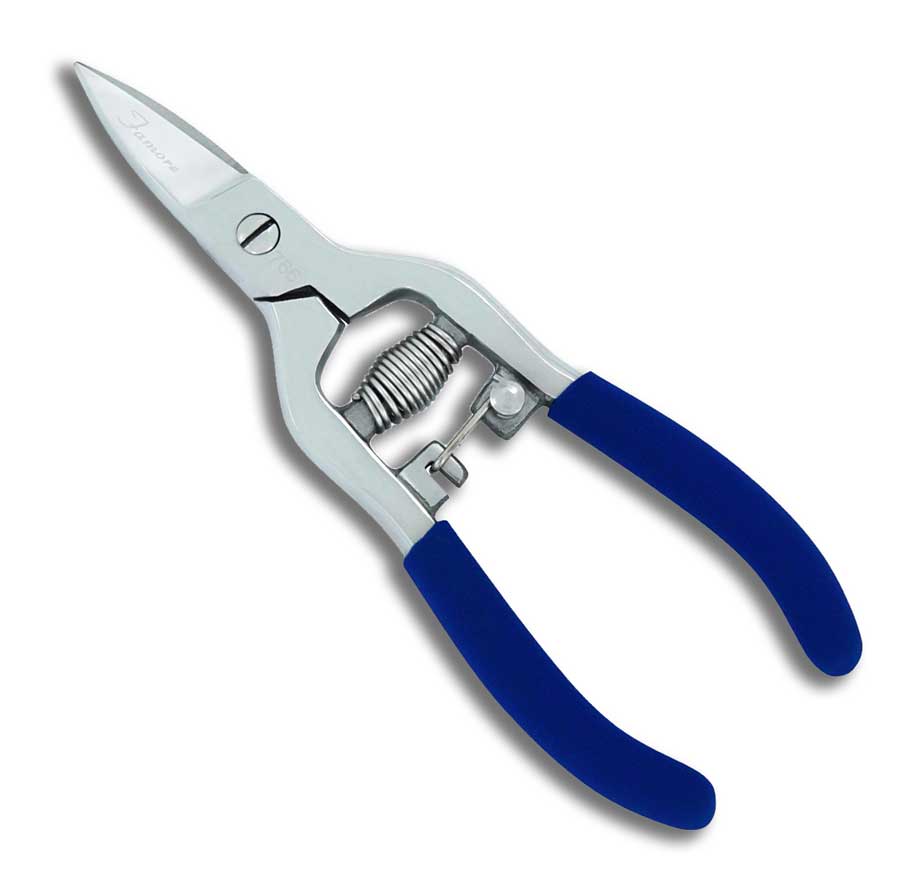
Rag scissors are workhorses designed specifically to cut through multiple layers of fabric at one time, like for rag-edge quilts. Not your typical scissor look, they take on a plier look for more cutting power.

Pictured: Famore Rag Clips


Havels Stitch Cutting ScissorsStitch-cutting scissors have a small hook at one end of a blade to slide under a single stitch and they’re ideal for ripping out stitches without damaging the fabric below.

Pictured: Havels Stitch Cutting Scissors


Tacony Undertrimmer Scissors
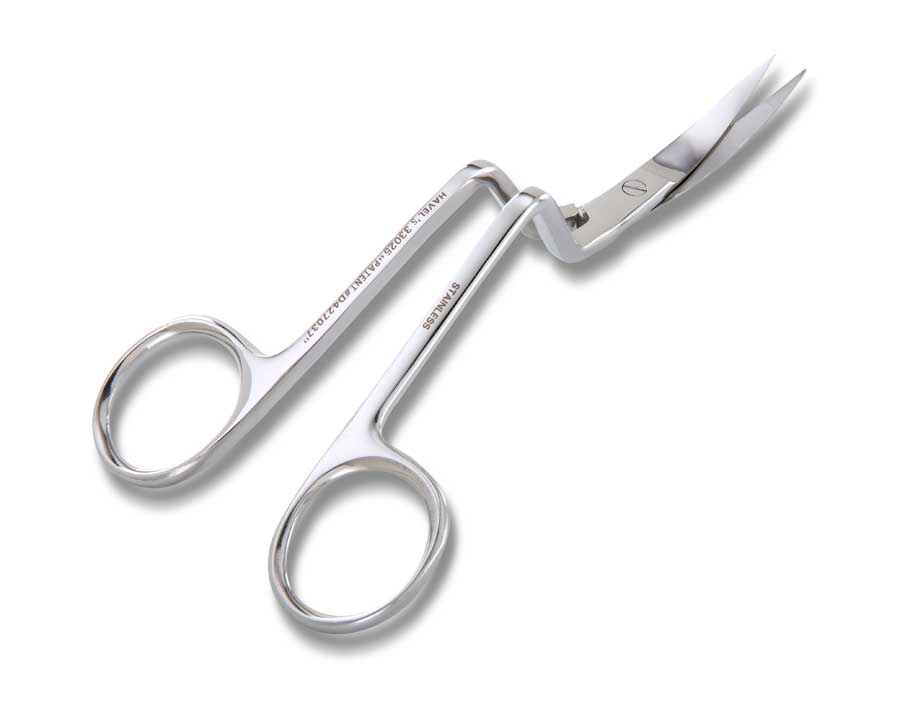
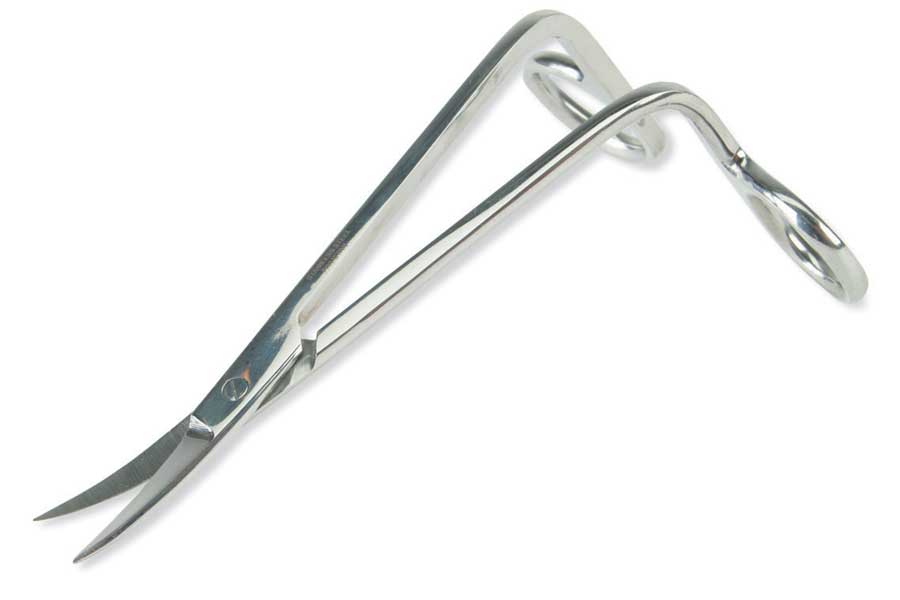
Under-trimmers, like their cousins the machine embroidery scissor, these quirky looking scissors allow for trimming in an embroidery hoop while it’s on the machine, but also have the ability and shape to reach under the hoop as well to trim bobbin threads during the embroidery or stitching process.

Pictured: Tacony Undertrimmer Scissors


Close encounters

Gingher Featherweight Thread SnipsSnips: In addition to this grouping of novelty scissors, don’t forget the ever-handy nippers, snippers, thread clips—the names differ, but the function is the same. Their small, spring-action blades make trimming threads easier than ever.

Pictured: Gingher Featherweight Thread Snips


Famore Blunt Tip ScissorsKids: If you’re teaching sewing to kids, look for blunt-tip safety scissors to prevent major accidents with sharper pointed scissors.

Pictured: Famore Blunt Tip Scissors


~Linda Griepentrog
Linda is the owner of G Wiz Creative Services and she does writing, editing and designing for companies in the sewing, crafting and quilting industries. In addition, she escorts fabric shopping tours to Hong Kong. She lives at the Oregon Coast with her husband Keith, and two dogs, Yohnuh and Abby. Contact her at .

Did you enjoy this article?
Are you an ASG member?
This field is for validation purposes and should be left unchanged.

Tagged With: scissors, snips

December 3, 2021

Creating a Monogram

Monogrammed robeWhether it’s an item you’ve made or an item you’ve bought, a monogram is a wonderful way to add a personal touch. And if you’re pressed for sewing time, it’s a great way to solve your gift-giving dilemmas. For example, if you don’t have time to make a robe, buy it and personalize it… with towels to match!

Monograms are usually composed of capital letters. Until the beginning of the 20th century, a single initial, usually the last initial, was the most common style. Today, one-, two-, and three-letter monograms are all equally common but the most conventional monogram arrangement consists of three letters: a larger central letter, flanked by two smaller letters, one on each side. Generally, the center letter is the surname or last name, with the letter on the left representing the first name, and the letter on the right representing the middle name. This arrangement makes sense for an individual with three initials available. Typically, each member of the household sharing the same surname would have their own monogram. A married couple might choose to blend their individual initials into a common monogram. For example, John R. Smith, who marries Katherine L. Brown, might create the common monogram JSK. In contemporary life, it would also be acceptable to use KSJ, with the woman’s initial appearing first.

Arranging the Letters

The spacing of the letters and their position relative to each other will vary depending on the style of lettering, the letters themselves, and your own personal preference.

When you work with individual designs for each letter, you have complete control over placement and spacing. Just move the letters around onscreen until you are happy with the results, then save the combination under a new file name—one that you can easily remember.

Embroidered boxSeveral of the EmbroideryArts styles (e.g., Circle, Empire) have left, middle, and right versions of each letter. Although the individual letters can still be used alone, these styles are designed to make three-letter monograms that form a specific shape, so the left side A, for example, is a different letter than the right side A.

Start with the larger center letter for the surname or last name, and then add the flanking letters, on the left and right. This sewing sequence will produce longer connecting threads between letters for embroiderers whose machines do not have automatic thread trimmers, and will also push the fabric away from the center as the complete design is sewn.

Placing the Design

Once you’ve determined the arrangement of your letters, you’ll need to consider the placement on your project. To do this, stitch out a sample of the monogram and photocopy it. Then:

  1. Find the center of the design by measuring the height and width, then drawing crossed lines half way between each dimension.
  2. At the center point, cut away a 1⁄4″ square or use a standard paper punch to make a hole.
  3. Cut away the excess paper surrounding the monogram and place the photocopy where you intend to put the monogram.
  4. Using a water-soluble or air-soluble marker, mark the design center on the fabric. If you don’t want to mark directly on your fabric, place a dot on a small piece of masking tape. Slide the tape under the hole in the photocopy until it is centered, then hold both the photocopy and the tape together, and place the two where you want the design to go. Lift the photocopy and the tape will stay in place, marking the center.
  5. Hoop the fabric, making sure the center mark is in the center of the hoop. If using the tape method, remove the tape before stitching the monogram.

Where the Letters Go

If you’re puzzled about where to place the monogram, here are a few guidelines.

  • Golf shirt: 7″ to 9″ inches down from the left shoulder seam and 4″ to 6″ over from the center.
  • Wash cloth: 1-1/2″ above the hem, or 1″ above the border for placement parallel to the edge; for placements in the corner, turn the washcloth diagonally until the shape is a diamond, then determine placement based on the design size.
  • Monogrammed towel
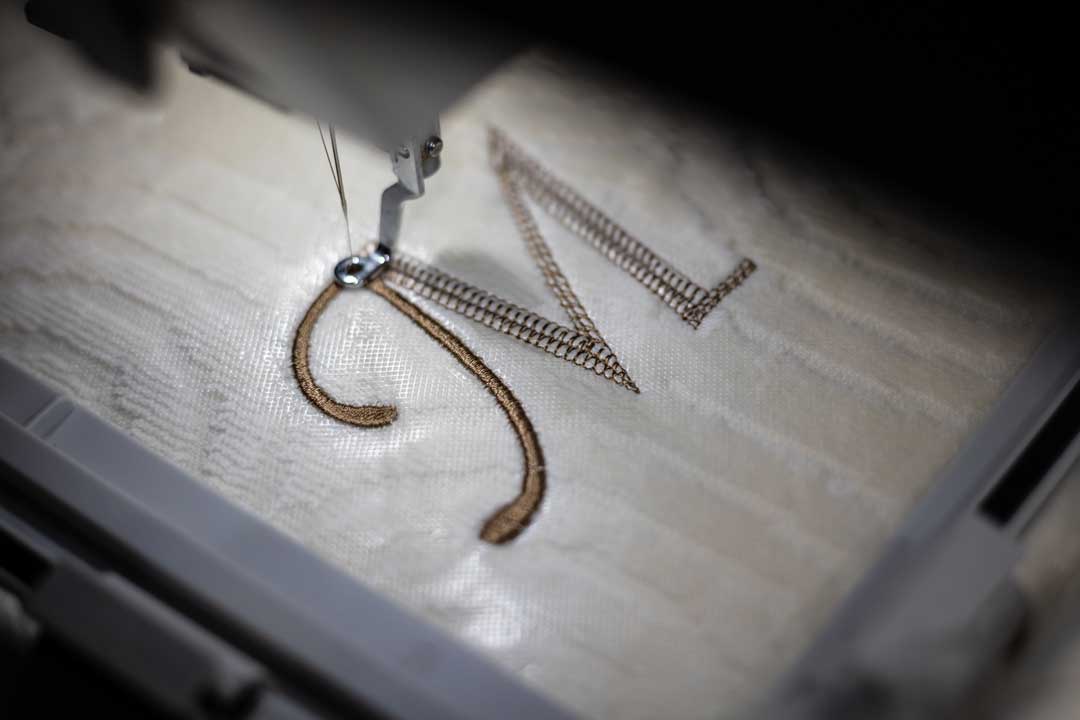
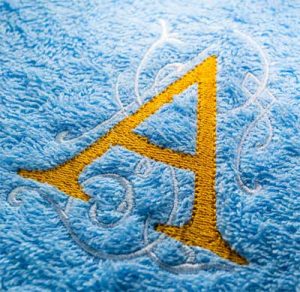
Hand towel: 2″ above the hem, or 1-1/2″ above the border, on the opposite edge from the label.
  • Bath towel: 4″ above the hem, or 2″ above the border, on the opposite edge from the label.
  • Sheets: the bottom of the monogram should be centered at the midpoint of the sheet width, and should be approximately 2″ above the wide hemline at the top of the sheet.
  • Pillowcase: centered at the midpoint of the width of the open end, and also centered midway between the edge of the pillowcase and the hem edge.
  • Shirt cuff: on the top of the wrist, and from 1″ to 1-3/8″ toward the buttonhole from the center of the cuff. Cuff monograms are typically small, and are placed so that the bottom of the design is 1/4″ to 1/2″ above the cuff edge
  • Coat lining: on the right side of the lining, at approximately waist level.

~This article appeared in a previous issue of Notions
Richards Jarden, born and raised in the suburbs of Philadelphia, Pa., studied fine arts in the U.S., India, England, and Canada as a college student. He is a former associate professor of fine arts, and in the late 1980s was head of the Sculpture Department at Rhode Island School of Design. He has managed various art-related businesses, first in architectural restoration, later in decorative painting, and since 1993 in embroidery design and digitizing. He has a particular interest in lettering and monogramming, and is the president of Embroideryarts (www.embroideryarts. com), which designs and markets digitized monogram designs for home and commercial embroiderers.

Did you enjoy this article?
Are you an ASG member?
This field is for validation purposes and should be left unchanged.

Tagged With: embroidery, monogram

December 1, 2021

Jacksonville, FL Chapter wins SVP Presentation

Watch us Grow!

ASGIn 2020, while organizations throughout the country were struggling to simply maintain their membership, six ASG chapters increased their numbers by at least 10%!

Winning Approach

One of those chapters was located in Jacksonville, FL and for their outstanding efforts, they won a FREE program provided by Singer-Viking-Pfaff (SVP). I interviewed Chapter President, Lois Kelly, and asked her to share the strategies that lead to this achievement during such trying times. She explained that the chapter planned several events at little or no cost. First, they promoted a “Bring a Friend” campaign. Historically, this kind of “invite-a-friend” approach tends to be the most effective way to introduce sewers to the American Sewing Guild and encourage membership. An invitation is a great way to make someone feel special and wanted and provides company to someone who may not ordinarily attend an event alone.

Jacksonville Facebook postAnother approach they shared was to refresh their Facebook posts at ASG Jacksonville, FL. When I looked at their past posts, I noticed that those earlier than 2020 were interesting, colorful, and inspiring, but the content leaned towards high fashion/historical/creative DIY. In refreshing the content, they transitioned to posting current projects created by their members. In a sense, earlier Facebook posts seemed like a fashion blog that would drive readership. More recent posts highlighted the activities and virtues of the chapter saying, “This is a community to join in person!”

Also, some of the members are sewing teachers and they invited their students to look into ASG. This provided novice sewers the opportunity to bond in a group that shared their creative interests. Just these three small changes brought in new members—a 10% increase in the size of their chapter!

An Eye on the Prize

The chapter was delighted to win the speaker award and despite, or maybe because of a Covid world, they explored other innovative resources to run the presentation in an innovative way. One of the members got permission from her employer to use a large meeting room with professional-grade audio-visual equipment for the Zoom event.  While a majority of the participants attended a socially distant in-person watch party of this hands-on workshop with a table for every person’s serger and supplies, others were able to watch from their homes. Attendees could work right along with the presenter, whether enjoying the camaraderie with other members or enjoying the presentation from the comfort of their sewing rooms.  It was a great way to think outside of the box and provide chapter programming to their members that took into consideration the comfort levels of participants in this unprecedented time!  SVP educator Katrina Walker hosted her Serger Stitch Savvy Workshop from her studio in Spokane, WA.

Katrina demonstrated how a basic 4-thread serger can create up to 18 different stitches, some of which are probably not shown in the user manuals. She introduced each stitch, discussed its application, and demonstrated how to set up the serger for it. Students were able to see pictures of Katrina’s sample garments and finished objects embellished with those stitches.

Katrina’s workshop classes are renown for the sample reference books that students build so they can look back at all the steps in the techniques. For this virtual workshop,  Katrina provided the supply list and a blank reference page so students could make copies for each stitch taught in the class. Students took notes from Katrina’s demonstration, then set up their sergers and stitched samples to keep for their records.

Once again, the chapter implemented the “Bring a Friend” approach and put flyers in local fabric stores. This brought 6 non-members to the event.

Congratulations to the Jacksonville Chapter for not only winning this free event, but for continuing to spread the word of ASG and bringing new friends into our family.


~Carolyn Chen

Did you enjoy this article?
Are you an ASG member?
This field is for validation purposes and should be left unchanged.

November 26, 2021

Covering Your Own Buttons

Are there times when you just can’t find the right buttons to accent your project, and you long for something really unique? Well, never fear, you can make buttons look like anything your heart desires by covering your own.

Forms

Button covering forms come is sizes from 7/16” to 2 ½”, depending on where you’re going to use them. The smaller ones are ideal for cuffs or down the back of a wedding dress, while the larger sizes are great for home décor uses and jewelry. Yes, jewelry (see below).

Metal button forms come in both flat and domed shapes, depending on the look you like and the size needed.

Flat
Domed

There are two components to each button form—the top portion which has sharp teeth around the underside to grip the fabric, and the bottom portion which snaps into the top to hold the fabric in place. The top portion of the button form also includes a wire shank which goes through the bottom section when the button components are snapped together.

The packaging on the button forms contains a pattern to use for cutting the covering circles, so carefully trim around it when opening the pack of forms.

Covering Up

Buttons with embroidery, decorative stitching, and computer printing

Almost any fabric can be used to cover buttons—some easier than others. If your fabric has a loose weave or is not opaque, the shiny metal form may show through, so back the fabric with a lightweight interfacing or underlining.

If your covering fabric is very bulky, like some home décor fabrics or faux furs, cut the circle slightly smaller than the template and/or trim any pile from the underside edges to reduce bulk.

Keep in mind that the covering fabric can be fussy-cut to showcase a particular area on the button circle, so plan ahead for repeat buttons.

The covering fabric can also have numerous other decorative techniques applied to it before use—stenciling, painting, dyeing, hand stitchery, needle felting, machine embroidery, texturizing, etc. Just keep in mind the button size to showcase the embellishments. A Bit of Stitch offers two design packs made specifically for machine embroidered covered buttons.

A Bit of Stitch, Oriental Button Cover

Cut the covering fabric from the supplied template and cut as many as needed to cover all the buttons.

Lay the fabric circle face down on the table surface and center the button form top face down on it. Pull the fabric around the form and hook it over the teeth on the underside. Work from opposite sides of the button and pull the fabric taut over the form, so there are no wrinkles or pleats. Work your way around the button hooking the fabric securely to the teeth. If you get wrinkles, unhook and try again to smooth the fabric in place.

When the covering fabric is well anchored into the teeth all the way around, position the back section over the wire shank and snap it firmly into place covering the teeth. If your fabric is bulky, a light tap with a small hammer may be helpful to be sure the backing snaps in place.

Repeat to make as many buttons as needed.

Help, the button is winning! If things don’t go quite as smoothly as you’d like and it feels like the button form is winning the wrestling match, try using some temporary spray adhesive to hold the fabric in place while you pull it tautly over the form and anchor it to the hooks. Another option is to use a little fabric glue along the teeth to help hold wiry or otherwise testy fabrics in place.

Fun Options

In addition to functional closures, fabric covered buttons are ideal for jewelry and craft projects, like holiday ornaments. Remove the wire shank before adding the button back if you need a flat back, and cover the button back with a felt circle to finish. If you’re making a brooch, just glue a pinback to the button flat underside.

Once the button is covered, you can add beads or other gemstones to it for embellishment, or even some iron-on crystals for a bit of bling.


~Linda Griepentrog
Linda is the owner of G Wiz Creative Services and she does writing, editing and designing for companies in the sewing, crafting and quilting industries. In addition, she escorts fabric shopping tours to Hong Kong. She lives at the Oregon Coast with her husband Keith, and two dogs, Yohnuh and Abby. Contact her at .

Did you enjoy this article?
Are you an ASG member?
This field is for validation purposes and should be left unchanged.

Tagged With: buttons

November 19, 2021

Fabric Sources: Other Living Things

This article is Part 2 of the Fabric Sources: Living Things series

Plants (part 1) | Plants (part 2)
Living Things: Silk | Living Things: Wool | Other Living Things
Minerals: Acrylics, Polyester, & Nylon (part 1) | Minerals: Spandex and Rayon (part 2)

There are other fabrics we haven’t yet covered that are usually not considered to be part of the silk or wool family. These include fiber from animals such as llamas, camels, yak, and even possums. These fibers are usually more available in yarns and roving than fabric so it is unlikely you will be adding these to your stash, but you may find them interesting nonetheless.


Llamas

Llama
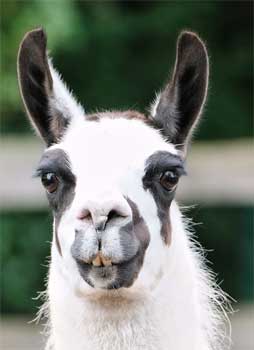
Llamas, part of the camel family, are typically found in South America. Their fine undercoat is typically used for garments, while the courser outer hairs are more commonly used in rugs, wall hangings, and ropes. Llama fiber is normally available in white, black, grey, brown as well as reddish-brown colors.

How is it processed

Llama hair is harvested by shearing, clipping, or brushing. The first step involves cleaning the Llama’s hair. Some do this by blowing the debris out of the hair with something like a leaf blower; some brush them with a wire brush (much like a dog brush); and some just give the llama a good bathing. Once cleaned, the animal is ready to have its hair removed. Shearing and clipping are faster and generate a higher yield than brushing, but brushing will result in the highest quality of llama fiber, leaving more of the courser hairs behind. The hairs are then ready to be spun, washed, and woven into fabric.

Watch this 6-minute video and hear 4 different llama farmers talk about raising and processing their llama fibers into various uses.

Pros

Llama fibers are very similar to alpaca wool and are lightweight, strong, durable, lanolin-free, and hypoallergenic but not as fine as alpaca fibers. It is also naturally absorbent, flame retardant, and stain-resistant.

Cons

Because llama fibers don’t have good “memory,” the fabric will stretch over time. For this reason, it is quite often blended with another fiber, like sheep’s wool. Finding llama fabric is very difficult and is far more often found as yarn for knitting/crochet or as roving for felting and spinning.

Impact on the animals

As with most shorn animals, handling of the animals during this process is key. The process can be stressful to the animal if they are not treated with gentleness.

Where can I buy it?

Many places sell llama yarn and roving. Check your local quality yarn and fiber shop and if you are ambitious, weave some fabric of your own!


Camels

The two-humped Bactrian camels 
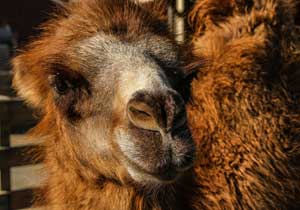
of Mongolia give the softest of camel hairs. China, Afghanistan, and Iran produce the most camel fibers in the world. Although most camel hair is left as its natural tone of golden tan, the hair can be dyed and accepts dye in the same way as wool fibers. Camel hair may be blended to create fabrics suitable for coats, outer sweaters, and underwear.

How is it processed

Camel hair is gathered in the Spring when they shed naturally during the 6-8 week molting season.  The fine, soft undercoat hairs are separated from coarse hairs. Coarse guard outer coat hairs are not suitable for weaving fabric but can be used for ropes and strong yarn. The finer hairs are washed to ensure they do not contain any dirt or debris and that any remaining coarse hair and dandruff is removed. From there, the hairs are carded and spun into yarn that can be used for weaving or knitting.

This video about camel fiber focuses on yarn but gives a great overview of the process.

Pros

Camel fabric is very warm and not prone to stretching or pilling. The product is durable yet very soft—nearly as soft as cashmere—and is often blended with cashmere to make luxury garments.

Cons

Since camel hair is seldom processed in factory settings, it can be quite expensive. Viewed as a luxury textile, it’s on par with other luxury wools like mohair and cashmere in terms of price.

Impact on the animals

The chances of animal cruelty occurring during camel wool harvesting are significantly limited. Since the camel naturally sheds its hair every year, it is unnecessary to restrain these animals during the fiber harvesting process.

Where can I buy it?

As with most of the luxury fabrics covered in this article, you are unlikely to find camel fabric outside an upscale fabric shop.  Here are two who do stock this fabric.

  • Tissura
  • Mood

Yak

Himalayan Yak
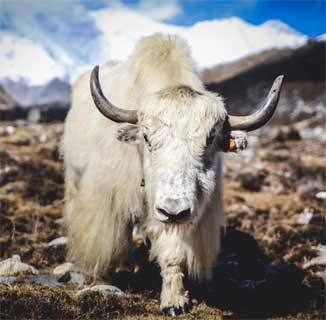
Yaks are largely found in the Himalayas in India and Tibet. The hair of the yak is very useful in the production of warm clothes, mats, and sacks due to its warmth and strength.  Yak fiber wool has been used by nomads in the Trans-Himalayan region for over a thousand years to make clothing, tents, ropes, and blankets. More recently, the fiber started being used in the garment industry to produce premium-priced clothing and accessories

How is it processed

Yak hair is collected in the Spring when they naturally shed their coats and is usually done by plucking or combing. The harvested hair is sorted by color and quality, then de-haired and washed.  The sorted pure, fine down hair is dried, carded, and spun into yarn than can be used for knitting or weaving fabric. This 3-minbute video will give you insight into yak life and harvest.

Pros

Yak wool has similar properties to other animal fibers but has been proven to outperform sheep wool in warmth, softness, breathability, and odor-resistance. Its exotic nature and favorable performance characteristics make it an attractive alternative to cashmere.

Cons

Yak hair is not very receptive to dying, thus is usually left in its natural color.

Impact on the animals

The yak, a sacred animal in Tibet, is left free in its natural habitat where it lives until it dies from natural causes. Their spontaneous fur loss releases quite easily with brushing. They might squirm some when getting a good brushing, but it’s not harming them, and they will also be better off when all the loose fiber gets removed.

Where can I buy it?

Yak fabric is very difficult to find, but we can share one shop with a yak blend fabric. Finding yak yarn and roving or shawls and scarves is most likely so if you really want to sew with yak fabric, you might have to weave your own!

  • B&J Fabrics

Possum (phalanger)

Brushtail possum 
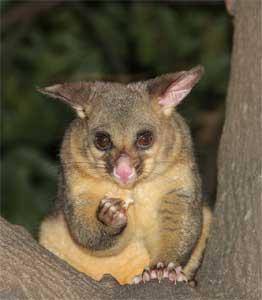
Brushtail possums are harvested under permit, and their soft pelts are plucked, shipped, spun and knitted into high-quality Australian apparel. There are tight regulatory controls over the harvest to ensure the possums were harvested correctly. It is commonly combined with other fibers, frequently Merino wool. When used to create Possum Merino knitwear, the combination of possum in the fabric leads to very lightweight garments. According to some sources, possum fur is 8% warmer and 14% lighter than wool.

How is it processed

The possum is New Zealand’s biggest ecological threat and they are legally classified as pests. As such, they are hunted and the hair is collected, often by a machine that dehairs the carcass.  From there, it’s processed much like other animal hairs – washed, carded, spun, and woven.

To get a glimpse of the process of preparing the collected hair for weaving, watch this 3-minute video:

Pros

Opossum fiber is incredibly soft, breathable, odor-resistant and doesn’t pill.

Cons

It is very difficult to source and thus, very expensive.

Impact on the animals

While the impact on the opossum is that it takes their life, due to the threat they pose to the New Zealand environment, the International Fur Trade Federation defines possum fabric as ethically sound. This is one reason the possum/merino mix has been seen on the catwalks of Paris.

Where can I buy it?

We are unable to find a source for possum fabric, though there are a few products at fashion retailers, such as McDonald of New Zealand.


~Sheryl Belson

Did you enjoy this article?
Are you an ASG member?
This field is for validation purposes and should be left unchanged.

Tagged With: fabric, textiles

  • « Previous Page
  • 1
  • …
  • 35
  • 36
  • 37
  • 38
  • 39
  • …
  • 82
  • Next Page »

Become a Member

Join the only national organization dedicated to Advancing Sewing as an Art and Life Skill.

Join Now button

Blog Article Categories

  • ASG Conference
  • Chapter Stories
  • Embroidery
  • Fitting
  • Learn to Sew
  • National Sewing Month
  • Products, Books, & Patterns
  • Projects
  • Quilting
  • Sewing
  • Sewing Techniques
  • Sewing Tips
  • Sewing Tours
  • Videos
  • Disclaimer
  • Privacy Policy

American Sewing Guild
National Headquarters
9660 Hillcroft, Suite 230
Houston TX 77096
713-729-3000 | 713-721-9230 Fax
www.ASG.org

ASG wordcloud - education, conference, discounts, videos, special offers, tours and more

Copyright © 1998–2025 · American Sewing Guild · All Rights Reserved