American Sewing Guild (ASG)

Visit our blog Visit the ASG Facebook page Visit ASG on Pinterest Visit ASG's YouTube channel Visit ASG on Instagram
  • Home
  • Join ASG
    • Join Online
    • Chapter Locations
    • Member Benefits
    • Member Brochure
    • Join by Mail
  • Education & Classes
  • Resources
    • Contests & Awards
    • Giving Back
    • Hall of Fame
    • Links
    • Travel and Tours
    • Measurement Chart
  • Shop
    • ASG Store
    • Chapter Products
    • Video Resources
  • Blog
  • About
    • About Us
    • Donate to ASG
    • ASG Sensitivity Statement
    • FAQ’s
    • Start a Chapter
  • Contact
  • Member Login
    • Login First!
    • Members Only
    • Leadership Only
    • Website FAQ’s
    • Logout
  •  

April 16, 2021

Do I Really Need a Serger?

When I first saw a home serger back in the 1980’s, I knew I NEEDED it! OK, maybe it was more WANTED than needed, but I definitely wanted one and my enthusiasm for this machine has only grown over the years. And while I treasure my serger, I’ve wondered why many sewists have never used one or, if they do have one, why it’s often stored in the back of the closet, still in the box. While we all love sewing, why do some just never take to this machine while others can’t live without it? April is National Serger Month, so let’s take a look at the serger and see what may be splitting us into advocates and critics and what we need to know to bring this machine in to the light.

April is National Serger Month

I saw that first serger at a Stretch & Sew class my mother had dragged me to in the hope that I might become interested in sharing her love of sewing. Mom was an amazing seamstress who could work miracles with a needle, thread, and fabric. She created garments, from tailored jackets and suits to gowns; home dec, including pinch pleat drapes; and even upholstery. And whatever she made was always perfect. For me, the tedious steps and handwork in sewing drove me crazy. But, for this particular trip, being out with Mom, even for sewing, was more fun than a day with restless kids and housework.

Enter Stretch & Sew

In this class, I learned that Stretch & Sew patterns were simple, the techniques were easy, and the serger made them even faster than a sewing machine. The instructor assured us that we could whip up a knit shirt in less than an hour. It was love at first sight! Unfortunately, my mother who normally loved new gadgets, was less impressed. It didn’t occur to me until later that when it comes to sergers, a person’s sewing interests and personality have more to do with their compatibility with sergers than simply their interest in sewing.

That Christmas, dad bought 2 sergers, one for me and one for mom. We took classes together and learned to operate this new machine and while I embraced it totally, she merely tolerated it. The serger’s ability to clean finish and construct a seam at the same time was a time-saving feature for me—a definite plus. Mom preferred the look of a pinked or other hand finished tailoring seam that she could do in the evening while watching TV. She didn’t want to let go of her traditional sewing methods and was an advocate of slow sewing even before the term became popular. For me, a young working mom with kids who had to be chauffeured, fed, watered, schooled, etc. though, the serger was a hobby I could do at home in those precious few stolen minutes of down time.

Having grown up in the Flower Power generation, I wanted the free flowing clothing that was easily constructed with the serger and I loved the sweatshirts and T’s I could make for the whole family. Knits became the lure that created my passion for sewing, especially since the serger and knits were made for each other. With the serger more suited to what I created than those tailored jackets that my mom produced, it was no wonder I began to explore more and more uses for my new friend. Sweater bodies (yarn knitted yardage) on the serger resulted in beautiful sweaters that looked hand knitted. When Stretch & Sew started focusing on more patterns for wovens that included instructions for working with sergers, I used these new methods for more business style clothing like dresses and blazers since I had gone back to a full-time job.

Don’t touch that dial!

In an early serging class I attended, the instructor frightened us into believing that the tension controls should never be moved. But why would the manufacturer make an adjustable dial that shouldn’t be touched? Although I’m not a rebel, it wasn’t hard to figure out that even if you adjusted the dial, it was easy enough to return it to the original setting by rotating back to the original number on the dial. A few years later, another instructor suggested we thread the machine with contrasting colors of thread, setting the tension dials to 0, and then changing just one dial at a time so that we could easily see what each adjustment did and which thread was affected. That empowering knowledge assured we could make the machine adapt to whatever fabric we were working with.

Many serger owners are a bit intimidated by the machine’s tension dials and, unfortunately, never learn its full capabilities. I’ve now switched from taking serger classes to giving them and I include the tips I learned in my classes so that no one is doomed to poor stitching just because of various weights of fabrics and thicknesses of seams. For those who use their machines for clean finishing seam allowances only, having to adjust the tension may cause you to move that serger to the back of the closet. The good news is that manufacturers recognize the worry about tension dials and many have now developed a self adjusting tension feature on new machines to alleviate that concern. Special sensors can determine the thickness of the fabric and automatically adjust the tension without the operator touching a dial. But even if your machine is missing that feature, don’t be afraid to rotate those dials and experiment!

But, now I want blue

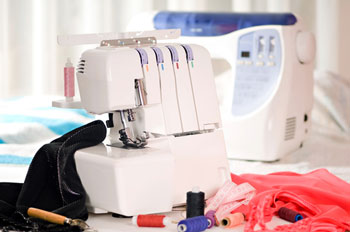
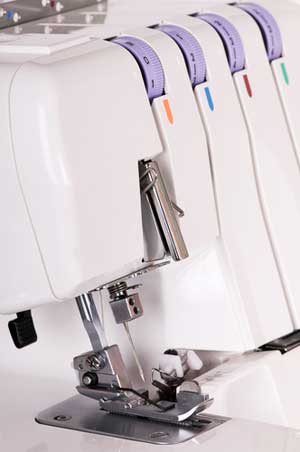
The next biggest fear of serger owners is changing threads. On a 4-thread serger, the first two spools are for the needles. Threading the needle is much the same as it is a traditional sewing machine—the thread paths are very similar except for the telescoping guide above the thread cone. The remaining two spools are for the loopers (the thread path that comes from below and creates the overlock) and can be a little more involved to thread. However, most all machine have color coded pathways to indicate the proper thread paths so you can start at the spool and follow the same colored dots all the way to the needles. And just like the tensions, many manufacturers now offer air threaders that allow the user to insert the thread into a hole, press a button, then find the thread at the looper all ready to go.

So, do you need a serger?

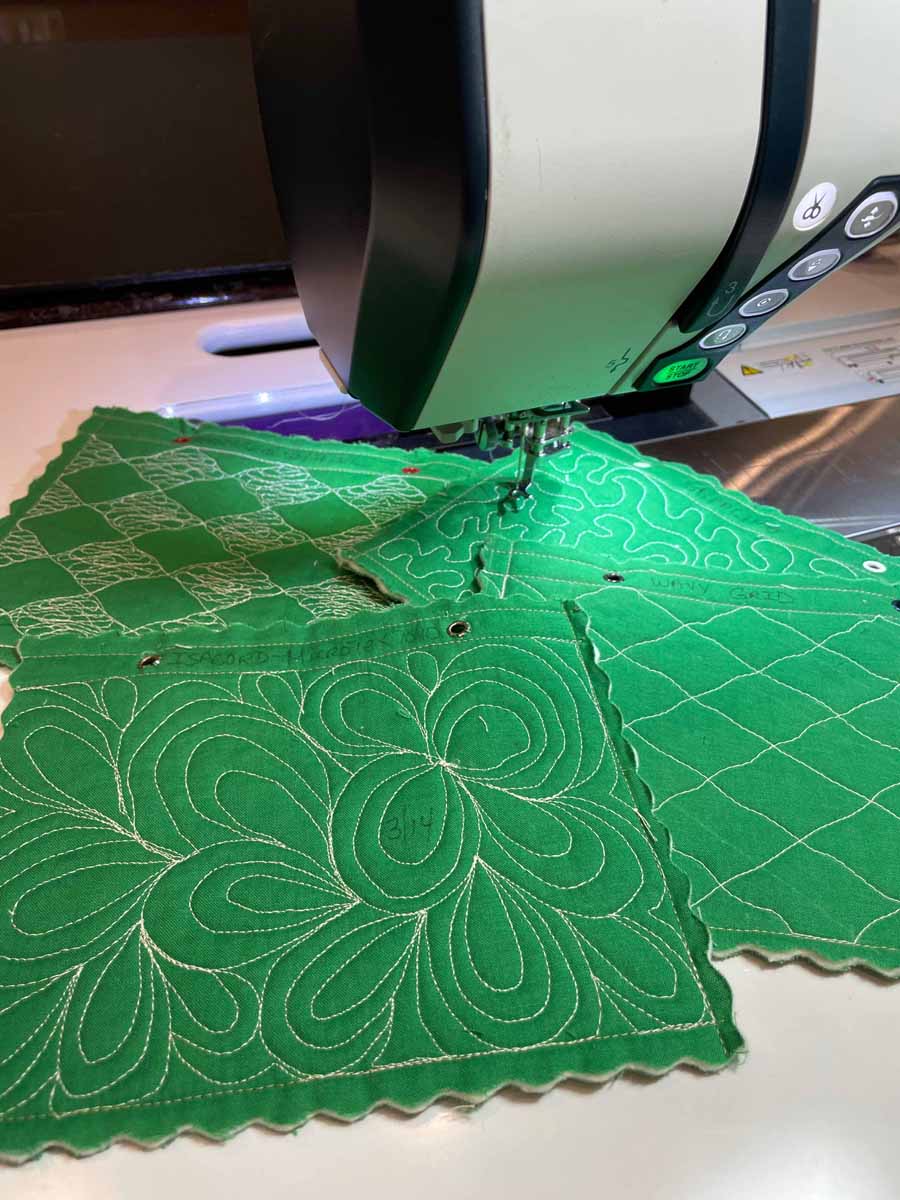
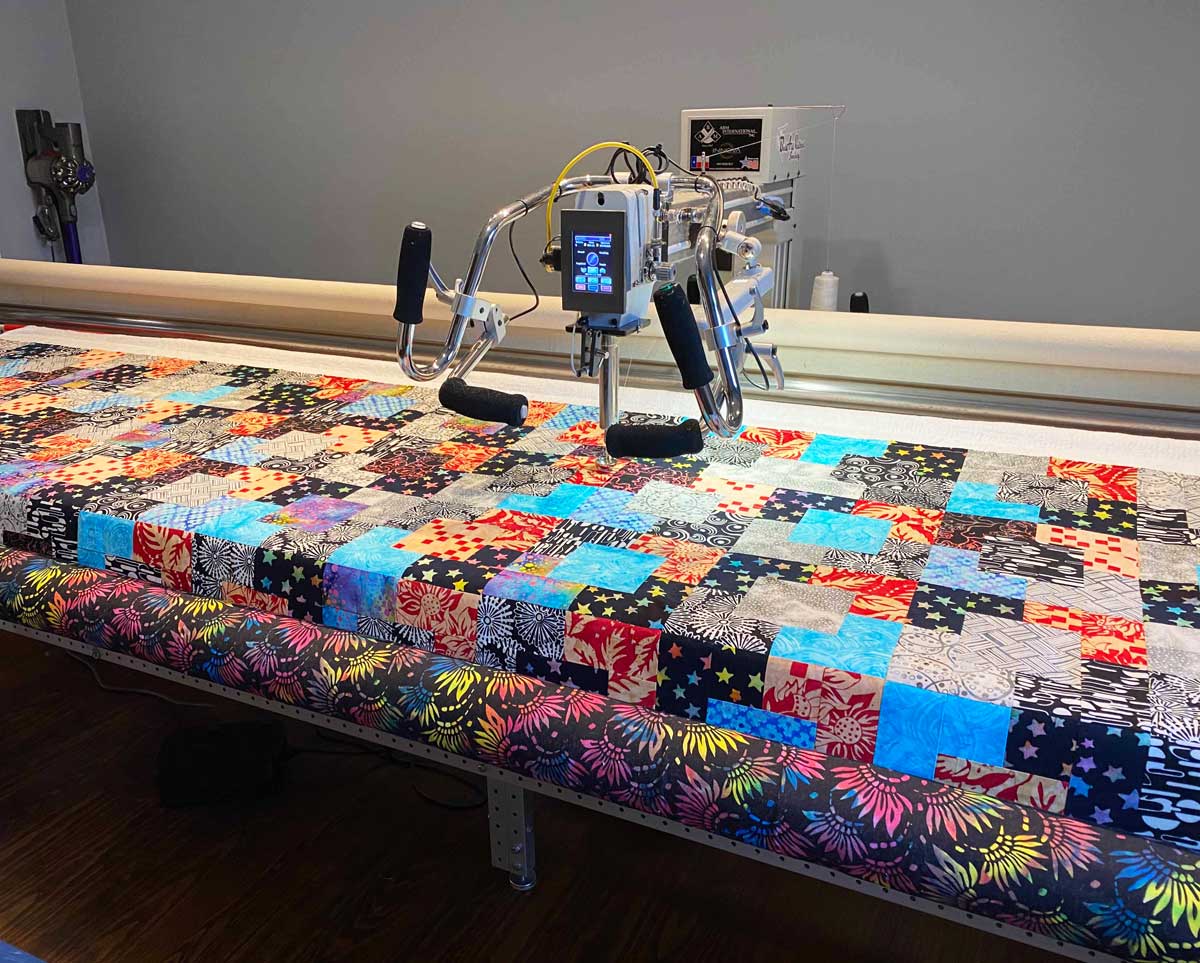
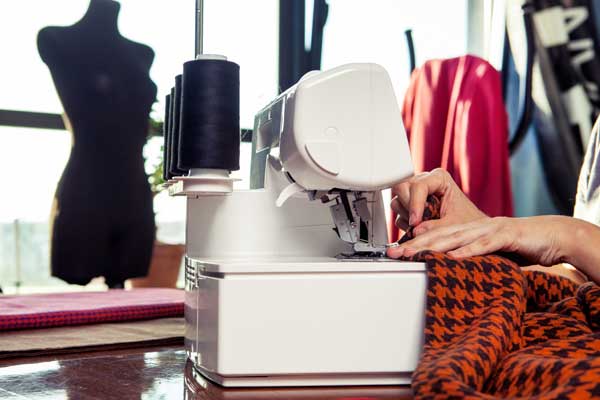
A serger can be a little like a microwave. The microwave doesn’t replace the regular oven, and neither does a serger replace a regular sewing machine. While some sergers are only used for finishing seam allowances, they can also contribute to the creation of many clothing items, purses, totes, baskets, curtains, pillows, quilts, baby items, and masks, and can even be used to insert a zipper! I have used the serger to do rolled hems on garments and home dec items, and the flatlock technique has decorated shirts, inserted lace for a mock heirloom look, and created fleece blankets with “invisible” seams.

After so many years with this old friend, I guess I can say that I really did NEED that serger back then. And I do believe that anyone who sews can benefit from a serger if you only allow yourself to use it. So if you have a serger sitting in the closet all alone, bring it out for National Serger Month and explore all the possible ways you might be able to get acquainted. The ASG National Conference often features serger classes from some of the leading experts if you need some help. For inspiration, check out Gail Yellen and Deb Canham who have books, patterns, and YouTube videos available. Then take this brief quiz to determine your compatibility to sergers. The more “no’s” you answer, the more likely you are to enjoy a serger. Happy serging!

  1. Are you a traditionalist? Do you believe that all sewing must be done in the old, time tested methods?
  2. Do you prefer hand sewing to machine sewing?
  3. Are you intimidated by machines?
  4. Does playing with dials to see what they do scare you?
  5. Are you an advocate of “slow sewing”?
  6. Do you prefer to stick to what you know rather than try something new?
  7. Are you overwhelmed when you have to re-thread a sewing machine?
  8. Does playing with new techniques seem like a waste of time?
  9. Do you follow the “I can’t touch it, I might break it” philosophy?
  10. Are you content to remain sewing the way you always have?

~Rosemary Fajgier

Did you enjoy this article?
Are you an ASG member?
This field is for validation purposes and should be left unchanged.

Tagged With: flatlock, overlock, serger

April 9, 2021

A Sticky Situation: All About Glue Sticks

There are times when it’s hard to keep something in place until you get it sewn. Of course, you can always hand-baste, but that’s tedious and time consuming. But, there’s a more slightly less conventional solution—a glue stick!

Now, it you’re a sewing purist, you may be saying to yourself—WHAT? How could someone recommend gluing something in place? But, keep in mind that the glue is only an aid, not the final attachment.

June Tailor Fabric Glue Pen

Glue sticks come in a variety of configurations—some are twistable, like a lipstick, others are shaped more like a pen with a smaller tip for more precise placement. A few brands of glue sticks are colored so that you can see where you’ve actually glued, but then as they dry, they become clear. Just be sure you choose one that’s water-soluble and temporary, unless you want permanency.

So, why would you want a glue stick in your sewing room?

  • Anytime you need to alter or create a pattern and have tissue to overlap, a glue stick is handy to hold the paper.
  • Placing appliqués, ribbons, laces and trims is easier when they can be secured in place prior to stitching.
  • Sewing on buttons is also easier if you’re not trying to hold the button in place with one hand and stitch with the other. A small dab of glue stick on the underside of the button is all you need to secure it while stitching.
  • Keeping quilt crazy patches aligned is easy with a dab of glue stick under the edges, then add your beautiful hand or machine embroidery stitches for permanency.
  • Positioning a patch pocket is simple with a glue stick—just use a narrow line of adhesive near the finished pocket edges.
  • And who doesn’t love trying to hold a zipper in place for a centered application? A thin line of glue along the zipper tape edges works wonders to keep it positioned for stitching.
  • Mending kid’s jeans? Outline the edge of the patch wrong side with a glue stick for a sure hold. Glue is equally helpful for holding decorative patches, like on scout sashes or shirts.
  • If you’re an English paper piecer, you know how tricky it is to get a sharp turned-under edge on the detailed shapes, but a thin glue stick line makes it easy peasy to fold over and hold.
  • Struggling to keep bias binding from rippling and sliding off a curve as you stitch? Glue stick to the rescue on the wrong side of the binding, let dry and stitch ripple free.
  • Applying flat bias around appliqué shapes is also a cinch with a thin line of glue stick behind. Stained glass appliqué has never been easier, and that pesky bias end can be tucked under with ease.
  • When working with fabrics like vinyl, laminates or leather where pin holes last forever, a glue stick is a must for holding anything and everything in place for stitching, pin-free.
  • Matching plaids and stripes along seamlines is easy if you glue the seam first, as opposed to pinning. There are no worries about accidentally hitting a pin while stitching or having the seam shift just enough to be noticeable.
  • Matching adjacent seamlines, like on pieced quilts, or with garment detailing like yokes, is simplified with the help of a bit of glue, too. Again, no pins to worry about, and no shifting as you sew.
  • Fusible interfacing is a real timesaver, but it doesn’t work for all fabrics. However, with your handy glue stick you can handle any sew-in interfacing with ease. Simply run a line of glue along the seam allowance outer edges and position the interfacing atop. The glue stick line secures the interfacing in place until it’s caught in the sewn seam.
  • If you’re making a garment and no one is around to help you mark the hem, grab the glue stick and temporarily hold the hem in place while you try it on. Adjust the length as needed and re-glue for a final check before stitching.

Helpful Hints

  • To use your glue stick to best advantage, allow the glue to dry before sewing. If you’re short on time, use a dry iron to speed the drying process.
  • Can you stitch through a glued area without issue? In most cases, yes, as long as the glue is dry. A non-stick needle is recommended anytime you’re stitching through an area with any kind of adhesive, whether fusible or glue.

Remember that fabric glues are also available in forms other than sticks and can be used for all the same purposes mentioned above. Now that you’re armed with this knowledge, you should be able to handle any sticky situation that arises!


~Linda Griepentrog
Linda is the owner of G Wiz Creative Services and she does writing, editing and designing for companies in the sewing, crafting and quilting industries. In addition, she escorts fabric shopping tours to Hong Kong. She lives at the Oregon Coast with her husband Keith, and two dogs, Yohnuh and Abby. Contact her at .

Did you enjoy this article?
Are you an ASG member?
This field is for validation purposes and should be left unchanged.

Tagged With: applique, bias binding, glue, glue stick, mending, paper piecer, quilting

April 2, 2021

Sewing Q&A

Maybe you’ve wondered about something related to sewing, but couldn’t find an answer elsewhere. We’re here to help!

Bias Binding

Q. If I want to cut my own bias binding, how do I do that?

A. True bias is a 45° angle to the selvage edge of the fabric. It’s stretchier than either the lengthwise or crosswise grain making it ideal to bind curves. To find that angle, use a ruler with a 45° marking and align that mark with a straight edge of the fabric (selvage) to make your first cut. After the initial cut, use the ruler to cut enough bias strips for your project at the width you need.

  • Bias binding is usually cut four times the desired finished width, plus seam allowance. So, if you want a ½” finished binding, cut the strips 2 1/2” wide (using a ¼” seam allowance).
  • Seam the lengths together along the straight grain using a diagonal seam. Why? So that it distributes the bulk of the seam more evenly and the seam allowances aren’t on top of each other making a lump.
  • If you’re binding something without curves, you can cut binding on the straight grain instead of bias. Simply cut the strips across the width of the fabric and sew them together using diagonal seams to create the length needed.
  • Fold the binding using a bias tape maker, or apply using another method.

Tip: Watch our short video on how to use a bias tape too

Press Cloth

Q. Why do I need to use a press cloth? 

Dritz Pressing Cloth available on Amazon

A. A press cloth is used to protect the fabric so that it isn’t damaged by the iron’s heat. It helps prevent scorching, water marking and errant press marks. Some fabrics develop a shine if they’re pressed directly and it’s irreversible; others can melt. A press cloth can be as simple as a piece of cotton fabric. Some press cloths are napped, others are flat finished, depending on the material you’re using it on. Good fabric choices for press cloths are solid color batiste, muslin and silk organza. The latter allows you to see through the cloth to the fabric detailing below.

Another function of a press cloth can be to add moisture to the pressing process. Some fusible interfacings and stabilizers fuse best with a damp press cloth, and moisture is helpful for shaping wool pieces, like collars and lapels, during the tailoring process.

Fusible Stay Tape

Q. The shoulders in my knit T-shirts seem to stretch. Is there a way to prevent that?

A. Absolutely! You can purchase a straight grain fusible stay tape that can be ironed on over the shoulder seamline area before you stitch the seam. That will maintain the original size of the pattern piece. Another option is to use the selvage area of a similar color woven fabric as a stay tape that you sew over. If you need some give in the shoulder seam, sew over some clear elastic that you stretch ever so slightly as you sew the shoulder seam.

Shredding Thread

Q. What causes my thread to shred (and break) while I’m sewing?

A. There are several things that can cause thread to shred, but most commonly is using the wrong size needle. Thread needs to have clearance to pass freely through the eye of the needle and subsequently through the fabric layers you’re sewing. If the needle isn’t large enough to make a hole of sufficient size, the abrasion can cause the thread to shred as it passes through the fabric. Always match the size and type of needle to the fabric.

Another cause of shredding can be a burr on the needle. If you’ve sewn over pins (Like, who would do that?), they could have slightly nicked the needle and that rough area can catch on the thread as it forms the stitches. Poor quality thread can also be an issue, so always purchase good quality thread—it’s worth the investment.


~Linda Griepentrog
Linda is the owner of G Wiz Creative Services and she does writing, editing and designing for companies in the sewing, crafting and quilting industries. In addition, she escorts fabric shopping tours to Hong Kong. She lives at the Oregon Coast with her husband Keith, and two dogs, Yohnuh and Abby. Contact her at .

Did you enjoy this article?
Are you an ASG member?
This field is for validation purposes and should be left unchanged.


Tagged With: bias binding, fusibles, pressing cloth, stay tape, thread

March 31, 2021

Fireside Chat: Shankari Paradee

We hope you enjoy this 25 minute chat with Shankari (a.k.a. Sewl Sister) as she talks about making quilts and memory bears with a plan for zero waste. Her goal is to live in a world with no landfill fabric. We think you will enjoy her story and be inspired! Visit the Sewl Sister website at https://www.sewlsister.com/


~Sheryl Belson

Did you enjoy this article?
Are you an ASG member?
This field is for validation purposes and should be left unchanged.

Tagged With: fabric, memory bears, quilt

March 26, 2021

Quilting Terms: Quilting, Borders and Sashing

This article is part of a two-part Quilting Basics series. Part one is available here.

Quilting

Quilting is the stitching that holds the quilt top, batting, and backing together.

The quilting (stitching) of the three layers of fabric can be done simply by tying the three layers together with yarn or heavy thread. Most quilts are quilted utilizing one of these common methods of:

Free Motion Quilting

This is usually performed utilizing a domestic sewing machine (the kind that you use to sew the top). This is where the quilt sandwich (quilt top, batting, and backing) is moved “under” the sewing machine needle. To learn a few of the basics of Free Motion quilting, watch this short video by Leah Day.

Free Motion Quilting on a Domestic Sewing Machine

Long Arm Quilting

Another method of quilting is using a “sit down” Long Arm machine. These machines have a large arm opening and large table surrounding the sewing machine head that allows for the ease of moving the quilt around. these are specialized quilting machines designed specifically for the quilting process. Long Arm Quilting machines have a large frame where the quilt layers are attached to rollers. The sewing machine head is driven “over” the quilt sandwich. These machines can be driven manually by the quilter or be fitted with a computer that drives the sewing machine head.

Source: Diana Quinn


Hand Quilting

Hand quilting is the oldest method of quilting and is still done today. The quilter assembles the quilt “sandwich” and then will baste or pin the three layers together loosely to hold it in place. The quilting pattern is then marked with a removable marker. The quilter places the sandwich loosely in a frame or hoop and a very short quilting needle called a “between” is used to stitch the quilting pattern.

Hand Quilting Hoop

Quilting Patterns

Quilting patterns can be very simple, such as just straight lines, or can be very fancy and intricate.

Simple Grid Quilting Example

Quilt made and quilted by Diana Quinn, Marietta, GA


Custom Intricate Quilting Example

Quilt made by Diana Quinn, Marietta GA; Quilting by Terri Taylor, Marietta, GA

Binding

Binding is strips of fabric that wrap from the front to back of the quilt, finishing the raw edges.

Quilt binding strip before being sewn onto quilt

Once the three layers of a quilt are quilted, the quilt is then trimmed to remove any excess batting and backing fabric. That leaves “raw edges” that need to be covered to finish the quilt.

To create the binding, strips of fabric are sewn together to be one long piece of fabric. The most common widths of binding strips are 2 ¼” and 2 ½”.

After being sewn together, the strips are pressed in half creating a “double fold.” The double folded fabric is then sewn to the front of the quilt and wrapped around to the back of the quilt.

Quilt with Binding attached; Quilt by Diana Quinn, Marietta GA


There are many different methods of making and attaching binding. To learn more on how to Make Quilt Binding and How to Bind and Finish a Quilt here a couple of videos from Sew Very Easy:

  • How to Make Quilt Binding
  • How to Bind and Finish a Quilt

Border

The border is strips of fabric that surround the center of the quilt top.

Borders are used to “frame” a quilt much like one would frame a picture. The border around the center of the quilt may be a single piece of fabric or may be made of up of pieced pieces of a fabrics (blocks). Some quilts may have multiple borders to provide more interest. Not all quilts will have borders, and that decision is left up to the discretion of the quilt maker.

Quilt with single Fabric Border
Quilt with NO Border
Quilt with Multiple Borders
Quilt with a pieced border

Quilts by Diana Quinn, Marietta. GA

Sashing

Sashing is the strips of fabric between the quilt blocks.

Sometimes quilt blocks are stand alone and are not connected to adjacent blocks in the quilt. To give each block its own space strips of fabric are sewn in between the blocks and this is known as sashing. In the sashing example below, it should be noted that the square blocks (dark red) in between the sashing strips are known as “Corner Stones.” Corner Stones are used to keep the blocks aligned.

Quilt by Diana Quinn, Marietta, GA

Quilting is such an artistic expression of the art and skill of sewing and there is much to say and learn about the topic. Hopefully, this discussion of a few of the fundamentals has piqued your interest in quilting. To begin learning, reach out to your local ASG Chapter to meet members who quilt or look up local quilts shops in your area and start taking classes!


~Diana Quinn, ASG Atlanta Chapter

Did you enjoy this article?
Are you an ASG member?
This field is for validation purposes and should be left unchanged.

Tagged With: quilt binding, quilt borders, quilting, sashing

  • « Previous Page
  • 1
  • …
  • 46
  • 47
  • 48
  • 49
  • 50
  • …
  • 82
  • Next Page »

Become a Member

Join the only national organization dedicated to Advancing Sewing as an Art and Life Skill.

Join Now button

Blog Article Categories

  • ASG Conference
  • Chapter Stories
  • Embroidery
  • Fitting
  • Learn to Sew
  • National Sewing Month
  • Products, Books, & Patterns
  • Projects
  • Quilting
  • Sewing
  • Sewing Techniques
  • Sewing Tips
  • Sewing Tours
  • Videos
  • Disclaimer
  • Privacy Policy

American Sewing Guild
National Headquarters
9660 Hillcroft, Suite 230
Houston TX 77096
713-729-3000 | 713-721-9230 Fax
www.ASG.org

ASG wordcloud - education, conference, discounts, videos, special offers, tours and more

Copyright © 1998–2025 · American Sewing Guild · All Rights Reserved