American Sewing Guild (ASG)

Visit our blog Visit the ASG Facebook page Visit ASG on Pinterest Visit ASG's YouTube channel Visit ASG on Instagram
  • Home
  • Join ASG
    • Join Online
    • Chapter Locations
    • Member Benefits
    • Member Brochure
    • Join by Mail
  • Conference & Education
  • Resources
    • Contests & Awards
    • Giving Back
    • Hall of Fame
    • Links
    • Travel and Tours
    • Measurement Chart
  • Shop
    • ASG Store
    • Chapter Products
    • Video Resources
  • Blog
  • About
    • About Us
    • Donate to ASG
    • ASG Sensitivity Statement
    • FAQ’s
    • Start a Chapter
  • Contact
  • Member Login
    • Login First!
    • Members Only
    • Leadership Only
    • Website FAQ’s
    • Logout
  •  

November 27, 2020

Fast and Easy Fringed Edge Finishes

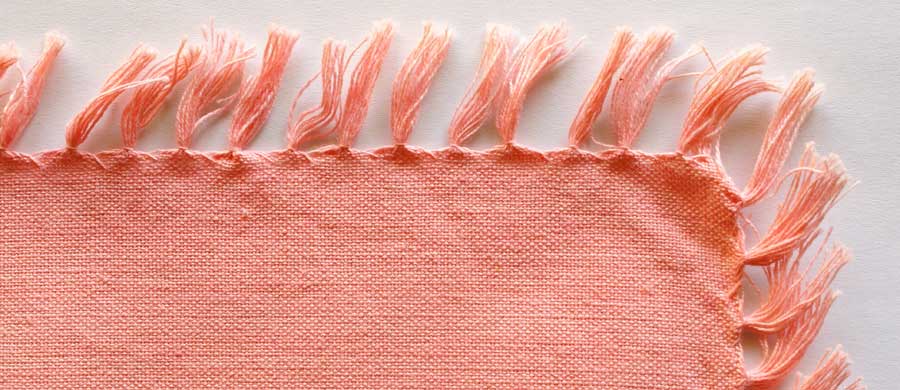
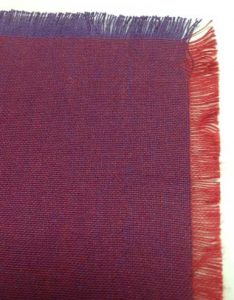
If you’re looking for a fast and easy edge finish, there’s nothing easier than fringe! It works on single-layer placemats, scarves, patches and pockets, or with a little more effort, you can insert fringe into a seam or hem.

The results of fringing are not always what you expect, as some fabrics are woven with different color threads going lengthwise and crosswise, so you get totally different colors in one direction from the other. Denim is a good example, as white threads are usually used one way and indigo the other.

The Basics

Select a woven fabric (knits cannot be fringed using this technique). Fabrics like linen, burlap, gauze, wools and bouclés are ideal candidates. The looser the weave, the easier the fringing process.

  • To create a simple fringe, be sure your project edge is cut parallel to the fabric grain. Sew a line of stitching where you want the fringe to stop, then start pulling threads up to the stitching line. The stitching thread can match the fabric or contrast with it.
  • For easier removal, use a needle or a large pin to help separate the fabric threads and gently pull them across the fringed area. Note that if your project has a right-angle corner (like a scarf), there will be a gap in the thread fringe at the corners.
  • If you want to knot the fringe, either singly or with thread groups, allow extra length for that process. Test-fringe a sample to see how much length you need for either a square knot or an overhand knot.
  • For a top-fringed pocket, cut the pocket top on the straight grain and extend it the desired fringe length (no hem). For a fringed sleeve hem, determine the sleeve length, then extend the lower edge the desired fringe length, being sure to keep a straight grain edge.
  • Single-layer scarves can be fringe-finished on all edges or just the ends, like on a muffler.

Inset Fringe

  • Inserting fringe into a seam allows for more placement flexibility and allows for placing it on a curve as well.
  • To make a fringe strip, cut a straight grain strip the desired width of the fringe, plus the requisite seam allowance. Stitch and fringe as noted above. On very loosely woven fabrics, layer two strips for a denser fringe.
  • Use the fringe strip as you would a piping, basting it along one layer of the seamline with the fringe facing the bulk of the project. Then top with the second layer of the project, and sew just inside the basting line. When you turn the project right side out, the fringe will extend beyond the seamed edge.
  • For long fringe strips, simply abut the ends of multiple fabric strips as needed. If you need a bulkier fringe, layer two strips atop each other and treat as one layer.

Design Tip: inset fringe can be made from matching or contrasting fabric.
Trim Tactics

If desired, you can add a ribbon or trim along the stitched edge of fringe as an accent, whether it’s single layer or inserted into a seam.

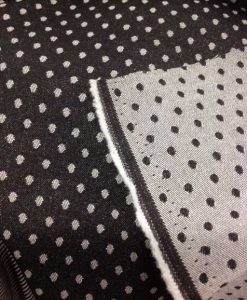
Don’t forget to check the selvage of your fabric, as some have fun fringes that can be used as is, and they already match!


~Linda Griepentrog
Linda is the owner of G Wiz Creative Services and she does writing, editing and designing for companies in the sewing, crafting and quilting industries. In addition, she escorts fabric shopping tours to Hong Kong. She lives at the Oregon Coast with her husband Keith, and two dogs, Yohnuh and Abby. Contact her at .

Did you enjoy this article?
Are you an ASG member?
This field is for validation purposes and should be left unchanged.

Tagged With: fringe, fringed edges, jacket, jeans, knotted fringe, learn to sew, placemats, scarves, sewing tip

November 23, 2020

Ginger Joins ASG

A new member talks about her experience in joining ASG and about how she loves the education, friendships and tips. Welcome, Ginger!


~Sheryl Belson

November 20, 2020

Sewing Basics: Fabric Terms

What is the one item that you absolutely must have for every sewing project you will ever do? It’s fabric, of course! Since the fabric you choose will have a significant impact on how your finished project turns out, it can help to have an understanding of how fabric is woven so that you can meet the expectations of your finished project. While weaving is a skill all on its own, understanding weaving principles can open our eyes to a greater depth of our understanding of fabric. Let’s start by watching this 7-minute video as we see cotton and hemp woven into fabric.

Fabric Terms

Now that we have a visual of the process, let’s look at fabric terms:

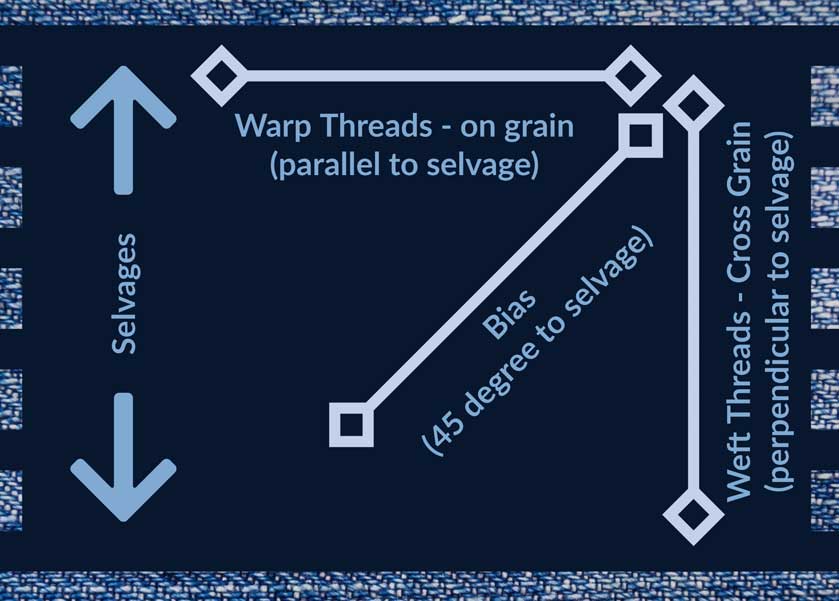
Selvage: The video provides a great visual representation of selvage and why it exists. The process of shuttling the weft threads back and forth is what creates the finished edge. Now, as you think about how that thread if shuttled from one direction then the other, wrapping the edge as you turn to the other direction, selvage makes a lot more sense. No wonder it doesn’t ravel! And since it is created by wrapping those vertical warp threads, it now makes sense why the selvage is so vital to determining the grainline, as well as the most stable part of the fabric. The selvage can be included when cutting a waistband to help reduce the stretch factor that is sometimes experienced while wearing a garment. Using the finished edge of the selvage in a waistband can add strength and may eliminate the need to turn another layer of fabric inside, thus reducing a layer of bulk.

Warp: As shown in the video, warp threads are the first to be set up and run the length of the fabric. Warp threads provide the structure for the weft threads to weave through and give the fabric stability. Warp thread and grainline go together — the grainline equals the direction of the warp thread. Doesn’t it make more sense now that the grainline is the most stable direction of the fabric?

Weft: Remember the threads being shuttled from the left to the right in the video? Those vertical threads are the weft, which also defines the cross grain of the fabric. The cross grain is the second most stable direction of your fabric but since they are not held tightly in place like the warp thread, they have a bit more “give” to them. However, since they are in a straight line, they have more stability than the bias, which we will talk about next.

Bias: Think of bias as a tic-tac-toe grid and draw a line from one corner to the opposite diagonal corner. That 45-degree angle is the bias. This has the most give and the least stability of any direction in your fabric. With an understanding now of how threads are woven, you can probably visualize the tiny gap between the threads. When you pull those threads at a diagonal, there is no straight thread to pull against, thus you are pulling across that tiny open gap between the threads. Sometimes we use the property of bias to the advantage of a project. For example, a garment made with bias-cut pieces will have a greater amount of drape and will skim the body much more than the same garment made of the same fabric that was cut on the grain.

Grain: By now, just by talking about warp and weft, we have already addressed grainline. But to see a little bit more focus on the grainline, watch this 6-minute video we published in January of 2020. It addresses some of the things already discussed here with a little more information about how to identify and use the grainline when cutting out your projects.

Hand: The final term in this discussion is hand. The “hand” of a fabric refers to the “feel” of the fabric against your skin. There are many adjectives that can be used to describe the hand, or feel, of a fabric. Words like cool, slick, smooth, loose, stiff, heavy and stretchy can all be used to tell someone about the hand of a fabric.

  • Hand and drape are terms that are very closely related. The drape of a fabric is the way it flows over things. Stiff fabrics have less drape while fluid fabrics have more. You can feel the weight of a fabric easily by the thickness when you feel the fabric in your hand  — it will feel either light or heavy.
  • Think back to what you saw in the weaving video about the threads used in weaving the fabric. The characteristics of those threads play a vital role in the hand and drape of the fabric. The thicker and more stable the threads, the stiffer, and more stable the fabric. Delicate silk threads will weave together to create a much different hand and drape than heftier linen or cotton threads.
  • Special treatments of the fabric after it is woven can also impact the hand or drape of the fabric. For example, the dying process can create a stiffer, less drapey hand based of the amount of mordant. A mordant or dye fixative is a substance used to set (i.e. bind) dyes on fabrics. Some mordants can create a stiffer hand and less drape in the final product.

We hope that diving into the art of weaving has given you a new perspective on fabric and has helped to explain the importance of understand the relationship between the fabric you’ve chosen for your project and your desired outcome.


~Sheryl Belson

Did you enjoy this article?
Are you an ASG member?
This field is for validation purposes and should be left unchanged.

Tagged With: fabric, selvadge, sewing basics, video, weave, weaving

November 16, 2020

National Button Day

November 16 is National Button Day! Buttons can be utilitarian, decorative, functional, collector’s item, or works of art and this special day is a celebration of buttons, whether they are in a tin in a drawer, attached to a garment, or displayed in a competition. National Button Day was founded in 1938 by the National Button Society and recognizes button collecting as an organized hobby. Watch our video interview with Jerry Dawson with Benno’s Buttons and see some of his unique buttons, then ASG members are invited to take advantage of a 15% discount from Benno’s Buttons using the code found in the Special Offers area of ASG.org.


Did you enjoy this article?
Are you an ASG member?
This field is for validation purposes and should be left unchanged.

November 13, 2020

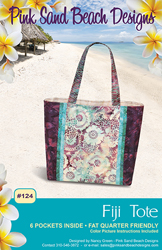
What I’m Sewing: Pink Sand Beach Designs Fiji Tote

Charlotte Trayer from the Seattle Chapter of ASG created this roomy, fat quarter friendly tote bag.

Q. Item Created 
A. Tote bag

Q. Independent Pattern Designer
A.
Pink Sand Beach Designs

Q. Name and Number of Pattern
A.
#124 Fiji Tote

Q. Fabric Used:
A. Cotton/linen for exterior, Japanese cotton print for lining, other cotton fabric for trim

Q. Special Embellishments/Notions Used
A. A Czech glass bead on the inside, to fasten a strap for my water bottle tote

Q. Skill level required?
A.
Medium

Q. Are the instructions easy to follow?
A.
The instructions were very easy to follow. It did use some Pellon products with which I wasn’t familiar. In the second rendition (in the first tote, I used all cotton fabrics from my stash), I did make one substitution and changed a couple of things about it.

Q. Are you pleased with the finished result?  Did it meet your expectations?
A.
Very much so to both questions. I receive compliments whenever I carry either tote.

Q. Did it look like the picture?
A.
The first one did as I made it exactly according to directions to test the pattern. The second one is similar, but with changes listed below.

Q. Did you make any modifications in the pattern?
A.
I made modifications on my second tote. First, I used a solid fabric for the exterior instead of piecing it as the pattern directs. Then I made the handle a little longer so I could put it over my shoulder. I also added a strap with button/buttonhole to the interior–the strap goes thru the handle of my water bottle tote (which I also made), to hold it upright. Finally, I made a slight change to the spacing of the stitching on the pocket panels so that the center pockets would be a little wider.

Q. Are there any changes you would have made?
A. None, other than the handle length, etc. mentioned above. Although, next time I may add an exterior pocket to the center panel.

Q. Did the pattern teach you any unique or special techniques?
A.
Just working with the Peltex, which is very stiff! Sewing the corners was a bit of a challenge for that reason.

Q. Would you make this again?
A.
Probably.

Q. Would you recommend this pattern to others?
A.
Yes!

Pattern Link: http://www.pinksandbeachdesigns.com


~ Rosemary Fajgier

Did you enjoy this article?
Are you an ASG member?
This field is for validation purposes and should be left unchanged.

Tagged With: fat quarters, pattern, tote bag

  • « Previous Page
  • 1
  • …
  • 51
  • 52
  • 53
  • 54
  • 55
  • …
  • 82
  • Next Page »

Become a Member

Join the only national organization dedicated to Advancing Sewing as an Art and Life Skill.

Join Now button

Blog Article Categories

  • ASG Conference
  • Chapter Stories
  • Embroidery
  • Fitting
  • Learn to Sew
  • National Sewing Month
  • Products, Books, & Patterns
  • Projects
  • Quilting
  • Sewing
  • Sewing Techniques
  • Sewing Tips
  • Sewing Tours
  • Videos
  • Disclaimer
  • Privacy Policy

American Sewing Guild
National Headquarters
9660 Hillcroft, Suite 230
Houston TX 77096
713-729-3000 | 713-721-9230 Fax
www.ASG.org

ASG wordcloud - education, conference, discounts, videos, special offers, tours and more

Copyright © 1998–2025 · American Sewing Guild · All Rights Reserved