American Sewing Guild (ASG)

Visit our blog Visit the ASG Facebook page Visit ASG on Pinterest Visit ASG's YouTube channel Visit ASG on Instagram
  • Home
  • Join ASG
    • Join Online
    • Chapter Locations
    • Member Benefits
    • Member Brochure
    • Join by Mail
  • Education & Classes
  • Resources
    • Contests & Awards
    • Giving Back
    • Hall of Fame
    • Links
    • Travel and Tours
    • Measurement Chart
  • Shop
    • ASG Store
    • Chapter Products
    • Video Resources
  • Blog
  • About
    • About Us
    • Donate to ASG
    • ASG Sensitivity Statement
    • FAQ’s
    • Start a Chapter
  • Contact
  • Member Login
    • Login First!
    • Members Only
    • Leadership Only
    • Website FAQ’s
    • Logout
  •  

September 6, 2019

Meet Linda Lee

Congratulations to Linda Lee on her induction into the 2019 ASG Hall of Fame!

Linda LeeLinda has long been one of ASG’s most popular educators at ASG conferences as well as a sought-after speaker at ASG chapters throughout the country. She began her sewing journey at a very young age sewing doll clothes and, by the sixth grade, she had begun her first business venture by making and selling felt beanie hats for $1 each. She soon expanded her line with dirndl skirts and a career was born. Her formal training began at Kansas State University with a degree in Interior Design which included two years as a Clothing and Textiles major.

Her resume reflects a number of business endeavors including I, a commercial and residential interior company; Threadwear, a retail fabric store; and The Sewing Workshop, a sewing school in San Francisco. When asked about how this all came about, Linda commented, “When you don’t have access to good fabric, then doesn’t it make sense to open a fabric store? It did to me. I had heard about a woman in Kansas City named Karen Ladish who knew the insides of the garment district in New York. She took me there and showed me how to buy fabric from the jobbers and brokers at the right prices. It was fascinating!”

The Sewing Workshop


As a shop owner, Linda took a class from sewing icon Sandra Betzina and said, “I couldn’t get enough of what she had to say. That was the first time I had ever heard of The Sewing Workshop, a sewing school in San Francisco. I went there and fell in love with the place. And it was Sandra who encouraged me to buy it. So let’s see, if you don’t have access to good sewing education, then doesn’t it make sense to buy a school? It did to me.”

Continuing to reflect on the path her career has taken, Linda said, “The best seamstress I have ever met, Shermane Fouche, was teaching at The Sewing Workshop at the time. One Sunday night I was in her studio while she was putting the finishing touches on her first pattern collection. This was before Fedex and I discovered that the patterns needed to be at her printer the following day in Manhattan, KS. Well, I was flying home to Kansas, so I offered to hand deliver the patterns to McCalls in Kansas. And that’s where the idea of starting a Sewing Workshop pattern collection began.”

Linda Lee patternLinda describes these patterns as “designs that are simple but have a little ‘edge’ to them so they are more interesting to construct—a unique detail, a fine finish, asymmetry. I think it is important to teach people the correct way to do things and to offer some challenges as well. Over time, we have evolved from a pattern company that had mostly oversized Asian-inspired designs to a much more wearable wardrobe concept theme. They are designed to fit a lot of body types and to span the generations, too. If I wear them at 71 and my daughter at 30 wears them, then I consider that a success. The steps to construct each pattern are illustrated in great detail making it easy to make one of our patterns. All of the production of our patterns happens in-house so we are in complete control of every step. The only thing we sub-contract is the fashion illustration on the cover of the envelope.”

Getting back to her career path, Linda continued, “At the same time, I started the Sewing Workshop pattern collection, I received a phone call from Vogue/Butterick pattern company in New York who wanted to use The Sewing Workshop as the site for filming a pilot television show. Of course I took that phone call and promptly converted the school to a filming studio for about a week. The pilot sold to PBS and 30 shows needed to be produced. They needed ideas for the 30 shows, so I became the content editor and writer for all of the shows. This is where I honed my skills for making step-out samples, writing scripts and boiling content down to a few minutes—all within a really tight timeline and budget.”

Linda also filmed over 100 how-to shows on HGTV, filmed shows for Sew It All and It’s Sew Easy for PBS, became a contributing editor to Threads magazine, and wrote 13 books related to sewing and home decorating. Her latest book is Sewing Knits from Fit to Finish. And if that wasn’t enough, she also produced a tutorial program called Sew Confident! featuring fitting, pattern variations, wardrobing, sewing techniques, and sewing inspiration with over 65 online sewing tutorials on her website.

With this wealth of knowledge and experience, it is no wonder that students flock to her classes when we are fortunate to have her teach at conference. And if you haven’t been able to get into one of her classes there, don’t despair. Linda also has a number of classes on Bluprint.com (formerly Craftsy).

When asked what she has enjoyed most about her career, she was quick to respond, “I love the thrill of marketing and selling the best. I think that anyone who is in business needs to love that part of a business; otherwise, it is pointless. I am bored by the repetitive aspects of what my business requires such as sewing. I don’t like to make the same thing twice; however, unfortunately, that has to happen when developing a pattern. I like to think about things and then delegate. Don’t get me wrong, I love to sew, but I would prefer to sew without deadlines and just for me instead of constantly sewing for a purpose in the business. I do use some really fine seamstresses to make some of the samples but, ultimately, I need to sew most of the samples garments in order to understand the hurdles of a design or a particular fabric.”

Linda reflected, “Everything has come together and formed a rich career that I can’t seem to leave. But I am watching the young people in my company begin to implement new ideas and take charge. My daughter Alex will complete her Masters in Fashion Management from the London College of Fashion this October. Will she join my company? I hope so! I have never felt more positive about the future of sewing — it really is in good hands. I enjoy reading blogs, following mind-blowing fashions, and staying tuned into Instagram. I am looking forward to seeing where The Sewing Workshop will be in 10 years. Hopefully I will be starting some new project, because if I don’t have access to something I need, perhaps I will start it or buy it.”

Linda Lee bag


Linda is a proud ASG member in the Kansas City Chapter and offers fellow ASG members a generous one-time per year discount of 25%. Check the Special Offers page in the Members Only area for the code. Be sure to check out Linda’s collection of patterns and other items on The Sewing Workshop website.


~Rosemary Fajgier

The American Sewing Guild is truly fortunate to be able to count many gifted sewing designers and instructors among our friends, members, and supporters. Throughout this coming year we will be featuring some of them in our Notions Blog. We hope you will enjoy reading about them and take the opportunity to get to know them better and explore their many talents by visiting their websites, taking their classes, and discovering the wide variety of designs they bring to the home sewing market.

Tagged With: books, instructor, patterns, sewing

August 9, 2019

Sewing Swimwear – Tips of the Trade

Sewing Swimwear - Tips of the Trade by DIYStyle

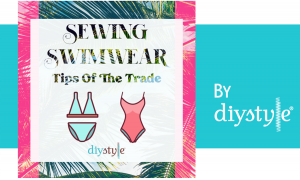
DIYStyle® for the Millennial Sewer

by Cindy Cummins

Editor’s Note August, 2022: This article has been updated to remove links that are no longer operational

To say that I’m passionate about sewing is an understatement. With more than 35 years’ experience in the industry, from working in sewing education to designing some of the first serger patterns, I’ve gained some valuable knowledge to pass down to young sewists. This is one of the reasons that I launched DIYStyle® along with designer (and my daughter) Allyce King. We frequently offer tips on anything and everything related to sewing, but we are particularly qualified to give tips on a certain subject: Sewing Knits & Swimwear.

History

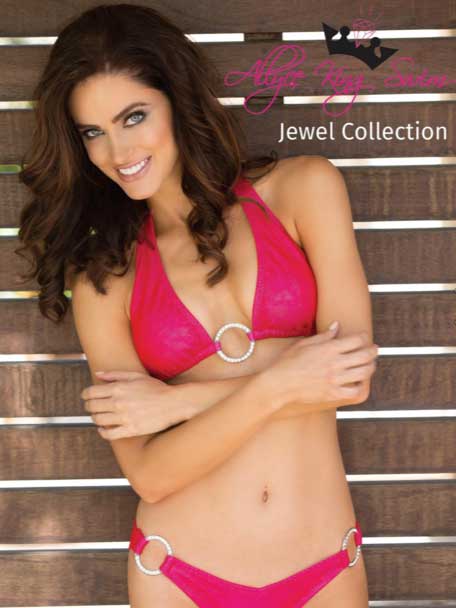
In addition to working together at DIYStyle, Allyce and I made up part of the team at Allyce King Swim, a custom swimwear company that focuses not only on suits for the pool, but suits for the stage. Our line was worn by competitors nationwide, including Miss USA, Miss America, Miss Teen USA, and Mrs. United States, just to name a few.

Allyce first started learning swim and activewear design and sewing techniques in fashion design school, graduating from Stephens College. She later honed her designs and techniques with seamstresses in the sample workroom, and in production. Design, line, fit, color, and optimal style for body type are of key importance with these discerning customers. Allyce was one of only a handful of designers in this niche, and many clients won in Allyce King Swim suits.

Our Swimwear Creation Tips

It all starts with the best tools, good lining, and best quality 4-way stretch fabrics. These are a few of our favorite notions/tools and tips that are important as we are creating new sample pieces.

Must-have notions for swimwear

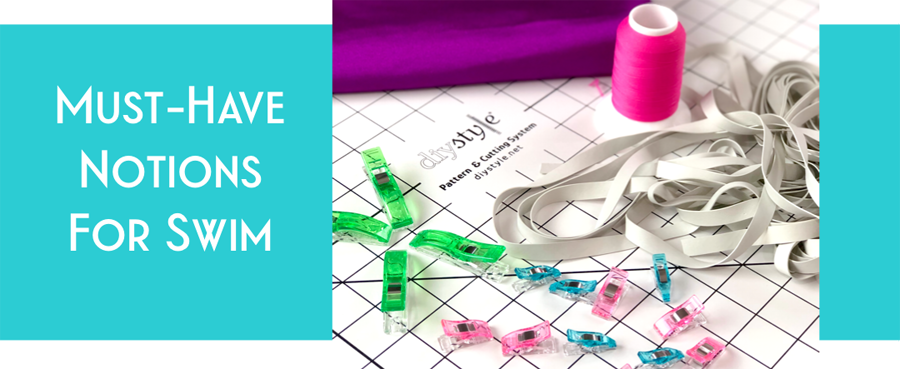
  • Use clips instead of pins for most all construction, including applying elastics. We especially like the pointed ones for ultimate control in tight places.
  • Tech Elastic works best for swim and activewear as it is latex free, does not break down with chlorine or sweat, and does not have that messy powder like some other rubber elastic tapes. We discovered this while Allyce did pageant swimsuits, as many of the girls had latex allergies. We use this for all of Allyce King Swim pieces.
  • Use a chalk liner for markings. It brushes off most swim and activewear fabrics. Test color first on a swatch. We most often use white and pink for most colors.
  • Texturized thread is great for ultimate stretch with 4-way stretch fabrics and the movement swim and activewear garments require. This thread is nylon or poly, and is crimped. It has some “spring” to it, making it stretch and recover–just like the S-T-R-E-T-C-H knit fabric.

Tips for Swim/Activewear Construction

Cut precisely & control fabric

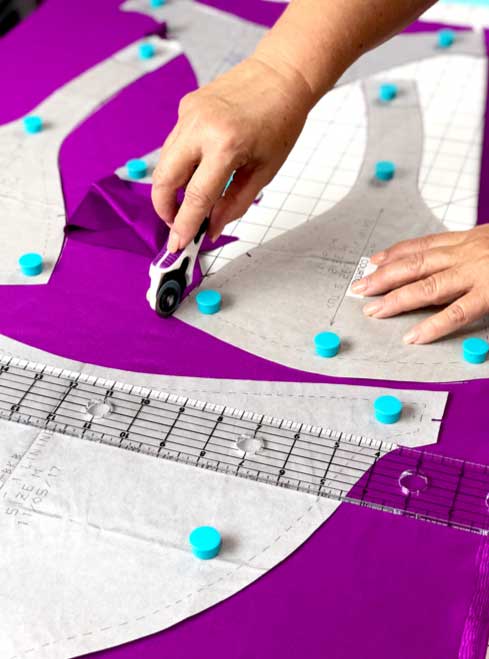
Cut with precision. A 1/4” difference is a LOT in swim and activewear. Use a set-up that does not distort or stretch the fabric when cutting. Our magnetic DIYStyle Pattern and Cutting System works great for this! The low-profile magnets hold slippery fabrics like swimwear in place, while keeping the fabric from pulling and stretching. We also use our Pro T-square for cutting straps and bands precisely. We’ll give you more information on our system below.

An ongoing debate with sewers! Are you team Rotary cutter or team Shears? We lean to the rotary cutter in our studio, as we feel it cuts faster and is accurate for our needs. But some sewers feel more comfortable with a great pair of sharp shears. As long as you are not lifting up or moving the fabric as you are cutting (thus distorting the cutting line) both work just fine. Especially helpful with either method our FabricMagnets™ (in lieu of pattern weights) along with the magnetic mat, hold everything in place for cutting precisely.

Team rotary cutter for swimwear

Make a stretch muslin. We use fabrics that are similar stretch to the finished design to judge the fit and design of a garment. It’s so much easier to make adjustments on the muslin than to fit and reverse sew the fashion stretch fabric! Once the muslin is fit, sewing the final piece goes so much faster.

Linings are important in swimwear. Don’t ever leave out the lining. We have a special lining that we use for the Allyce King Swim line that is heavier for our pageant (stage) clients. For a suit worn in the water, the lining must have similar stretch as the fashion fabric to fit properly. White swim lining makes fabrics look brighter, nude is another choice standard, and black for dark fabrics. And interlining with a stretch mesh adds another layer of control, hugging the body and smoothing lumps and bumps. Cut this the same as the lining, sandwiching between the swim (or activewear) fabric and lining.

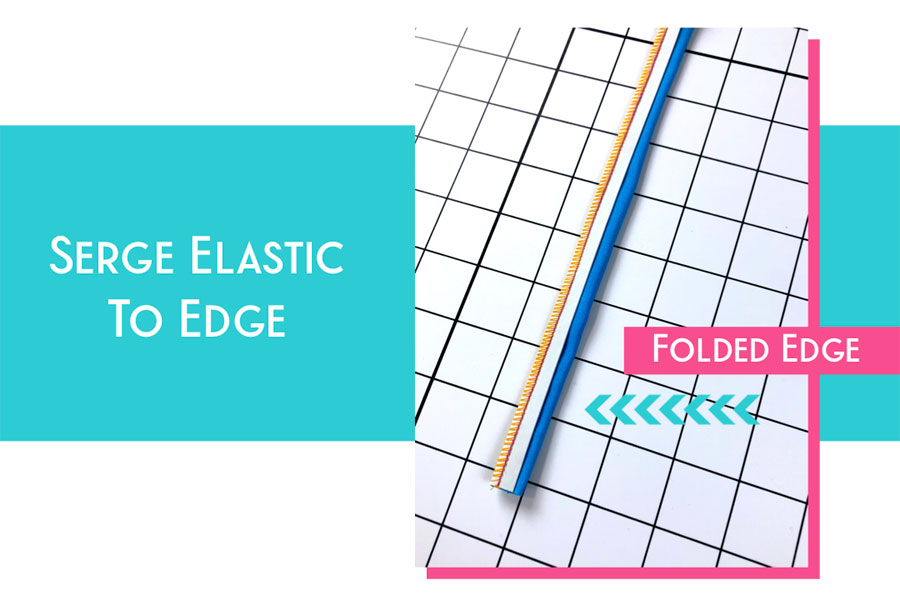
Use Tech elastic to control edges, and where elastic is needed. We like 3/8” wide for all of our suits, and it’s most appropriate for all swim and activewear. Here are the steps we use for applying and finishing elastic quickly and neatly.

1. Apply Tech Elastic to edge. We use the serger for a professional application. The edge of the elastic tape rides along the seam line (our patterns have ½” seam allowance, so we trim a scant 1/8” while applying. Use a 3-thread wide stitch with a 2.5 stitch length.

Swimwear11-Elastic1 Swimwear12-Elastic2

2. Fold over and secure. We prefer the coverstitch for this step, but you can also use a multi-step zig-zag or regular zig-zag for finishing. A wide or narrow coverstitch can be used, with a 2.5 stitch length. This is also where the texturized nylon thread works great in the looper for ultimate stretch. Be sure to fold over, then stretch the elastic up to the fabric, but do NOT stretch the fabric as you are securing the elastic. Stitch close to the inside edge of the elastic, with both needles penetrating the elastic.

3. Prevent tunneling (that ruffled looking edge) by pulling elastic taught, while smoothing the stretch fabric at the same time before securing.

Ongoing debate #2! Sewing machine vs. Serger for sewing swim and activewear. While we prefer the serger and coverstitch combo, you can definitely sew swim and activewear with a sewing machine that has just straight and a few zig-zag stitches. Because you are sewing a stretch fabric, you will need a stitch that gives and recovers with the fabric. The only time we use a straight stitch in swimwear is for basting linings, gathers, and stabilizing areas with twill tape that we do not want to stretch. A narrow zig-zag is appropriate for seams, while a multi-step zigzag is best for applying elastic and finishing.

Speaking of seams, watch the exact seam (stitching) line as you are sewing. As stated above, ¼” is a lot in swim and activewear! As you are sewing or serging, be sure the needle is directly on the seam line. If serging, engage the knife so the excess is trimmed off. If sewing, trim the excess after, close to the zig-zag stitching. For serging use a 3-thread wide stitch, 2.0 stitch length. For sewing, use a multi-step zig-zag, with 2.5 stitch length, and 3.0 width.

Straps need elastic! Fabric tubes alone are not sufficient for hold and stretch on a swimsuit (or workout garment), especially once that suit hits the water! We use a French-filled strap method for creating all swim and activewear straps. This creates a professionally finished and pretty strap, filled with elastic.

Swimwear13-straps Swimwear14-straps Swimwear15-straps

Creating your own swim and active pieces is actually faster than shopping for a swimsuit (and we know how we all dread that)! Using these tricks of the trade, and you will be on your way to adding your own custom suits to your wardrobe.

Saving Time—Increasing Accuracy

Along the (sewing) journey at Allyce King Swim, we invented a new system and method for cutting fabrics fast as well as making patterns efficiently. Used in our studio for a few years, we recently brought our new Magnetic DIYStyle Pattern and Cutting System to the home sewer.

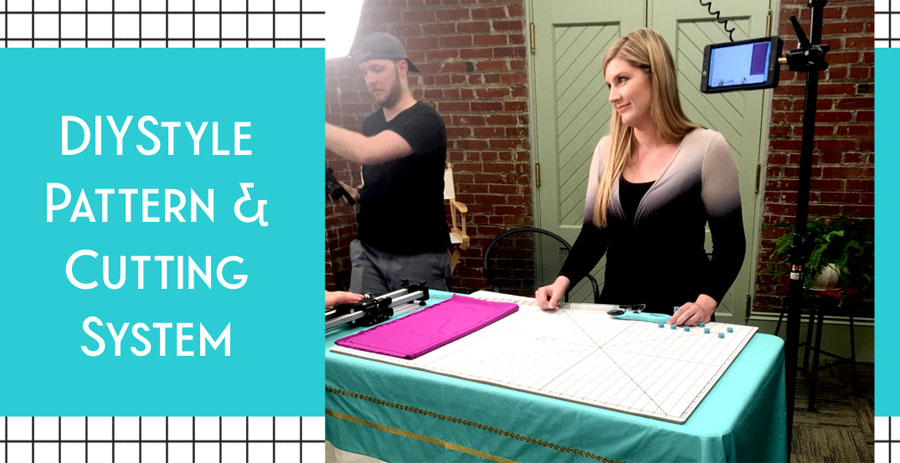
With this new magnetic set-up, you can cut fabrics in 2/3 the time, as well as increase accuracy in cutting (1/4” is a LOT in swimwear). No more pins! This is especially important in producing a line for customers–reducing time spent in the prep is key.

We also use our specially designed Pro T-Square for aligning pieces, as well as cutting strips. We are extremely proud to have our DIYStyle Pattern and Cutting System made in the USA. In doing so, we employ several individuals with disabilities, as well as veterans.

With the addition of this new product, DIYStyle® revolves around designing, developing and promoting new products that help the home sewer and small design businesses. And we continue to offer the on-trend fashion projects creators love.


~Cindy Cummins, DIYStyle

Tagged With: Cindy Cummins, DIYStyle, sewing, sewing tips, swimwear

July 12, 2019

Sewing Enthusiasts are “Sew” into the Cricut!

It’s likely that you’ve spotted a Cricut machine while browsing your local fabric and craft store. At first glance, it’s difficult to figure out what the Cricut actually does, and even more difficult to figure out how it can help you with your sewing projects. But many sewing enthusiasts are calling the Cricut a must-have for their sewing rooms. Why?

It’s important to note that there are several Cricut models. The current models are the Cricut Explore One, Cricut Explore Air, Cricut Explore Air 2, and the Cricut Maker. The Cricut Explore One is the most simplistic of the machines, with the most limited abilities. The Cricut Maker is the most advanced machine available.

At their core, Cricut machines are die-cutting machines, often used for scrapbooking and paper projects. But Cricut has taken the idea of a die-cutting machine and adapted it to work for a variety of handicrafts. With the Cricut, you can cut, score, draw and write using top-quality Cricut tools that are easy to switch out between projects. The Cricut Maker can cut paper, vinyl, leather, faux leather, fabric, cardstock, poster board, aluminum, canvas, cork, denim, felt, washi tape, wrapping paper, and much more. (Note: Be sure to check what materials your machine can cut based on the model you purchase.)


Cricut has also teamed up with Simplicity to offer hundreds of patterns for small sewing projects through Cricut’s digital design program, Design Space!

The Design Space program is downloaded to your computer and you plug your Cricut into your computer as well. To start a project, simply open the program, choose the project you want to work on, and follow Cricut’s simple step-by-step directions. You can also upload your own patterns to Design Space to complete custom projects.

The standard Cricut cutting mat is 12” x 12”, and you can purchase a cutting mat up to 24” x 12”. Because of this, you are limited to the size of fabric you can cut, which is why the Cricut works best on small projects like baby or doll clothing, clutches, stuffed animals, ornaments, etc.

Design Space allows you to upload or use a pattern that aligns perfectly with the Cricut cutting mat, which is how the machine is able to cut so precisely. Once you’ve completed your design and installed the proper tool, like a cutting knife or rotary blade, all you have to do is place your fabric on the sticky cutting mat, enter it into the machine and push a few buttons. Forget all of the hand measuring and cutting, Cricut does the work for you!

Cricut is constantly offering new tools and projects for users. They partnered with Riley Blake designs to offer quilt patterns and offer a variety of free and paid fabric projects on their own. They even have their own line of designer fabrics that are pre-cut to the size of their mats! But whatever you have in your stockpile will work just fine.

Not only can you cut fabric to make your sewing projects simpler, but you can use the Cricut to truly customize your projects with iron-on vinyl.

  • As an example, maybe you’ve just completed a pair of baby overalls as a gift. You used your Cricut maker to cut the denim and sewed the project to perfection. But you’d really like to make the project unique by adding the baby’s name to the front of the bibs. You can head back to your computer and open up Design Space, type the baby’s name, choosing your favorite font and sizing it to fit the project, and cut out your design on iron-on vinyl. Then, you simply have to iron on the decal you’ve made for the perfect final touch.

If you’re looking for a new tool to customize your sewing projects, you may just want to add a Cricut Maker to your sewing wishlist. With an ever-expanding library of tools, projects, resources, and products, more sewists are jumping on the Cricut bandwagon! Will you be one of them?

May 24, 2019

Kenneth King: “Smart Fitting Solutions” Book Review

Smart Fitting Solutions by Kenneth D. King

Kenneth King coming to ASG Conference
Image from KennethDKing.com

If you have ever been frustrated with trying to get a garment to fit YOUR body, don’t despair. Help is on the way! Iconic designer and sewing educator Kenneth D. King has written a new book, Smart Fitting Solutions, that demystifies the fitting process for a multitude of problem areas for women no matter what their body type.

Perhaps you have journeyed down this fitting road before and have been confused with wordy explanations and unclear instructions of what to look for and how to achieve a solution.

What you will absolutely love about this book is the clear, concise text that accompanies the hundreds of beautiful photographs that are truly worth a thousand words each. Smart Fitting Solutions is like a graphic novel for sewing. Unlike a video that whirls by quickly, the photographs provide the reader an opportunity to review the brief text, then take the time to study the picture to really see what is being conveyed.

The impressive photographs are not the only aspect that make this book unique. Scattered throughout the book are King’s personal preferences and tips. These span topics like recycling a muslin, pattern making techniques, fixing gaping necklines, and even where to begin flaring a skirt. I liked that King distinguished between conventional techniques and his own preferences, allowing the reader to understand the reasoning behind the differences.


Smart Fitting Solutions Explained

Smart Fitting Solutions by Kenneth KingThe layout of the book begins with evaluating a figure and creating a personal “croquis” or sketch from which to determine characteristics for an individual. Again through pictures, when the proportions of fashion illustrators are modified to reflect the actual proportions of the individual, it becomes quite clear why the completed garment is not as flattering as the illustrations made it appear.

Six women from the Threads staff are featured wearing several different garments that are evaluated on fit and figure flattering aspects. After “reading” each, King then gives suggestions on both fitting and style that would enhance their appearance. He even gives ideas for modifying ready to wear to salvage those non-flattering garments. His insights provide an excellent starting point for choosing the right design aspect that does not work against a particular body type.

King’s fitting approach simplifies the process into three basic categories: net loss, net gain or no net change.

While these sound like complicated accounting terms, they are just his way of saying an area of the pattern is too large, too small, or just not in the right spot.

And the remaining 80% of the book is devoted to showing us how and where to add, remove, or rotate the fabric to place it where it is needed.  (In Appendix 1 he has included diagrams of a body as well as a pattern with key measurement points indicated so that the reader can easily see the points on the body and where those adjustments would be made on the corresponding pattern.)

King begins with step by step instructions for modifying a pattern based on his initial croquis evaluation to create a muslin, then “reading” that muslin to see what the drag lines and wrinkles tell us. Again, those pictures clearly illustrate the techniques he uses to make the adjustments on the muslins for each of his six subjects. Those adjustments are then transferred to the pattern.

“Once I understood the concept, I found I was reading wrinkles on everyone.” ~ Rosemary Fajgier

The more I observe, the more I understand and see how the adjustments can be applied. I am working on a top that I have made several times with stock adjustments that have never worked. I am looking forward to tweaking the fit using the methods from this book.


~ Reviewed by Rosemary Fajgier

Tagged With: fitting, Kenneth King

June 14, 2017

Radial Grading

Radial Grading, also known as Radial Projection, was a method used by pattern companies many years ago and I’ve often wondered why it’s not used any longer — it certainly would save a lot of paper and printing butt does require a little more effort on the part of the user. During the first part of the last century and before, magazines were printed with fashion illustrations and included were tiny little pattern templates of the pattern pieces needed for the garment all on a page or two. The fashion illustrated on the page was sewn from the pattern drafted from those tiny templates — clever, isn’t it! Honestly, once learned, the method can be used for any pattern and for any size as long as the pattern template is accurately drafted and printed.

This method is not new. The “Lady’s Godey” magazines used illustrated fashion “plates” and often included the patterns to make the garments. The University of Vermont has an extensive collection of Lady’s Godey books; they have scanned excerpts of patterns and illustrations. Some full editions may also be found online in the Hathi Trust Collection.

Costume makers use this method. It just requires using the template (small scale pattern) of a pattern piece and a ratio method to draft a pattern to full scale, as seen in this video.

Costuming Books

There are many costuming books available with pattern templates (check Dover Publications).

  • Fashions & Costumes from Godey’s Lady’s Book is an example
  • Scale Rulers and Charts: Not only can patterns be graded up, but they can be graded down using this method, as demonstrated by Don McCunn

Using this method is all about “ratios,” but it’s not that hard or complicated. Just use the ratio of the pattern to the person as illustrated in the videos and go to it!

How would this come in handy? Well, if you create a sloper for yourself, you can radial grade it down to a quarter or half scale pattern. Because it is a “personal” sloper, you already know it fits. It is sometimes easier to design in quarter or half scale either by flat pattern or draping on a half or quarter scale form. Once a newly design pattern in quarter or half scale is finalized, then all you’d have to do is radial grade the final pattern up and you’d have an actual full-size pattern in your size — how wonderful is that! Now, it won’t be “perfect.”  There will still be some alterations depending upon the accuracy of your drafting, radial grading, and also the fabric used for the garment — there is always tweaking and editing as we know. You’ll be able to determine alterations while making a mock-up of the garment.

There are companies that have taken this method of pattern making and made companies. For instance: The Sunburst Pattern System,The Dot Pattern System, and Lutterloh — hot here in the U.S. in the 1980’s — they called it the”Golden Rule” system of pattern making.

Can you begin to see how beneficial this type of pattern making would be? Mr. McCunn has a downloadable and printable PDF of  “scale” rulers used in his video at the bottom of the page—print them and try this method.

I think this might be a fun Neighborhood Group project for an ASG chapter, don’t you?

Sew ‘til next time…enjoy the journey of sewing!

~Ramona

Tagged With: costume making, Dot Pattern System, pattern drafting, pattern grading, radial grading, scale rulers, sewing, Sunburst Pattern System

  • « Previous Page
  • 1
  • 2
  • 3

Become a Member

Join the only national organization dedicated to Advancing Sewing as an Art and Life Skill.

Join Now button

Blog Article Categories

  • ASG Conference
  • Chapter Stories
  • Embroidery
  • Fitting
  • Learn to Sew
  • National Sewing Month
  • Products, Books, & Patterns
  • Projects
  • Quilting
  • Sewing
  • Sewing Techniques
  • Sewing Tips
  • Sewing Tours
  • Videos
  • Disclaimer
  • Privacy Policy

American Sewing Guild
National Headquarters
9660 Hillcroft, Suite 230
Houston TX 77096
713-729-3000 | 713-721-9230 Fax
www.ASG.org

ASG wordcloud - education, conference, discounts, videos, special offers, tours and more

Copyright © 1998–2025 · American Sewing Guild · All Rights Reserved