American Sewing Guild (ASG)

Visit our blog Visit the ASG Facebook page Visit ASG on Pinterest Visit ASG's YouTube channel Visit ASG on Instagram
  • Home
  • Join ASG
    • Join Online
    • Chapter Locations
    • Member Benefits
    • Member Brochure
    • Join by Mail
  • Education & Classes
  • Resources
    • Contests & Awards
    • Giving Back
    • Hall of Fame
    • Travel and Tours
    • Measurement Chart
  • Shop
    • ASG Store
    • Chapter Products
    • Video Resources
  • Blog
  • About
    • About Us
    • Donate to ASG
    • ASG Sensitivity Statement
    • FAQ’s
    • Start a Chapter
  • Contact
  • Member Login
    • Login First!
    • Members Only
    • Leadership Only
    • Website FAQ’s
    • Logout
  •  

July 16, 2021

Stabilizer Organizer

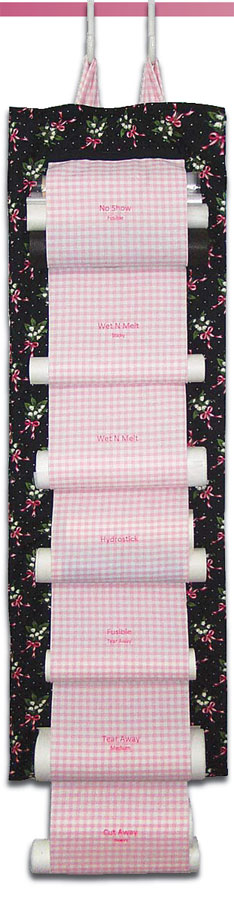
Tired of hunting for the right stabilizer every time you tackle an embroidery project? This project is a great way to keep them clearly identified and within easy reach. Carmen DePalma, a talented educator and ASG member, originally created the organizer for the Marathon Thread Company and has shared it with us.

Image of finished stabilizer organizerSturdy Home Dec, Denim, or Canvas Fabric*

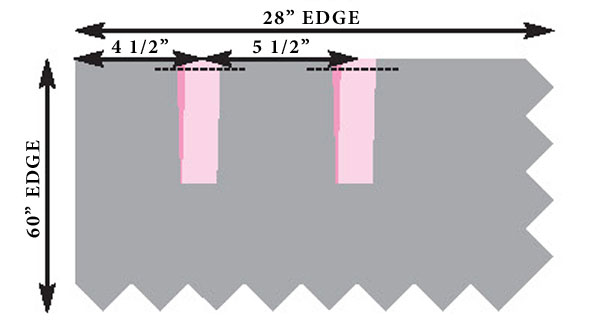
  • 1—28″ x 60″ rectangle for the base
  • 7—20″ x 10″ rectangles for the pockets
  • 1—12″ x 4″ strip for the hanging loops

Additional Supplies

  • 77″ of 1″-wide ribbon
  • Fusible web, such as Steam-A-Seam (optional)
  • Glue stick (optional)
  • 2 Over-the-door hooks if hanging on the back of a door

*If you prefer to use a lightweight fabric, you will also need:

  • 1—14″ x 60″ piece of batting or fusible interfacing for the base
  • 7—20″ x 10″ rectangles of fusible interfacing for the pockets
  • 1—12″ x 14″ strip of batting for the hanging loops
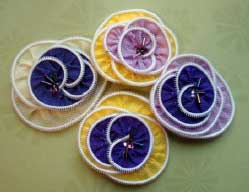
Prepare the Pockets

For lightweight fabric, fuse interfacing to the pocket sections before you begin.

  1. On each pocket section, machine embroider* the name or type of stabilizer you will store in this pocket, centering the lettering approximately 5″ below the top (10″) edge. If your machine doesn’t embroider letters, use a fabric pen to print the names.
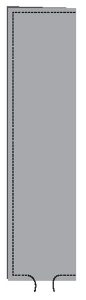
  2. Serge-finish the long edges of each pocket section or press under 1⁄4″ twice and fuse or topstitch in place.
  3. Fold the pocket in half crosswise and stitch or serge the 10″ edges together. (Note: This edge will not show on the finished holder.) Do this for all seven pockets.

Construct the Hanging Loops

  1. Fold the long edges of the loop strip 1⁄2″ under and press. With wrong sides together, fold lengthwise in half; topstitch close to the pressed edges.
  2. Cut into two 6″ long sections.

If using lightweight fabric, insert a strip of batting into each loop. This will strengthen the loop and help support the weight of the holder.

Position the Loops

  1. Working along one 28″ edge of the base, measure and mark 41⁄2″ in from one long edge. Measure and mark again, 51⁄2″ from the first mark.
  2. Fold each strip crosswise in half to form the loop. Center one loop over each mark, matching the raw edges of the loop to the raw edge of the base. (The loops will be approximately 4″ apart.) Machine baste 1⁄2″ from the raw edges, through all layers.

Assemble the Base

  1. Fold the base in half lengthwise, right sides together.
    Note: For lightweight fabric, center batting over the folded base or fuse interfacing to one (wrong) side before proceeding.
  2. Using a 1⁄2″ seam allowance, stitch around raw edges of the base, leaving a 10″ opening at the center of the lower edge for turning.
  3. Clip the corners. Turn the base right side out; tuck the raw edges in at the lower edge and press. Slipstitch *or machine stitch the opening closed.
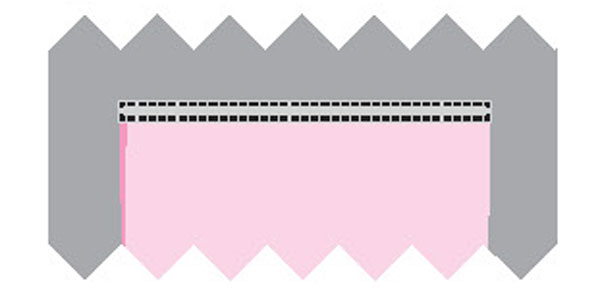
  4. To reinforce where the loops are attached, topstitch across the upper edge of the holder.

Attach the Pockets

  1. Pin the first pocket to the base so that its upper edge is 1″ above the lower edge of the base. Make sure the embroidered names are “right side up.” Machine baste.
  2. Pin the next pocket in place so its lower edge overlaps the upper edge of the first pocket by about 1″. Repeat, until all seven pockets are pinned and basted in place.
  3. Cut the ribbon into seven 11″ pieces. On each piece of ribbon, fold the cut ends under 1⁄2″ and press.
  4. Center one piece of ribbon over the upper edge of one pocket; pin or glue-baste in place. Edge-stitch all around the ribbon, stitching through the pocket and the base.
  5. Repeat for the upper edges of all the pockets.

~Carmen DePalma, ASG Tampa Chapter

This field is for validation purposes and should be left unchanged.
Did you enjoy this article?
Are you an ASG member?

Tagged With: how-to project, stabilizer organizer

June 11, 2021

Make Your Own Luggage Tote

Finished luggage toteAfter being cooped up at home for over a year, everyone is anxious to travel again, even homebodies like me. In anticipation of an in-person ASG conference, I decided to make a luggage tote that fits on the handle of my rolling suitcase. To get exactly what I wanted, I made my own pattern for this project which was quick and easy—just perfect for me. I especially like the boxed ends and the simplicity of how it could be achieved. I’m including my own instructions below, but if you prefer a commercial pattern, one of my favorite conference instructors, Linda McGehee from Ghee’s, has the L-Bag pattern with multiple sizing, helpful tips, and excellent instructions. While there, also check out the variety of novelty zippers she sells that make the bag really pop.

Luggage Tote Instructions (pdf)

Let’s Get Started

For this project, I used 4 sheets of 8.5 x 11 copy paper to make the pattern, and included a sleeve on one side to slide over the handle of my luggage. Although there is basic geometry involved in the design, making the pattern required no measuring or angles to calculate, just simple paper folding.

I chose a heavy-weight home-dec fabric that I had in my collection for the bag. The right side of the fabric felt like a medium-weight denim, and the wrong side had a rubberized backing. While it appeared strong and durable and did not require lining, it was also sturdy enough to support the contents of a packed bag while still remaining flexible to stuff under an airplane seat.

Luggage tote front and back

I added an embroidered pocket on one side of the bag that was held in place by the handle straps that go up the sides of the bag. The pocket design was a Monarch butterfly from Embroidery Library. For the sleeve that slips over the luggage handle, I included a zipper on the outside of the sleeve, with a solid piece of fabric for the back side. This created an additional zippered pocket for more security. Free standing 3D butterflies were used on the sleeve and were made with a butterfly design from my Brother embroidery machine that was stitched on using a double layer of mylar with a heavier cutaway stabilizer sandwiched between the layers of mylar. This provided enough stiffness that the butterflies could be bent slightly to give the 3D effect. The butterflies were cut close to the stitching, leaving an ever so slight margin of mylar, then were securely hand-stitched to the outside of the sleeve pocket by going around the stitches of the body (and not the wings). The technique would not withstand the abuse of luggage handlers, but is fine for a carry-on.

Webbing is the best choice for handles, but with none available at midnight when I wanted to sew, I made the handles from the bag fabric. It ended up a little too thick for my liking, so future bags will be made with the webbing. Sewing through the 4 layers of the handle, the double layers of the pocket, plus the side of the bag did not make my trusty old Singer happy. It plowed through, but not without a few complaints. I used webbing for the second tote.

Ready to Travel

Tote bags on luggageI love the design of this bag! It is streamlined for getting those flat, squared ends of the bag perfect every time. Excluding the embroidery and the fabric handles, the entire bag can be constructed in about an hour. And while it makes for a great travel bag, it also works well for carrying sewing supplies to retreats, meetings, or anytime more space is needed than my trusty purse provides. I hope you will give this one a try.


~Rosemary Fajgier

This field is for validation purposes and should be left unchanged.
Did you enjoy this article?
Are you an ASG member?

Tagged With: luggage tote, tote bag

April 29, 2021

National Zipper Day: Zipper Pansy Pin

Make this sweet pansy pin using designer zippers from Ghee’s! It’s easy to construct and is a perfect embellishment for any season. Feature one or several on a lapel, handbag or headband or decorate a hat, belt, or shoes. You can even make other unique jewelry like a necklace or bracelet.

Materials

  • 2 decorative zippers from Ghee’s. Zippers should be at least 14″ long and in contrasting colors  (2 zippers will yield 2 pansy pins)
  • 2 circles, each 1½”-wide, of backing such as buckram, felt, or heavy interfacing
  • 2 pin backs
  • Bugle beads, small crystals or seed beads for flower centers
  • Needle and matching thread or sewing machine
  • Fabri-Tac™ glue

ASG members receive a 15% discount on their entire purchase at Ghee’s. You can find the code on the Special Offers page in the Members Only area of ASG.org.

Directions

  1. Cut bottom stop from both zippers, then separate the zippers and set the zipper pull aside for another use.
  2. Using one side of each zipper, make a gathering stitch along the length of the zipper tape ¼” from tape edge with needle and thread or by sewing machine. Repeat with all the zipper
    tapes.
  3. To make larger petals, pull gathering stitches up loosely on one tape. Coil into 3 large petals. Arrange large petals on outer edge of backing circle. Glue in place. For center petals, pull
    gathering stitches tightly and arrange coils to fit into center of large petals, hiding tape end. Trim off zipper tape if you have too many center petal coils. Glue onto center of larger petals. Repeat for second pansy pin.
  4. Remove any gathering stitches that show. Glue or sew bugle beads and small crystals or seed beads to the center of the pansy.
  5. Sew or glue pin back to pansy backing.

Download these instructions as a pdf file from Ghee’s


~Linda McGehee, Ghee’s

This field is for validation purposes and should be left unchanged.
Did you enjoy this article?
Are you an ASG member?

Tagged With: National Zipper Day, zippers

March 5, 2021

DIY Table Runner

Run, Run… Table Runners

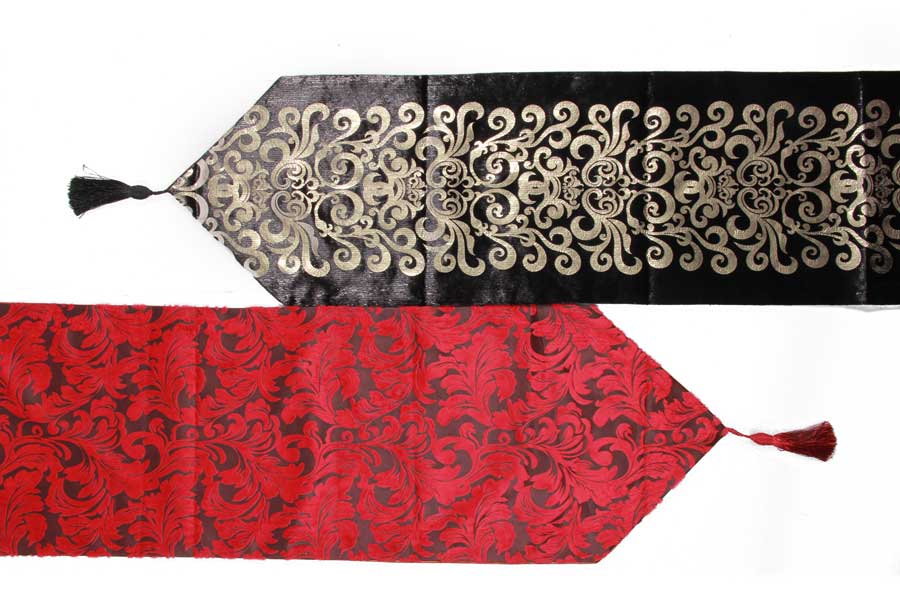
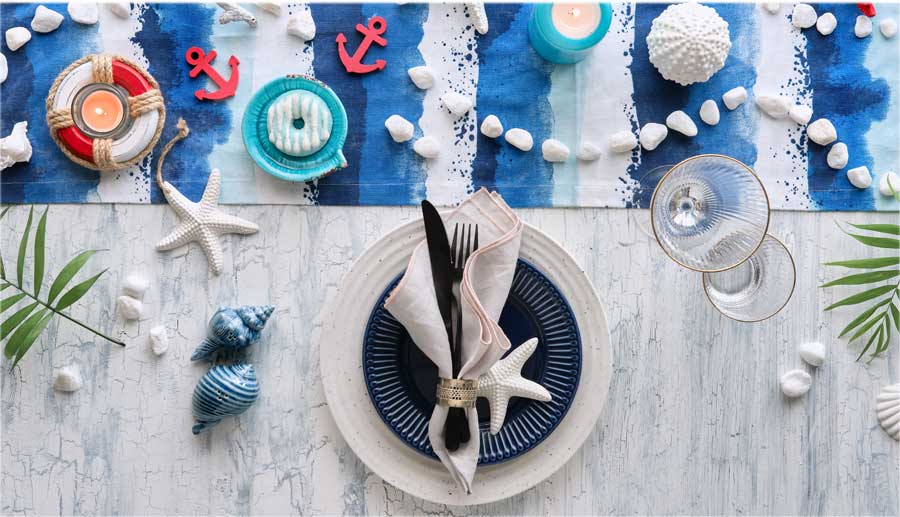
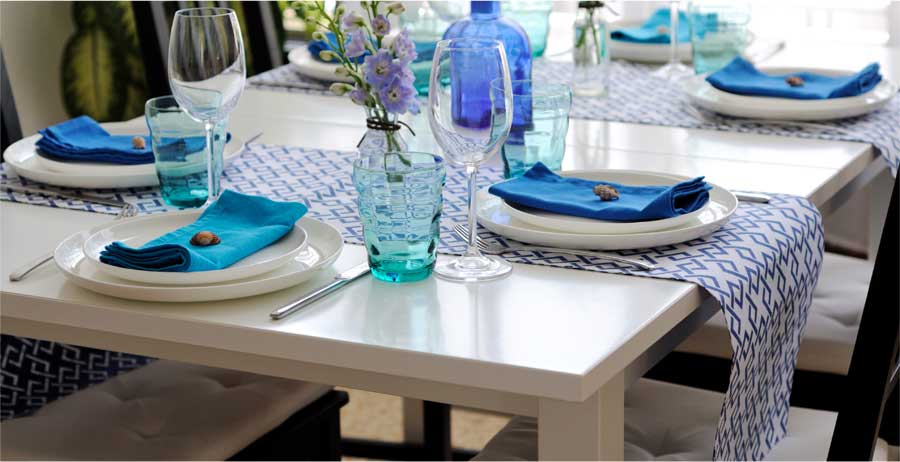
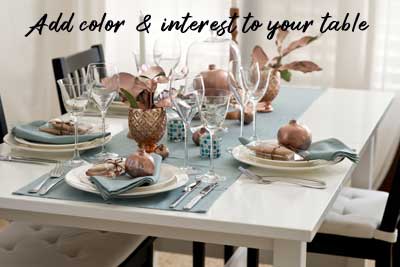
A table runner can be used to add color and interest to any part of your home décor, showcase a display of collectibles, or it can be used simply to protect the dining table surface. You get multiple functions in one! A runner can even be used over a tablecloth to double the decorating punch.

Runners can be as simple as a length of fabric with both edges fringed—a perfect project for kids to make, or they can be more elaborate as a canvas for stenciling, stitching, piecing and quilting.

Don’t limit the use of a runner to an eating table—they can also be used on dressers, coffee tables, buffets, breakfast bars, atop shelving units and other flat surfaces.

Fabric

  • Fabric for runners runs the gamut from burlap for a casual look to velvet, brocade, organza or sequins for a more elaborate occasion. Runners can be single layer, or combined with batting and backing to offer more protection to the table surface. If the runner goes on a patio table, consider a laminate, oilcloth or other outdoor fabric.

Edge Finishes

  • Edge finishes can be simple fringe, applied trim, binding, lace, piping or narrow hems. Or, for a reversible look, make each side different with encased edges. It’s easy to combine Thanksgiving and Christmas in one double-sided runner.

Runner Ends

  • Runner ends can be pointed, round or square. Because runners can be shorter than the table length, the same length or longer with a generous drop, there are creative opportunities for end finishes. Tassels, beads or decorative fringes are often added for weight if the runner extends beyond the table length.

Table runners can be used to dress any table shape, from rectangular to circular. On rectangular tables, they can be placed lengthwise down the center, at one end or crosswise. Multiple crosswise runners can double as placemats. Runners can also be combined both lengthwise and crosswise on a table, visually connecting diners.

Use coordinating fabric to make napkins to accent your runner.

Size Wise

So how wide should a runner be? While there are no absolutes and it’s purely a matter of preference, the general rule is that a runner should be about 1/3 the width of table if it will be displayed lengthwise. This allows for place settings on both sides without having plates teetering half on and half off the runner. So, for a 48” table, the width should be about 13”-16”.

And how long? Again, a matter of preference. If the runner is longer than the table, there should be a 6” fabric overhang on each end. If it’s going over a tablecloth, the runner should not hang below the tablecloth edge. It should also not hit the seat of any guests. On a buffet table accent, the runner could go all the way to the floor as it won’t interfere with diners.

When figuring length, it’s important to consider any leaves that might be added to the table, as you might need longer runners if you’re adding leaves to increase the table length.

Another consideration for length is family pets (and small kiddos) who might be intrigued with dangling tassels, beads, etc. and opt for pulling the runner off the table surface sending any breakables crashing to the floor.

Runners roll up for easy storage, so plan to make several for different occasions.


~Linda Griepentrog
Linda is the owner of G Wiz Creative Services and she does writing, editing and designing for companies in the sewing, crafting and quilting industries. In addition, she escorts fabric shopping tours to Hong Kong. She lives at the Oregon Coast with her husband Keith, and two dogs, Yohnuh and Abby. Contact her at gwizdesigns@aol.com.

This field is for validation purposes and should be left unchanged.
Did you enjoy this article?
Are you an ASG member?

Tagged With: home decor, sewing, table runner

November 13, 2020

What I’m Sewing: Pink Sand Beach Designs Fiji Tote

Charlotte Trayer from the Seattle Chapter of ASG created this roomy, fat quarter friendly tote bag.

Q. Item Created 
A. Tote bag

Q. Independent Pattern Designer
A.
Pink Sand Beach Designs

Q. Name and Number of Pattern
A.
#124 Fiji Tote

Q. Fabric Used:
A. Cotton/linen for exterior, Japanese cotton print for lining, other cotton fabric for trim

Q. Special Embellishments/Notions Used
A. A Czech glass bead on the inside, to fasten a strap for my water bottle tote

Q. Skill level required?
A.
Medium

Q. Are the instructions easy to follow?
A.
The instructions were very easy to follow. It did use some Pellon products with which I wasn’t familiar. In the second rendition (in the first tote, I used all cotton fabrics from my stash), I did make one substitution and changed a couple of things about it.

Q. Are you pleased with the finished result?  Did it meet your expectations?
A.
Very much so to both questions. I receive compliments whenever I carry either tote.

Q. Did it look like the picture?
A.
The first one did as I made it exactly according to directions to test the pattern. The second one is similar, but with changes listed below.

Q. Did you make any modifications in the pattern?
A.
I made modifications on my second tote. First, I used a solid fabric for the exterior instead of piecing it as the pattern directs. Then I made the handle a little longer so I could put it over my shoulder. I also added a strap with button/buttonhole to the interior–the strap goes thru the handle of my water bottle tote (which I also made), to hold it upright. Finally, I made a slight change to the spacing of the stitching on the pocket panels so that the center pockets would be a little wider.

Q. Are there any changes you would have made?
A. None, other than the handle length, etc. mentioned above. Although, next time I may add an exterior pocket to the center panel.

Q. Did the pattern teach you any unique or special techniques?
A.
Just working with the Peltex, which is very stiff! Sewing the corners was a bit of a challenge for that reason.

Q. Would you make this again?
A.
Probably.

Q. Would you recommend this pattern to others?
A.
Yes!

Pattern Link: http://www.pinksandbeachdesigns.com


~ Rosemary Fajgier

This field is for validation purposes and should be left unchanged.
Did you enjoy this article?
Are you an ASG member?

Tagged With: fat quarters, pattern, tote bag

  • « Previous Page
  • 1
  • 2
  • 3
  • 4
  • 5
  • Next Page »

Become a Member

Join the only national organization dedicated to Advancing Sewing as an Art and Life Skill.

Join Now button

Blog Article Categories

  • ASG Conference
  • Chapter Stories
  • Embroidery
  • Fitting
  • Learn to Sew
  • National Sewing Month
  • Products, Books, & Patterns
  • Projects
  • Quilting
  • Sewing
  • Sewing Techniques
  • Sewing Tips
  • Sewing Tours
  • Videos
  • Disclaimer
  • Privacy Policy

American Sewing Guild
National Headquarters
9660 Hillcroft, Suite 230
Houston TX 77096
713-729-3000 | 713-721-9230 Fax
www.ASG.org

ASG wordcloud - education, conference, discounts, videos, special offers, tours and more

Copyright © 1998–2026 · American Sewing Guild · All Rights Reserved