American Sewing Guild (ASG)

Visit our blog Visit the ASG Facebook page Visit ASG on Pinterest Visit ASG's YouTube channel Visit ASG on Instagram
  • Home
  • Join ASG
    • Join Online
    • Chapter Locations
    • Member Benefits
    • Member Brochure
    • Join by Mail
  • Conference & Education
  • Resources
    • Contests & Awards
    • Giving Back
    • Hall of Fame
    • Links
    • Travel and Tours
    • Measurement Chart
  • Shop
    • ASG Store
    • Chapter Products
    • Video Resources
  • Blog
  • About
    • About Us
    • Donate to ASG
    • ASG Sensitivity Statement
    • FAQ’s
    • Start a Chapter
  • Contact
  • Member Login
    • Login First!
    • Members Only
    • Leadership Only
    • Website FAQ’s
    • Logout
  •  

December 4, 2020

Border Prints 101

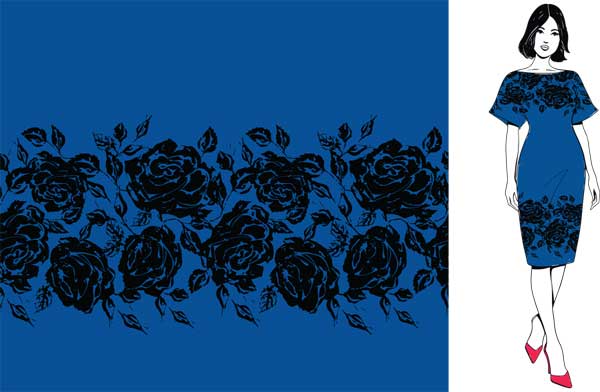
When shopping for fabric, we’re accustomed to seeing rows of bolts with an allover print. But look a little deeper and you’ll find some with unique features—border prints! Border prints are fun to work with and allow you to showcase this print feature in creative ways.

What is a border print?
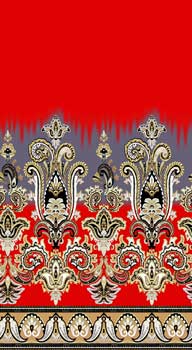
Instead of a fabric having the same patterning across the full width of the fabric, border prints have a different pattern along one or both edges. The bands of distinct prints can be narrow or wide, and can extend their emphatic look across the fabric’s full width in some instances creating a beautiful graphic element.

  • A double border print may have the same or differing designs along each fabric edge. A common pairing is to have one narrow border and one wider one.
  • A border print is parallel to the fabric’s selvage, ready for showcasing in a garment, accessory or quilt and can be found on a woven fabric or along the cut edge of a knit.
  • Another type of fabric considered a border print has a lengthwise edge detail like scallops or fringe along one or both sides.

Working with a Border Print
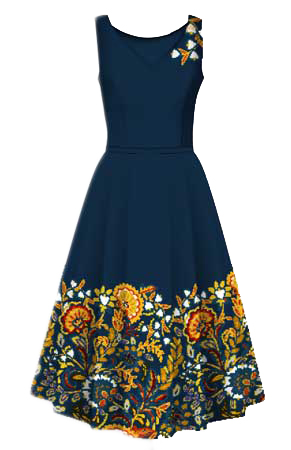
The primary difference in working with a border print is that the project needs to be on the crosswise grain of the fabric, rather than the traditional lengthwise spec. The design area is best showcased along a straight edge, like a skirt or sleeve hemline, pant leg, jacket hem, etc., though it doesn’t need to be at the bottom of a garment. The border can also be used along a pocket edge, in a bodice area or even at the waistline.

If you prefer to use the border vertically instead of horizontally, think about a jacket front, wrap skirt or side-seam accent. If you choose this orientation, be sure the border design isn’t directional—for example, you probably don’t want flower stems horizontal on a jacket front, or people lying down along a wrap skirt edge. The print should really be non-directional for vertical use.

Border prints can also be used to accent small areas, like collars and cuffs, totes, etc., and are also ideal for home décor projects, like on a curtain hem, pillow or quilt border.

Like any distinct print, matching is always a good idea, so consider where you may need to match a distinct pattern before you begin cutting. A hemline border should match at the side seams to avoid breaking the visual patterning.

Pattern Adaption
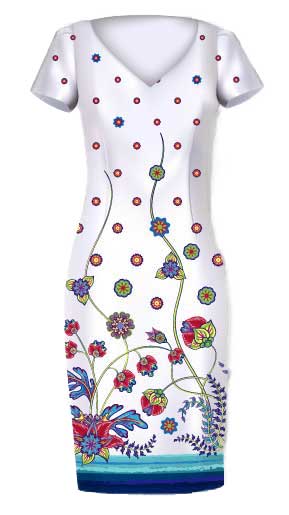
Some patterns are designed specifically to be used with border prints, but most are not. Look for designs with straight edges, like a gathered or pleated skirt, if you want to feature the print along the hemline.

  • If the area you want to use the print in is curved, you’ll need to straighten it or risk losing part of the border to the curve.
  • Redraw your pattern’s grainline to reflect the new orientation on the fabric. Use a ruler to change up the standard grainline 90°. Double check the fabric width to accommodate the new orientation.
  • Since some border prints are close to the selvage, it may be necessary to modify a hem depth if you want to use the print along the bottom of a skirt. A narrower hem, or a faced hem, could both be options depending on the design placement.

Yardage Adaptation

The amount of yardage needed for a border print will likely differ from what was originally called for if the garment was originally cut on the lengthwise grain. After redrawing the grainline on the pattern pieces, do a test layout to refigure the fabric before purchasing. Keep in mind that it’s best to cut all the garment pieces on the same grain to avoid any variance in directional prints or shading.

The width of the fabric may limit the use of the border on certain garments, or require you to piece a garment if you’re intent on using a particular fabric.

Note that you can also trim off the border and reattach it if needed, to get the look you want in your project.

Now that you know more about them, when you see a border print fabric, think about how you can showcase it in your next project!


~Linda Griepentrog
Linda is the owner of G Wiz Creative Services and she does writing, editing and designing for companies in the sewing, crafting and quilting industries. In addition, she escorts fabric shopping tours to Hong Kong. She lives at the Oregon Coast with her husband Keith, and two dogs, Yohnuh and Abby. Contact her at .

Did you enjoy this article?
Are you an ASG member?
This field is for validation purposes and should be left unchanged.

Tagged With: border prints, fabric, garments, textiles

November 20, 2020

Sewing Basics: Fabric Terms

What is the one item that you absolutely must have for every sewing project you will ever do? It’s fabric, of course! Since the fabric you choose will have a significant impact on how your finished project turns out, it can help to have an understanding of how fabric is woven so that you can meet the expectations of your finished project. While weaving is a skill all on its own, understanding weaving principles can open our eyes to a greater depth of our understanding of fabric. Let’s start by watching this 7-minute video as we see cotton and hemp woven into fabric.

Fabric Terms

Now that we have a visual of the process, let’s look at fabric terms:

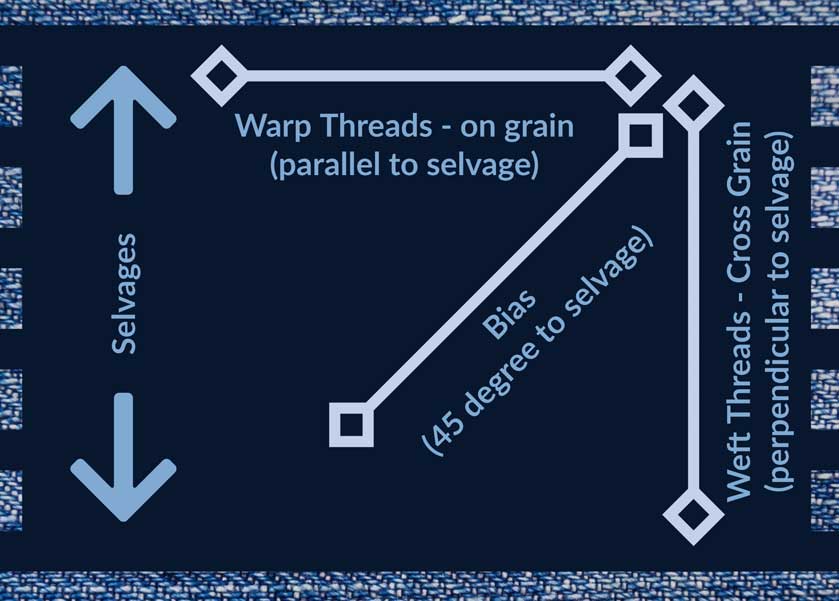
Selvage: The video provides a great visual representation of selvage and why it exists. The process of shuttling the weft threads back and forth is what creates the finished edge. Now, as you think about how that thread if shuttled from one direction then the other, wrapping the edge as you turn to the other direction, selvage makes a lot more sense. No wonder it doesn’t ravel! And since it is created by wrapping those vertical warp threads, it now makes sense why the selvage is so vital to determining the grainline, as well as the most stable part of the fabric. The selvage can be included when cutting a waistband to help reduce the stretch factor that is sometimes experienced while wearing a garment. Using the finished edge of the selvage in a waistband can add strength and may eliminate the need to turn another layer of fabric inside, thus reducing a layer of bulk.

Warp: As shown in the video, warp threads are the first to be set up and run the length of the fabric. Warp threads provide the structure for the weft threads to weave through and give the fabric stability. Warp thread and grainline go together — the grainline equals the direction of the warp thread. Doesn’t it make more sense now that the grainline is the most stable direction of the fabric?

Weft: Remember the threads being shuttled from the left to the right in the video? Those vertical threads are the weft, which also defines the cross grain of the fabric. The cross grain is the second most stable direction of your fabric but since they are not held tightly in place like the warp thread, they have a bit more “give” to them. However, since they are in a straight line, they have more stability than the bias, which we will talk about next.

Bias: Think of bias as a tic-tac-toe grid and draw a line from one corner to the opposite diagonal corner. That 45-degree angle is the bias. This has the most give and the least stability of any direction in your fabric. With an understanding now of how threads are woven, you can probably visualize the tiny gap between the threads. When you pull those threads at a diagonal, there is no straight thread to pull against, thus you are pulling across that tiny open gap between the threads. Sometimes we use the property of bias to the advantage of a project. For example, a garment made with bias-cut pieces will have a greater amount of drape and will skim the body much more than the same garment made of the same fabric that was cut on the grain.

Grain: By now, just by talking about warp and weft, we have already addressed grainline. But to see a little bit more focus on the grainline, watch this 6-minute video we published in January of 2020. It addresses some of the things already discussed here with a little more information about how to identify and use the grainline when cutting out your projects.

Hand: The final term in this discussion is hand. The “hand” of a fabric refers to the “feel” of the fabric against your skin. There are many adjectives that can be used to describe the hand, or feel, of a fabric. Words like cool, slick, smooth, loose, stiff, heavy and stretchy can all be used to tell someone about the hand of a fabric.

  • Hand and drape are terms that are very closely related. The drape of a fabric is the way it flows over things. Stiff fabrics have less drape while fluid fabrics have more. You can feel the weight of a fabric easily by the thickness when you feel the fabric in your hand  — it will feel either light or heavy.
  • Think back to what you saw in the weaving video about the threads used in weaving the fabric. The characteristics of those threads play a vital role in the hand and drape of the fabric. The thicker and more stable the threads, the stiffer, and more stable the fabric. Delicate silk threads will weave together to create a much different hand and drape than heftier linen or cotton threads.
  • Special treatments of the fabric after it is woven can also impact the hand or drape of the fabric. For example, the dying process can create a stiffer, less drapey hand based of the amount of mordant. A mordant or dye fixative is a substance used to set (i.e. bind) dyes on fabrics. Some mordants can create a stiffer hand and less drape in the final product.

We hope that diving into the art of weaving has given you a new perspective on fabric and has helped to explain the importance of understand the relationship between the fabric you’ve chosen for your project and your desired outcome.


~Sheryl Belson

Did you enjoy this article?
Are you an ASG member?
This field is for validation purposes and should be left unchanged.

Tagged With: fabric, selvadge, sewing basics, video, weave, weaving

November 16, 2020

National Button Day

November 16 is National Button Day! Buttons can be utilitarian, decorative, functional, collector’s item, or works of art and this special day is a celebration of buttons, whether they are in a tin in a drawer, attached to a garment, or displayed in a competition. National Button Day was founded in 1938 by the National Button Society and recognizes button collecting as an organized hobby. Watch our video interview with Jerry Dawson with Benno’s Buttons and see some of his unique buttons, then ASG members are invited to take advantage of a 15% discount from Benno’s Buttons using the code found in the Special Offers area of ASG.org.


Did you enjoy this article?
Are you an ASG member?
This field is for validation purposes and should be left unchanged.

October 23, 2020

Denim Dynamics

One of America’s most beloved fabrics, denim can be a delight to sew if you know the tricks.

Tools

  • Always use sharp scissors or a new rotary cutter blade to cut clean edges on this dense fabric.
  • On heavier denims, use spring clips to hold edges together for sewing, as opposed to pins which may bend.
  • If you have a walking foot, use it to help keep bulky layers from shifting.
  • A definite must—a denim/jeans needle with a sharp point for piercing the closely woven fabric.
  • For decorative topstitching, use heavy thread and a topstitching needle.

Preparation

  • No doubt about it, denim shrinks, so pre-wash and dry it at least once. Wash it alone or with similar colors to prevent dye transfer.
  • Use a with-nap layout for your pattern to avoid shading. Denim’s twill weave is really a one-way design.
  • Once your pieces are cut, serge or zigzag all the edges to prevent fraying.

Seaming

Standard seams are ideal for denim and pressing seam allowances open creates a flat finish. Other options include pressing the seam allowances to one side and topstitching, or creating a real flat felled seam aka Levi’s look.

Topstitching denim helps to keep the bulk controlled. Look for matching or contrasting threads, or a blended denim thread for this purpose, and heavier weights for more prominence. Topstitch with a single, double or triple line of stitching.

A twin denim needle with 6mm spacing will create two parallel rows of topstitching in a single pass.

Hemming

A single-layer topstitched hem is easy to do in denim—just serge or zigzag the hem edge and topstitch in place. A double hem is also an option for lighter weight denims, but may be too bulky for heavier ones.

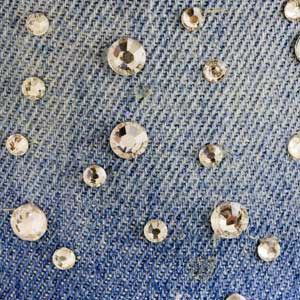
Photo compliments of Junk Jeans People

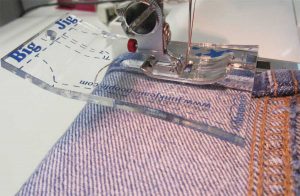
The biggest issue with hemming denim is crossing perpendicular seams, as there are multiple denim layers to contend with—feeding may not be even and stitching may become uneven due to the bulk. However, clever sewers have a tool to help with that situation, like the Big Jig. These are small plastic tools designed to level out the layers when stitching across bulky pile-ups. Simply place the tool under the presser foot at the start of the bulk and when the foot is level with the highest part, move it to the front of the foot to help with the decline.

Trimming out seam bulk and even pounding layers with a rubber mallet will also help reduce the bulk of multiple denim layers.

Fun touches

As noted, denim is prone to fraying, and you can use that characteristic for fun trims and design features on a denim garment. Sew a matching or contrasting line of straight stitching at the fringe depth you want, then pull threads up to it. Most denims have white threads in one direction and colored in the other, so choose which ones you’d like to expose.

Rhinestones and nail heads make perfect embellishments to add bling to your favorite blues. Look for the easy iron-on version for quick application.

Looking to copy your favorite Calvin’s? Add bartacks to pocket corners. Simply set the machine for a dense zigzag and stitch a few stitches to make the “bar” about 1/4” long.  Check your machine: it may have a bartack setting built in.


~Linda Griepentrog
Linda is the owner of G Wiz Creative Services and she does writing, editing and designing for companies in the sewing, crafting and quilting industries. In addition, she escorts fabric shopping tours to Hong Kong. She lives at the Oregon Coast with her husband Keith, and two dogs, Yohnuh and Abby. Contact her at .

Did you enjoy this article?
Are you an ASG member?
This field is for validation purposes and should be left unchanged.

Tagged With: denim, sewing

October 18, 2020

Anyone Can Win Contest Entries 2020

View the entries from the 2020 Anyone Can Win contest.

There are no images in this gallery.


The Winners!

1st Place Over 18:
Shirley Shaw
2nd Place Over 18:
Carol Coleman
1st Place Under 18:
Brooke Neuberger
2nd Place Under 18:
Regan Ray

Tagged With: anyone can win contest, simplicity pattern contest

  • « Previous Page
  • 1
  • …
  • 40
  • 41
  • 42
  • 43
  • 44
  • …
  • 62
  • Next Page »

Become a Member

Join the only national organization dedicated to Advancing Sewing as an Art and Life Skill.

Join Now button

Blog Article Categories

  • ASG Conference
  • Chapter Stories
  • Embroidery
  • Fitting
  • Learn to Sew
  • National Sewing Month
  • Products, Books, & Patterns
  • Projects
  • Quilting
  • Sewing
  • Sewing Techniques
  • Sewing Tips
  • Sewing Tours
  • Videos
  • Disclaimer
  • Privacy Policy

American Sewing Guild
National Headquarters
9660 Hillcroft, Suite 230
Houston TX 77096
713-729-3000 | 713-721-9230 Fax
www.ASG.org

ASG wordcloud - education, conference, discounts, videos, special offers, tours and more

Copyright © 1998–2025 · American Sewing Guild · All Rights Reserved