American Sewing Guild (ASG)

Visit our blog Visit the ASG Facebook page Visit ASG on Pinterest Visit ASG's YouTube channel Visit ASG on Instagram
  • Home
  • Join ASG
    • Join Online
    • Chapter Locations
    • Member Benefits
    • Member Brochure
    • Join by Mail
  • Education & Classes
  • Resources
    • Contests & Awards
    • Giving Back
    • Hall of Fame
    • Links
    • Travel and Tours
    • Measurement Chart
  • Shop
    • ASG Store
    • Chapter Products
    • Video Resources
  • Blog
  • About
    • About Us
    • Donate to ASG
    • ASG Sensitivity Statement
    • FAQ’s
    • Start a Chapter
  • Contact
  • Member Login
    • Login First!
    • Members Only
    • Leadership Only
    • Website FAQ’s
    • Logout
  •  

March 31, 2021

Fireside Chat: Shankari Paradee

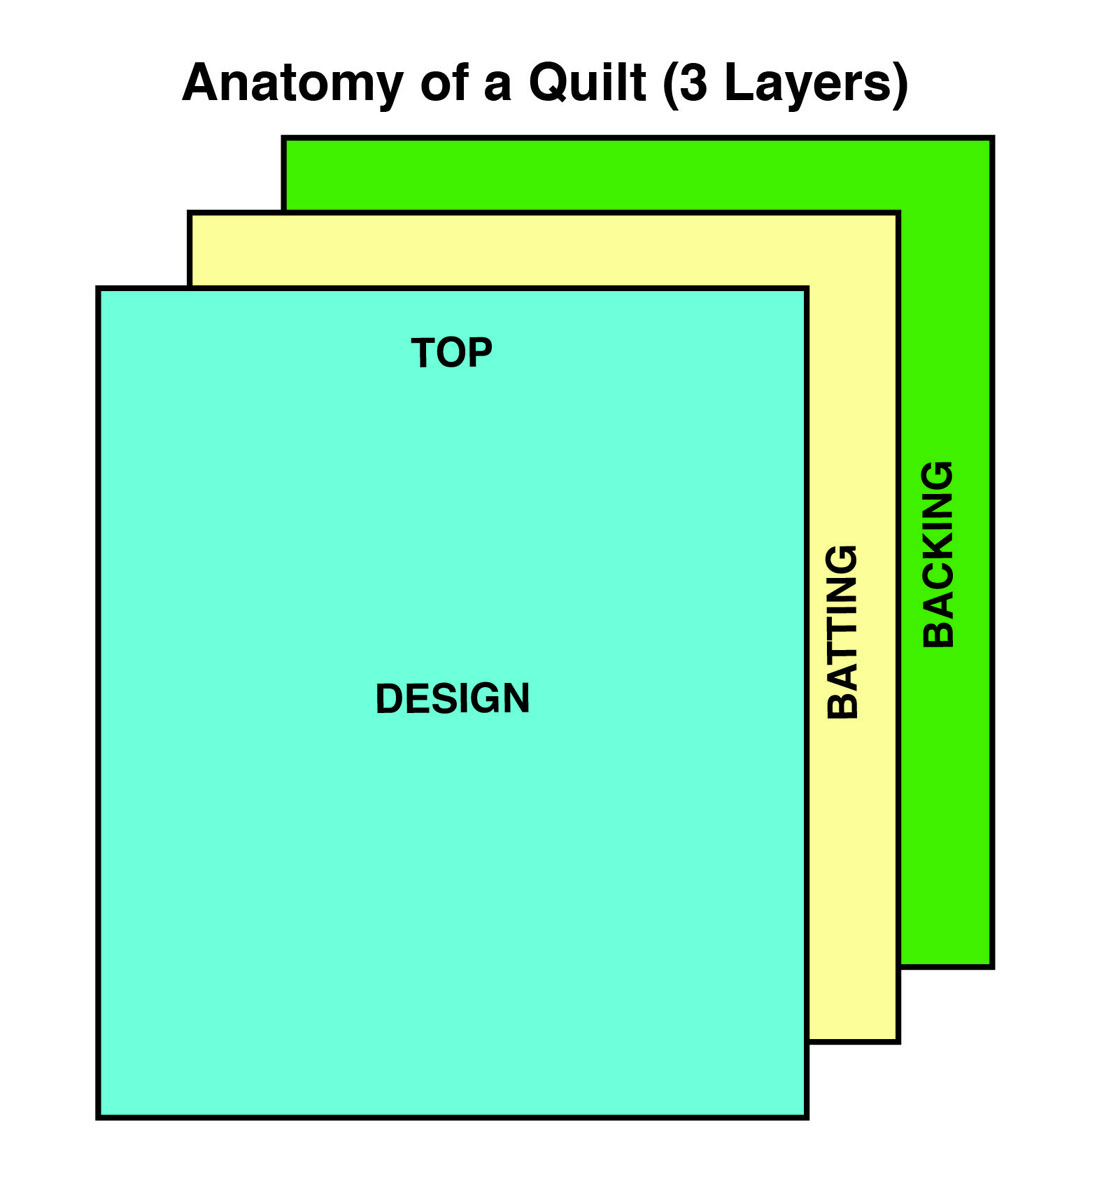
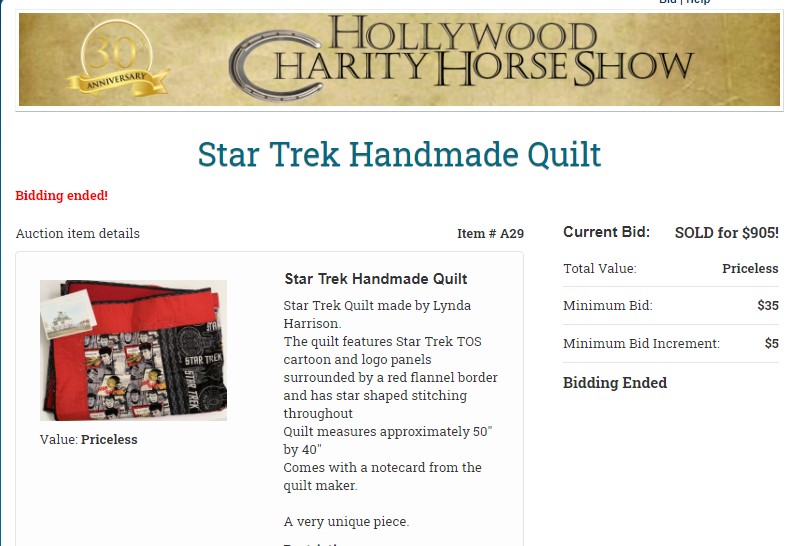
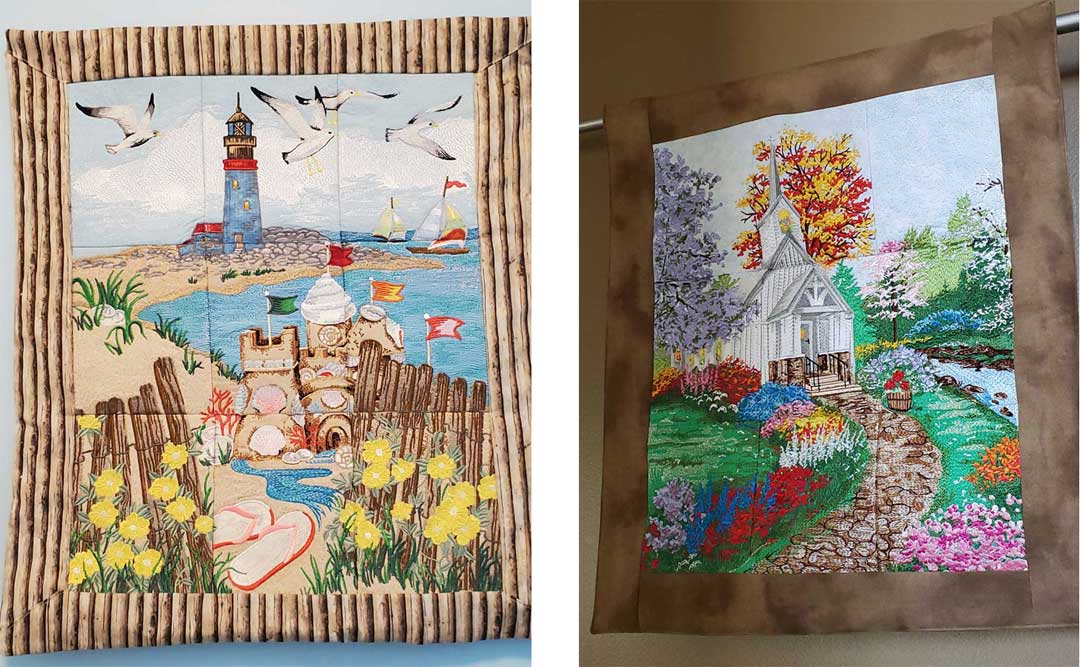
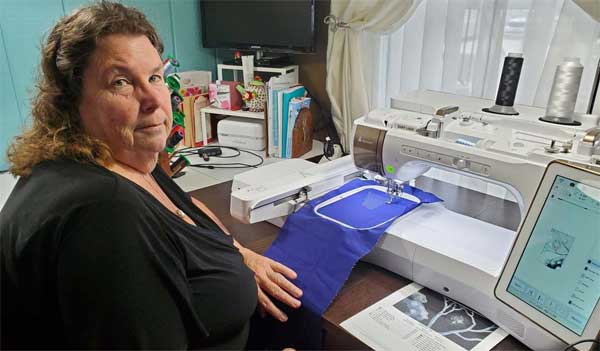
We hope you enjoy this 25 minute chat with Shankari (a.k.a. Sewl Sister) as she talks about making quilts and memory bears with a plan for zero waste. Her goal is to live in a world with no landfill fabric. We think you will enjoy her story and be inspired! Visit the Sewl Sister website at https://www.sewlsister.com/


~Sheryl Belson

Did you enjoy this article?
Are you an ASG member?
This field is for validation purposes and should be left unchanged.

Tagged With: fabric, memory bears, quilt

March 19, 2021

Quilting Terms: Backing, Blocks, and Batting

What is a Quilt?

This is Part One of a two-part series. Part Two will be published on March 26, 2021.

According to the Merriam-Webster dictionary: a bed coverlet of two layers of cloth filled with padding (such as down or batting) held in place by ties or stitched designs

Anatomy of a QuiltA quilter’s definition is simply three layers of fabric that are stitched together that consist of:

  • Top – is the design of the quilt or the front of the quilt.
  • Batting – is the layer of padding between the Top and the Back
  • Backing– is the layer of fabric on the back of the quilt that covers the batting

So, if a quilter’s definition is not confined to a bed coverlet, what is a Quilt?  Bed coverlets are certainly included, quilts may consist of wall hangings, table coverings (table toppers and table runners), artistic renditions of people, places or anything that the quilt artist may conceive. Bottom line, if it has three layers of fabric and it is stitched together it is a quilt!

The Parts of a Quilt

Backing

The backing is a layer of fabric on the back of a quilt that covers the batting.

The Back of a quilt generally is a single fabric that covers the batting of the quilt making up the third layer of the quilt. Quilters choose for various reasons to have several fabrics that may make up the backing. This may be a design choice, or simply because they don’t want to purchase a large piece of fabric and may choose to stitch together leftover fabric from other projects.

Block

A block is one square of the quilt design.

The Block is the foundation of a quilt’s design. The exception to this is a quilt that is an artistic rendition of something.

The Design of the quilt may consist of multiple blocks that are combined to make up the TOP of the quilt. Blocks may be very simple (just consisting of a single square of fabric) to very complex designs what may include 60 or more pieces.

Here is an example how different 3 “foundation” blocks can be put together to make one block that can be replicated to create an interesting quilt design.

Block 1 – Rectangle block containing two different fabrics.

Rectangle block

Block 2 – Pinwheel Block is made up of 4 smaller quilt blocks called Half Square Triangles and those pieces are arranged to make the pinwheel. Note, that the fabrics chosen to match the same fabrics in the Rectangle block.

Pinwheel block


Block 3 – Mary G’s Block
is made with a one large triangle, a square surrounded by two triangles. This block is an alternate color scheme to provide some variety. A pair of these blocks is made to be placed into the larger block.

Mary G’s Block


Quilt Block
– The four blocks (rectangle, pinwheel and two Mary g’s) are then placed into the desired layout.

Quilt design — multiple blocks are made and then arranged into the desired pattern. Here is how that one single block now fits into the design of the quilt top. Note that the Rectangle and Pinwheel blocks with the cheddar and cream background are in each of the blocks, while Mary G’s blocks are made up of different fabrics in the blocks.

Batting

Batting is a layer of padding between the quilt top and the backing.

The Batting provides a cushion or layer between the top and back that gives the quilt some warmth, thickness, and weight. The choice of batting in a quilt may provide varying degrees of warmth, ease of quilting, or the ability for the quilting to stand out. There are many different types of batting available in the marketplace. The choice of batting usually depends on the intended use of the quilt.

Batting:  Top is Wool batting, bottom two are cotton batting.

Stay tuned for Part Two of this 2-part Quilting Basics article. Part Two covers Quilting, Borders, and Sashing and will be published March 26, 2021.


~Diana Quinn, ASG Atlanta Chapter

Did you enjoy this article?
Are you an ASG member?
This field is for validation purposes and should be left unchanged.

Tagged With: backing, batting, quilt, quilt block, quilt design, quilt terms, quilting

February 26, 2021

Corner Cues: Mitered Binding Corners

If binding a quilt is one of your least favorite tasks, and that simple directive in the instructions that says “Miter the corners as you bind the edges” leaves you bewildered, read on.

A mitered binding corner is simply a clever way to make a neat flat corner. It creates a fold at 45° to the edge. Mitered corners are less bulky than lapped corners and give a professional look to your binding.

Step by Step

To miter a corner, begin sewing the double-fold binding to one edge of the quilt, matching the cut edges of the binding to the trimmed edge of the layered quilt right side.

As you approach the corner of the quilt, stop stitching ¼” from the perpendicular edge (1).

Step 1

Move the fabric just clear of the presser foot, and fold the binding back at a 45° angle to the edge you just sewed (2). At this point the unsewn binding length will be extending at right angles to the edge you just sewed.

Step 2

Fold the binding again, this time matching the cut edges to the perpendicular quilt edge (the 45° fold is between the binding and the quilt) (3). There will be a fold at the corner that matches the quilt edge you just sewed the binding to.

Step 3

Begin sewing again on the ¼” seam line and sew the next edge—you’ll be sewing over the fold you just made (4). When you get to the second corner, repeat the process and repeat for the remaining corners.

Step 4

When the binding is attached on all edges, fold the binding at a 45° angle at each corner underside. Set the bulk of the fold in the opposite direction of that on the quilt front. Hand-stitch the folded binding edge in place around the quilt. The underside miter should look as good as the front side (5).

Step 5

If you’re not making a quilt, this same mitering technique works to bind any edge like a collar, cuff, jacket front or pocket, as long as the corner is a 90° square.


~Linda Griepentrog
Linda is the owner of G Wiz Creative Services and she does writing, editing and designing for companies in the sewing, crafting and quilting industries. In addition, she escorts fabric shopping tours to Hong Kong. She lives at the Oregon Coast with her husband Keith, and two dogs, Yohnuh and Abby. Contact her at .

Did you enjoy this article?
Are you an ASG member?
This field is for validation purposes and should be left unchanged.

Tagged With: learn to quilt, learn to sew, mitered binding corner, mitered corner, quilt

February 12, 2021

To Boldly Go Where No Quilt Has Gone Before

This is the story of my little lap quilt that ended up across the country, helping people.

I’m sure all sewists can relate to seeing a certain fabric that catches their eye and the excitement of seeing that it’s on clearance! JoAnn’s had Star Trek fabric for $3.00 a yard and I had to buy it. As a 12 year old, I loved Star Trek so I brought it home and there it sat, in my stash, for several years. Then COVID-19 happened and everything shut down, so I used my new-found free time to sew and vowed to use some of my stash. Like many, I made masks, but I also needed to do something creative and fun. I came across the Star Trek fabric and went to work. In a few days I had a nice lap quilt in red and black, quilted with embroidered stars, but it really didn’t fit my decor. I decided to ask my son, Andrew, if any of his friends would like a science fiction quilt. He thought about it and came up with a plan. He wanted to put it up for auction on Twitter for charity.

I really didn’t think anyone would pay much for it, but anything for charity is good. Since the pandemic had caused food insecurity for so many, we chose Philabundance. After five days on Twitter, the winning bid was $125.00 from a young man in California named Josh. I was so happy that the quilt would feed people and make Josh happy.

Then something exciting occurred — Josh and Andrew were contacted by William Shatner. Yes, “the” William Shatner… the REAL CAPTAIN KIRK! Mr. Shatner told Josh he was lucky to get the quilt and wished that he had seen it sooner so that he could have bid on it and put it in his children’s charity auction. Josh was so sweet, he donated the quilt for the auction! I boxed the quilt up and sent it to Mr. Shatner’s company in April of 2020 and included a note about the quilt. And since Josh was so nice, I made him a new Star Trek quilt to replace the donated one.

The pandemic continued and I kept busy, not thinking much about the quilt. In early November, Andrew received the following tweet from Mr. Shatner:

@yoda have you seen the current bid price? Your mother should go into business!

I couldn’t believe it! Now don’t think that I am vain enough to believe that my sewing skills are worth that much. It may have something to do with the fact that the quilt was signed by William Shatner – Captain Kirk himself – on the label.

I was so excited and shared this story with my friend, Dianna Kelly, and she mentioned it at our Sew What group Zoom meeting. I hadn’t followed up on the bidding because I just didn’t think it would go any higher … but then Beverly Betz found this:

Final bid $ 905.00! I am beyond thrilled that my sewing hobby has helped children and provided food for those who are struggling. The takeaway here is a reminder that what we do as sewists is now being looked at in a different light since the pandemic started. Whether it’s quilts, masks, or caps for friends, family or strangers, what we create is making a difference in the world. So to paraphrase Mr. Spock from Star Trek  — live long and prosper — and keep sewing.


~Lynda Harrison, ASG Member

Did you enjoy this article?
Are you an ASG member?
This field is for validation purposes and should be left unchanged.

Tagged With: Captain Kirk, charitable sewing, quilt, sewing, Star Trek, William Shatner

December 11, 2020

What I’m Embroidering: Tile Embroidery

Gorgeous! Amazing! Exquisite! So detailed!
But how LONG did it take?

Diana Latino of the Princeton Chapter is getting used to comments like these that come every time she shares one of her completed tile embroideries. And she has a number of them done already.

What’s Tile Embroidery?

Tile embroidery is a complex design done on an embroidery machine in which up to 32 separate, usually very dense designs are stitched independently  and then sewn together to create a complete picture for a wall size quilt.

Diane’s holiday design, Starry Night Santa from OESD is the perfect example of this intricate style. With the light just right, you can see where the separate tiles have been sewn together to create the image of Santa standing on a snowy landscape looking up at the Christmas star. Each tile is created by the embroidery stitches with a myriad of threads to create the subtle shadings. The entire design was more than a million stitches with about 32 thread changes per tile. And as for how long did it take, Diana claims to have completed the embroidery in just a week. Then she added, “But that was stitching 8 hours or more a day, every day,” and credits husband Mike with doing all the cooking which allowed her to focus on the stitching. With 32 tiles and each tile taking up to 3 hours to embroider, that was an intense 96 hour work week! But the results are spectacular.

Getting Started

Diana began embroidering in 2005, and discovered the tiles in 2010 when she got tired of just sewing for her kids and wanted something more challenging. She says she gets such a feeling of accomplishment when she puts the finishing touches on one of these designs, and even though many are holiday themed, she leaves them hanging all year. Her Santa’s Workshop, also from OESD, is another Christmas themed design. This one appears to be in black and white, but achieves its detail and subtle shadings through the use of 18 different shades of gray thread. Keeping the thread names, numbers, and spools coordinated is one of her biggest challenges. In fact, she once relied on the color name that came up on her machine and ended up with a blue ear on Santa!  Now she lines up all her threads and labels them BEFORE she begins her first tile.

Adding Machine Appliqué

Some of the designs like Poppy also incorporate machine appliqué with the stitching. The use of fabrics cuts down the embroidery time and gives a more traditional quilting look to the finished project. Her Halloween from Molly Mine designs is another example of the use of appliqué. And another Halloween design this time from Anita Good is Haunted House.

Not all of her efforts go into holiday designs. Diana shared some pictures of floral designs from Anita Good, Connecting Flowers and County Church as well as the landscape, Beach.

Tips

If you have been inspired to try a tile embroidery, Diana has a few suggestions.

  • Organization is essential for any project, but especially when working with tiles.
  • Be sure to have the right threads and label them so you can easily select the correct color.
  • To save fabric, instead of cutting out and hooping separate blocks, cut fabric into longstrips the required width for the hoop.  This allows you to hoop the next design without the large areas of wasted fabric outside the hoop.
  • To make stitching the tiles together easier, on each completed tile, label the back with the number of the tile to make sewing the project more organized.
  • To line up the tiles more accurately, a bright colored thread in the bobbin for the outline stitch makes the alignment more visible.
  • Trim the blocks to a ½” seam allowance instead of the ¼” recommended.  The ½” is more manageable.

Diana regularly shares her embroidery projects with the online embroidery group of the Princeton Chapter where she has inspired and motivated members to experience the fun of machine embroidery.


~Diana Latino, Princeton Chapter

Did you enjoy this article?
Are you an ASG member?
This field is for validation purposes and should be left unchanged.

Tagged With: embroidery, quilt, wall quilt

  • 1
  • 2
  • Next Page »

Become a Member

Join the only national organization dedicated to Advancing Sewing as an Art and Life Skill.

Join Now button

Blog Article Categories

  • ASG Conference
  • Chapter Stories
  • Embroidery
  • Fitting
  • Learn to Sew
  • National Sewing Month
  • Products, Books, & Patterns
  • Projects
  • Quilting
  • Sewing
  • Sewing Techniques
  • Sewing Tips
  • Sewing Tours
  • Videos
  • Disclaimer
  • Privacy Policy

American Sewing Guild
National Headquarters
9660 Hillcroft, Suite 230
Houston TX 77096
713-729-3000 | 713-721-9230 Fax
www.ASG.org

ASG wordcloud - education, conference, discounts, videos, special offers, tours and more

Copyright © 1998–2025 · American Sewing Guild · All Rights Reserved