American Sewing Guild (ASG)

Visit our blog Visit the ASG Facebook page Visit ASG on Pinterest Visit ASG's YouTube channel Visit ASG on Instagram
  • Home
  • Join ASG
    • Join Online
    • Chapter Locations
    • Member Benefits
    • Member Brochure
    • Join by Mail
  • Education & Classes
  • Resources
    • Contests & Awards
    • Giving Back
    • Hall of Fame
    • Links
    • Travel and Tours
    • Measurement Chart
  • Shop
    • ASG Store
    • Chapter Products
    • Video Resources
  • Blog
  • About
    • About Us
    • Donate to ASG
    • ASG Sensitivity Statement
    • FAQ’s
    • Start a Chapter
  • Contact
  • Member Login
    • Login First!
    • Members Only
    • Leadership Only
    • Website FAQ’s
    • Logout
  •  

January 3, 2020

Tailoring Tricks, Part 1

So, you want to tailor a coat or jacket, but you’re not sure what that involves, but willing to take the leap.

There are basically two types of tailoring: traditional work with tedious hand stitching or fusible tailoring where you let technology do the “stitching” for you. While the former is worthy of the effort, most first-time tailoring adventures are successfully done with fusible techniques.

Choose Wisely!

  • Measuring the shoulder length on a jacket
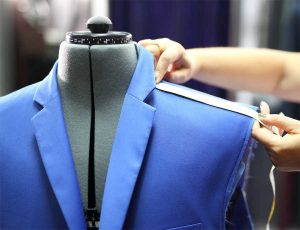
Wool or a wool blend is the best choice for a tailored garment, as it’s easily shaped with steam and good pressing techniques. Preshrink your wool selection prior to sewing—easily done by asking your dry cleaner to steam press it for you, though some wools are washable, so check the label first.
  • Select quality interfacings. A woven hair canvas type is ideal for jacket or coat lapels and collars, and to stabilize some hem edges. Different weights are available to match up with the fabric weight, and it’s available in fusible for a quick application. It’s also available in sew-in if you prefer to hand stitch. Preshrink the interfacing by soaking in warm water for 30 minutes and lying flat to dry.
  • Lining helps tailored garments hold their shape during repeated wearings, and it covers up the inside construction detailing. A satin-finish lining makes it easy to get the garment on and off over sweaters or other garments.
  • Look for great fasteners for your tailored garment—beautiful buttons, fun snaps or hooks are ideal choices. Make your selection before starting the garment as it affects the closure construction, like the size of buttonholes or reinforcement needed for novelty closures.
  • In addition to conventional thread for construction of your project, you may want to select a heavier weight for topstitching, either in a matching color or contrast, depending on the desired look.

Pattern Picks

  • All major and many independent companies offer patterns for tailored garments. Coat and jacket patterns are made to fit over other garments, so purchase your usual size. Because wool or other tailoring fabrics can be costly, it’s best to test-fit the garment pattern before cutting your fashion fabric. Tissue-fit or make a muslin and note any fitting changes needed on the final pattern.
  • Follow the pattern guidesheet for cutting, but if the layout allows, cut 1” seam allowances on side and under the arm seams, just to allow for adjustment if needed to accommodate thicker fabric. Be sure to use the “with nap” layout to avoid obvious shading on the finished garment. If the fabric is very thick, cut out single-layer pieces, remembering to flip the pattern for a right and left side.
  • Transfer all markings to the cut pieces using chalk, removable marker or thread tailor tacks. If you can’t tell the right from the wrong side, mark them for consistency.
  • If your wool is lightweight, staystitch any bias and curved edges to avoid them stretching during handling. This line of regular-length stitching is done just barely inside the seam line so it doesn’t show in the finished garment.

Marking fabric

Pressing Matters

  • You’ll be doing a lot of pressing as you construct a tailored garment, as that’s part of the shaping process. Use steam to help shape the wool—either the steam setting on your iron, or a dry iron with a damp press cloth. Do not press wool with a dry iron alone. Test-press some scraps to see which works best for your fabric, as some wools can develop an unsightly shine if pressed directly with the iron.
  • Because of the bulk, it’s best to press seams open, unless the garment style dictates pressing to one side and topstitching to make a sporty mock flat-felled seam.

~Linda Griepentrog
Linda is the owner of G Wiz Creative Services and she does writing, editing and designing for companies in the sewing, crafting and quilting industries. In addition, she escorts fabric shopping tours to Hong Kong. She lives at the Oregon Coast with her husband Keith, and two dogs, Yohnuh and Abby. Contact her at .

Tagged With: sewing, tailoring, wool

November 22, 2019

Serger Rolled Hem

Perhaps you use your serger only for making neatly finished seams—but there’s so many other things you can do with it. One of my favorites is a rolled hem.

Whether you’re creating beautiful edges on napkins or silk scarves, or delicate hems on lingerie, the rolled hem is perfect to hide any “pokies” of thread along the edge. It’s also ideal for quickly finishing ruffle edges.

On a Roll

Image courtesy of Bernina
Used with permission

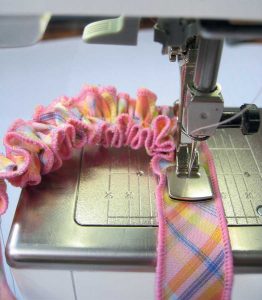
Before you begin the rolled hemming process, read your instruction manual for setting adjustments. Some brands of sergers utilize a different needle plate, others a separate foot or attachment, but common to all is altering settings so that the fabric edge rolls under. This is usually accomplished by making adjustments to the tension settings and stitch width, and using only one needle.

Narrow rolled hems can be stitched with regular serger thread or a novelty thread, like Woolly Nylon or a texturized polyester that fills in the stitched area. These threads will produce more of a satin stitch look to the edge, covering the entire fabric edge. Using rayon thread in the upper looper will produce an edge with a sheen, while texturized polyester thread creates a matte finished edge.

If your serger has a standard setting for a rolled hem, follow the instructions for its use. If you need to manually adjust, begin by using a narrow stitch finger for a perfect roll. Tighten the lower looper tension so that the fabric edge rolls under and is encased by the upper looper thread. You may need to adjust the needle tension to perfect the stitch. Shorten the stitch length to produce the look you want. It’s all a matter of testing on the fabric you want to hem, as each fabric reacts differently. Softer fabrics roll easier than stiffer fabrics which may not roll at all.

Rolled edge on knit fabric
Rolled edges are ideal for knit fabric finishing.

Change it Up

For variation, try using a variegated thread, but note that you might produce a striped edge depending on the thread brand, as some threads are dyed in regular intervals, while others are dyed randomly.

In addition to creating a lovely edge finish, a narrow rolled hem can also be used to stitch a seam in delicate fabrics like lingerie tricot or sheers. Only the width of the stitch shows, creating an almost invisible seamline. To use as a seam, leave the stitch length slightly longer than for edge finishes to keep the seam soft and subtle.


~Linda Griepentrog
Linda is the owner of G Wiz Creative Services and she does writing, editing and designing for companies in the sewing, crafting and quilting industries. In addition, she escorts fabric shopping tours to Hong Kong. She lives at the Oregon Coast with her husband Keith, and two dogs, Yohnuh and Abby. Contact her at .

Tagged With: finishing edges, rolled hem, serger, sewing technique

November 20, 2019

Learn to Sew: Knowing the Nap

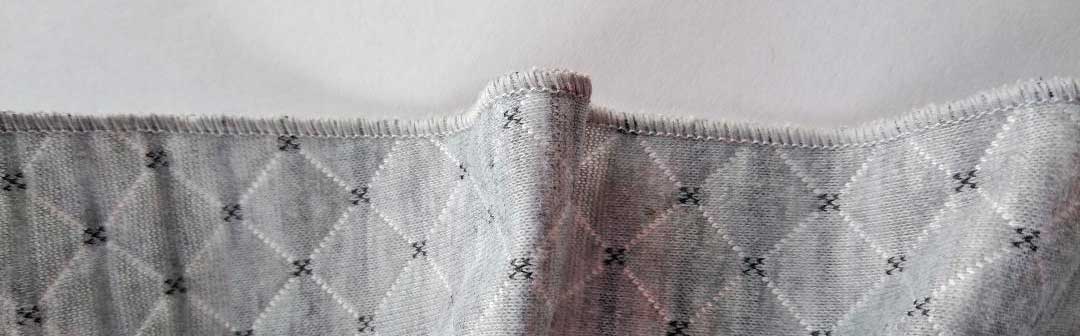
Napped fabrics are normally cut so that the nap runs down the garment, from the top down toward the lower hem. This feels softer, and the fabric tends to pill less and wear better. However, when the nap runs up, the color is richer.

Short-nap fabrics, such as corduroy and velour, can be cut with the nap running up to achieve a richer, deeper color and a more interesting texture.

Outerwear fabrics with heavy and longer surface fibers, such as fleece and camel’s hair, should be cut with the nap running down, so the pile is smooth and the garment repels moisture better.


~ Thank you to www.sewing.org for this tip (reprinted with permission)

Tagged With: fabric, fabric nap

November 13, 2019

How to make your own bias tape

Bias tape is most often used to finish the edges of garments, especially along curved edges like armholes and necklines. But it can also be used as a decorative element on garments (think pockets and hems for example) or on other projects, like handbags, quilts, table runners and Christmas stockings. You can purchase packaged bias tape, but it’s very easy to make your own with a Bias Tape Maker tool. This short video will show you how easy is it to DIY your own bias tape.

https://www.asg.org/wp-content/uploads/2019/11/Bias_Tape_Tool_Tutorial_HQ.mp4

~© ASG: Thank you to Sheryl Belson, ASG Plano Chapter

Tagged With: bias tape

November 8, 2019

Button and Buttonhole Positioning

Button & Buttonhole Placement on the ASG blogButton and buttonhole placements can sometimes be confusing. If the button and buttonhole are placed incorrectly, the garment may be too tight, too loose, or create gaping. The number of buttons on the garment is suggested on your pattern envelope, but it’s up to your personal preference or need. A good guide to start placing your buttons vertically is to keep in mind your body’s pressure points. Pressure points are where your body may put strain on the garment and may be your bust, belly, or even the hip if you are making a button front dress or skirt.

Button Placement

Once you have identified your pressure point(s), mark these on your muslin or sloper (block) pattern for future reference.

  • Decide how many buttons to use.
  • Lay your pattern or muslin flat, mark the center front and your pressure points.
  • Place your highest and lowest buttons on the muslin.
  • Measure the distance between your top and bottom buttons.
  • Divide this distance between the number of buttons you will use. If you use 5 buttons, divide by 4. You will always divide by one less button, because that is the number of actual spaces between your buttons.
  • Determine if the button placement falls on your pressure point(s). If not, you may want to adjust the position slightly to hit that sweet spot.

Buttonhole Position

Now that you have the button position, you need to determine if you want vertical or horizontal buttonholes. Horizontal buttonholes will need a facing deep enough to fit the entire length of the buttonhole. I have seen some patterns where the facing is too narrow for horizontal buttonholes. Vertical buttonholes allow for button play. This means if the button is not set exactly in the measured spot, there is room for the button to move up and down within the hole.

The distance between center front and the finished edge of your garment is generally 5/8”. This is okay if your button is 7/8” or smaller. If the button is larger, you will need to extend the distance from CF to the finished edge of your garment.

Buttonhole Size

To figure out what size buttonhole to use, some machines have a button hole foot that the button sits on the back carriage and the machine will make a buttonhole to that size. Or you have a machine that is computerized and you can adjust for your button size. The general rule of thumb is, the buttonhole needs to be 1/8” bigger than the button, for ease of going through the hole.

  • 1/2” button uses a 5/8” buttonhole
  • 5/8” button uses a 3/4” buttonhole
  • 3/4” button uses a 7/8” buttonhole

Good Buttonhole Practices

When making a vertical buttonhole, the button and buttonhole will be placed exactly at center front. In the case of horizontal buttonholes, the button is set at center front, but the hole is started 1/8” away from center, toward the finished edge. If your garment needs a button at the top edge, I start at 5/8” down for the button placement, but you can decide how far down, depending on the width of your button. But never start a buttonhole higher than ¼” below the neck edge.

  • Always make a test buttonhole with the same thickness as your garment, Top fabric, bottom fabric and interfacing. Make sure your button will pass through the hole easily.
  • Buttons are set on the left front and buttonholes on the right front for women’s garments

Something that I do for jackets, especially for horizontal buttonholes, is to set all the buttonholes along the edge of your fabric BEFORE cutting out the front body. This allows for checking the placement without chancing ruining the garment and works best for bound button holes because the inside opening is usually hand finished.


~© Annalisa T, Alameda County Chapter

Tagged With: buttonholes, buttons, sewing

  • « Previous Page
  • 1
  • …
  • 9
  • 10
  • 11
  • 12
  • 13
  • …
  • 15
  • Next Page »

Become a Member

Join the only national organization dedicated to Advancing Sewing as an Art and Life Skill.

Join Now button

Blog Article Categories

  • ASG Conference
  • Chapter Stories
  • Embroidery
  • Fitting
  • Learn to Sew
  • National Sewing Month
  • Products, Books, & Patterns
  • Projects
  • Quilting
  • Sewing
  • Sewing Techniques
  • Sewing Tips
  • Sewing Tours
  • Videos
  • Disclaimer
  • Privacy Policy

American Sewing Guild
National Headquarters
9660 Hillcroft, Suite 230
Houston TX 77096
713-729-3000 | 713-721-9230 Fax
www.ASG.org

ASG wordcloud - education, conference, discounts, videos, special offers, tours and more

Copyright © 1998–2025 · American Sewing Guild · All Rights Reserved