American Sewing Guild (ASG)

Visit our blog Visit the ASG Facebook page Visit ASG on Pinterest Visit ASG's YouTube channel Visit ASG on Instagram
  • Home
  • Join ASG
    • Join Online
    • Chapter Locations
    • Member Benefits
    • Member Brochure
    • Join by Mail
  • Conference & Education
  • Resources
    • Contests & Awards
    • Giving Back
    • Hall of Fame
    • Links
    • Travel and Tours
    • Measurement Chart
  • Shop
    • ASG Store
    • Chapter Products
    • Video Resources
  • Blog
  • About
    • About Us
    • Donate to ASG
    • ASG Sensitivity Statement
    • FAQ’s
    • Start a Chapter
  • Contact
  • Member Login
    • Login First!
    • Members Only
    • Leadership Only
    • Website FAQ’s
    • Logout
  •  

November 20, 2020

Sewing Basics: Fabric Terms

What is the one item that you absolutely must have for every sewing project you will ever do? It’s fabric, of course! Since the fabric you choose will have a significant impact on how your finished project turns out, it can help to have an understanding of how fabric is woven so that you can meet the expectations of your finished project. While weaving is a skill all on its own, understanding weaving principles can open our eyes to a greater depth of our understanding of fabric. Let’s start by watching this 7-minute video as we see cotton and hemp woven into fabric.

Fabric Terms

Now that we have a visual of the process, let’s look at fabric terms:

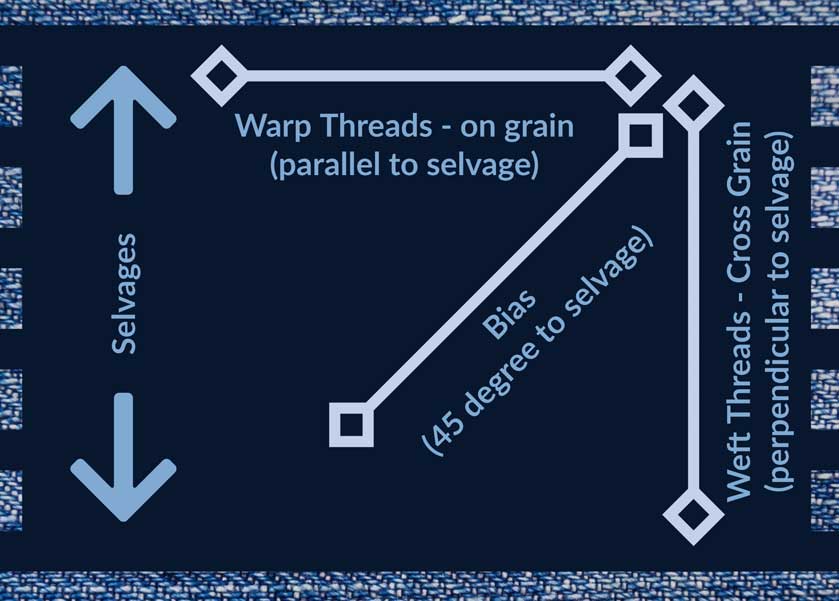
Selvage: The video provides a great visual representation of selvage and why it exists. The process of shuttling the weft threads back and forth is what creates the finished edge. Now, as you think about how that thread if shuttled from one direction then the other, wrapping the edge as you turn to the other direction, selvage makes a lot more sense. No wonder it doesn’t ravel! And since it is created by wrapping those vertical warp threads, it now makes sense why the selvage is so vital to determining the grainline, as well as the most stable part of the fabric. The selvage can be included when cutting a waistband to help reduce the stretch factor that is sometimes experienced while wearing a garment. Using the finished edge of the selvage in a waistband can add strength and may eliminate the need to turn another layer of fabric inside, thus reducing a layer of bulk.

Warp: As shown in the video, warp threads are the first to be set up and run the length of the fabric. Warp threads provide the structure for the weft threads to weave through and give the fabric stability. Warp thread and grainline go together — the grainline equals the direction of the warp thread. Doesn’t it make more sense now that the grainline is the most stable direction of the fabric?

Weft: Remember the threads being shuttled from the left to the right in the video? Those vertical threads are the weft, which also defines the cross grain of the fabric. The cross grain is the second most stable direction of your fabric but since they are not held tightly in place like the warp thread, they have a bit more “give” to them. However, since they are in a straight line, they have more stability than the bias, which we will talk about next.

Bias: Think of bias as a tic-tac-toe grid and draw a line from one corner to the opposite diagonal corner. That 45-degree angle is the bias. This has the most give and the least stability of any direction in your fabric. With an understanding now of how threads are woven, you can probably visualize the tiny gap between the threads. When you pull those threads at a diagonal, there is no straight thread to pull against, thus you are pulling across that tiny open gap between the threads. Sometimes we use the property of bias to the advantage of a project. For example, a garment made with bias-cut pieces will have a greater amount of drape and will skim the body much more than the same garment made of the same fabric that was cut on the grain.

Grain: By now, just by talking about warp and weft, we have already addressed grainline. But to see a little bit more focus on the grainline, watch this 6-minute video we published in January of 2020. It addresses some of the things already discussed here with a little more information about how to identify and use the grainline when cutting out your projects.

Hand: The final term in this discussion is hand. The “hand” of a fabric refers to the “feel” of the fabric against your skin. There are many adjectives that can be used to describe the hand, or feel, of a fabric. Words like cool, slick, smooth, loose, stiff, heavy and stretchy can all be used to tell someone about the hand of a fabric.

  • Hand and drape are terms that are very closely related. The drape of a fabric is the way it flows over things. Stiff fabrics have less drape while fluid fabrics have more. You can feel the weight of a fabric easily by the thickness when you feel the fabric in your hand  — it will feel either light or heavy.
  • Think back to what you saw in the weaving video about the threads used in weaving the fabric. The characteristics of those threads play a vital role in the hand and drape of the fabric. The thicker and more stable the threads, the stiffer, and more stable the fabric. Delicate silk threads will weave together to create a much different hand and drape than heftier linen or cotton threads.
  • Special treatments of the fabric after it is woven can also impact the hand or drape of the fabric. For example, the dying process can create a stiffer, less drapey hand based of the amount of mordant. A mordant or dye fixative is a substance used to set (i.e. bind) dyes on fabrics. Some mordants can create a stiffer hand and less drape in the final product.

We hope that diving into the art of weaving has given you a new perspective on fabric and has helped to explain the importance of understand the relationship between the fabric you’ve chosen for your project and your desired outcome.


~Sheryl Belson

Did you enjoy this article?
Are you an ASG member?
This field is for validation purposes and should be left unchanged.

Tagged With: fabric, selvadge, sewing basics, video, weave, weaving

June 5, 2020

Tackling Tulle

Tulle tu-tu on a little girlWhether you’re making a flirty tutu, a long flowing wedding veil or decorating for a bridal shower, it’s likely some tulle will be involved in the process.
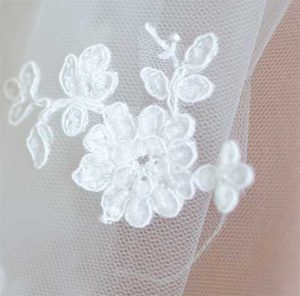
Like its netting cousin, tulle is an openwork fabric sporting allover holes for a transparent look. Netting has larger holes than tulle and it’s usually stiffer. Both are usually made from nylon, though some other fibers are often found in specialty stores. Both netting and tulle are available in wide widths—from 54” to 108”, so it’s economical to use both for garments and home décor.

When tulle is used in garments, it’s often used either over another fabric, or it’s used in multiple layers for deeper color and modesty. A single layer of tulle is almost invisible.

Tulle has no grain so pieces can be cut any direction. It also doesn’t ravel, so edges do not require finishing, unless for decorative purposes. Trims, such as lace, are often applied over the raw edges of tulle for interest and additional weight. When used on veils or as ruffles, tulle often has serged rolled hems and fishing line can be added for undulating edges.

Tulle edges can be scratchy, especially around a multi-layered gathered waistline, and kids are the first to express their discomfort with aplomb. Waistlines of tulle skirts are easily bound with ribbon or fabric to prevent the itchy distress.

Pressing

Because of its fiber content, tulle requires extra care during pressing to remove any bolt wrinkles. It’s a good idea not to press directly on the tulle, but instead use a lightweight pressing cloth and a low-temperature iron. Before committing to a pressing method, test on some scraps.

Cutting

To cut tulle, it’s best to use a rotary cutter, ruler and mat for a perfectly straight and even edge. Cutting with scissors can leave uneven or jagged edges. Hold the fabric in place with weights or a ruler while cutting. If you’re cutting more intricate shapes (other than the most-often used rectangles), pin tissue under the fabric, then cut through both at once to maintain the shape needed.

Sewing

Seaming tulle can be challenging, as the layers may try to shift at your machine. Large, flat-head pins can help, as can spring clips to hold the edges in place. If those don’t work, then add a layer or tissue paper or water-soluble stabilizer under the area to be seamed.

Speaking of seaming, with tulle being translucent, all seams are obvious. It’s best to opt for a narrow seam with exactly matching thread, or even clear thread. However, sewing a narrow seam is not without its challenges either—often best to sew a slightly wider seam, then trim to make it narrower.

Use a small needle for tulle sewing and a longer than normal stitch length. If the toes of the presser foot tend to catch on the fabric’s holes, put transparent tape on the bottom of the presser foot, or switch to a roller foot for unhindered feeding.

Gathering can be done my machine or by hand. If you’re gathering by hand, use a large needle and a heavier thread and make even stitches through the mesh openings. Threads can easily pull out in the gathering process so be sure to knot securely at one end. Or, if your tulle project has a layer of other fabric with it, gather both at the same time for easier handling.

If you’re trying to apply a trim to a cut edge of tulle, prevent slipping by using a fabric glue stick to secure the trim in place before sewing.

Other Tulle Uses

In addition to the usual places you find tulle, it’s also a good base to use for machine embroidered laces and trims. Pair it with a water-soluble stabilizer to hold it in place for stitching, then remove once the design is completed. Look for designs specifically digitized for lace.

Tulle is also ideal for gift wrapping—you can purchase it in spooled strips of varying widths to tie up packages and wrap chairs for festive occasions. Use it as you would ribbons and scrunch and tie as desired. Strips of tulle are also ideal for making small gift bags to hold holiday treats or favors—just seam both sides and tie the top. Tulle strips can also be used to make fluffy pompoms and flowers for party décor.


~Linda Griepentrog
Linda is the owner of G Wiz Creative Services and she does writing, editing and designing for companies in the sewing, crafting and quilting industries. In addition, she escorts fabric shopping tours to Hong Kong. She lives at the Oregon Coast with her husband Keith, and two dogs, Yohnuh and Abby. Contact her at .

Did you enjoy this article?
Are you an ASG member?
This field is for validation purposes and should be left unchanged.

Tagged With: fabric, tulle

January 17, 2020

Sewing Basics: Fabric Grainline

Fabric grain refers to the direction in which the threads run. It’s important for the lengthwise and crosswise threads to meet at right angles, or the project will twist or hang crooked. Do you understand fabric grain, why it is important and how to work with it? This video will tell you everything you need to know to begin building your understanding.

Tagged With: fabric, grainline, sewing

November 20, 2019

Learn to Sew: Knowing the Nap

Napped fabrics are normally cut so that the nap runs down the garment, from the top down toward the lower hem. This feels softer, and the fabric tends to pill less and wear better. However, when the nap runs up, the color is richer.

Short-nap fabrics, such as corduroy and velour, can be cut with the nap running up to achieve a richer, deeper color and a more interesting texture.

Outerwear fabrics with heavy and longer surface fibers, such as fleece and camel’s hair, should be cut with the nap running down, so the pile is smooth and the garment repels moisture better.


~ Thank you to www.sewing.org for this tip (reprinted with permission)

Tagged With: fabric, fabric nap

November 1, 2019

Guide for Seam Finishes

You have all of your supplies ready, you’ve adjusted your pattern, cut your fabric and you’re ready to start sewing. Before you sit down at the machine, have you thought about the best seam finish to use for your fabric? This post will help you to choose the best method to assure your seams are perfect.

Fabrics & Best Seam Finishes

  • Learn what searm finishes to use on different fabricsBatik: Flat fell seam or sew with a plain seam and serge together
  • Batting: Butt the raw edges together and hand overcast with basting thread to get the width you need.
  • Beaded Fabric: Finish with a product like Great Seams as in Hong Kong finish. Eliminate facings. Finish the neck and armholes with bias silk charmeuse or line your garment, making the attachment at the neck and shoulders.
  • Boiled Wool: Sew seams and clip curves. Press seams open and top-stitch on each side from the right side using a wide double needle or top-stitch each side separately from 1/8” to 1/4” allowance from the seam. Trim to your top-stitching.
  • Brocade: Press seams open and overlock separately, even if lined. Use a Hong Kong finish with lightweight silk or bind separately with double fold bias.
  • Burnout: Finish with a narrow French seam.
  • Charmeuse: Use flat fell or French seam on serger.
  • Chiffon: Use a narrow French seam. On long vertical seams, sew with tiny zig-zag stitches to prevent drawing up.
  • Corduroy: Serge seams separately or flat fell the seams.
  • Crinkle: Sew with a tiny zig-zag.
  • Damask: Sew flat fell seams.
  • Denim: Sew a straight seam. Serge one seam allowance and trim the other without turning under. Overlap the serger seam allowance onto trimmed seam allowance and topstitch. This forms a fake flat fell seam that is less bulky.
  • Dupioni: Serged or traditional flat fell; serge and press open.
  • Faux Fur: None
  • Faux Leather: Use a fake flat fell seam or finger press open and top stitch from the right side, straddling the seam. Trim close to stitching.
  • Faux Suede: Lightweight ultra suede seams can be simply pressed open. Other faux suede’s can be top-stitched with a double needle or treated with a fake flat fell seam.
  • Flannel: Straight stitch or flat fell seam
  • Fleece: Sew with a straight seam and finger press open. Top-stitch or serge.


  • Gabardine: Press seam open and serge each side separately with a woolly nylon in lower looper; flat fell; or Hong Kong bound.
  • Georgeette: French seam.
  • Jersey: For lightweight knits, sew the seam, press to one side and top-stitch 1/4’ from seam. Trim extra fabric away. For invisible seams on wool jersey, zig-zag and press open.
  • Mudcloth: Flat fell or bind with double bias.
  • Rayon: Flat Fell or press open and serge.
  • Slinky: Four thread serge with Woolly Nylon in lower looper. Use differential feed if needed.
  • Sweater Knits: Stabilize horizontal seams and neckline using 1/4” clean elastic. Sew seams with small zig-zag then four thread serge. You can also sew with a lightening stitch and bind with Great Seams.
  • Tencel: Flat fell or press open and serge separately.
  • Velvet: Press open, pink or or serge separately.

© Sunny Kent, ASG Inland Empire Chapter

Tagged With: fabric, seams, sewing

  • « Previous Page
  • 1
  • 2
  • 3
  • 4
  • 5
  • Next Page »

Become a Member

Join the only national organization dedicated to Advancing Sewing as an Art and Life Skill.

Join Now button

Blog Article Categories

  • ASG Conference
  • Chapter Stories
  • Embroidery
  • Fitting
  • Learn to Sew
  • National Sewing Month
  • Products, Books, & Patterns
  • Projects
  • Quilting
  • Sewing
  • Sewing Techniques
  • Sewing Tips
  • Sewing Tours
  • Videos
  • Disclaimer
  • Privacy Policy

American Sewing Guild
National Headquarters
9660 Hillcroft, Suite 230
Houston TX 77096
713-729-3000 | 713-721-9230 Fax
www.ASG.org

ASG wordcloud - education, conference, discounts, videos, special offers, tours and more

Copyright © 1998–2025 · American Sewing Guild · All Rights Reserved