American Sewing Guild (ASG)

Visit our blog Visit the ASG Facebook page Visit ASG on Pinterest Visit ASG's YouTube channel Visit ASG on Instagram
  • Home
  • Join ASG
    • Join Online
    • Chapter Locations
    • Member Benefits
    • Member Brochure
    • Join by Mail
  • Education & Classes
  • Resources
    • Contests & Awards
    • Giving Back
    • Hall of Fame
    • Travel and Tours
    • Measurement Chart
  • Shop
    • ASG Store
    • Chapter Products
    • Video Resources
  • Blog
  • About
    • About Us
    • Donate to ASG
    • ASG Sensitivity Statement
    • FAQ’s
    • Start a Chapter
  • Contact
  • Member Login
    • Login First!
    • Members Only
    • Leadership Only
    • Website FAQ’s
    • Logout
  •  

November 27, 2020

Fast and Easy Fringed Edge Finishes

If you’re looking for a fast and easy edge finish, there’s nothing easier than fringe! It works on single-layer placemats, scarves, patches and pockets, or with a little more effort, you can insert fringe into a seam or hem.

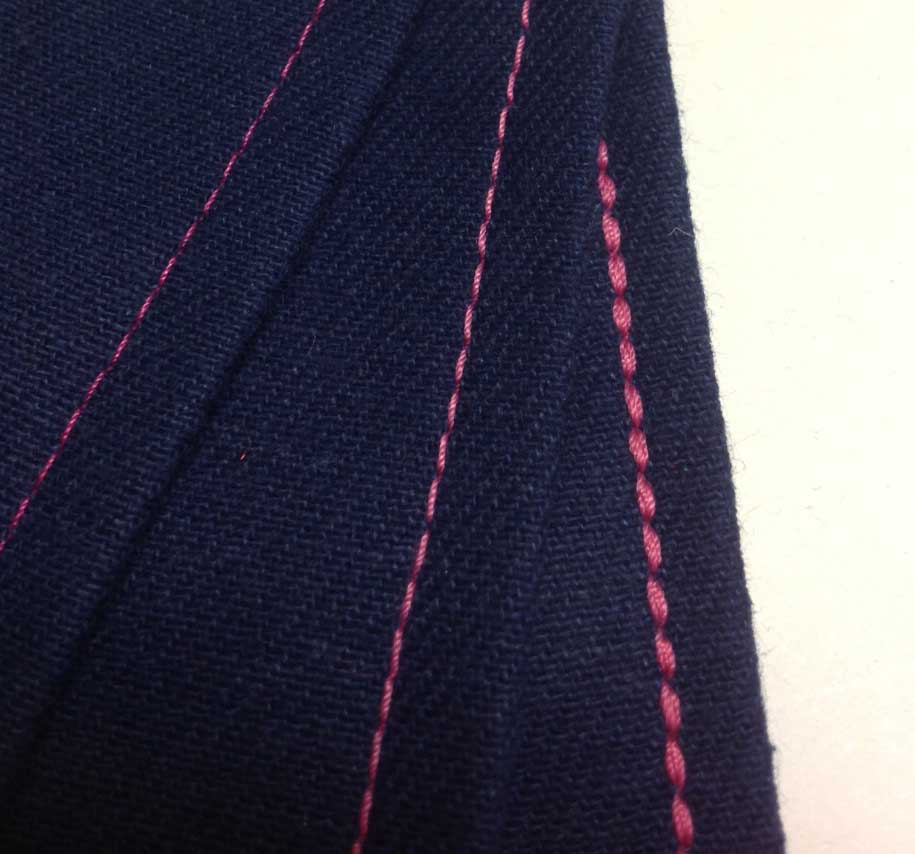
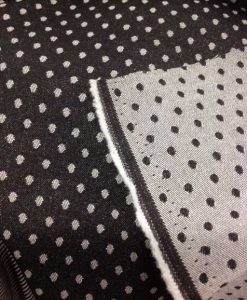
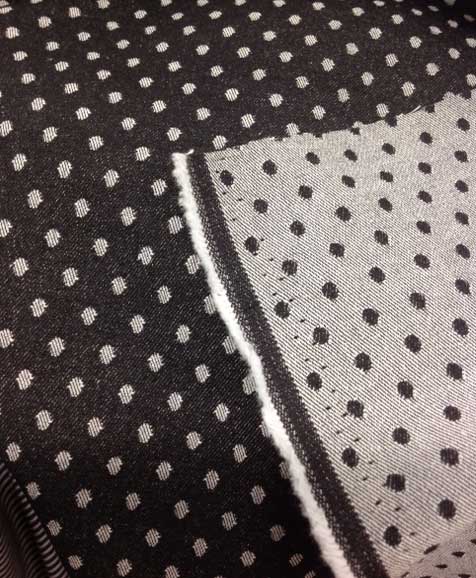
The results of fringing are not always what you expect, as some fabrics are woven with different color threads going lengthwise and crosswise, so you get totally different colors in one direction from the other. Denim is a good example, as white threads are usually used one way and indigo the other.

The Basics

Select a woven fabric (knits cannot be fringed using this technique). Fabrics like linen, burlap, gauze, wools and bouclés are ideal candidates. The looser the weave, the easier the fringing process.

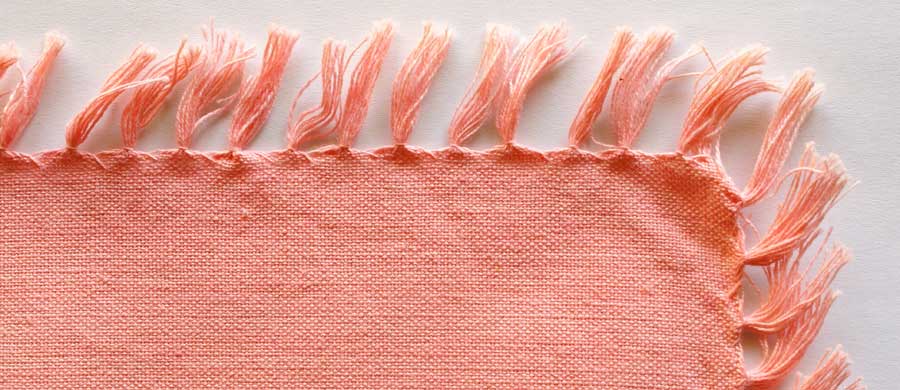
  • To create a simple fringe, be sure your project edge is cut parallel to the fabric grain. Sew a line of stitching where you want the fringe to stop, then start pulling threads up to the stitching line. The stitching thread can match the fabric or contrast with it.
  • For easier removal, use a needle or a large pin to help separate the fabric threads and gently pull them across the fringed area. Note that if your project has a right-angle corner (like a scarf), there will be a gap in the thread fringe at the corners.
  • If you want to knot the fringe, either singly or with thread groups, allow extra length for that process. Test-fringe a sample to see how much length you need for either a square knot or an overhand knot.
  • For a top-fringed pocket, cut the pocket top on the straight grain and extend it the desired fringe length (no hem). For a fringed sleeve hem, determine the sleeve length, then extend the lower edge the desired fringe length, being sure to keep a straight grain edge.
  • Single-layer scarves can be fringe-finished on all edges or just the ends, like on a muffler.

Inset Fringe

  • Inserting fringe into a seam allows for more placement flexibility and allows for placing it on a curve as well.
  • To make a fringe strip, cut a straight grain strip the desired width of the fringe, plus the requisite seam allowance. Stitch and fringe as noted above. On very loosely woven fabrics, layer two strips for a denser fringe.
  • Use the fringe strip as you would a piping, basting it along one layer of the seamline with the fringe facing the bulk of the project. Then top with the second layer of the project, and sew just inside the basting line. When you turn the project right side out, the fringe will extend beyond the seamed edge.
  • For long fringe strips, simply abut the ends of multiple fabric strips as needed. If you need a bulkier fringe, layer two strips atop each other and treat as one layer.

Design Tip: inset fringe can be made from matching or contrasting fabric.

Trim Tactics

If desired, you can add a ribbon or trim along the stitched edge of fringe as an accent, whether it’s single layer or inserted into a seam.

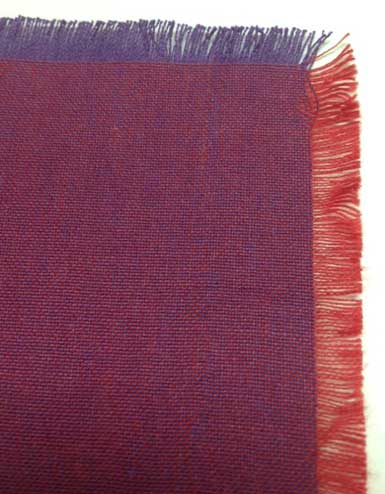
Don’t forget to check the selvage of your fabric, as some have fun fringes that can be used as is, and they already match!


~Linda Griepentrog
Linda is the owner of G Wiz Creative Services and she does writing, editing and designing for companies in the sewing, crafting and quilting industries. In addition, she escorts fabric shopping tours to Hong Kong. She lives at the Oregon Coast with her husband Keith, and two dogs, Yohnuh and Abby. Contact her at .

This field is for validation purposes and should be left unchanged.
Did you enjoy this article?
Are you an ASG member?

Tagged With: fringe, fringed edges, jacket, jeans, knotted fringe, learn to sew, placemats, scarves, sewing tip

September 11, 2020

What I’m Sewing: Denim Jeans from Cashmerette

Our thanks to ASG member, Tina Gordon, for her review of this jeans pattern!

Q. Item Created 
A. Denim Jeans

Q. Independent Pattern Designer
A.
Cashmerette

Q. Name and Number of Pattern
A.
Ames 4101

Q. Fabric Used:
A. Stretch Denim with 2% Lycra

Q. Special Embellishments/Notions Used
A. Rivets, embroidered pockets

Q. Skill level required?
A.
Intermediate

Q. Are the instructions easy to follow?
A.
The instructions were very well written with detailed illustrations.

Q. Are you pleased with the finished result?  Did it meet your expectations?
A.
I am very pleased with how my jeans turned out. Having struggled with fit issues on another pattern of similar style, my hopes were not set high. Surprisingly, the fit was almost perfect. Really, I think after another washing to two, the “excess” fabric I see will not be noticeable any longer and will have “worn in,” conforming to my specific shape. The pattern says high rise, but it’s really mid at best.

Q. Did it look like the picture?
A.
Yes and no. The line drawings are spot on with regard to styling. However, if I had made the pattern for my body type, which looks most like the picture for the apple pelvis style, the jeans would not have fit as well since this view is meant for a flat posterior and not rounded (although my full tummy and straight hips fit the scenario pictured). By choosing the pear pelvis (which is what is recommended by the designer), this view accounts for a round rear, although the model pictured is a true pear shape with a more defined waistline.

Q. Did you make any modifications in the pattern?
A.
The pattern is drafted for a woman who is 5’6″, so I shortened the leg length. Otherwise, that’s it. The pattern is already drafted for a swayback with a rounded waistband.

Q. Are there any changes you would have made?
A. The next pair I make I will adjust the rise just a bit, as I like my jeans to sit slightly higher. I will adjust the waistband as well but just minimally to account for my swayback with a round derriere.

Q. Did the pattern teach you any unique or special techniques?
A.
I love sewing fly-front zippers. It’s my thing.

Q. Would you make this again?
A.
YES!

Q. Would you recommend this pattern to others?
A.
It’s definitely drafted for the curvy figure. I highly recommend it for those curvy ladies struggling with fit in other patterns.

Pattern Link: https://www.cashmerette.com/products/ames-jeans-pdf-pattern


~Tina Gordon, Central Savannah River Chapter

Tagged With: denim, jeans, pattern

October 4, 2019

Hemming Jeans – the Denim Blues

Hemming JeansPerhaps you searched long and hard for the perfect fitting jeans, but alas, they’re too long! Or maybe you painstakingly created a custom pair and it’s time to hem them. Either way, you’re in the thick of it—literally!

The hem area of jeans can be up to eight layers thick, depending on how the side and inseams are constructed. Stitching through all of that thickness while maintaining straight, even stitches and not breaking the needle can be a challenge for any sewer, but here are some helpful hints to make the process easier.

Before you sew

Before you determine the length of your jeans, be sure to wash and dry them at least twice to allow the fabric to shrink. Nothing’s worse than meticulously hemming them and after the first wash, they’re ankle skimmers.

Try on the jeans with the shoes you plan to wear with them and pin-mark the desired finished length on both legs. Both legs aren’t always the exact same length.

Assemble the arsenal

Denim Needles

Having the proper tools to sew multiple denim thicknesses is a must. First, select a denim or jeans needle with a special tip and blade to cut through the fibers without deflecting (because of the tight weave) or breaking. Denim needles are made especially for sewing extra thick fabrics, and they’re available in sizes 70/10 to 110/18—the heavier the denim, the larger the needle size needed.

Topstitching

In addition, if you’re doing decorative topstitching to mimic the infamous Levi gold version, acquire a topstitching needle with a large eye and groove to accommodate jeans thread without shredding.

Denim ThreadDenim Thread

Choose either an all-purpose or denim blue thread for stitching if you want a matching hem, or a heavier jeans thread if you prefer contrast seaming detail. Denim thread is a twist of multiple blue colors to mimic the looks of our favorite indigo fabric.

Hemming

  • Press up the hem at the desired length and trim the hem allowance, leaving about 1”. Press under ¼” along the upper hem edge, then ¾” forming a double hem. Pin in place.
  • If you need a bit of stability on lightweight denim, slip a narrow strip of fusible web into the hem area and press before stitching to firm up the edge.
  • Straight stitch along the upper folded edge using matching or contrasting thread. For more prominent stitching, use a straight stretch stitch.
  • On very heavy denim, serge the upper hem edge instead of folding it under to finish, and that will save one layer of thickness.

Height busters

The absolute hardest part of hemming jeans is going over those leg seams, but there are tools to help. Look for a Jean-a-ma-jig, Hump Jumper or Big Jig to help even out the raised area.

Hemming Jeans - Big Jig

These tools are slipped under the presser foot on the ascent to the leg seam thickness to help keep the presser foot horizontal over the ridge and again on the other side to keep it from sliding off the raised area and making uneven stitches on the downward journey. And, they work on all machines.

For the neatest appearance, bring thread ends to the wrong side and tie them off instead of backstitching.


~ By Linda Turner Griepentrog
You might know my name from my years as editor of Sew News, from the many magazine articles I’ve written, or perhaps you’ve been on one of the ASG Sew Much Fun Hong Kong tours with me. But soon you’ll be seeing my name a bit more often as I’m writing for the American Sewing Guild blog!


Tagged With: garment sewing, jeans, sewing, sewing tips

Become a Member

Join the only national organization dedicated to Advancing Sewing as an Art and Life Skill.

Join Now button

Blog Article Categories

  • ASG Conference
  • Chapter Stories
  • Embroidery
  • Fitting
  • Learn to Sew
  • National Sewing Month
  • Products, Books, & Patterns
  • Projects
  • Quilting
  • Sewing
  • Sewing Techniques
  • Sewing Tips
  • Sewing Tours
  • Videos
  • Disclaimer
  • Privacy Policy

American Sewing Guild
National Headquarters
9660 Hillcroft, Suite 230
Houston TX 77096
713-729-3000 | 713-721-9230 Fax
www.ASG.org

ASG wordcloud - education, conference, discounts, videos, special offers, tours and more

Copyright © 1998–2025 · American Sewing Guild · All Rights Reserved