American Sewing Guild (ASG)

Visit our blog Visit the ASG Facebook page Visit ASG on Pinterest Visit ASG's YouTube channel Visit ASG on Instagram
  • Home
  • Join ASG
    • Join Online
    • Chapter Locations
    • Member Benefits
    • Member Brochure
    • Join by Mail
  • Conference & Education
  • Resources
    • Contests & Awards
    • Giving Back
    • Hall of Fame
    • Links
    • Travel and Tours
    • Measurement Chart
  • Shop
    • ASG Store
    • Chapter Products
    • Video Resources
  • Blog
  • About
    • About Us
    • Donate to ASG
    • ASG Sensitivity Statement
    • FAQ’s
    • Start a Chapter
  • Contact
  • Member Login
    • Login First!
    • Members Only
    • Leadership Only
    • Website FAQ’s
    • Logout
  •  

November 8, 2019

Button and Buttonhole Positioning

Button & Buttonhole Placement on the ASG blogButton and buttonhole placements can sometimes be confusing. If the button and buttonhole are placed incorrectly, the garment may be too tight, too loose, or create gaping. The number of buttons on the garment is suggested on your pattern envelope, but it’s up to your personal preference or need. A good guide to start placing your buttons vertically is to keep in mind your body’s pressure points. Pressure points are where your body may put strain on the garment and may be your bust, belly, or even the hip if you are making a button front dress or skirt.

Button Placement

Once you have identified your pressure point(s), mark these on your muslin or sloper (block) pattern for future reference.

  • Decide how many buttons to use.
  • Lay your pattern or muslin flat, mark the center front and your pressure points.
  • Place your highest and lowest buttons on the muslin.
  • Measure the distance between your top and bottom buttons.
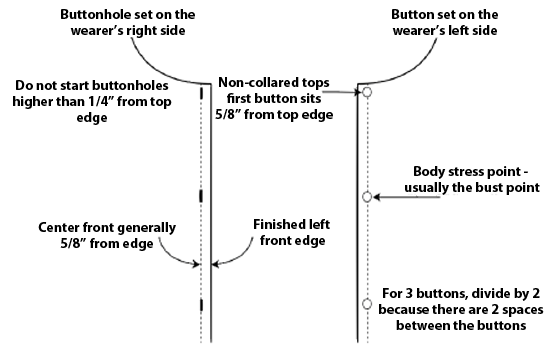
  • Divide this distance between the number of buttons you will use. If you use 5 buttons, divide by 4. You will always divide by one less button, because that is the number of actual spaces between your buttons.
  • Determine if the button placement falls on your pressure point(s). If not, you may want to adjust the position slightly to hit that sweet spot.

Buttonhole Position

Now that you have the button position, you need to determine if you want vertical or horizontal buttonholes. Horizontal buttonholes will need a facing deep enough to fit the entire length of the buttonhole. I have seen some patterns where the facing is too narrow for horizontal buttonholes. Vertical buttonholes allow for button play. This means if the button is not set exactly in the measured spot, there is room for the button to move up and down within the hole.

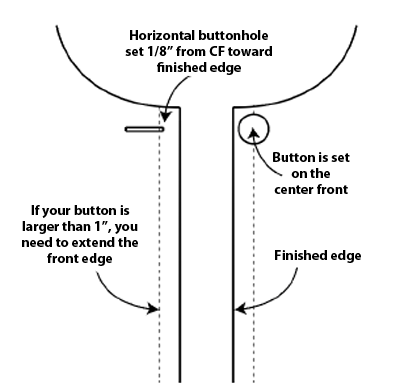
The distance between center front and the finished edge of your garment is generally 5/8”. This is okay if your button is 7/8” or smaller. If the button is larger, you will need to extend the distance from CF to the finished edge of your garment.
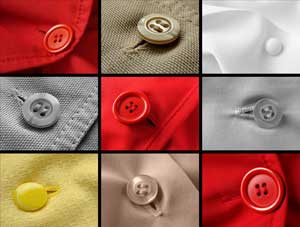
Buttonhole Size

To figure out what size buttonhole to use, some machines have a button hole foot that the button sits on the back carriage and the machine will make a buttonhole to that size. Or you have a machine that is computerized and you can adjust for your button size. The general rule of thumb is, the buttonhole needs to be 1/8” bigger than the button, for ease of going through the hole.

  • 1/2” button uses a 5/8” buttonhole
  • 5/8” button uses a 3/4” buttonhole
  • 3/4” button uses a 7/8” buttonhole

Good Buttonhole Practices

When making a vertical buttonhole, the button and buttonhole will be placed exactly at center front. In the case of horizontal buttonholes, the button is set at center front, but the hole is started 1/8” away from center, toward the finished edge. If your garment needs a button at the top edge, I start at 5/8” down for the button placement, but you can decide how far down, depending on the width of your button. But never start a buttonhole higher than ¼” below the neck edge.

  • Always make a test buttonhole with the same thickness as your garment, Top fabric, bottom fabric and interfacing. Make sure your button will pass through the hole easily.
  • Buttons are set on the left front and buttonholes on the right front for women’s garments

Something that I do for jackets, especially for horizontal buttonholes, is to set all the buttonholes along the edge of your fabric BEFORE cutting out the front body. This allows for checking the placement without chancing ruining the garment and works best for bound button holes because the inside opening is usually hand finished.


~© Annalisa T, Alameda County Chapter

Tagged With: buttonholes, buttons, sewing

November 1, 2019

Guide for Seam Finishes

You have all of your supplies ready, you’ve adjusted your pattern, cut your fabric and you’re ready to start sewing. Before you sit down at the machine, have you thought about the best seam finish to use for your fabric? This post will help you to choose the best method to assure your seams are perfect.

Fabrics & Best Seam Finishes

  • Learn what searm finishes to use on different fabrics
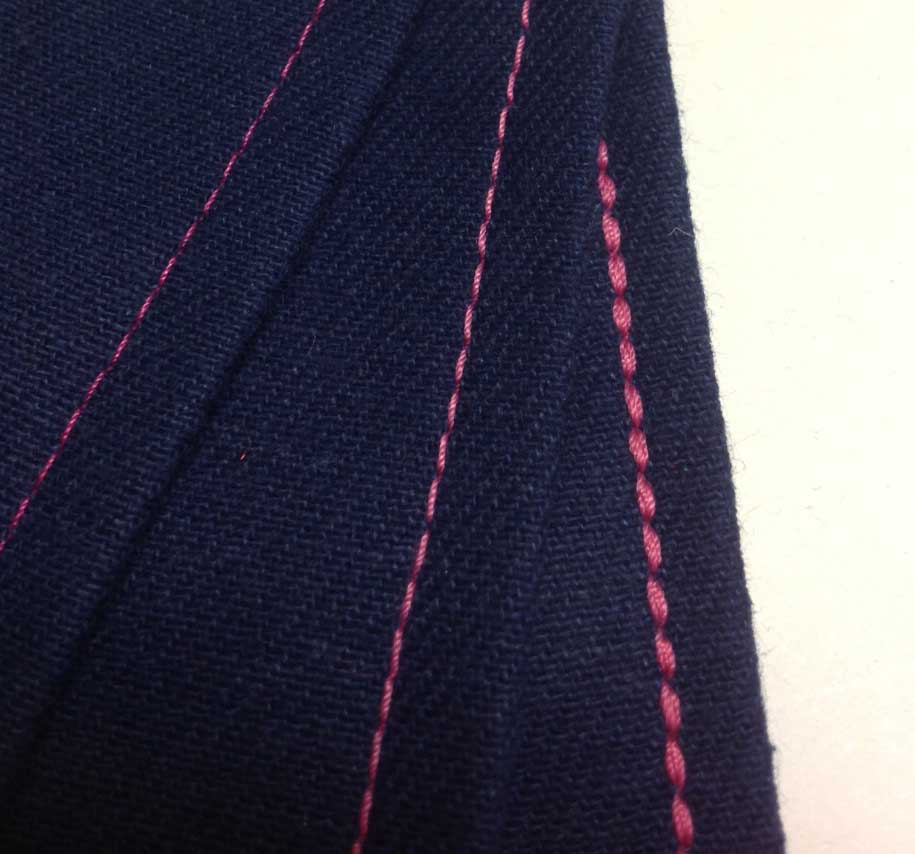
Batik: Flat fell seam or sew with a plain seam and serge together
  • Batting: Butt the raw edges together and hand overcast with basting thread to get the width you need.
  • Beaded Fabric: Finish with a product like Great Seams as in Hong Kong finish. Eliminate facings. Finish the neck and armholes with bias silk charmeuse or line your garment, making the attachment at the neck and shoulders.
  • Boiled Wool: Sew seams and clip curves. Press seams open and top-stitch on each side from the right side using a wide double needle or top-stitch each side separately from 1/8” to 1/4” allowance from the seam. Trim to your top-stitching.
  • Brocade: Press seams open and overlock separately, even if lined. Use a Hong Kong finish with lightweight silk or bind separately with double fold bias.
  • Burnout: Finish with a narrow French seam.
  • Charmeuse: Use flat fell or French seam on serger.
  • Chiffon: Use a narrow French seam. On long vertical seams, sew with tiny zig-zag stitches to prevent drawing up.
  • Corduroy: Serge seams separately or flat fell the seams.
  • Crinkle: Sew with a tiny zig-zag.
  • Damask: Sew flat fell seams.
  • Denim: Sew a straight seam. Serge one seam allowance and trim the other without turning under. Overlap the serger seam allowance onto trimmed seam allowance and topstitch. This forms a fake flat fell seam that is less bulky.
  • Dupioni: Serged or traditional flat fell; serge and press open.
  • Faux Fur: None
  • Faux Leather: Use a fake flat fell seam or finger press open and top stitch from the right side, straddling the seam. Trim close to stitching.
  • Faux Suede: Lightweight ultra suede seams can be simply pressed open. Other faux suede’s can be top-stitched with a double needle or treated with a fake flat fell seam.
  • Flannel: Straight stitch or flat fell seam
  • Fleece: Sew with a straight seam and finger press open. Top-stitch or serge.


  • Gabardine: Press seam open and serge each side separately with a woolly nylon in lower looper; flat fell; or Hong Kong bound.
  • Georgeette: French seam.
  • Jersey: For lightweight knits, sew the seam, press to one side and top-stitch 1/4’ from seam. Trim extra fabric away. For invisible seams on wool jersey, zig-zag and press open.
  • Mudcloth: Flat fell or bind with double bias.
  • Rayon: Flat Fell or press open and serge.
  • Slinky: Four thread serge with Woolly Nylon in lower looper. Use differential feed if needed.
  • Sweater Knits: Stabilize horizontal seams and neckline using 1/4” clean elastic. Sew seams with small zig-zag then four thread serge. You can also sew with a lightening stitch and bind with Great Seams.
  • Tencel: Flat fell or press open and serge separately.
  • Velvet: Press open, pink or or serge separately.

© Sunny Kent, ASG Inland Empire Chapter

Tagged With: fabric, seams, sewing

October 11, 2019

Meet Janet Pray

I Want to Teach the World to Sew!

Janet PrayThat’s the mantra of sewing icon Janet Pray, educator, designer, and owner of Islander Sewing Systems. Her passion for all things sewing is evident wherever you find her—and she can be found in the classroom, on her website, on Facebook, and on Bluprint. Her comprehensive knowledge of sewing and her dry, quick humor puts her name on the top of the list for ASG chapter events as well as for conference instructor.

Concerning her mantra, Janet says, “It always seems so cliché, but it’s true for me. I loved the idea of sewing from the age of 5. When I first saw my grandmother create a doll dress without a pattern right in front of my eyes, I thought it was nearly magic!”

Growing Up Sewing

At age ten Janet made it her mission to learn how to sew from her grandmother who lived more than 200 miles away. Each time she visited, she would take a new project that included a technique she wanted to learn. She recalled one visit when she wanted to learn how to install a zipper. “I took a break to play outside and when I returned, much to my disappointment, grandma had installed the zipper—perfectly, of course. I realized then I had never told her of my motives to learn the process. When she knew I really wanted to learn, it was game-on!”  She soon turned this passion for learning into one of sharing that knowledge with the world.

As a pre-teen she had the opportunity to spend the summer in Southern California with her aunt, Margaret Islander. Janet enjoyed going to work with her aunt one evening a week where she would see the industrial equipment used to train sewing machine operators for the garment industry. Over the years Margaret would share the industrial techniques that Janet later incorporated into her own ready to wear business. Janet credits these sewing techniques to eventually allow her to hire private contractors to sew her products. “These contractors were really home sewers until I taught them industry techniques that allowed them to sew from home and make a very reasonable hourly wage. I paid them by the piece but taught them the fastest way to make it. Win-win!”

Islander Sewing SystemsJanet continued, “During the years I was conducting my sewing production business, I would often accompany Margaret when she was invited to teach at trade shows and special events. Her style of teaching was enthusiastic and engaging and I always try to carry on that tradition. When Margaret retired, she asked me to continue her mission to teach home sewers that sewing can be more fun, faster and better, than they know. What an honor and a pleasure for me to share all of her special information and now some of my own, with other sewers. I am one of the lucky ones who work at what we love; and, therefore, it doesn’t even seem like work, more like play. When I share this information I can see it in the eyes of the students how excited and happy they are to know a better way to sew. I cannot imagine enjoying anything more, and I feel so blessed to be on this mission, all I can say is: I want to teach the world to sew!”

Tuesdays at Two

While Janet continues to teach around the country, she has also embraced the new platform of social media. Each week Janet and her daughter Jessica do a live Facebook presentation called Tuesdays at Two. (That’s 2 eastern time.)  This hour long presentation is a warm interaction between mother and daughter sharing sewing tips, techniques, and even sew-alongs. Coming up on October 22 will be the very popular Islander Shirt, a camp style shirt for both men and women. Also in the works is their Baja hoody pullover.

Tuesdays at TwoWhile Janet does the sewing demonstration, Jessica is hard at work monitoring comments and questions from viewers. The excellent visual quality gives viewers a great opportunity to not only see exactly how the construction should be done, but also the ability to ask questions in real time. And if you miss the live show, don’t despair, Janet has all episodes archived on the Facebook page and there is even a searchable directory now. For the archived list of episodes, go to her website www.islandersewing.com.

And on the topic of her website, in addition to her books and videos, you can also find quality fabrics, notions, and patterns. The Islander Patterns are classic, comfortable styles that work with any wardrobe. However, there is a definite difference in the pattern itself. While the traditional pattern companies have that large, awkward pattern instruction sheet, Janet has chosen to put her instructions in a booklet. This allows her to use actual pictures of the construction process which is excellent for the visual learner. And what’s even better, the newer patterns are color coded. Her well written, easy to follow instructions are also very different from the traditional patterns in another way. Her goal has always been “better, faster, easier” and her instructions reflect this goal. She not only uses industrial time saving techniques for sewing, but she also emphasizes sequencing steps. She said, “My patterns are designed to be constructed using techniques that do not require pins or basting. Seldom do my patterns have any hand stitching at all. Seam allowances are specific to the operation never needing trimming. (i.e. sew seam at 5/8 next step, trim to ¼”). My newer pattern guides are designed with my exclusive “Express” method of construction. This is where I cut down on the back-and-forth from machine to iron by a new order of construction, sewing as many pieces as possible before pressing and pressing as many pieces as possible before sewing.”   The instructions give much more than simple construction steps, they are a whole new, EASIER way to sew.

Islander SewingIslander Sewing

Fashion Patterns by Coni

In addition to her own Islander Patterns, Janet also offers patterns from designer Connie Crawford, of Fashion Patterns By Coni, a company she purchased last year. Janet commented on the purchase, “Just like Margaret’s work, Connie’s products are too important to let go. So I am proud to have brought together the very best in drafting and fitting with the very best in construction and teaching.”

Fashion Patterns by Coni

Janet was referring to Connie’s six year study to create better sizing for plus sizes that resulted in patterns that fit the larger sized woman rather than simply scaling up all over. So with Janet’s designs featuring sizes from very small to 4X and Connie’s designs going to 6X, www.islandersewing.com is one of the only places to go for those seeking larger size styling as well as the traditional sizes.

When asked what advice she would like to share, she wanted to encourage people to purchase a good quality sewing machine and not be lured into purchasing  a low end machine. While not endorsing any particular brand, she said that the better machines produce a more uniform stitch and feed the fabric better so that the operator does not have to struggle with the machine. “Low quality machines cause the new sewer to be discouraged because she/he thinks it’s their inability to sew well and it’s really the machine’s. Even my sewing is unsatisfactory using a low quality machine. “

Awards

Janet is the recipient of the 2012 Association of Sewing and Design Professionals – Life Time Achievement Award as well as ASG’s Sewing Hall of Fame for 2017.

Janet is a long time ASG member in the Detroit Chapter and offers fellow ASG members a generous 20% discount off books, DVDs, and patterns at www.islandersewing.com.  Visit the Special Offers section in the Members Only area for the discount code. A limited number of kits for the Islander Shirt that will be the subject of her sew-along on October 22, 2019 are also available.


~ Rosemary Fajgier

The American Sewing Guild is truly fortunate to be able to count many gifted sewing designers and instructors among our friends, members, and supporters.  Throughout this coming year we will be featuring some of them in our Notions Blog.  We hope you will enjoy reading about them and take the opportunity to get to know them better and explore their many talents by visiting their websites, taking their classes, and discovering the wide variety of designs they bring to the home sewing market.

Tagged With: patterns, sewing

October 4, 2019

Hemming Jeans – the Denim Blues

Hemming JeansPerhaps you searched long and hard for the perfect fitting jeans, but alas, they’re too long! Or maybe you painstakingly created a custom pair and it’s time to hem them. Either way, you’re in the thick of it—literally!

The hem area of jeans can be up to eight layers thick, depending on how the side and inseams are constructed. Stitching through all of that thickness while maintaining straight, even stitches and not breaking the needle can be a challenge for any sewer, but here are some helpful hints to make the process easier.

Before you sew

Before you determine the length of your jeans, be sure to wash and dry them at least twice to allow the fabric to shrink. Nothing’s worse than meticulously hemming them and after the first wash, they’re ankle skimmers.

Try on the jeans with the shoes you plan to wear with them and pin-mark the desired finished length on both legs. Both legs aren’t always the exact same length.

Assemble the arsenal

Denim Needles

Having the proper tools to sew multiple denim thicknesses is a must. First, select a denim or jeans needle with a special tip and blade to cut through the fibers without deflecting (because of the tight weave) or breaking. Denim needles are made especially for sewing extra thick fabrics, and they’re available in sizes 70/10 to 110/18—the heavier the denim, the larger the needle size needed.

Topstitching

In addition, if you’re doing decorative topstitching to mimic the infamous Levi gold version, acquire a topstitching needle with a large eye and groove to accommodate jeans thread without shredding.

Denim ThreadDenim Thread

Choose either an all-purpose or denim blue thread for stitching if you want a matching hem, or a heavier jeans thread if you prefer contrast seaming detail. Denim thread is a twist of multiple blue colors to mimic the looks of our favorite indigo fabric.

Hemming

  • Press up the hem at the desired length and trim the hem allowance, leaving about 1”. Press under ¼” along the upper hem edge, then ¾” forming a double hem. Pin in place.
  • If you need a bit of stability on lightweight denim, slip a narrow strip of fusible web into the hem area and press before stitching to firm up the edge.
  • Straight stitch along the upper folded edge using matching or contrasting thread. For more prominent stitching, use a straight stretch stitch.
  • On very heavy denim, serge the upper hem edge instead of folding it under to finish, and that will save one layer of thickness.

Height busters

The absolute hardest part of hemming jeans is going over those leg seams, but there are tools to help. Look for a Jean-a-ma-jig, Hump Jumper or Big Jig to help even out the raised area.

Hemming Jeans - Big Jig

These tools are slipped under the presser foot on the ascent to the leg seam thickness to help keep the presser foot horizontal over the ridge and again on the other side to keep it from sliding off the raised area and making uneven stitches on the downward journey. And, they work on all machines.

For the neatest appearance, bring thread ends to the wrong side and tie them off instead of backstitching.


~ By Linda Turner Griepentrog
You might know my name from my years as editor of Sew News, from the many magazine articles I’ve written, or perhaps you’ve been on one of the ASG Sew Much Fun Hong Kong tours with me. But soon you’ll be seeing my name a bit more often as I’m writing for the American Sewing Guild blog!


Tagged With: garment sewing, jeans, sewing, sewing tips

September 6, 2019

Meet Linda Lee

Congratulations to Linda Lee on her induction into the 2019 ASG Hall of Fame!

Linda LeeLinda has long been one of ASG’s most popular educators at ASG conferences as well as a sought-after speaker at ASG chapters throughout the country. She began her sewing journey at a very young age sewing doll clothes and, by the sixth grade, she had begun her first business venture by making and selling felt beanie hats for $1 each. She soon expanded her line with dirndl skirts and a career was born. Her formal training began at Kansas State University with a degree in Interior Design which included two years as a Clothing and Textiles major.

Her resume reflects a number of business endeavors including I, a commercial and residential interior company; Threadwear, a retail fabric store; and The Sewing Workshop, a sewing school in San Francisco. When asked about how this all came about, Linda commented, “When you don’t have access to good fabric, then doesn’t it make sense to open a fabric store? It did to me. I had heard about a woman in Kansas City named Karen Ladish who knew the insides of the garment district in New York. She took me there and showed me how to buy fabric from the jobbers and brokers at the right prices. It was fascinating!”

The Sewing Workshop


As a shop owner, Linda took a class from sewing icon Sandra Betzina and said, “I couldn’t get enough of what she had to say. That was the first time I had ever heard of The Sewing Workshop, a sewing school in San Francisco. I went there and fell in love with the place. And it was Sandra who encouraged me to buy it. So let’s see, if you don’t have access to good sewing education, then doesn’t it make sense to buy a school? It did to me.”

Continuing to reflect on the path her career has taken, Linda said, “The best seamstress I have ever met, Shermane Fouche, was teaching at The Sewing Workshop at the time. One Sunday night I was in her studio while she was putting the finishing touches on her first pattern collection. This was before Fedex and I discovered that the patterns needed to be at her printer the following day in Manhattan, KS. Well, I was flying home to Kansas, so I offered to hand deliver the patterns to McCalls in Kansas. And that’s where the idea of starting a Sewing Workshop pattern collection began.”

Linda Lee patternLinda describes these patterns as “designs that are simple but have a little ‘edge’ to them so they are more interesting to construct—a unique detail, a fine finish, asymmetry. I think it is important to teach people the correct way to do things and to offer some challenges as well. Over time, we have evolved from a pattern company that had mostly oversized Asian-inspired designs to a much more wearable wardrobe concept theme. They are designed to fit a lot of body types and to span the generations, too. If I wear them at 71 and my daughter at 30 wears them, then I consider that a success. The steps to construct each pattern are illustrated in great detail making it easy to make one of our patterns. All of the production of our patterns happens in-house so we are in complete control of every step. The only thing we sub-contract is the fashion illustration on the cover of the envelope.”

Getting back to her career path, Linda continued, “At the same time, I started the Sewing Workshop pattern collection, I received a phone call from Vogue/Butterick pattern company in New York who wanted to use The Sewing Workshop as the site for filming a pilot television show. Of course I took that phone call and promptly converted the school to a filming studio for about a week. The pilot sold to PBS and 30 shows needed to be produced. They needed ideas for the 30 shows, so I became the content editor and writer for all of the shows. This is where I honed my skills for making step-out samples, writing scripts and boiling content down to a few minutes—all within a really tight timeline and budget.”

Linda also filmed over 100 how-to shows on HGTV, filmed shows for Sew It All and It’s Sew Easy for PBS, became a contributing editor to Threads magazine, and wrote 13 books related to sewing and home decorating. Her latest book is Sewing Knits from Fit to Finish. And if that wasn’t enough, she also produced a tutorial program called Sew Confident! featuring fitting, pattern variations, wardrobing, sewing techniques, and sewing inspiration with over 65 online sewing tutorials on her website.

With this wealth of knowledge and experience, it is no wonder that students flock to her classes when we are fortunate to have her teach at conference. And if you haven’t been able to get into one of her classes there, don’t despair. Linda also has a number of classes on Bluprint.com (formerly Craftsy).

When asked what she has enjoyed most about her career, she was quick to respond, “I love the thrill of marketing and selling the best. I think that anyone who is in business needs to love that part of a business; otherwise, it is pointless. I am bored by the repetitive aspects of what my business requires such as sewing. I don’t like to make the same thing twice; however, unfortunately, that has to happen when developing a pattern. I like to think about things and then delegate. Don’t get me wrong, I love to sew, but I would prefer to sew without deadlines and just for me instead of constantly sewing for a purpose in the business. I do use some really fine seamstresses to make some of the samples but, ultimately, I need to sew most of the samples garments in order to understand the hurdles of a design or a particular fabric.”

Linda reflected, “Everything has come together and formed a rich career that I can’t seem to leave. But I am watching the young people in my company begin to implement new ideas and take charge. My daughter Alex will complete her Masters in Fashion Management from the London College of Fashion this October. Will she join my company? I hope so! I have never felt more positive about the future of sewing — it really is in good hands. I enjoy reading blogs, following mind-blowing fashions, and staying tuned into Instagram. I am looking forward to seeing where The Sewing Workshop will be in 10 years. Hopefully I will be starting some new project, because if I don’t have access to something I need, perhaps I will start it or buy it.”

Linda Lee bag


Linda is a proud ASG member in the Kansas City Chapter and offers fellow ASG members a generous one-time per year discount of 25%. Check the Special Offers page in the Members Only area for the code. Be sure to check out Linda’s collection of patterns and other items on The Sewing Workshop website.


~Rosemary Fajgier

The American Sewing Guild is truly fortunate to be able to count many gifted sewing designers and instructors among our friends, members, and supporters. Throughout this coming year we will be featuring some of them in our Notions Blog. We hope you will enjoy reading about them and take the opportunity to get to know them better and explore their many talents by visiting their websites, taking their classes, and discovering the wide variety of designs they bring to the home sewing market.

Tagged With: books, instructor, patterns, sewing

  • « Previous Page
  • 1
  • …
  • 10
  • 11
  • 12
  • 13
  • 14
  • …
  • 16
  • Next Page »

Become a Member

Join the only national organization dedicated to Advancing Sewing as an Art and Life Skill.

Join Now button

Blog Article Categories

  • ASG Conference
  • Chapter Stories
  • Embroidery
  • Fitting
  • Learn to Sew
  • National Sewing Month
  • Products, Books, & Patterns
  • Projects
  • Quilting
  • Sewing
  • Sewing Techniques
  • Sewing Tips
  • Sewing Tours
  • Videos
  • Disclaimer
  • Privacy Policy

American Sewing Guild
National Headquarters
9660 Hillcroft, Suite 230
Houston TX 77096
713-729-3000 | 713-721-9230 Fax
www.ASG.org

ASG wordcloud - education, conference, discounts, videos, special offers, tours and more

Copyright © 1998–2025 · American Sewing Guild · All Rights Reserved