 If good fit is important to you, especially when sewing with woven fabrics, you already know the significance of a properly placed and well-fitting bust dart. Darts shape that two-dimensional fabric to fit around your three-dimensional body. Even for the less-endowed figure, when darts are the correct size and pointed to the correct location, they can add shape and flatter your frame.
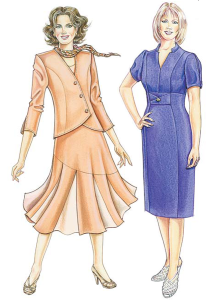
When they are incorporated into special design lines, darts also have wonderful attributes beyond fitting and shaping. Fashion designers have always known and utilized these skills for creating different styles with special design lines. For your own design explorations, here are some guidelines for moving the standard side seam bust-fitting dart and converting it into the always flattering princess line. This design line can originate from the shoulder line or from the armscye—that choice is yours.
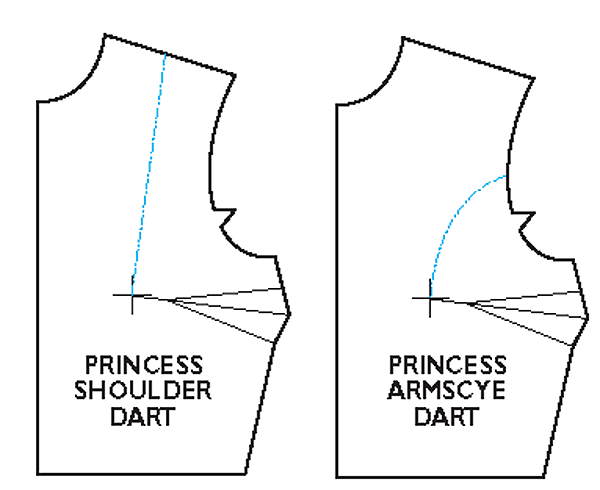
When the princess design line extends from the shoulder line, it creates a vertical line which gives more visual height to the wearer. It is the easiest version to sew. When it comes from the armscye, the tighter the armscye curve, the more challenging those curved seams can be to stitch together particularly for the full-busted figure. However, the closer the starting point is to the shoulder point, the easier it will be to sew.
Basic Dart Fit
Princess lines flatter most figure shapes. However, they can end up being ill-fitting and unsightly if your bust dart is not the correct width for your cup size and is not aimed toward your apex. If the original bodice sloper doesn’t conform properly to your apex contours, then the curvature of the princess line could ride above or below your actual apex level, creating a poor fit. When you begin with a pattern that is fit exclusively to your body contours, where the side bust-fitting dart is the correct shape and is pointed toward your apex, you can rest assured that the resulting princess line fashion detail will also fit as it should and be flattering on your body.
Make sure you have the correct size dart for the fullness of your bust and that the dart is pointing toward your apex. Sure-Fit Designs offers an Adjust-A-Bust template with A through E-cup dart sizes. This template is found within the Sure-Fit Designs Dress Kit. If you’re full busted, this solves the problem for the traditional FBA (full bust adjustment).
Creating the Shoulder Princess Seam
Now, let’s begin to move that dart.
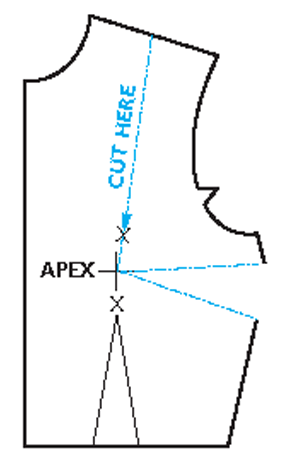
1. Beginning at the top and bottom legs of the side seam dart, draw a designer’s dart, which is one that extends to the apex cross mark. The tip of this dart, which is now at your apex, will become a pivot point.
 2. Stabilize the apex with a piece of clear plastic tape. Then, cut on the designer’s dart lines to remove this dart.
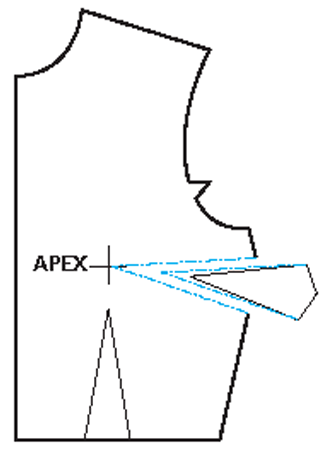
3. Approximately mid-shoulder, mark a point where the princess detail will begin. Draw a straight line from this point to your apex marking. Continue this line down through the center of the waist-fitting dart. Mark X’s above and below the apex which will become the princess seam matching notches. Cut on this line down to the apex only.
4. Close the original side-fitting bust dart, allowing the pattern to pivot at the apex hinge. Tape original side seam dart in this closed position.
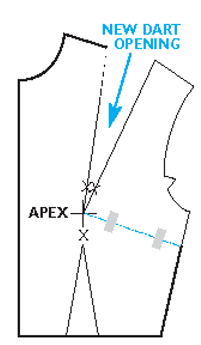
5. Continue cutting from the apex down through the waist-fitting dart. Separate the Center Front panel from the Side Front panel. Add 5⁄8″ (1.6cm) seam allowances to both cut edges. Extend the X’s to create the matching notches.
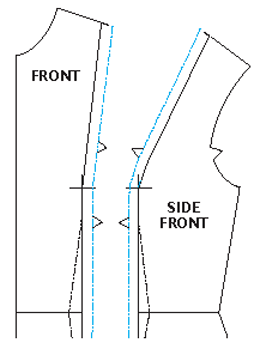
6. If you want the princess line to fit with more shaping at the waistline, you can always stitch on the side legs of the waist-fitting dart to tighten the bodice.
This article appeared in a previous issue of Notions
~ Glenda Sparling is president of Sure-Fit Designs, an international company specializing in pattern fitting and designing. Canadian-born, her background includes 10 years as a home economics educator and 30 years in the sewing industry. Based in Eugene, Ore., she has traveled extensively, teaching in the U.S., Canada, Australia, New Zealand, and Great Britain. Glenda has written pattern fitting, designing, and embellishment books, including “Wrapped in Fabrique,” and a series of how-to fitting videos that have been converted recently to DVD format. She is a member of the ASG Willamette Valley, Ore. Chapter. www.surefitdesigns.com

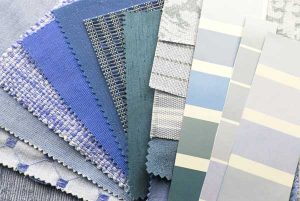 Short answer—it depends! Many home décor fabrics can be used for garments, but some are better left on the bed or the chair. So, ask some questions about it before jumping into the switch.