American Sewing Guild (ASG)

Visit our blog Visit the ASG Facebook page Visit ASG on Pinterest Visit ASG's YouTube channel Visit ASG on Instagram
  • Home
  • Join ASG
    • Join Online
    • Chapter Locations
    • Member Benefits
    • Member Brochure
    • Join by Mail
  • Education & Classes
  • Resources
    • Contests & Awards
    • Giving Back
    • Hall of Fame
    • Links
    • Travel and Tours
    • Measurement Chart
  • Shop
    • ASG Store
    • Chapter Products
    • Video Resources
  • Blog
  • About
    • About Us
    • Donate to ASG
    • ASG Sensitivity Statement
    • FAQ’s
    • Start a Chapter
  • Contact
  • Member Login
    • Login First!
    • Members Only
    • Leadership Only
    • Website FAQ’s
    • Logout
  •  

January 13, 2023

Just Encase

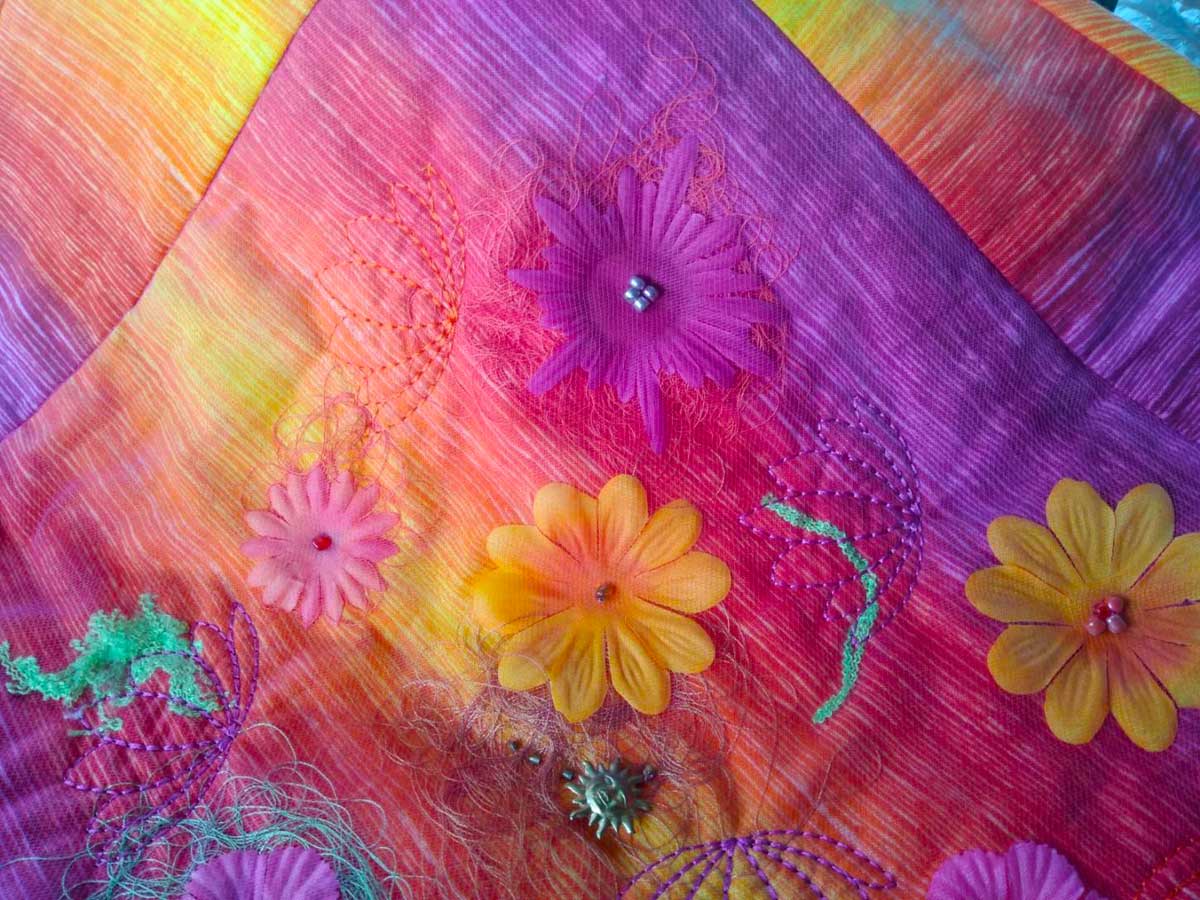
There are times when you want to add a bit of texture and fun to a project, but you may not be quite sure what to do. Think about encasing something under tulle, which serves to hold it in place and protect the addition at the same time.

What to encase?

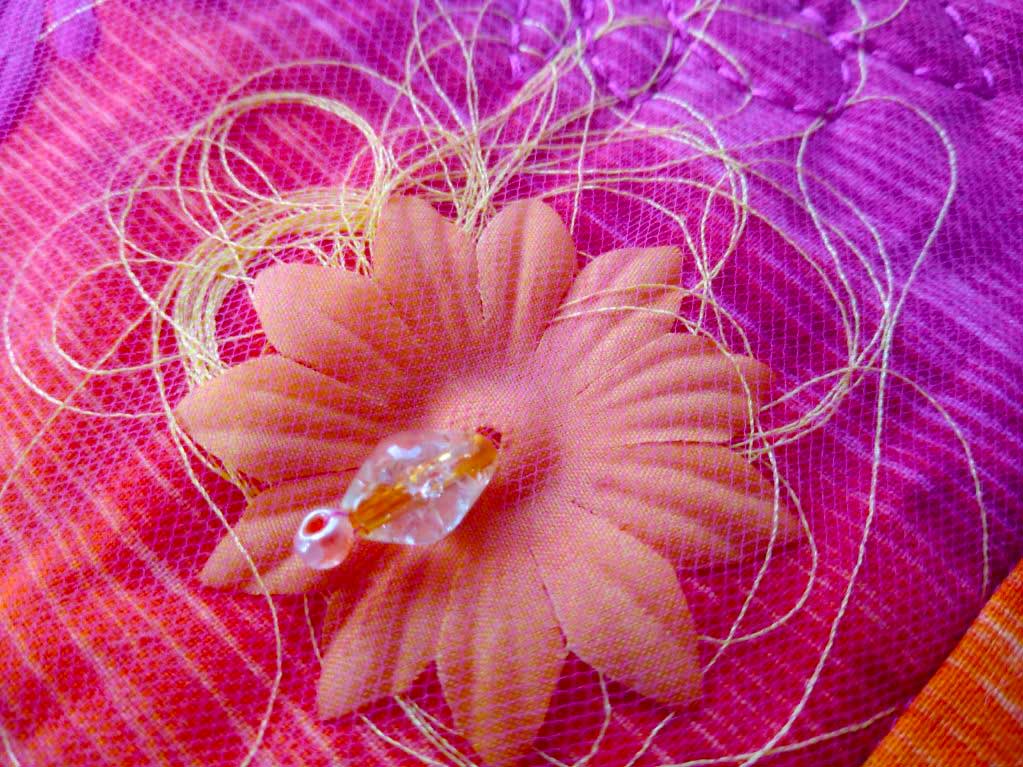
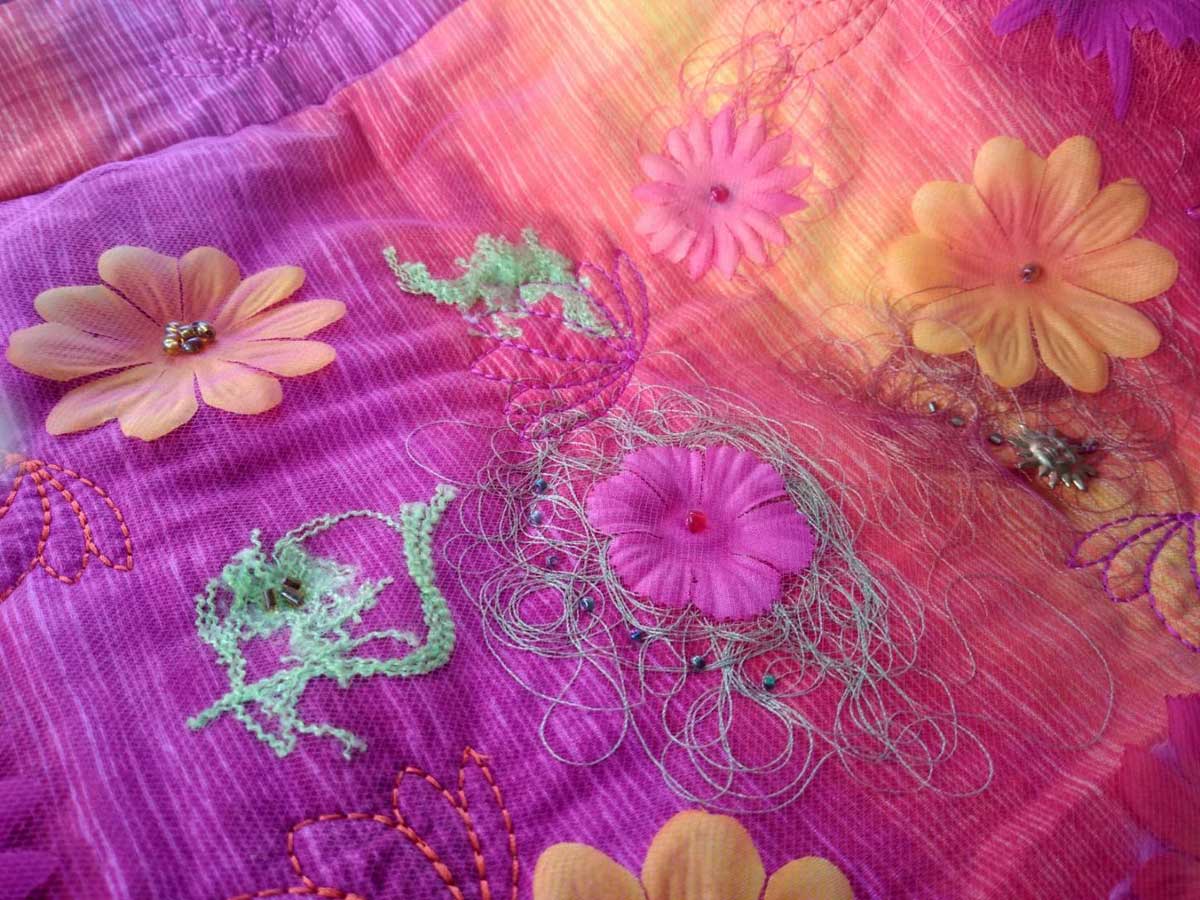
Depending on the project you’re making, there are many choices. Silk flowers are a fun addition to home décor items or special-occasion wear. They’re affordable and look beautiful. Envision a long skirt fully embellished with silk flowers. OK, if you’re not quite that ambitious, think about a collar, pocket or tote bag. Take apart the flowers to use single layers or individual petals.

silk flower on fabric

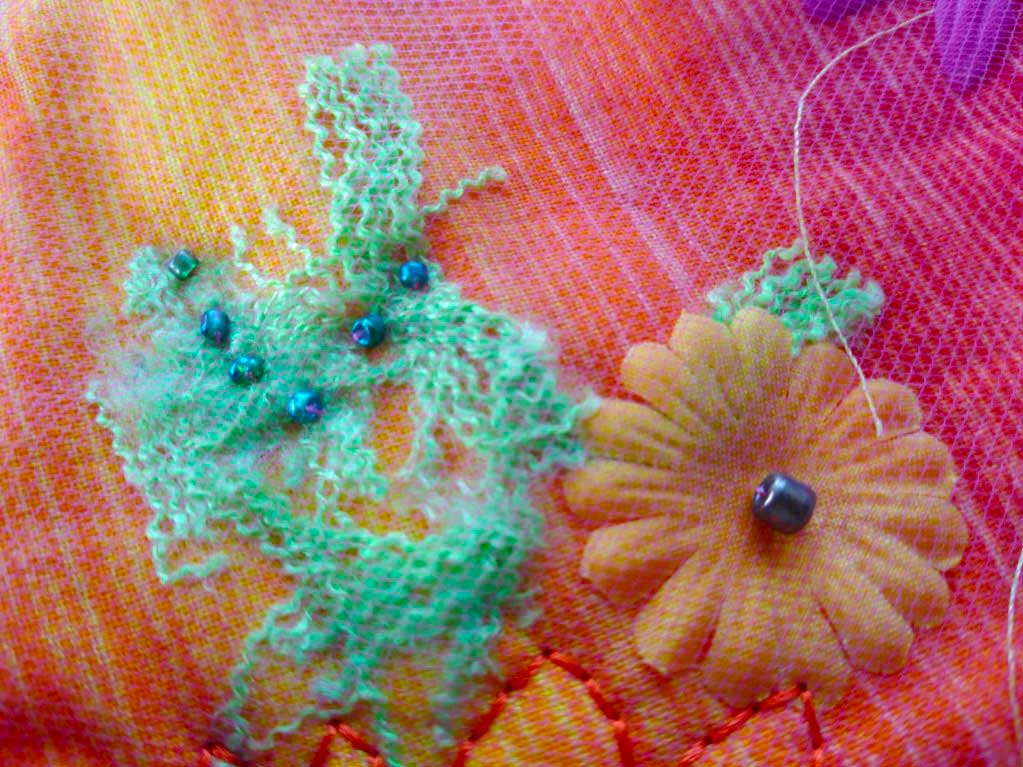
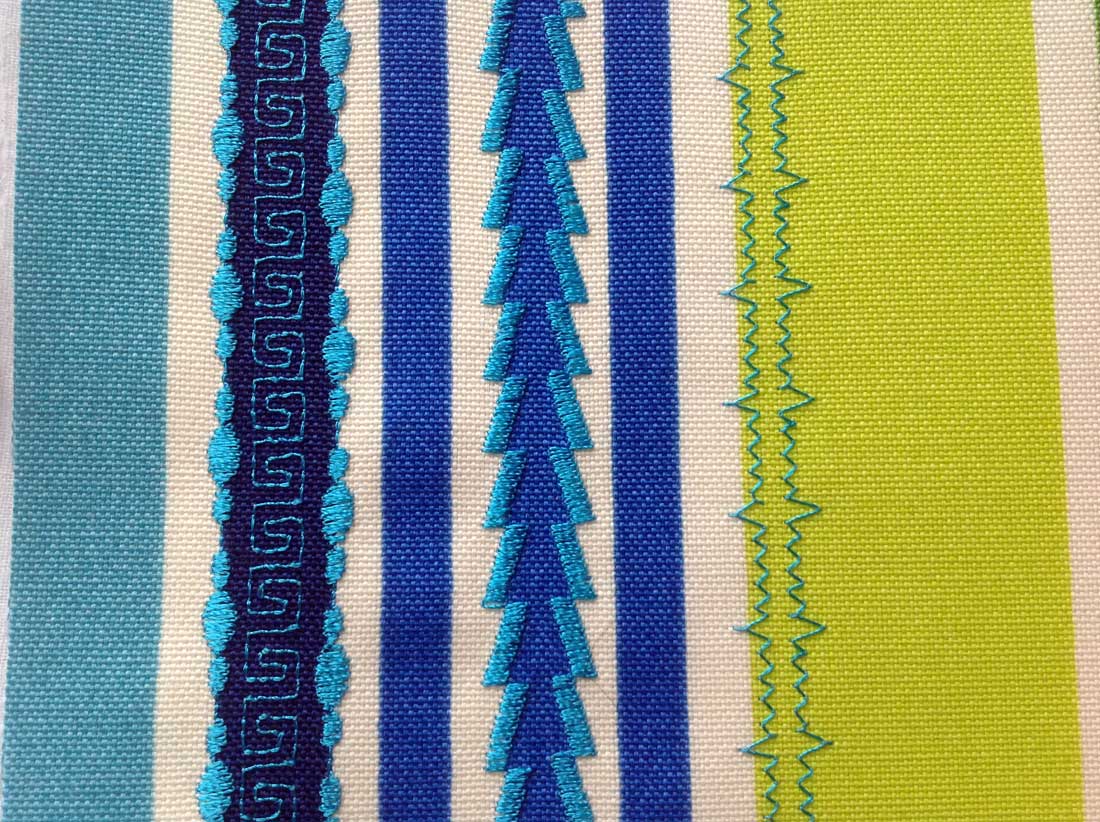
Bits of novelty threads, yarns or trims are another option. They can form a pattern or be totally free-form embellishments.

silk flower on fabric with beads

A collage of fabric bits is another idea—those tiny but colorful slivers of fabric you trim with a rotary cutter are ideal, as are small shapes of fabric purposefully cut for this technique. If the project isn’t going to be washed (like a wall hanging), then you can think more broadly to small rocks, shells, photos, etc.

Over the Top

Tulle is ideal for going over the top of your treasures—it’s very thin and almost invisible, depending on the color used and the base color, but it adds a “just-right” layer to help hold things in place.

Tulle is a fine mesh fabric found in the special occasion department of the fabric store, and it comes in myriad colors. It’s lighter and finer than the holes in net for a more invisible look. Note that some tulle is nylon and will easily melt, so check the fiber content and adjust the iron temperature as needed before pressing.

silk flower on fabric

Covering Up

In addition to the items you want to encase, some fabric glue is helpful to hold multiple items in place. If you prefer not to glue, then use long pins to temporarily hold things until the finish stitching is done.

Cut the base fabric in the size needed. For example, if it’s a garment and you want to embellish the pocket, collar or perhaps an entire skirt, cut the pattern piece from the fashion fabric. If it’s a pillow or wall hanging, cut the fabric pieces as required by the pattern.

Position the accent items where you want them on the right side of the base fabric. Add a dot of fabric glue behind to hold it place—don’t cover the entire surface as you want to have some dimension. If you’re using silk flower petals, just a glue dot at the center is sufficient for securing.

silk flower on fabric with thread and beads

Audition your creation with different colors of tulle to see the variation in look depending on the color used. When you’ve chosen an appropriate color, cut the tulle about 1” larger than the base fabric shape and press out any wrinkles. If your encasements, are thicker, cut the tulle larger to allow for full coverage.

Pin the tulle over the base fabric, placing some pins along the edges and some in and between the encased accents.

Now comes the fun—adding embellishments to hold things in place.

Embellishing

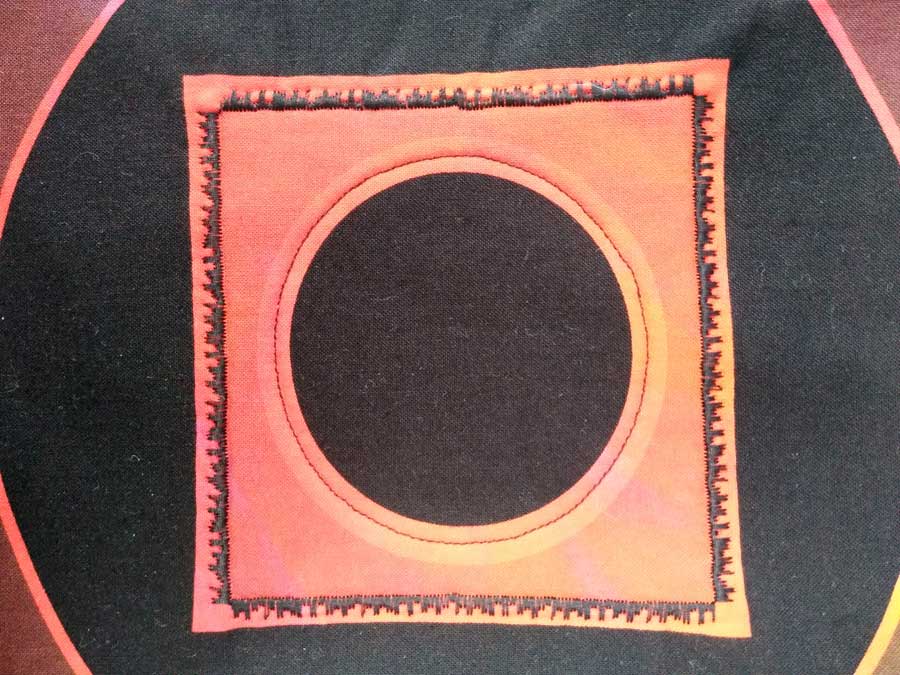
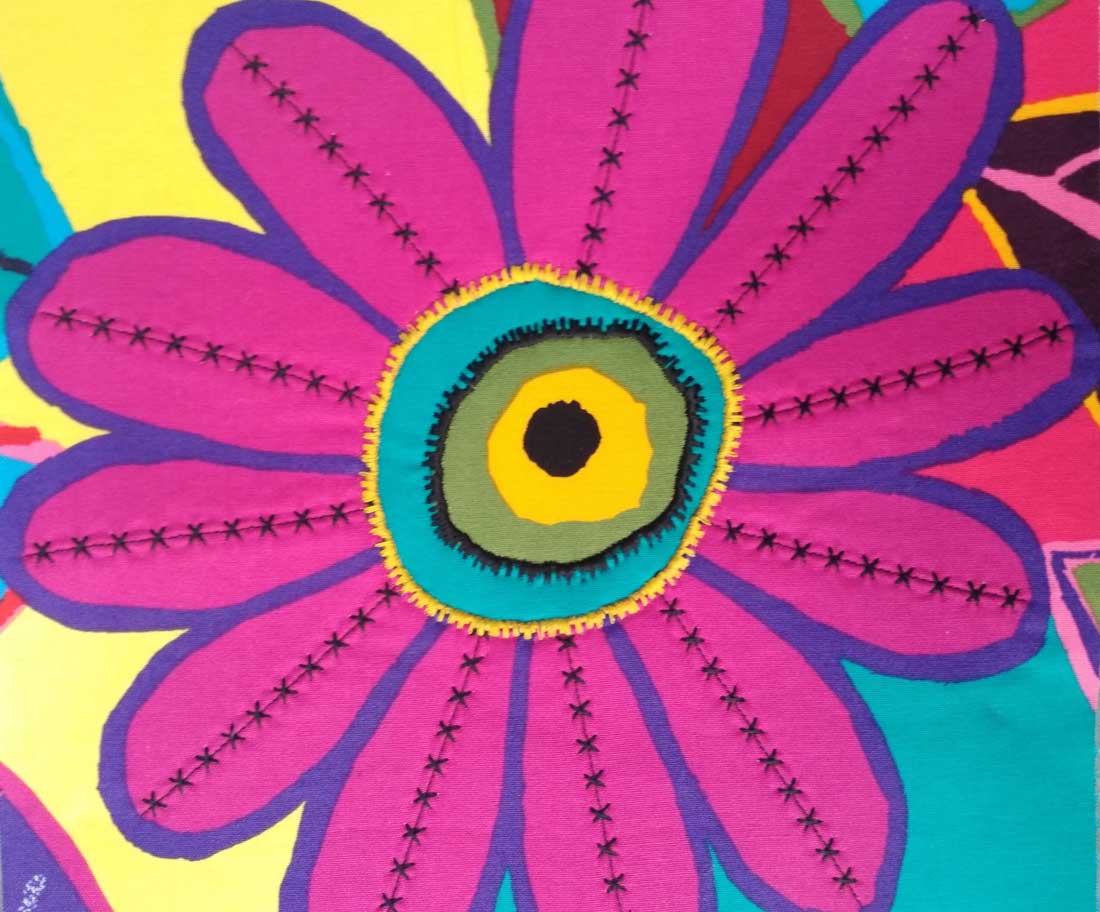
To help hold items in place, think about hand- or machine stitching around them to make a “pocket”, add some beads through the layers (especially nice for silk flower petals), or add hand- or machine embroidery to keep things where you want them.

Whatever technique is done over the layers keeps the tulle from being loose and “bagging out” if it’s not anchored in some way.

silk flower on fabric with beads and thread

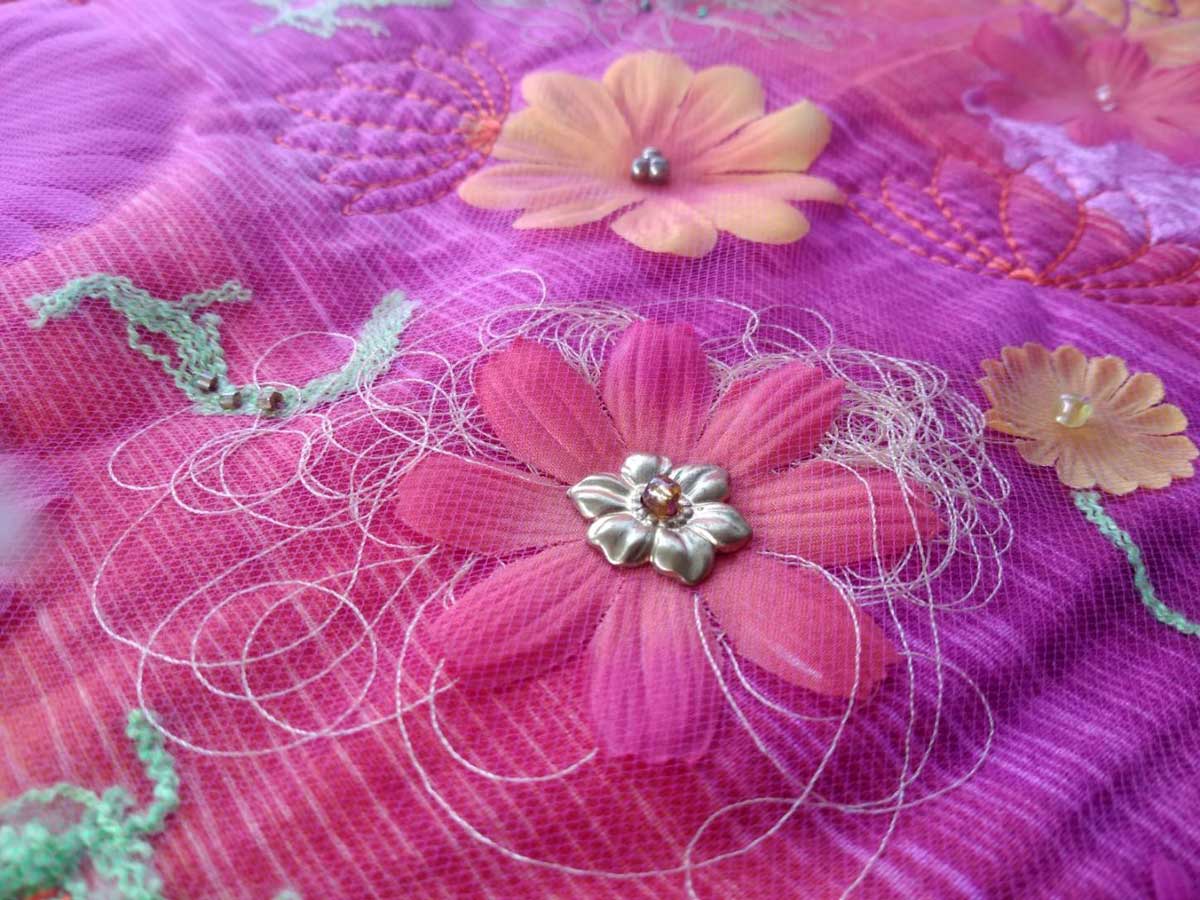
You can use free-motion stitching to go around shapes, or keep the presser foot on for a more controlled look. Single motifs of decorative stitches are ideal for flower centers or weave rows of decorative stitches in and out of the encased items.

For machine embroidery motifs, add a layer of stabilizer underneath for hooping. When hand-stitching, sew through both the tulle and base layer, and the same for attaching beads, charms or baubles. The more stitching that’s done, the flatter the finished piece will be.

When the embellishing process is complete, stitch around the edge of the entire piece and trim the tulle to match the base shape.

Finishing

Use your embellished piece in your finished garment or project, just as you would if it were plain fabric—you’ve created your own unique fabric worthy of compliments and questions about how you did it, as the tulle is elusive.


~Linda Griepentrog is the owner of G Wiz Creative Services and she does writing, editing and designing for companies in the sewing, crafting and quilting industries. In addition, she escorts fabric shopping tours to Hong Kong. She lives at the Oregon Coast with her husband Keith, and three dogs, Yohnuh, Abby, and Lizzie. Contact her at .

Did you enjoy this article?
Are you an ASG member?
This field is for validation purposes and should be left unchanged.

Tagged With: embellishment, fabric, texture, tulle

September 23, 2022

Decorative Stitches: Accenting a Print

Who doesn’t love a great print fabric? But, sometimes, it might “just need a little something” to make it pop. Enter the myriad decorative stitches found in your sewing machine…those that often sit unused and those you’ve always wanted to use but didn’t quite know where.

Accenting a print is easy! Just look at the lines and pick a place to embellish.

Preparation

Most cotton prints will require some kind of stabilization to avoid puckering, especially if you plan to use a dense satin-stitch type design. The stabilizer can be as simple as a fusible interfacing added to the underside, or an “official” stabilizer you may have in your machine embroidery supplies. Some sewers use a liquid stabilizer to saturate the fabric and when it’s dried and pressed, the fabric becomes paper-like to better support the stitches. After stitching, it’s simply washed away.

The choice of stabilizer is also influenced by the fabric’s final use. If it’s part of a tote or bag, or even a quilt, batting or fusible fleece on the underside may suffice to stabilize the fabric. But, if it’s a pocket, cuff or yoke of a garment, batting isn’t a likely option, so select something else.

If you do a lot of decorative stitching, you likely have a stash of various types of stabilizers to experiment with.

Planning

Whenever possible, it’s best to end any accent stitching in seam allowances. This eliminates the need to tie off thread ends, and crossing the stitching with another seaming ensures no pull-out issues.

Stripes are one of the easiest prints to accent, as there are already lines and spaces to follow. Simply pick a place on your presser foot to follow the printed stripe with the added stitching.

Decorative stitch - stripes

Does your fabric have circles or squares on it? If so, think about what will happen if you outline the design area and the stitches come together to complete the shape… it’s almost impossible to plan an exact match, and you may have a “blip” in the design area. Are you OK with that? Can you cover it with another type of embellishment, like a tassel, button, or charm, to hide the mismatch? If that’s not in your plan, select a stitch without distinct motifs—one that looks continuous—so there’s no visible mismatch at the joining.

If your print motifs have corners, how will you handle those? Again, it’s a good idea to choose embellishing stitches that don’t have distinct motifs and look continuous, then stop the needle on the inside of the stitch, turn and continue on, leaving an open corner.

If your machine has programmable features, it’s possible to figure out exact lengths of repeats to outline a print motif with whole stitched motifs, or you can combine stitches to have, for example, a line of straight stitches with five flower repeats and another line of straight stitches, making it a no-brainer for corner turning with aplomb.

At the end of the outline stitching, do not overlap the motifs but instead stop stitching exactly at the beginning point. Pull threads to the underside and tie off to secure, or use a lock-stitch feature on your machine to sew a few stitches in place to anchor the thread ends.

It’s a good idea to use a bobbin thread that matches the top thread to avoid any visible tension issues and, of course, you should test-stitch on the same fabric/stabilizer you plan to embellish before actually committing to the project.

Accent Options

For large flower petals, like our funky daisy, consider stitching down the petal centers for accents, then around center printed motif(s) for additional color.

Decorative stitch application

Some prints look great with simply a straight-stitch accenting. On the parrot fabric, a straight stitch with gold metallic thread accents their perches and adds just a small touch of bling to the fabric. Be sure to use a metallic needle with a larger eye to avoid shredding delicate metallic threads. Straight stitch accents can be done using the presser foot, or with free-motion techniques.

Decorative stitching on parrot-themed fabric

Finally, a simple zigzag stitch can be used to accent any geometric print.

Photo courtesy of Bernina

Stitch Options

More articles on using decorative stitches:

  • Sewing Machine: Using the Built-In Specialty Stitches
  • Decorative Stitches, Part 2: In the Hoop
  • The Triple Straight Stitch

~Linda Griepentrog Linda is the owner of G Wiz Creative Services and she does writing, editing and designing for companies in the sewing, crafting and quilting industries. In addition, she escorts fabric shopping tours to Hong Kong. She lives at the Oregon Coast with her husband Keith, and three dogs, Yohnuh, Abby, and Lizzie. Contact her at .

Did you enjoy this article?
Are you an ASG member?
This field is for validation purposes and should be left unchanged.

Tagged With: decorative stitches, embellishment, fabric, stitching

May 6, 2022

The Allure of Beads

What is it about beads that make these shiny objects so alluring? Take one bead by itself and nothing much happens; group several together and you’ve instantly created an eye-popping sensation.

Containers of different color beads

Bead embellishment has been around for hundreds of years, appearing in everything from ethnic costumes to haute couture. In fact, beading has become so mainstream that one can’t help but notice beads adorning everything from clothing to accessories to home decor. As sewists, we have a unique ability to add these shimmering touches to any of our creations with minimal expense.

Beadwork is a very broad term that encompasses techniques for making jewelry and other three-dimensional objects. Our focus here is on bead embroidery — using beads to embellish fabric. Beads can be applied to plain old fabric in a random pattern, to a fabric with a transferred design, to pre-printed fabric, a fabric with an embroidery design, or to a purchased garment. Another idea is to add beads to an existing trim. The repeating pattern trims provides an accurate template to follow as you apply the beads.

Start on your path to a beading addiction by practicing some stitches. Keep it simple by practicing just one stitch and using only one color of beads, but in two or three different sizes. Create multiple samples and, even if you make a mistake, don’t bother to undo it because, after all, these were just samples. Before long, you’ll begin to realize that the “mistakes” were nothing more than variations that can become a gold mine of three-dimensional beading ideas just waiting to be used.

Look for inspiration in various mediums for help giving you fresh ideas for your projects, whether it’s in a bead-focused publication, in a store, or in a high-fashion magazine.

Bead Basics

Beads come in every imaginable size and shape. They can be made of plastic, glass, metal, bone, shell, gemstone, wood, rubber, polymer clay… the list goes on! Basically, anything with a hole can be considered a bead. Even those without a hole, such as a cabochon, fall into the bead category. In the case of a bead without a hole, the application technique is to couch it, cage it, or as a last resort, glue it down.

Remember that not all beads are alike. Consider the quality, uniformity of shape, and colorfastness. Some beads also have sharper edges than others. This fact should be considered when applying beads to areas of stress in a garment. If you do not happen to live near a good source for beads, there are wonderful online mail order sources.

How many beads will you need?

This is where creating a sample is important. If using a hank of beads, it helps to use an entire strand to bead a sample to determine how far a hank will go. If using beads from a tube or a vial, weight might be a better estimate. The weight on tube or vial packaging is generally labeled in grams. Weigh all the beads, create the sample, then weigh the leftover beads. Subtract the current weight from the initial weight and the resulting number is the weight of beads in the sample. Having a small digital postage or kitchen scale that alternates between ounces and grams is perfect for this task.

Fabric Facts

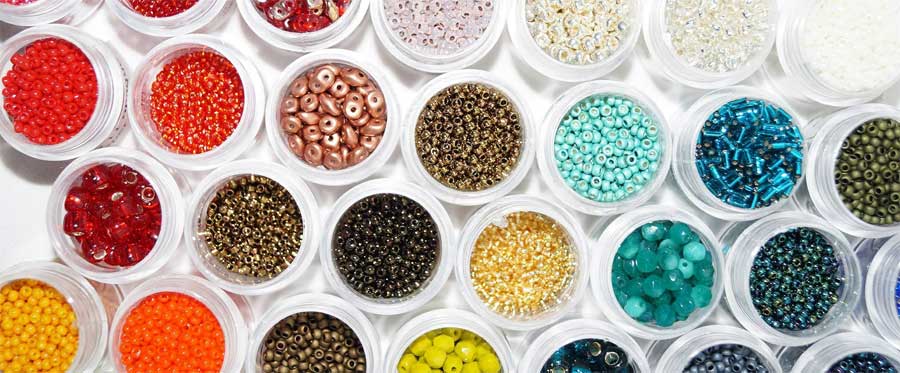
The list of fabrics suitable for beading ranges from laces and chiffons to very heavy fabrics, such as tapestries and leathers. Besides fabric, beading can also be done on lace trims, ribbons, and 3-D embellishments (such as fabric flowers and crocheted rosettes). Because bead work becomes heavy very fast, especially when using glass beads, your fabric may require some sort of support. If this is the case, determine which stabilizing medium will prevent distortion and hold your design in its original shape. Choices include stabilizers made for machine embroidery, flannel (a favorite choice), muslin, organza, self fabric, interfacing, and grosgrain ribbon. Sometimes the best stabilizer might even be another bead, just like you would use a flat button to back a heavier button on a leather jacket.

Beading Supplies

It doesn’t take much to get started on your beading journey. The basic requirements are patience, a good light source, a comfortable chair, a needle, a hank of beads, thread, fabric, and a basic instruction book. Note the order of importance! A good needle is probably more important than the choice of bead — after all, if a needle doesn’t feel comfortable in your hand, you may not be very motivated to get started.

Beaded dressLighting: Beading can be very tiring, so begin with good lighting. In addition to working in a well-lit room, a task light or lighted magnifying lamp will help to keep eye strain at bay and make the detail work a little easier. Look for “daylight” rated bulbs or lamps. Daylight rated lighted can also help you to accurately color-match thread to fabric.

Needles: Traditional beading needles are generally very thin and flexible and often are not appropriate for beading on fabric because the motion of the hand-stitching requires a stiffer needle. In most cases for beading on fabric, a sharp needle will work the best. For creating fringe, try a milliner’s needle, which is longer. Remember, though, that not all needles are alike. You need a stiff needle that is thin enough to be able to go through the beads at least twice. Look for Japanese needles (size 9 sharp), John James needles (size 10 milliners), or the Roxanne English needles (size 11 sharp).

Thread: Although ordinary sewing thread can be used for beading in something that won’t see much movement, such as a home decorating project, it’s best to use thread made specifically for the purpose. Beading thread will be stronger and less likely to tangle, especially when working on a garment.

Hoop: Beading can be done with or without a hoop. If you choose to hoop your fabric, be sure to cushion all the hard edges by wrapping them with yarn, muslin strips, twill tape, etc.

Beading Stitches

Beading stitches examplesTerms that refer to styles of stitching include bead embroidery (traditional hand embroidery stitches such as cross stitch and buttonhole stitch executed in beads), netting, peyote, brick, square, right-angle weave, fringes, herringbone, and tambour (which uses a hooked needle to make a continuous chain stitch). There are entire books written on each subject, as well as plenty of YouTube videos and beader blog posts to learn the different techniques. You don’t have to be proficient at all these stitches, but you should familiarize yourself with each technique.

Understanding the basic jewelry-making stitches will expand your vision of bead embellishment on fabric. Basically there are three ways to embellish fabric with beads:

  1. Beads can be sewn directly on fabric.
  2. They can be sewn to a backing, then the backing is trimmed and the bead work is appliqued to fabric.
  3. Beaded components are made freehand using jewelry-making techniques (i.e., using a bracelet pattern for a strap on a dress, a tank top, a waistband, etc.) and then appliqued to fabric.

When beading on fabric, never attach every single bead individually. If you do, chances are your fabric will pucker. For attaching multiples of beads, stitch options include the running stitch, the backstitch, or couching. Another solution is to create the beaded component as a separate applique, and then attach it to your project by sewing through some of the beads within the beaded design.

Transferring Techniques

If you’ve found a particular design you like, you can easily transfer the design or even bead over a pre-printed design. Transfer pens, transfer pencils, dressmaker’s carbon, thread tracing, or pouncing powder all work well. However, one easy method is to trace the design onto tissue paper, then baste the paper to the fabric. Bead through the paper and the fabric, then remove the paper. Tear-away stabilizer can also be used, but test it first to be sure it tears cleanly away from the project.

Storing/Preserving Beadwork

The more elaborate your beadwork, the heavier it gets, so store it flat. Avoid storing it in plastic bags/storage containers as condensation can build up inside them.

Depending on what the base fabric is and the colorfastness/quality of the beads, your beaded project can be hand washed. Upon starting a beaded project, anticipate whether or not it will need to be washed. As with any sewing project, if the answer is “yes,” pre-wash all the fabrics and notions, and soak the beads. After a good soaking, dry them on a piece of white fabric and look for any staining. If stains occur, look for new beads.

Hand wash your finished work, reshape it, and lay it flat to dry. Dry it as fast as possible, but never in direct sunlight. Note that it takes longer to dry under humid conditions than in dry conditions. Choose your wash day wisely!


~ Anna Mazur is a former accountant who turned her love of sewing into a passion. A member of the Connecticut ASG Chapter, she began to hand embroider as a child; by the age of 12, she discovered garment sewing. Her work has appeared on HGTV’s “Sew Much More,” the Fairfield and Bernina Fashion Shows, and in many publications, including Threads magazine, Quilting Arts, Belle Armoire, and Sew News. She is currently an author for Threads Magazine. This article is adapted from an article previously published in Notions.

Did you enjoy this article?
Are you an ASG member?
This field is for validation purposes and should be left unchanged.

Tagged With: beaded embroidery, beading, embellishment

January 22, 2021

Idea Board: Off-Grain Fringe Techniques

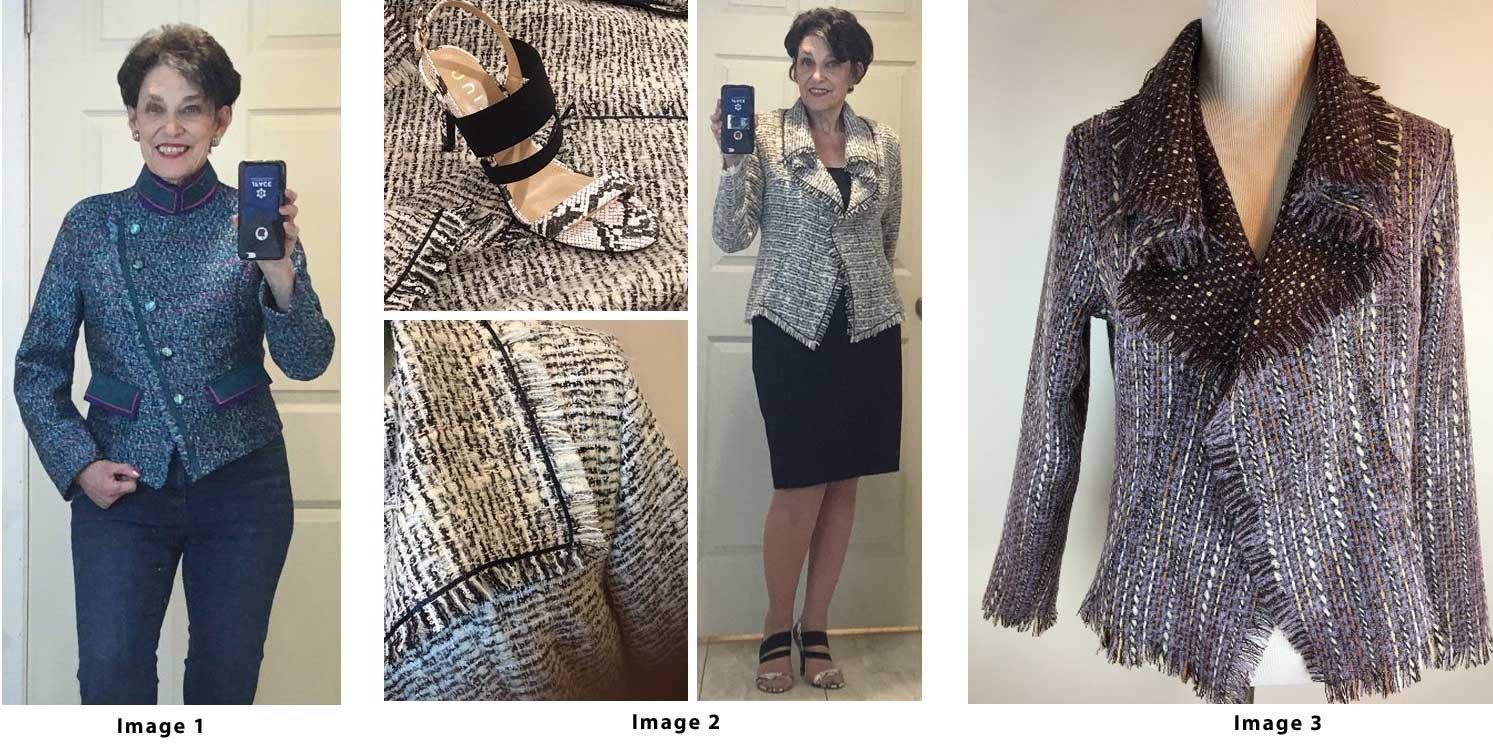
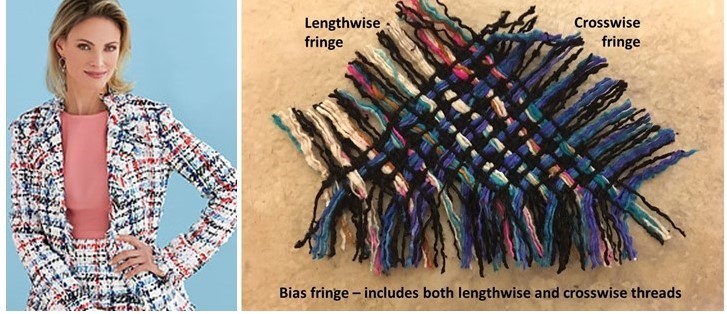
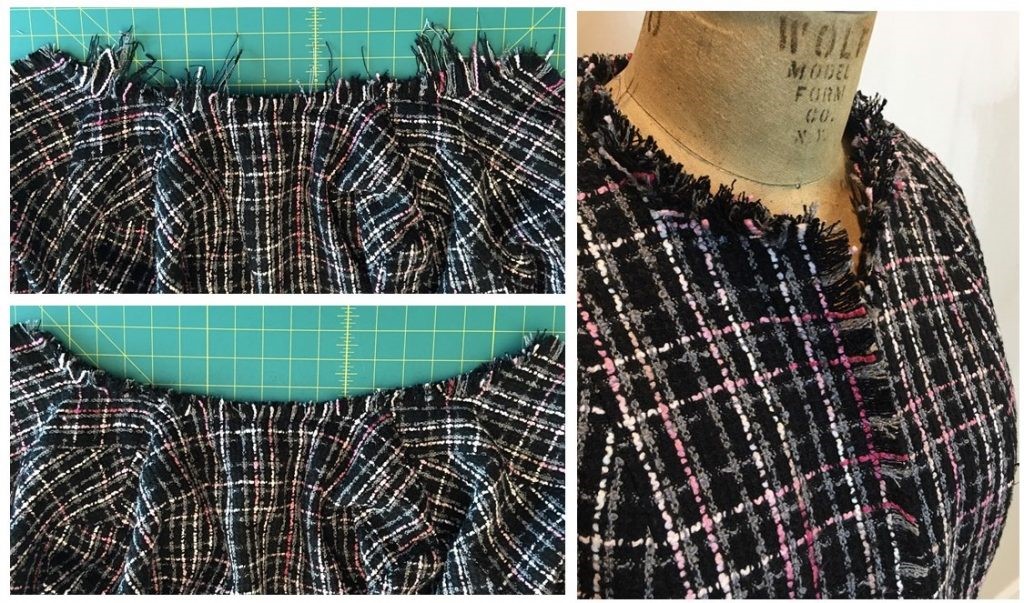
Fringe, whether you choose to love it or leave it, has undoubtedly stood the test of time. Dating back to 3000 B.C. in Mesopotamia, fringe became popular as a fashion embellishment in the 1920’s, then resurfaced again in the 50’s, and came full circle in the 60’s, 70’s and 80’s. Popular again today, it can be casual and trendy or utterly timeless, like in the garments shown here. Enjoy some ideas from Nancy Nix-Rice on these beautiful fringe accents.


On a multi-color tweed jacket, fringed along the off-grain center edge,  I added a top-stitched band of Ultrasuede to both stabilize the edge and emphasize the diagonal line. Carefully snipping – at about 1” intervals – from edge to seamline parallel to the crossgrain threads allowed the fringe to shape off-grain. (Image 1)

On the Itch to Stitch Hvar cardigan, I eliminated the double layer front in favor of a soft cascade effect. I zigzagged 1/8” black satin ribbon along the seamline to define the inner edge of the fringe, slipping the ribbon through an opening in the loose weave to bring it to the opposite side of the fabric at the bottom of the cascade. (Image 2)

On a second iteration of the Hvar, I used a serpentine stitch to stabilize that endpoint of the fringe. The stitches melded invisibly into the deep tweed texture. (Image 3)

I expected that to be the end of my fringe-fest. Then Butterick came out with this gem – Pattern 6738 – that included directions for creating a fuller, more color-balanced effect by fringing on the true bias. That is especially helpful since many fabrics fringe to a very different looks along the crosswise vs lengthwise grain. (Image 4)

Image 4 (Butterick 6738)

I didn’t actually make that pattern because I already had a black/gray/pink jacket in a bag in the closet – half-finished because of that very issue. The jewel neckline needed that bias technique in its curved areas and the front and hem edges needed an inset layer for a fuller look. Problem solved, and here is the result! (Image 5)

Image 5

~Nancy Nix-Rice

Did you enjoy this article?
Are you an ASG member?
This field is for validation purposes and should be left unchanged.

Tagged With: embellishment, fringe, garment sewing

Become a Member

Join the only national organization dedicated to Advancing Sewing as an Art and Life Skill.

Join Now button

Blog Article Categories

  • ASG Conference
  • Chapter Stories
  • Embroidery
  • Fitting
  • Learn to Sew
  • National Sewing Month
  • Products, Books, & Patterns
  • Projects
  • Quilting
  • Sewing
  • Sewing Techniques
  • Sewing Tips
  • Sewing Tours
  • Videos
  • Disclaimer
  • Privacy Policy

American Sewing Guild
National Headquarters
9660 Hillcroft, Suite 230
Houston TX 77096
713-729-3000 | 713-721-9230 Fax
www.ASG.org

ASG wordcloud - education, conference, discounts, videos, special offers, tours and more

Copyright © 1998–2025 · American Sewing Guild · All Rights Reserved