American Sewing Guild (ASG)

Visit our blog Visit the ASG Facebook page Visit ASG on Pinterest Visit ASG's YouTube channel Visit ASG on Instagram
  • Home
  • Join ASG
    • Join Online
    • Chapter Locations
    • Member Benefits
    • Member Brochure
    • Join by Mail
  • Education & Classes
  • Resources
    • Contests & Awards
    • Giving Back
    • Hall of Fame
    • Travel and Tours
    • Measurement Chart
  • Shop
    • ASG Store
    • Chapter Products
    • Video Resources
  • Blog
  • About
    • About Us
    • Donate to ASG
    • ASG Sensitivity Statement
    • FAQ’s
    • Start a Chapter
  • Contact
  • Member Login
    • Login First!
    • Members Only
    • Leadership Only
    • Website FAQ’s
    • Logout
  •  

January 22, 2021

Idea Board: Off-Grain Fringe Techniques

Fringe, whether you choose to love it or leave it, has undoubtedly stood the test of time. Dating back to 3000 B.C. in Mesopotamia, fringe became popular as a fashion embellishment in the 1920’s, then resurfaced again in the 50’s, and came full circle in the 60’s, 70’s and 80’s. Popular again today, it can be casual and trendy or utterly timeless, like in the garments shown here. Enjoy some ideas from Nancy Nix-Rice on these beautiful fringe accents.


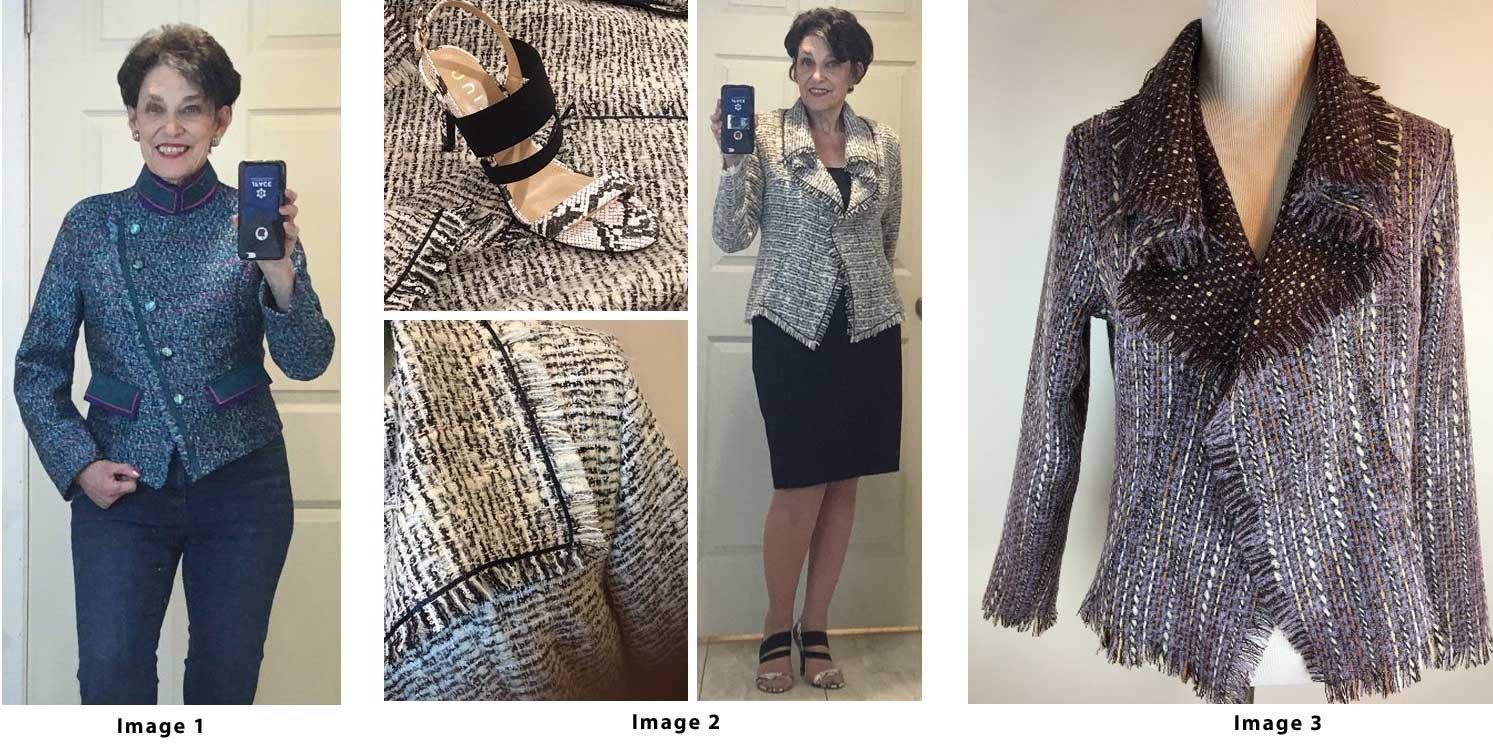
On a multi-color tweed jacket, fringed along the off-grain center edge,  I added a top-stitched band of Ultrasuede to both stabilize the edge and emphasize the diagonal line. Carefully snipping – at about 1” intervals – from edge to seamline parallel to the crossgrain threads allowed the fringe to shape off-grain. (Image 1)

On the Itch to Stitch Hvar cardigan, I eliminated the double layer front in favor of a soft cascade effect. I zigzagged 1/8” black satin ribbon along the seamline to define the inner edge of the fringe, slipping the ribbon through an opening in the loose weave to bring it to the opposite side of the fabric at the bottom of the cascade. (Image 2)

On a second iteration of the Hvar, I used a serpentine stitch to stabilize that endpoint of the fringe. The stitches melded invisibly into the deep tweed texture. (Image 3)
I expected that to be the end of my fringe-fest. Then Butterick came out with this gem – Pattern 6738 – that included directions for creating a fuller, more color-balanced effect by fringing on the true bias. That is especially helpful since many fabrics fringe to a very different looks along the crosswise vs lengthwise grain. (Image 4)
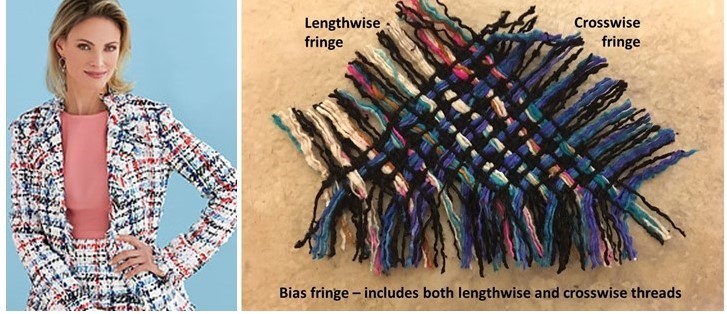
Image 4 (Butterick 6738)

I didn’t actually make that pattern because I already had a black/gray/pink jacket in a bag in the closet – half-finished because of that very issue. The jewel neckline needed that bias technique in its curved areas and the front and hem edges needed an inset layer for a fuller look. Problem solved, and here is the result! (Image 5)
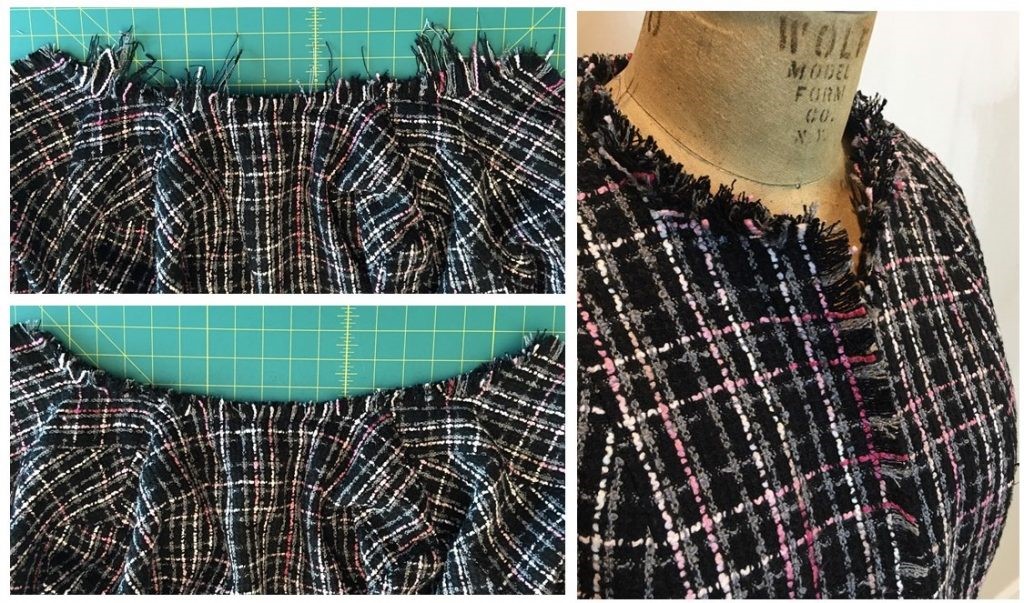
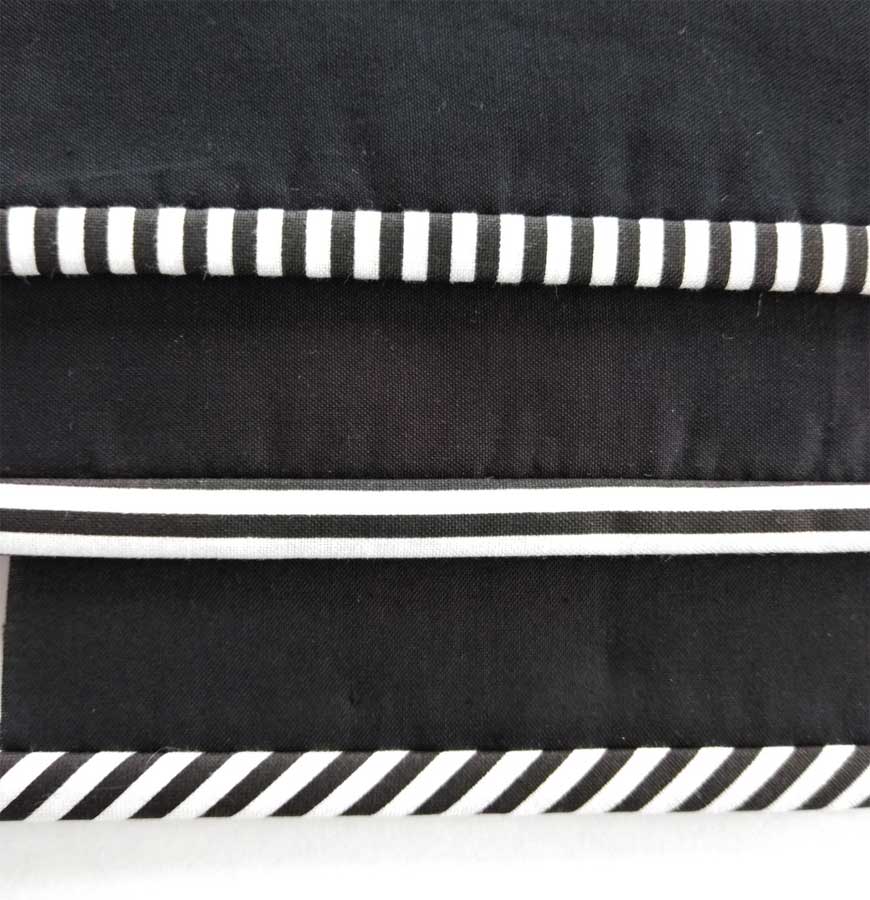
Image 5

~Nancy Nix-Rice

This field is for validation purposes and should be left unchanged.
Did you enjoy this article?
Are you an ASG member?

Tagged With: embellishment, fringe, garment sewing

July 10, 2020

Using Striped Fabric to Bind an Edge

It’s Stripe Hype!

Whether you’re binding a jacket front, collar or a quilt, using a striped fabric for the binding is a great way to accent the edge.

Stripes come in varying forms—from simple two-color versions to multi-color patterning, wide to narrow—but one thing’s for sure: they’re fun!

From the top: crosswise; lengthwise; bias

Stripes can be used three different ways for binding an edge: lengthwise, crosswise or on the bias. The choice depends on the desired finished look.

Using a stripe lengthwise on a binding showcases only about ¼” of the patterning, so for wide stripes, this use really isn’t a good option as you’ll likely see only one color. However, for tiny stripes, you can showcase three or four lines. Using a stripe lengthwise requires more yardage than cutting crosswise and/or more frequent seaming. You can use the entire fabric width and less yardage, but that strategy requires more seaming and matching end to end. The fun part—you can decide which stripes to showcase, but remember you’ll need to allow for seam allowances, so place the featured stripes accordingly.

Cutting binding crosswise is another option that showcases stripe repeats at right angles to the project edge. It allows for more visibility of stripe patterning and fewer seams are required with less yardage.

Many stripe aficionados prefer to cut striped binding on the bias (a true 45° angle) for some diagonal interest. The amount of yardage required depends on how frequently you want to piece the strips, matching the stripes. Cutting striped binding on the bias allows it go smoothly around curves, which is not the case with the horizontal or crosswise cutting, as those grains are suitable only for straight edges (like most quilts) rather than curves.

Piecing

In almost all instances, unless you have a short edge to cover, binding needs to be pieced to make enough length for the project. It can be pieced in two ways: with diagonal or horizontal seams.

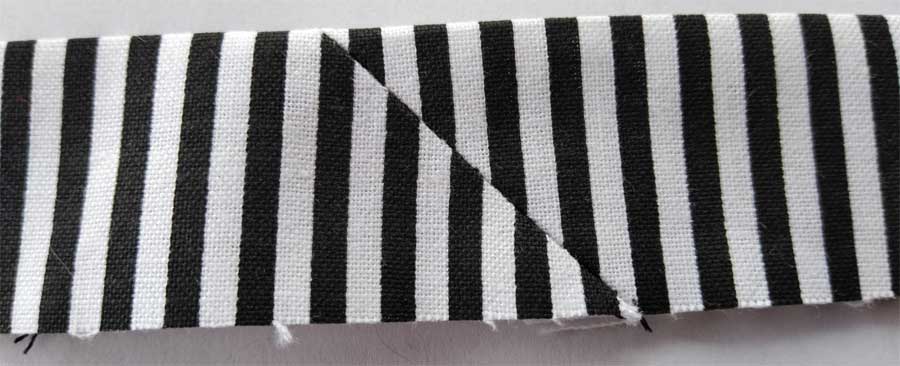
Diagonal Seaming: While diagonal seaming makes for flatter binding because seam allowances are offset and not on top of themselves with multiple layers, it can be more difficult to align stripes with this bias seaming.

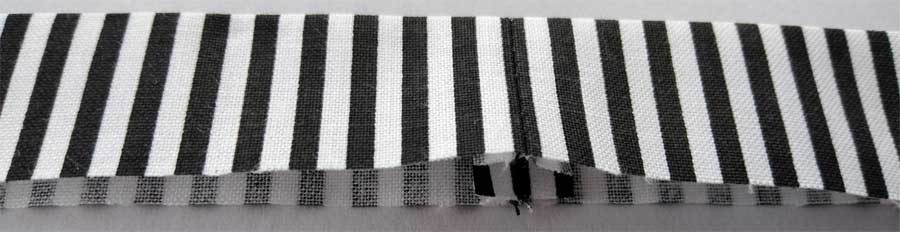
Crosswise Seaming: For crosswise stripe fabric strips, it’s easier to get a more invisible seam if you use horizontal piecing, sewing strips end to end. This technique also allows for a regular repeat of the stripe. To create a horizontal seam, place strips right sides together matching the same stripe on both layers. Stitch down the center of the stripe, trim the seam allowances to ¼” and press open. If you stitched accurately, the seam should be almost invisible and show a continuous stripe pattern along the binding.

Finishing

Once you’ve pressed your binding in half and sewn it the edge, first press it toward the edge you’re covering. Then fold it to the underside and hand-stitch the folded edge of the binding to the back side of the garment, quilt, etc.

For a quicker finish, fold the binding to the underside, pin or clip securely so that the underlayer is slightly wider than the top binding, and stitch in the ditch of the seamline where you initially attached the binding. Because the binding underside is slightly wider than the top, your stitching should easily catch the folded edge to secure it. Using transparent thread (either smoke or clear) works well for this, especially if your project is multi-color.


~Linda Griepentrog
Linda is the owner of G Wiz Creative Services and she does writing, editing and designing for companies in the sewing, crafting and quilting industries. In addition, she escorts fabric shopping tours to Hong Kong. She lives at the Oregon Coast with her husband Keith, and two dogs, Yohnuh and Abby. Contact her at gwizdesigns@aol.com.

This field is for validation purposes and should be left unchanged.
Did you enjoy this article?
Are you an ASG member?

Tagged With: binding, garment sewing, quilt, sewing

February 14, 2020

Linda MacPhee named Keynote Speaker for 2020 Conference

Linda MacPhee

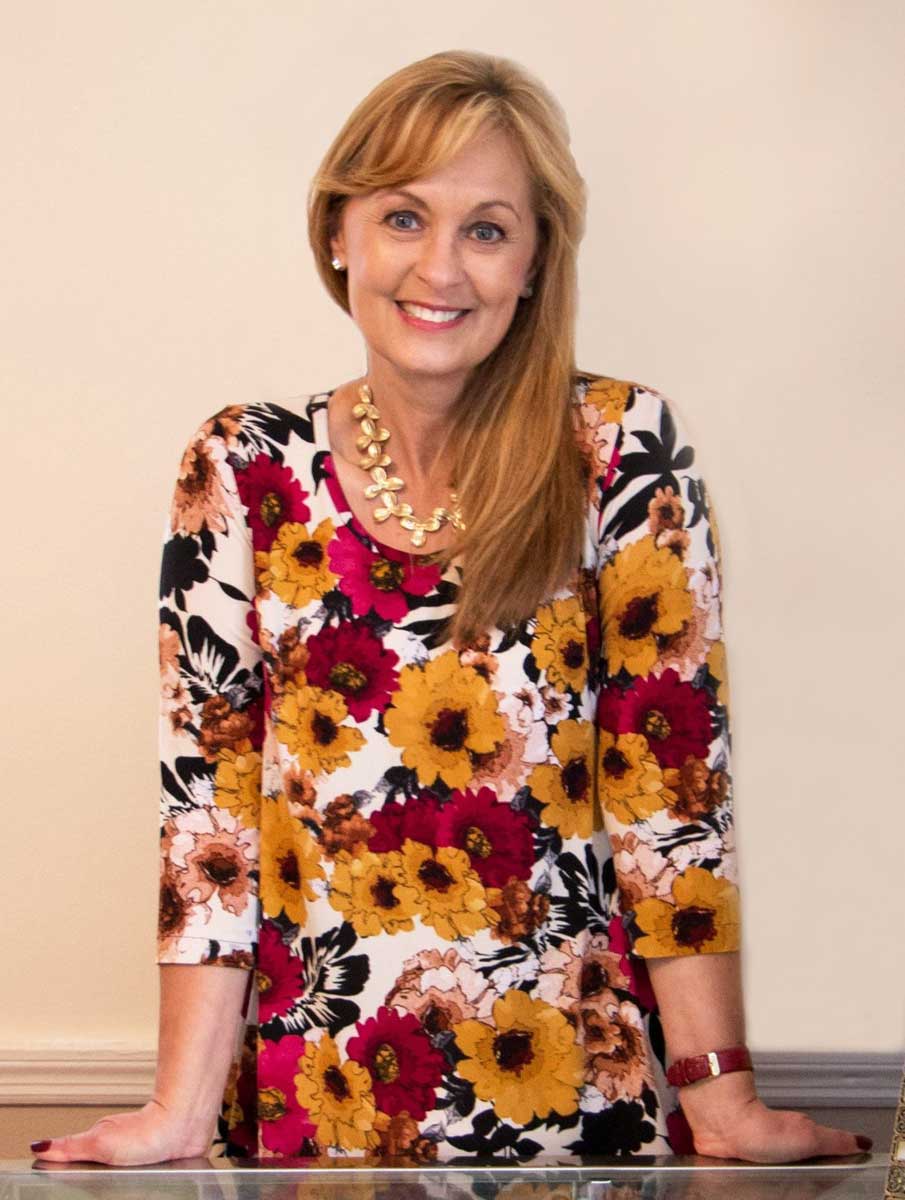
ASG is excited to announce that international designer Linda MacPhee will be the keynote speaker at the 2020 conference in San Antonio. As our way of introducing her to you, we have selected her as our independent designer of the month for February. Linda hails from Alberta, Canada and will be once again making her way back to conference.

Sears Catalog for Inspiration

As number 5 of six kids and raised on a family farm in northern Alberta, money wasn’t abundant. In fact, her early memories include going through the Sears catalog with her siblings and picking out their favorite outfits, only to have a local seamstress try to duplicate them from old garments. Even then she realized the finished product never really did live up to the picture she had chosen and hoped for. That’s why she decided at an early age to try her own hand at sewing. She sewed her first garment when she was about 12 when she wanted a new dress for her cousin’s wedding. “My dress was quite successful I remember; but because I knew nothing of fitting, I had to position myself against a wall so I could use my one hand to hold/grab a handful at the back of the dress to make it look like it fit! I guess that dressmaker likely influenced my desire to create my own look. Looking at family pictures now she really was a master as my brothers were in good looking suits that she had recycled from whatever. My mother didn’t sew or have any interest in sewing, although I’m sure she must have mended and repaired things as necessary. Our dressmaker, Mrs. Schmitt, was from Germany and was truly a master at the sewing machine. (We had a treadle of course!)”

Concerning her formal training, Linda commented, “I joined the local 4-H sewing club when I was old enough and that was my only training until I graduated from high school. I enrolled in Home Economics at the University of Alberta as by that time I was sewing all my clothes and was interested in learning more.”

It Started With a Parka

While working as a district Home Economist for the Department of Agriculture (extension agent) in Northern Alberta and at one of her meetings with 4-H groups, Linda met a leader who had on a beautiful Parka. She was a nurse and had recently immigrated from the Phillipines. While chatting, Linda learned that the woman had made it herself. That set her mind in motion and she set about to make one herself. It was no easy task for the woman had tanned her own coyote skin for the fur trim and had sourced her own fabric (wool duffle) from the local Hudson Bay store. Linda explained, “Well, I didn’t tan my own skin but decided if she (a nurse) could do it so could I—a Home Economist! So I did!! My favorite childhood story that I had read to me many times was “The Little Red Hen,” and the theme has fulfilled itself many times in my life!”

She continued, “One of my responsibilities as the extension agent was to teach adult sewing classes to rural women. I met lots of people and with my parka on, came many requests to make them for people. I had learned also how to make moccasins/mukluks from some of the Native American ladies I had worked with. So in my spare time I started making parkas and matching mukluks for a never ending line up of customers. I charged them $100 which seemed pretty good at the time! I realized quite quickly that the demand would never end, so I decided to teach people how to do it themselves. That was the start of my business!”

The Inuit ladies of the N.W.T. had been making parkas for years so those parkas were the inspiration for the basic design. Wanting her parkas to be different, she added applique and trim, and each one became its own work of art. She came up with many different patterns for parkas and applique designs to help people come up with their own look.

Creating the World’s Easiest Patterns

In commenting on her patterns Linda added, “I have always wanted patterns to be simple, “not rocket science.” I had basic pattern drafting from my university training, but my object was to have as few pattern pieces as possible and as simple construction as I could too. My object was to have everyone be able to make one of whatever I designed. My line of “world’s easiest” patterns were best sellers and business boomed. World’s Easiest meant the pattern was usually one, two or three pattern pieces total! I then taught an army of instructors to help in my quest to get everyone sewing. We then franchised our shops across Canada and life was good (but very busy). By this time I was married and my husband who was an R.C.M.P. officer turned down a transfer and joined the business full time which is the only way I could have carried on. Yes…. we are still happily married 52 years later!”

On the future of sewing…

“I’m seeing a renewed interest in recycling coming from the younger people, and that I find so exciting. They have inspired me to recycle/recreate, and I have made many patterns to help with this aspect of sewing. Once this group discovers the potential of the sewing machine, they will be hooked! This direction has brought me full circle to my humble first attempt!”

In her quest to teach the world to sew, she decided the best way to do it was by having her own T.V. show. It was quite a task to get going but she and her husband managed and directed “Sew Much Fun” and ran with it for 6 seasons (72 shows) which showed on Canadian channels as well as PBS in the U.S. They then developed that into “Linda Macphee’s Workshop” which ran for another 6 seasons. “That was likely the highlight of my career,” she added. “I was awarded the “Woman of Vision” by CTV Television and YWCA “Entrepeneur of the Year” and also an “Award of Merit” from the Canadian government for Business. My alma mater, University of Alberta, awarded me their highest Distinguished Alumni Honor award.”

When asked about her favorite aspect of her job, she replied, “It is creating/designing the original garment and then seeing it through to a pattern to enable me and others to teach the world.”

However, she also reflected, “I have been saddened by the lack of Home Ec training in schools where I think the spark should begin! I never did take Home Ec. in school as my school was too small to have it. I, of course, did take it in University and did earn my teaching degree but opted to teach adults instead of youth.”

“If we can keep the world sewing, I think the future is bright. How you ask? I think the patterns have to be kept quick and easy. More sewing T.V. shows like mine would certainly help to show how easy it can be. For example…..in all the garment patterns I designed (well over 200) there was never a buttonhole in any of them. That was something that a novice might not do well, and my motto always was ‘make it look like you didn’t make it!’”

Being from Canada, Linda was never part of ASG as a member. She said, “I was a sort of member of the Holt Michigan group who I worked with/for many years. I very much enjoyed my work with many ASG chapters across the country. I was always promoting the formation of Canadian groups, but we just don’t have the population to make it work.”

Today Linda describes herself as “sort of retired” and only does “private gigs.” She has stopped doing major sewing shows, but loves doing her own version of fashion shows using local women as models for her garments. She spends her winter months in Mesa, Arizona and finds fun in doing smaller gigs for the multitude of retirement parks within driving distance. You can check out Linda’s patterns at her website at www.macpheeworkshop.com.

~Rosemary Fajgier

Tagged With: ASG Conference, garment sewing, instructor, patterns, sewing

January 10, 2020

Meet Pamela Leggett of Pamela’s Patterns

Pamela Leggett | Pamela's Patterns
Pamela’s Patterns are designed to fit and flatter women with REAL figures.

Always a favorite at ASG conferences and other sewing events around the country is this month’s independent designer, Pamela Leggett, owner of Pamela’s Patterns.

Pamela’s tag line is “Designed to fit and flatter women with REAL figures.” Her patterns are designed for women with curves and fluff and scallops, not the slender 14 year old frame that commercial patterns cater to. Instructions are carefully written and crafted, and there is even YouTube support from her channel to assist with pattern altering, sewing, and fitting. If you go to PamelasPatterns.com and check out the photos of her garments, you will see the hint of a waist in all of her designs for tops. This gives even the “fluffy” figure the illusion of an hourglass shape. This flattering aid makes her patterns a favorite among many ASG members.

Pamela’s Patterns started in 2005 when she realized the need for patterns that fit mature figures. But that was not the start of her career. Pamela recalls, “My parents owned their own business and encouraged me to do the same. I started sewing to earn money at 14. I did alterations and made bags and clothes from jeans. At 16, I started doing custom work in clothing and home dec. At 20 I opened a boutique in an artist/tourist town with vintage, retail, and my own designs. At 24 I started in the retail sewing business and teaching, continuing with custom work and a short delve into small manufacturing of my designs.”

Childhood Sewing Memories

Her first recollection of sewing dates back to when she was around 4 or 5 and used her grandmother’s treadle machine to draw pictures, which was after she had no luck with knitting. She made her first dress with her mom when she was 7 or 8 and then couldn’t make enough clothes in junior and senior high. Along with her mother and grandmother, Pamela credits Stretch & Sew classes for shaping her sewing aesthetic. “Even though Stretch & Sew classes were expensive, my mother let me take many. She said she thought that would keep me out of trouble. I grew up in a family of makers. My mom and both grandmothers sewed beautifully. And they also were involved in many other crafts – pottery, painting, upholstery, needlework, knitting – even engine repair! My dad is an amazing recycling artist, leatherwork and scrapbooker.”

Pamela explained that she apprenticed for two years with a Japanese tailor who taught her a lot about alterations and fine handwork. Her biggest mentors have been Ann Person from Stretch & Sew (sewing and designing for knits), Pati Palmer from Palmer/Pletsch (pattern fitting) and Nancy Zieman from Sewing With Nancy (teaching). She says, “These women were incredibly generous and giving with their encouragement and sharing knowledge.”

When asked where she finds her inspiration for her designs, she explained, “I look at trends in ready-to-wear shops, catalogues, pinterest, online stores, and on the women around me. My students are also always happy to share a particular garment they love and hope that I will make a pattern for it. I keep everything rather classic – my best selling patterns are the patterns that are almost 15 years old! Some of my patterns take a little break in popularity, and just when I think I will discontinue them, they come back in style! This season it is the funnel neck – I created that pattern in 2007, and it is everywhere this season.”
In addition to her pattern company, Pamela is the East Coast director for two Palmer/Pletsch schools – Connecticut and Philadelphia. She said, “I am honored to carry on the excellence of teaching started by Pati Palmer and Marta Alto.” Other highlights she talked about included, “Being on two episodes of Sewing With Nancy was like a dream come true. My work with Taunton Press Publishers and Threads Magazine has been a wonderful experience. Creating class material for Bluprint/Craftsy was a great learning experience, they have such a high standard of production and work well with instructors. I have also sold my patterns on The Shopping Channel in Canada (the U.S. version of QVC) – live television is crazy!”  (Be sure to check out Pamela’s book and DVD on serging produced by Taunton Press and reviewed in a previous Notions article.)

A Love of Teaching

When asked what her favorite aspect of her career is, she replied, “I LOVE teaching! It is what inspires me to do everything else. I love working with women who share the common obsession of sewing. So much more than sewing happens when you gather caring and creative women together. The networking and support is unstoppable and addictive. Women who sew are the most generous women in the world.”

Each year Pamela teaches at Camp Workroom Social, a conference that pulls in sewists and instructors from all over the world, the majority of which are young professional women. She says, “Sewing is alive and well with young women; they are as obsessed as we are. Young people who sew, design, and teach have a different way of learning, shopping, and marketing than we do, but it is still rich and flourishing. We may see the demise of some of the “old” ways of doing business, but new ways will take over.”

Pamela began as a member of the Philadelphia chapter of ASG and since her move to Connecticut, has joined the Connecticut chapter. You can check out Pamela’s website at  https://pamelaspatterns.com or find her on Facebook and Instagram. ASG Members receive a 10% discount on online orders and can find the discount code in the Special Offers section of the ASG website.


~ Rosemary Fajgier

The American Sewing Guild is truly fortunate to be able to count many gifted sewing designers and instructors among our friends, members, and supporters.  Throughout this coming year we will be featuring some of them in our Notions Blog.  We hope you will enjoy reading about them and take the opportunity to get to know them better and explore their many talents by visiting their websites, taking their classes, and discovering the wide variety of designs they bring to the home sewing market.

Tagged With: educator, garment sewing, patterns

October 4, 2019

Hemming Jeans – the Denim Blues

Hemming JeansPerhaps you searched long and hard for the perfect fitting jeans, but alas, they’re too long! Or maybe you painstakingly created a custom pair and it’s time to hem them. Either way, you’re in the thick of it—literally!

The hem area of jeans can be up to eight layers thick, depending on how the side and inseams are constructed. Stitching through all of that thickness while maintaining straight, even stitches and not breaking the needle can be a challenge for any sewer, but here are some helpful hints to make the process easier.

Before you sew

Before you determine the length of your jeans, be sure to wash and dry them at least twice to allow the fabric to shrink. Nothing’s worse than meticulously hemming them and after the first wash, they’re ankle skimmers.

Try on the jeans with the shoes you plan to wear with them and pin-mark the desired finished length on both legs. Both legs aren’t always the exact same length.

Assemble the arsenal

Denim Needles

Having the proper tools to sew multiple denim thicknesses is a must. First, select a denim or jeans needle with a special tip and blade to cut through the fibers without deflecting (because of the tight weave) or breaking. Denim needles are made especially for sewing extra thick fabrics, and they’re available in sizes 70/10 to 110/18—the heavier the denim, the larger the needle size needed.

Topstitching

In addition, if you’re doing decorative topstitching to mimic the infamous Levi gold version, acquire a topstitching needle with a large eye and groove to accommodate jeans thread without shredding.

Denim ThreadDenim Thread

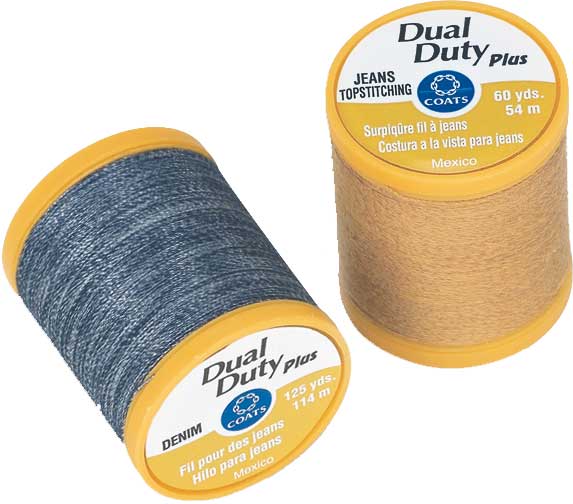
Choose either an all-purpose or denim blue thread for stitching if you want a matching hem, or a heavier jeans thread if you prefer contrast seaming detail. Denim thread is a twist of multiple blue colors to mimic the looks of our favorite indigo fabric.

Hemming

  • Press up the hem at the desired length and trim the hem allowance, leaving about 1”. Press under ¼” along the upper hem edge, then ¾” forming a double hem. Pin in place.
  • If you need a bit of stability on lightweight denim, slip a narrow strip of fusible web into the hem area and press before stitching to firm up the edge.
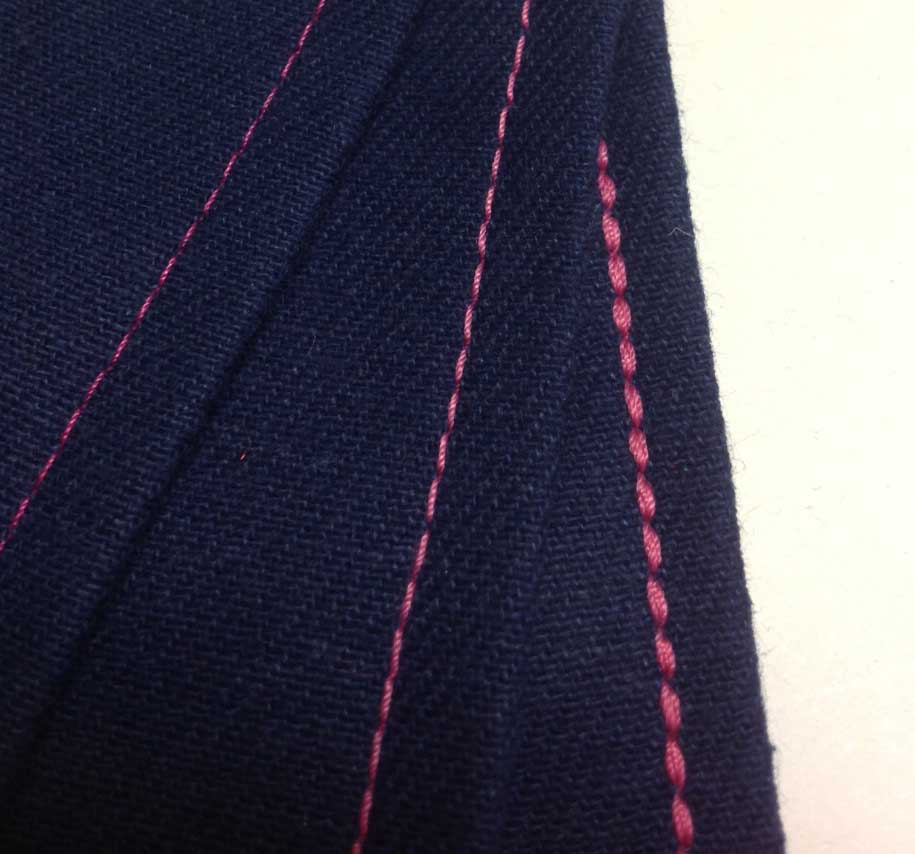
  • Straight stitch along the upper folded edge using matching or contrasting thread. For more prominent stitching, use a straight stretch stitch.
  • On very heavy denim, serge the upper hem edge instead of folding it under to finish, and that will save one layer of thickness.

Height busters

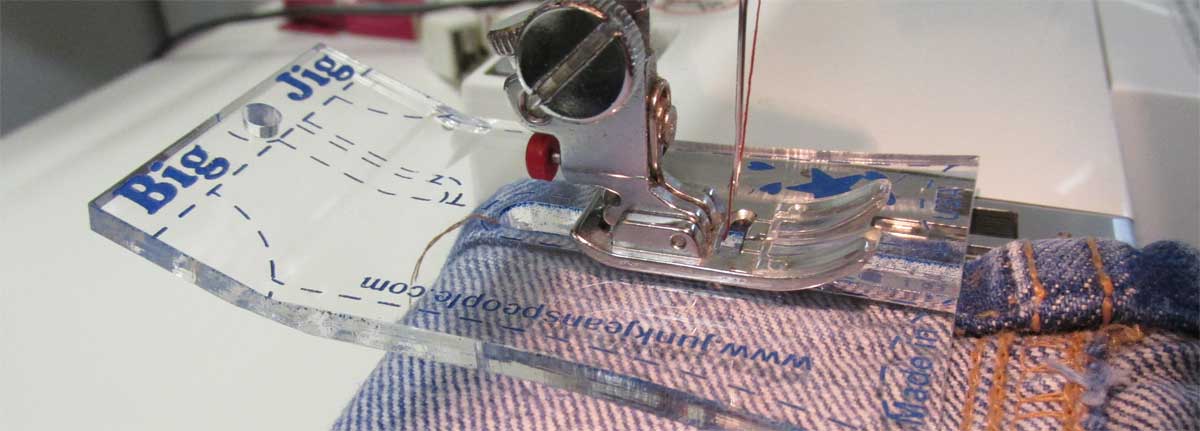
The absolute hardest part of hemming jeans is going over those leg seams, but there are tools to help. Look for a Jean-a-ma-jig, Hump Jumper or Big Jig to help even out the raised area.

Hemming Jeans - Big Jig

These tools are slipped under the presser foot on the ascent to the leg seam thickness to help keep the presser foot horizontal over the ridge and again on the other side to keep it from sliding off the raised area and making uneven stitches on the downward journey. And, they work on all machines.

For the neatest appearance, bring thread ends to the wrong side and tie them off instead of backstitching.


~ By Linda Turner Griepentrog
You might know my name from my years as editor of Sew News, from the many magazine articles I’ve written, or perhaps you’ve been on one of the ASG Sew Much Fun Hong Kong tours with me. But soon you’ll be seeing my name a bit more often as I’m writing for the American Sewing Guild blog!


Tagged With: garment sewing, jeans, sewing, sewing tips

  • « Previous Page
  • 1
  • 2
  • 3
  • 4
  • Next Page »

Become a Member

Join the only national organization dedicated to Advancing Sewing as an Art and Life Skill.

Join Now button

Blog Article Categories

  • ASG Conference
  • Chapter Stories
  • Embroidery
  • Fitting
  • Learn to Sew
  • National Sewing Month
  • Products, Books, & Patterns
  • Projects
  • Quilting
  • Sewing
  • Sewing Techniques
  • Sewing Tips
  • Sewing Tours
  • Videos
  • Disclaimer
  • Privacy Policy

American Sewing Guild
National Headquarters
9660 Hillcroft, Suite 230
Houston TX 77096
713-729-3000 | 713-721-9230 Fax
www.ASG.org

ASG wordcloud - education, conference, discounts, videos, special offers, tours and more

Copyright © 1998–2026 · American Sewing Guild · All Rights Reserved